
- 1汉字转拼音工具类_tohanyupinyinstringarray
- 2Transformer模型详解及代码实现_transformer伪代码
- 3关于GPT-SoVITS语音合成的效果展示(西游之西天送葬团)
- 4导出谷歌gemma模型为ONNX_gemmaforcausallm
- 5在 WordPress 中使用 AI 改善 SEO 的 10 种方法
- 6ChatGPT3.5.0+AI对话问答创作系统一体式程序源码_chatgpt3.5源码
- 7ajax爬虫小案例(百度翻译)_一个ajax的爬虫简单实例
- 8PaddlePaddle深度学习实战——英法文翻译机_深度学习实现中文翻译成英文
- 9计算化学:探索分子世界的数字之钥及其与AI的交融未来
- 10获取Java Exception异常详细信息,以便保存_java怎么将exception报错内容跟异常文件路径保存到表里
python_web1(前端开发之HTML、CSS、Bootstap、Javascript、JQuery)
赞
踩
知识总结:
Python_web前端开发
一、Flask网页开发
python 安装Flask web框架
pip install flask
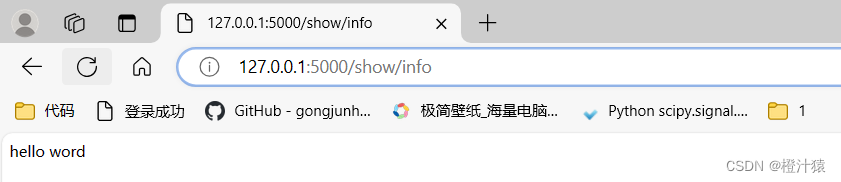
1.1创建一个名为web1.py的python文件
from flask import Flask

app = Flask(__name__)

#创建了网址和函数的对应关系
#访问网址会自动调用函数
@app.route('/show/info')
def index():
    return 'hello word'

if __name__ == '__main__':
    app.run()
- 1
- 2
- 3
- 4
- 5
- 6
- 7
- 8
- 9
- 10
- 11
- 12
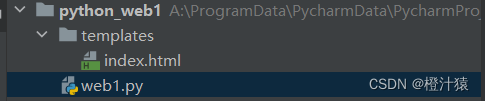
1.2 templates目录
简介:templates用来返回html的页面,而非文本。
创建文件index.html
结构如下
index.xml内容如下:
<!DOCTYPE html>
<html lang="en">
<head>
    <meta charset="UTF-8">
    <title>Title</title>
</head>
<body>
    <h1>hello world</h1> ->如果网页还需添加东西,可在<body>下添加
</body>
</html>
- 1
- 2
- 3
- 4
- 5
- 6
- 7
- 8
- 9
- 10
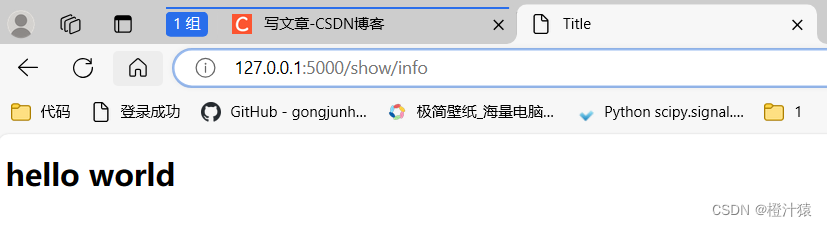
web1.py内容如下:
from flask import Flask, render_template

app = Flask(__name__)

#创建了网址和函数的对应关系
#访问网址会自动调用函数
@app.route('/show/info')
def index():
     #Flask内部会自动打开这个文件,并读取内容,将内容给用户返回。
     #默认:去当前项目目录的templates文件夹中找
     return render_template('index.html')

if __name__ == '__main__':
    app.run()
- 1
- 2
- 3
- 4
- 5
- 6
- 7
- 8
- 9
- 10
- 11
- 12
- 13
- 14
重新运行后:
二、html标签
固定格式:h/div/span/a/img/ul/li/table/input/form
2.1 编码
通用的字符编码
< meta charset=“UTF-8”>
2.2title < head >
<head>
    <meta charset="UTF-8">
    <title>title</title>
</head>
- 1
- 2
- 3
- 4
2.3 标题< h>
<body>
    <h1>一级标题</h1>
    <h2>二级标题</h1>
    <h3>三级标题</h1>
    ...
</body>
- 1
- 2
- 3
- 4
- 5
- 6
2.4 div和span
 <div>内容</div>
 <span>hello world</span>
- 1
- 2
- 3
- 4
div:一个人占一整行;
span:用多少占多少【行内标签、内联标签】
***span同行则内容相连,span不同行则内容间有空格。
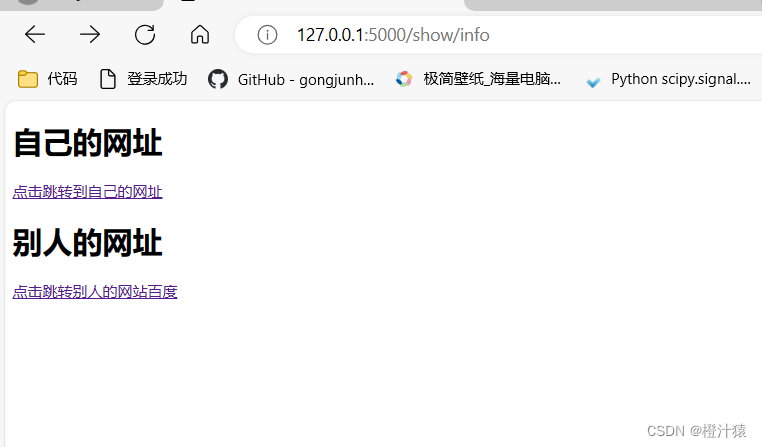
2.5超链接
设置一个跳转到本地链接和一个跳转到非本地链接。
1.在index.xml文件中补充。
<!DOCTYPE html>
<html lang="en">
<head>
    <meta charset="UTF-8">
    <title>我的联通</title>
</head>
<body>
    <h1 >自己的网址</h1>
    <a href="/show/get_self">点击跳转到自己的网址</a>
</body>
<body>
    <h1 >别人的网址</h1>
    <a href="https://www.csdn.net/">点击跳转别人的网站百度</a>
</body>
</html>
- 1
- 2
- 3
- 4
- 5
- 6
- 7
- 8
- 9
- 10
- 11
- 12
- 13
- 14
- 15
**注意:**本连链接可以只写路径即可,而非本地链接则需要完整的链接。
2.修改web1.py文件
在文件中添加一个读取自己网址
from flask import Flask, render_template

app = Flask(__name__)

#创建了网址和函数的对应关系
#访问网址会自动调用函数
@app.route('/show/info')
def index():
     #Flask内部会自动打开这个文件,并读取内容,将内容给用户返回。
     #默认:去当前项目目录的templates文件夹中找
     return render_template('index.html')

@app.route('/show/get_self')
def get_self():
     #Flask内部会自动打开这个文件,并读取内容,将内容给用户返回。
     #默认:去当前项目目录的templates文件夹中找
     return render_template('get_self.html')
if __name__ == '__main__':
    app.run()

- 1
- 2
- 3
- 4
- 5
- 6
- 7
- 8
- 9
- 10
- 11
- 12
- 13
- 14
- 15
- 16
- 17
- 18
- 19
3.添加get_self.html
在templates目录下创建get_self.html,并添加以下内容。
<!DOCTYPE html>
<html lang="en">
<head>
    <meta charset="UTF-8">
    <title>Title</title>
</head>
<body>
    <h1>自己的网址</h1>
    <div>欢迎来到我的网站</div>
</body>
</html>
- 1
- 2
- 3
- 4
- 5
- 6
- 7
- 8
- 9
- 10
- 11
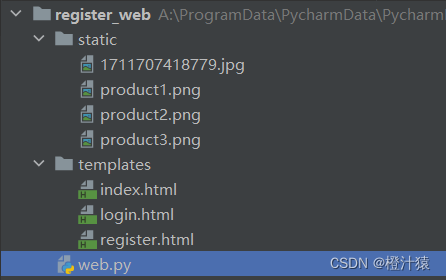
4.效果
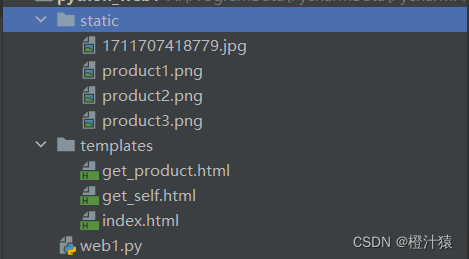
项目结构:
运行后的效果。
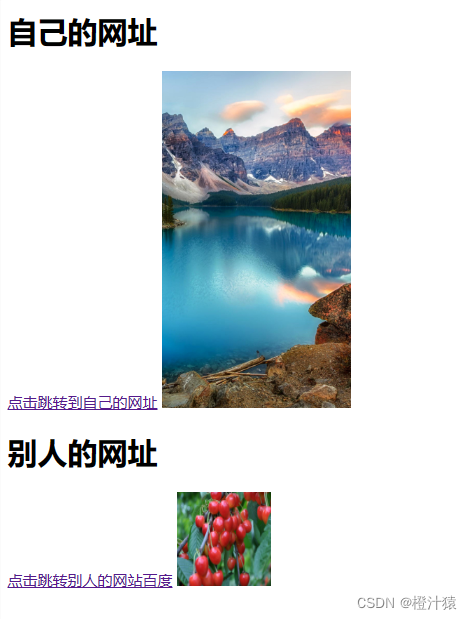
2.6图片
1.格式
<imgsrc="图片链接 ”>
2.图片大小
方法一:百分比
< img style=“height:10% ;width:10% " src=”/static/1711707418779.jpg">
方法二:像素大小
<img style=“height:100px;width:100px “src=”/static/1711707418779.jpg”>
3.本地图片的存放
在项目中创建static目录下,用来存放自己的图片文件。
在index.html文件添加以下代码。
<!DOCTYPE html>
<html lang="en">
<head>
    <meta charset="UTF-8">
    <title>我的联通</title>
</head>
<body>
    <h1 >自己的网址</h1>
    <a href="/show/get_self">点击跳转到自己的网址</a>
    <img style="height:100px;width:10% " src="/static/1711707418779.jpg">
</body>
<body>
    <h1 >别人的网址</h1>
    <a href="https://www.csdn.net/">点击跳转别人的网站百度</a>
    <img style="height:100px;width:100px " src="https://copyright.bdstatic.com/vcg/creative/cc9c744cf9f7c864889c563cbdeddce6.jpg@h_1280">
</body>
</html>
- 1
- 2
- 3
- 4
- 5
- 6
- 7
- 8
- 9
- 10
- 11
- 12
- 13
- 14
- 15
- 16
- 17
- 18
效果
小结
块级标签
-< h1> < /h1>
- < div>< /div>
行内标签
- < span></ span>
- < a>< /a>
- < img />
标签嵌套:
可以实现点击图片跳转到其他链接。
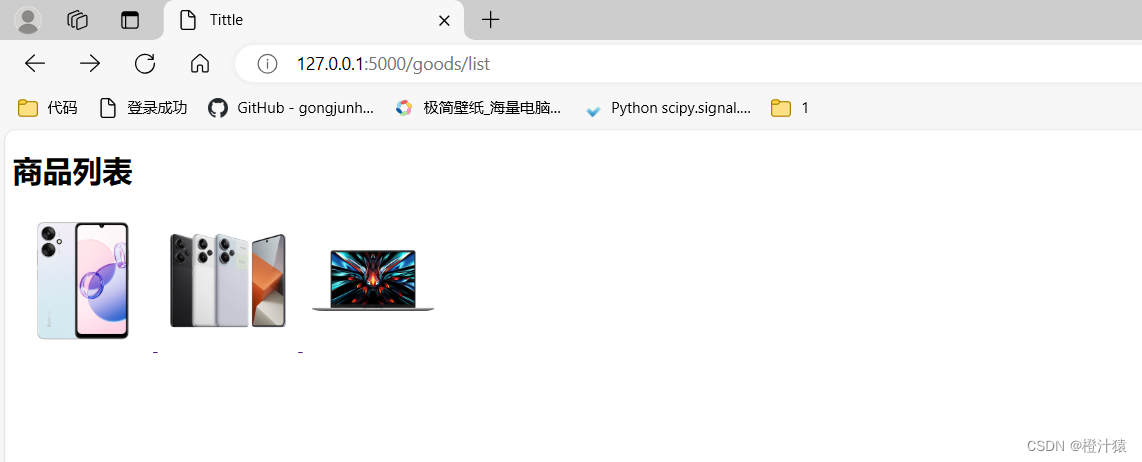
创建商品列表
在static目录下添加三张图片:
在web1.py中添加一个获取货物链接的方法:
@app.route('/goods/list')
def get_product():
     return render_template('get_product.html')
- 1
- 2
- 3
添加get_product.html,内容如下
<!DOCTYPE html>
<html lang="en">
<head>
    <meta charset="UTF-8">
    <title>Tittle</title>
</head>

<body>

 <h1>商品列表</h1>
    <a href="https://www.mi.com/shop/buy/detail?product_id=19715">
        <img src="/static/product1.png" style="width: 150px;"/>
    </a>
   <a href="https://www.mi.com/shop/buy/detail?product_id=19715">
        <img src="/static/product2.png" style="width: 150px;"/>
    </a>
   <a href="https://www.mi.com/shop/buy/detail?product_id=19715">
        <img src="/static/product3.png" style="width: 150px;"/>
    </a>


</body>
</html>
- 1
- 2
- 3
- 4
- 5
- 6
- 7
- 8
- 9
- 10
- 11
- 12
- 13
- 14
- 15
- 16
- 17
- 18
- 19
- 20
- 21
- 22
- 23
效果图
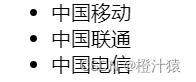
2.7列表
2.7.1无序列表
在get_product.html文件中添加:
<ul>
	<li>中国移动</li>
	<li>中国联通</li>
	<li>中国电信</li>
</ul>
- 1
- 2
- 3
- 4
- 5
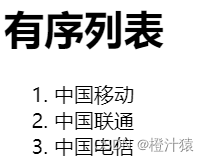
2.7.2有序列表
在get_product.html文件中添加:
- 中国移动
- 中国联通
- 中国电信
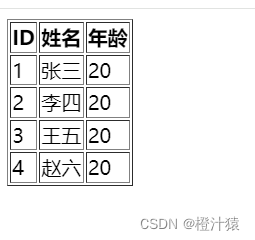
2.8表格
web1.py添加:
@app.route('/get/table')
def get_table():
     return render_template('get_table.html')
- 1
- 2
- 3
创建文件get_table.html并添加内容:
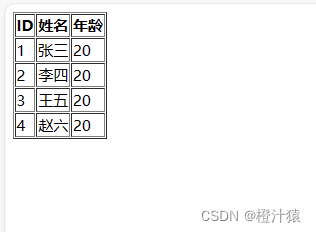
<!DOCTYPE html>
<html lang="en">
<head>
    <meta charset="UTF-8">
    <title>Title</title>
</head>


<body>
    <table border="1">
        <thead>
            <tr> <th>ID</th> <th>姓名</th> <th>年龄</th></tr>
        </thead>
        <tbody>
            <tr><td>1</td><td>张三</td><td>20</td></tr>
            <tr><td>2</td><td>李四</td><td>20</td></tr>
            <tr><td>3</td><td>王五</td><td>20</td></tr>
            <tr><td>4</td><td>赵六</td><td>20</td></tr>
        </tbody>
    </table>

</body>
</html>
- 1
- 2
- 3
- 4
- 5
- 6
- 7
- 8
- 9
- 10
- 11
- 12
- 13
- 14
- 15
- 16
- 17
- 18
- 19
- 20
- 21
- 22
- 23
其中border="1”是添加格式框。
2.9 input系列
<!-- 文本与密码 -->
<div><input type= 'text'></div>

<input type="password">
<!-- 选择文件 -->
<input type="file">
<!-- 单选框 -->
<input type="radio" name="n1">男
<input type="radio" name="n2">女
<!-- 复选框 -->
<input type="checkbox" />篮球
<input type="checkbox" />游泳
<input type="checkbox" />羽毛球
<input type="checkbox" />篮球
<!-- 按钮 -->
<input type="button" value="提交">普通提交
<input type="submit" value="提交">提交表单
- 1
- 2
- 3
- 4
- 5
- 6
- 7
- 8
- 9
- 10
- 11
- 12
- 13
- 14
- 15
- 16
- 17

2.10 下拉框
.<select>
	<option>北京</option>
	<option>上海</option>
	<option>深圳</option>
</select>
- 1
- 2
- 3
- 4
- 5
- 6
2.11 多行文本
<textarea></textarea>
- 1
2.12 用户注册案例
在web1.py文件中添加
@app.route('/register')
def get_register():
     return render_template('register.html')
- 1
- 2
- 3
在register.html文件中添加:
<!DOCTYPE html>
<html lang="en">
<head>
    <meta charset="UTF-8">
    <title>register</title>
</head>
<body>
    <h1>用户注册</h1>
    <div>
        用户名:
        <input type="text" />
    </div>

    <div>
        密码:
        <input type="password" />
    </div>

    <div>
        性别:
       <input type="radio" name="sex"/>男
       <input type="radio" name="sex"/>女
    </div>

    <div>
        爱好:
        <input type="checkbox">唱
        <input type="checkbox">跳
        <input type="checkbox">Rap
        <input type="checkbox">篮球
    </div>

    <div>
        城市:
        <select>
            <option>北京</option>
            <option>上海</option>
            <option>深圳</option>
        </select>
    </div>

    <div>
        备注: <textarea cols="30" rows="10"></textarea>
    </div>
    <div>
        <input type="button" value="button提交">
        <input type="submit" value="submit提交">
    </div>
</body>

</html>
- 1
- 2
- 3
- 4
- 5
- 6
- 7
- 8
- 9
- 10
- 11
- 12
- 13
- 14
- 15
- 16
- 17
- 18
- 19
- 20
- 21
- 22
- 23
- 24
- 25
- 26
- 27
- 28
- 29
- 30
- 31
- 32
- 33
- 34
- 35
- 36
- 37
- 38
- 39
- 40
- 41
- 42
- 43
- 44
- 45
- 46
- 47
- 48
- 49
- 50
- 51

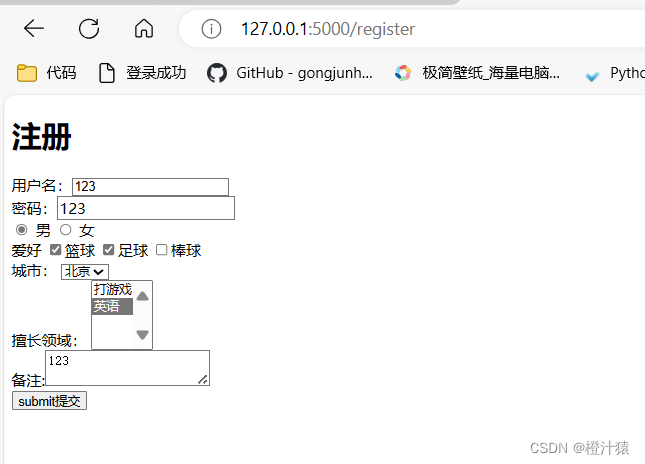
2.13案例:简单的用户注册登录系统
提交有两种方式:
GET: 可通过URL/表单提交
POST: 只能通过表单提交,提交数据不在URL而是在请求体中
form表单可以提交的前提条件:
提交方式: method=“get”
提交地址: action=“/xxx/xxx/xxx”
在form标签里面必须有一个submit标签
每个标签有name属性
项目结构:
1.用户注册的页面
register.html添加以下内容
<!DOCTYPE html>
<html lang="en">
<head>
    <meta charset="UTF-8">
    <title>Title</title>
</head>
<body>

<!-- get方法注册-->

```css
<h1>注册表1</h1>
<form method="post" action="/register">

    <div>
        用户名:<input style="text" name="user">
    </div>
    <div>
        密码:<input style="password" name="pwd">
    </div>

    <div>
        <input type="radio" name="gender" value="1"> 男
        <input type="radio" name="gender" value="2"> 女
    </div>
    <div>
        爱好
        <input type="checkbox" name="hobby" value="a">篮球
        <input type="checkbox" name="hobby" value="b">足球
        <input type="checkbox" name="hobby" value="c">棒球
    </div>
    <div>
        城市:
        <select name="city">
        <option value="bj">北京</option>
        <option value="sh">上海</option>
        <option value="sz">深圳</option>
        </select>
    </div>
    <div>
        擅长领域:
        <select name="skill" multiple>
        <option value="1">打游戏</option>
        <option value="2">英语</option>
        </select>
    </div>
    <div>
        备注:<textarea name="more"></textarea>
    </div>
    <div>
            <input type="submit" value="submit提交">
    </div>

</form>
</body>
</html>
- 1
- 2
- 3
- 4
- 5
- 6
- 7
- 8
- 9
- 10
- 11
- 12
- 13
- 14
- 15
- 16
- 17
- 18
- 19
- 20
- 21
- 22
- 23
- 24
- 25
- 26
- 27
- 28
- 29
- 30
- 31
- 32
- 33
- 34
- 35
- 36
- 37
- 38
- 39
- 40
- 41
- 42
- 43
- 44
- 45
- 46
- 47
- 48
- 49
- 50
- 51
- 52
- 53
- 54
- 55
- 56
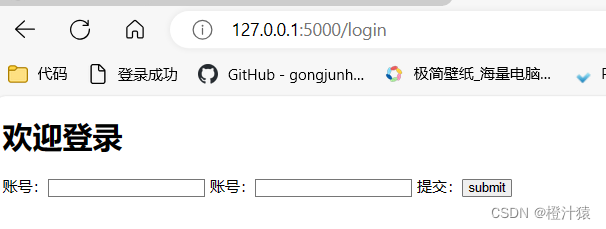
2.用户登录页面
login.html,添加以下内容:
<!DOCTYPE html>
<html lang="en">
<head>
    <meta charset="UTF-8">
    <title>Title</title>
</head>
<body>
<h1>欢迎登录</h1>
<form method="post" action="/login">
  账号:<input type="text" name="user">
  账号:<input type="text" name="pwd">
  提交:<input type="submit" name="button" value="submit">
</form>

</body>
</html>
- 1
- 2
- 3
- 4
- 5
- 6
- 7
- 8
- 9
- 10
- 11
- 12
- 13
- 14
- 15
- 16
3.用户登录后的页面
index.html,添加以下内容
<!DOCTYPE html>
<html lang="en">
<head>
    <meta charset="UTF-8">
    <title>Title</title>
</head>


<body>
    <table border="1">
        <thead>
            <tr> <th>ID</th> <th>姓名</th> <th>年龄</th></tr>
        </thead>
        <tbody>
            <tr><td>1</td><td>张三</td><td>20</td></tr>
            <tr><td>2</td><td>李四</td><td>20</td></tr>
            <tr><td>3</td><td>王五</td><td>20</td></tr>
            <tr><td>4</td><td>赵六</td><td>20</td></tr>
        </tbody>
    </table>

</body>
</html>
- 1
- 2
- 3
- 4
- 5
- 6
- 7
- 8
- 9
- 10
- 11
- 12
- 13
- 14
- 15
- 16
- 17
- 18
- 19
- 20
- 21
- 22
- 23
- 24
4.flask框架搭建web
在web.py中添加
from flask import Flask,render_template,request

app = Flask(__name__)

@app.route('/register',methods=['GET','POST'])
def register():
    if request.method == "GET":
        return render_template('register.html')
    else:
        user = request.form.get('user')
        pwd = request.form.get('pwd')
        gender = request.form.get('gender')
        hobby_list = request.form.getlist('hobby_list')
        city = request.form.get('city')
        skill_list = request.form.getlist('skill_list')
        more = request.form.getlist('more')

        print(user,pwd,gender,hobby_list,city,skill_list,more)
        return "注册成功"

#get方式
@app.route('/login',methods=['GET','POST'])
def do_register():
    if request.method == "GET":
        return render_template('login.html')
    else:
        return render_template('index.html')


if __name__ == '__main__':
    app.run()
- 1
- 2
- 3
- 4
- 5
- 6
- 7
- 8
- 9
- 10
- 11
- 12
- 13
- 14
- 15
- 16
- 17
- 18
- 19
- 20
- 21
- 22
- 23
- 24
- 25
- 26
- 27
- 28
- 29
- 30
- 31
5.效果
- 注册页面
- 在pycharm后台拿到账号和密码

- 在登录页面登录
- 登录完跳转到
三、CSS
简介:专门用来”美化“标签。
高度/宽度/块级or行内or块级行内/浮动/字体/文字对齐方式/内边距/外边距
关于边距:
-body
-区域居中
3.1CSS方式
3.1.1在标签上
<img src="..." stype="height: 100px">
<div stype="height: 100px">hello</div>
- 1
- 2
3.1.2在head标签的style上(*)
<head>
    <meta charset="UTF-8">
    <title>Title</title>
    <style>
        .c1 {
            color:red
        }
    </style>
</head>
<body>

<h1  class="c1">hello</h1>
- 1
- 2
- 3
- 4
- 5
- 6
- 7
- 8
- 9
- 10
- 11
- 12
3.1.3 写到文件中(*)
在static目录下创建 common.css文件
.XX{
    color: red;
}
- 1
- 2
- 3
调用CSS样式::
<!DOCTYPE html>
<html lang="en">
<head>
    <meta charset="UTF-8">
    <title>Title</title>
    <link rel="stylesheet" href="/static/common.css">
</head>
<body>

<h1  class="XX">hello</h1>

</body>
</html>
- 1
- 2
- 3
- 4
- 5
- 6
- 7
- 8
- 9
- 10
- 11
- 12
- 13
3.2选择器
1.ID选择器 #c1
<head>
    <meta charset="UTF-8">
    <title>Title</title>
    <style>
    #c1 {
	    color: red;
    }
    </style>
</head>
<body>

<h1  id="c1">hello</h1>

</body>
- 1
- 2
- 3
- 4
- 5
- 6
- 7
- 8
- 9
- 10
- 11
- 12
- 13
- 14
2.类选择器 .c2 **
<head>
    <meta charset="UTF-8">
    <title>Title</title>
    <style>
    #c1 {
	    color: red;
    }
    .c2 {
	    color: green;
    }
    div {
	    color: red;
    }
    </style>
</head>
<body>

<h1  >x</h1>
<div id="c1">小明</div>
<div class="c2">小红宏</div>
<div>小丽丽里</div>
- 1
- 2
- 3
- 4
- 5
- 6
- 7
- 8
- 9
- 10
- 11
- 12
- 13
- 14
- 15
- 16
- 17
- 18
- 19
- 20
- 21
3.标签选择器 **
<head>
    <meta charset="UTF-8">
    <title>Title</title>
    <style>
    div {
	    color: red;
    }
    </style>
</head>
<body>
<div>小丽丽里</div>
- 1
- 2
- 3
- 4
- 5
- 6
- 7
- 8
- 9
- 10
- 11
4,属性选择器
.v1[value="xx"]{
    color: gold;
}


 <div class="v1">小明</div>
<div class="v1" value="xx">小红宏</div>
- 1
- 2
- 3
- 4
- 5
- 6
- 7
找到标签为value=“xx”,才能做相应的操作。
5.后代选择器 **
指定对应的标签生效。
    .ss a{
        color:green;
    }
<div class="ss">
    <a>百度</a>
    <div>
        <a>谷歌</a>
    </div>
    <ul>
        <li>美国</li>
        <li>英国</li>
    </ul>
</div>
- 1
- 2
- 3
- 4
- 5
- 6
- 7
- 8
- 9
- 10
- 11
- 12
- 13
指定ss 类下的a标签生效
6.样式覆盖问题
 .c1 {
        color:red;
    }
     .c2 {
        color:gold;
    }
   <div class="c2 c1" value="xx">小红宏</div>
- 1
- 2
- 3
- 4
- 5
- 6
- 7
按style的顺序来生效的。class=“c1 c2”或者class=“c2 c1” 都是选择c2进行生效,c1则被覆盖,要使c1不被覆盖则需要增加 !important;
eg:
.c1 {
        color:red !important;
    }
- 1
- 2
- 3
3.3样式
1.高度和宽度
.c1{
height:300px;
widht:30%
}
注意事项:
- 支持百分比
- 行内标签: 默认无效
- 块级标签: 默认有效(右边的剩余空白区域也会被占用)
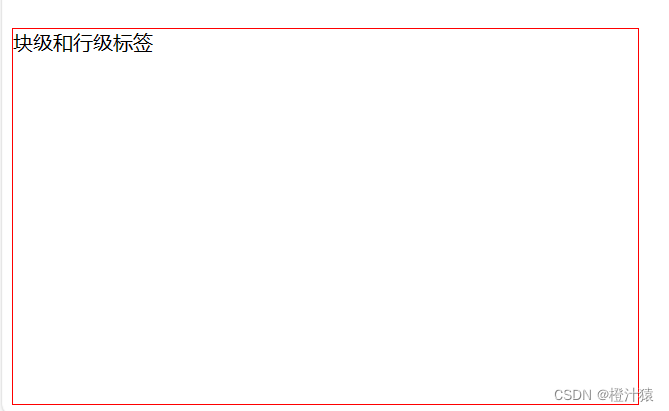
2. 块级和行内标签
display:inline-block 使行内标签对 height 和 width 生效
.c4 {
        display: inline-block;
        height: 300px;
        width: 500px;
        border: 1px solid red;
    }
    </style>


<body>
<span class="c3">块级和行内标签</span>
</body>
- 1
- 2
- 3
- 4
- 5
- 6
- 7
- 8
- 9
- 10
- 11
- 12
块级与行内标签的转换
<div style="display: inline;">块级转行内</div>
 <span style="display: block;">行内转块级</span>
- 1
- 2
注意:块级+块级&行内
3.字体和对齐方式:
<head>
    <meta charset="UTF-8">
    <title>Document</title>
    <style>
        .c1 {
            color: #00FF7F;                   /* 字体颜色 */
            font-size: 20px;                  /* 字体大小 */
            font-weight: 600;                 /* 字体粗细 */
            font-family: Microsoft Yahei;     /* 字体样式 */
            text-align: center;               /* 水平方向居中 */
            line-height: 50px;                /* 垂直方向居中 */
            border: 1px solid red;            /* 边框 */
        }
    </style>
</head>
- 1
- 2
- 3
- 4
- 5
- 6
- 7
- 8
- 9
- 10
- 11
- 12
- 13
- 14
- 15
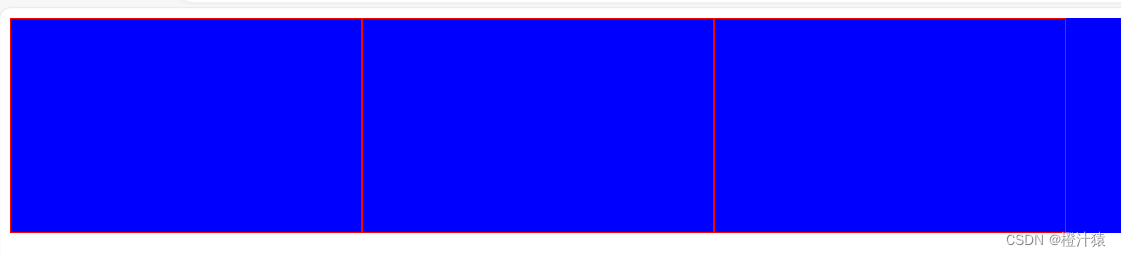
4. 浮动
如果在块级标签中,加入了float属性,那么这个块级标签奖不会再占用一整行,而是自己有多大就占用多大。
<!DOCTYPE html>
<html lang="en">
<head>
    <meta charset="UTF-8">
    <title>Document</title>
    <style>
        .item {
            float: left;
            width: 280px;
            height: 170px;
            border: 1px solid red;
        }

    </style>
</head>
<body>
    <div>
        <div class="item"></div>

    </div>
</body>
</html>
- 1
- 2
- 3
- 4
- 5
- 6
- 7
- 8
- 9
- 10
- 11
- 12
- 13
- 14
- 15
- 16
- 17
- 18
- 19
- 20
- 21
- 22
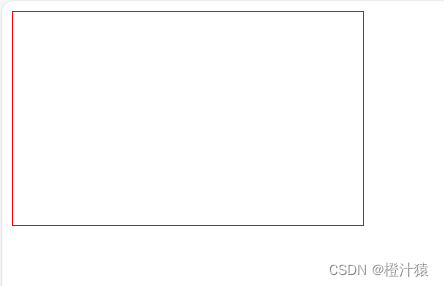
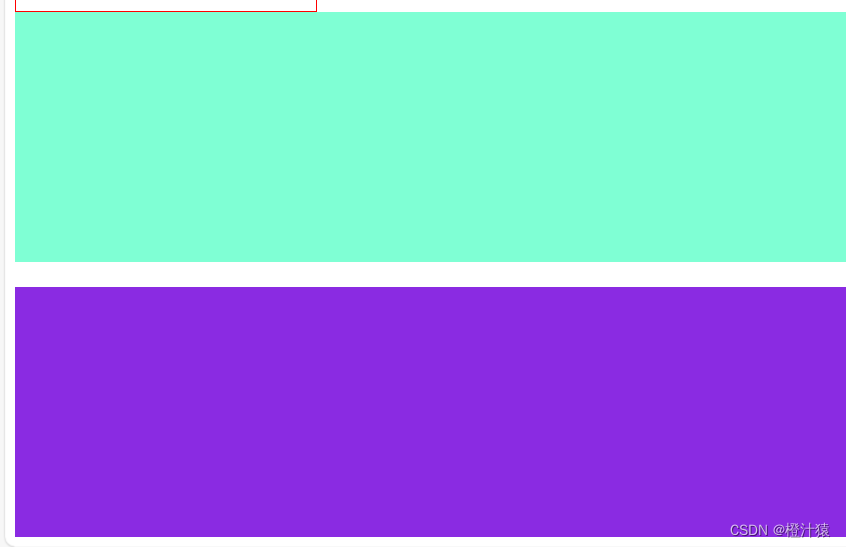
如果你让标签浮动起来之后,就会脱离文档流。
例如下面的例子中,我们给div的父标签赋予了一个蓝色的背景,但是你不会看到蓝色背景。因为他被浮动的div字标签挡住了。
<body>
    <div style="background-color: blue;">
        <div class="item"></div>
        <div class="item"></div>
        <div class="item"></div>
           </div>
</body>
- 1
- 2
- 3
- 4
- 5
- 6
- 7
此时父标签中的背景blue是没有显示的,如图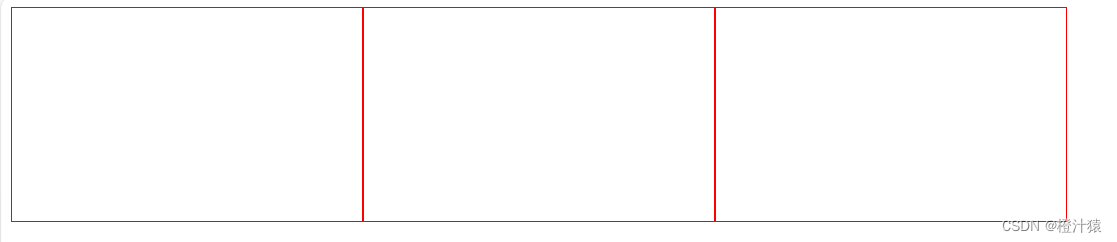
解决办法: 在同级子标签的最下面添加 style=“clear: both;”
<body>
    <div style="background-color: blue;">
        <div class="item"></div>
        <div class="item"></div>
        <div class="item"></div>
        <div style="clear: both;"></div>
    </div>
    </body>
- 1
- 2
- 3
- 4
- 5
- 6
- 7
- 8
- 9
5. 内边距
格式:
padding-top: 20px;
padding-left: 20px;
padding-right: 20px;
padding-bottom: 20px;
  <style>
    .outer {
        border: 1px solid red;
        height: 200px;
        width: 200px;

        padding-top: 20px;
        padding-left: 20px;
        padding-right: 20px;
        padding-bottom: 20px;
    }

</style>


<div class="outer">
  <div>小明</div>
  <div>w小红</div>

</div>
- 1
- 2
- 3
- 4
- 5
- 6
- 7
- 8
- 9
- 10
- 11
- 12
- 13
- 14
- 15
- 16
- 17
- 18
- 19
- 20
- 21
6. 外边距
margin
<body>
    <div style="height: 200px; background-color: aquamarine;"></div>
    <div style="height: 200px; background-color:blueviolet; margin-top: 20px;"></div>
</body>
- 1
- 2
- 3
- 4
7.全图页面和内容居中
全图页面:
body{
	margin:0;
}
- 1
- 2
- 3
内同居中:
- 文本居中,文本会在这个区域中居中
<div style="width:200px; text-align:center;">橙汁</div>
- 1

2. 区域居中,自己要有宽度+margin-left:auto;margin-right:auto;
 <style>
  .container{
  width:500px;
  margin:0 auto;
  }
    </style>


<div class="container">橙汁2</div>
- 1
- 2
- 3
- 4
- 5
- 6
- 7
- 8
- 9

- 父亲没有高度或者宽度,被孩子支撑起来
8.hover:设置变色
简介:鼠标接触目标就会显示不同的信息。
<!DOCTYPE html>
<html lang="en">
<head>
    <meta charset="UTF-8">
    <title>Document</title>
    <style>
        .c1 {
            color:brown;
        }
        .c1:hover {
            color: red;
            font-size: 20px;
        }

        .c2 {
            width: 300px;
            height: 300px;
        }
        .c2:hover {
            border: 3px solid red;
        }

        .download {
            display: none;
        }

        .app:hover .download {
            display: block;
        }

    </style>
</head>
<body>
    <div class="c1">鼠标靠近我变成red</div>
    <div class="c2">鼠标靠近我变成red</div>
    <div class="app">
        <div>鼠标放我这里触发显示二维码</div>
        <div class="download">
            <img src="static/img_1.png" alt="">
        </div>
    </div>
</body>
</html>
- 1
- 2
- 3
- 4
- 5
- 6
- 7
- 8
- 9
- 10
- 11
- 12
- 13
- 14
- 15
- 16
- 17
- 18
- 19
- 20
- 21
- 22
- 23
- 24
- 25
- 26
- 27
- 28
- 29
- 30
- 31
- 32
- 33
- 34
- 35
- 36
- 37
- 38
- 39
- 40
- 41
- 42
- 43
- 44
9.after 尾部添加东西
用来清除掉浮动,不用每次都写stype=“clear: both;”。
<!DOCTYPE html>
<html lang="en">
<head>
    <meta charset="UTF-8">
    <title>Document</title>
    <style>
        .clearfie:after {
            content: "";
            display:block;
            clear:both
        }
    </style>
</head>
<body>
    <div class="c1">
        <div class="item">1</div>
        <div class="item">1</div>
        <div class="item">1</div>
      </div>
</body>
</html>
- 1
- 2
- 3
- 4
- 5
- 6
- 7
- 8
- 9
- 10
- 11
- 12
- 13
- 14
- 15
- 16
- 17
- 18
- 19
- 20
- 21
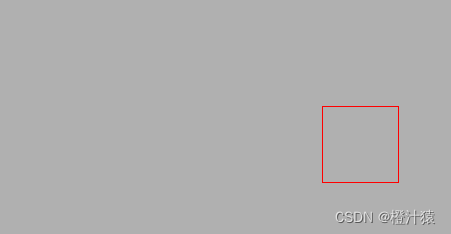
10 fixed 返回顶部
<!DOCTYPE html>
<html lang="en">
<head>
    <meta charset="UTF-8">
    <title>Title</title>
  <style>
    .back {
     position: fixed;
     width: 60px;
     height: 60px;
     border: 1px solid red;

     right: 50px;
     bottom: 50px;}
  </style>
</head>
<body>
<div style="height:1000px;background-color:#b0b0b0"></div>
<div class="back"></div>
</body>
</html>
- 1
- 2
- 3
- 4
- 5
- 6
- 7
- 8
- 9
- 10
- 11
- 12
- 13
- 14
- 15
- 16
- 17
- 18
- 19
- 20
- 21
10.对话框
.app{
            position: relative;
        }

        .app .download {
            position: absolute;
            display: none;
            height: 100px;
            width: 100px;
        }

        .app:hover .download {
            display: block;
        }


 <a href="https://www.mi.com" class="app" >下载app
<div class="download"> <img src="static/img_5.png" ></div>
</a>
- 1
- 2
- 3
- 4
- 5
- 6
- 7
- 8
- 9
- 10
- 11
- 12
- 13
- 14
- 15
- 16
- 17
- 18
- 19
- 20
- 21
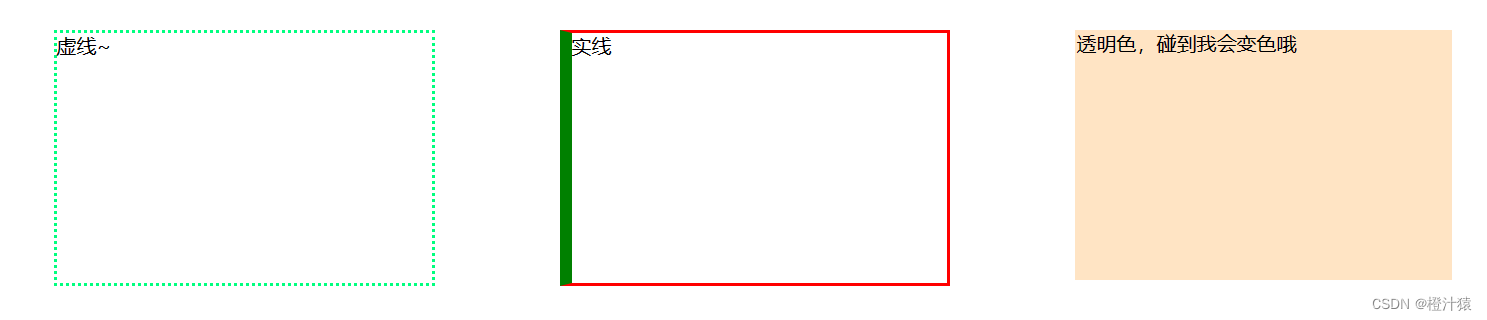
11.border边框
<!DOCTYPE html>
<html lang="en">
<head>
    <meta charset="UTF-8">
    <title>Document</title>
    <style>

        .left {
            float: left;
        }

        .c1 {
            height: 200px;
            width: 300px;
            border: 3px dotted #00FF7F;
            margin: 50px;
        }

        .c2 {
            height: 200px;
            width: 300px;
            border: 3px solid red;
            border-left: 10px solid green;
            margin: 50px;
        }

        .c3 {
            height: 200px;
            width: 300px;
            margin: 50px;
            background-color: bisque;
            border-left: 2px solid transparent;  /* 透明色 */
        }

        .c3:hover {
            border-left: 2px solid rgb(35, 211, 19);
        }

    </style>
</head>
<body>
    <div class="c1 left">虚线~</div>
    <div class="c2 left">实线</div>
    <div class="c3 left">透明色,碰到我会变色哦</div>
    <div style="clear: both;"></div>
</body>
</html>
- 1
- 2
- 3
- 4
- 5
- 6
- 7
- 8
- 9
- 10
- 11
- 12
- 13
- 14
- 15
- 16
- 17
- 18
- 19
- 20
- 21
- 22
- 23
- 24
- 25
- 26
- 27
- 28
- 29
- 30
- 31
- 32
- 33
- 34
- 35
- 36
- 37
- 38
- 39
- 40
- 41
- 42
- 43
- 44
- 45
- 46
- 47
3.4小米商城案例
1. 案例1:小米顶部
<!DOCTYPE html>
<html lang="en">
<head>
  <meta charset="UTF-8">
  <title>Title</title>
  <style>
    body {
      margin:0
    }

    .site-topbar {
      height: 40px;
      font-size: 12px;
      color: #b0b0b0;
      background: #333;
}

.container{
    width: 1226px;
    margin-right: auto;
    margin-left: auto;
}
.site-topbar .menu {
    float: left;
    height: 40px;
    line-height: 40px;
}
.site-topbar .accont {
    float: right;
    height: 40px;
    line-height: 40px;
}


  </style>
</head>
<body>

<div class="site-topbar">
  <div class="container">
    <div  class="menu">
      <a>小米官网 </a>
      <a> 小米商城 </a>
      <a>小米澎湃OS</a>
      <a> IoT </a>
      <a> 云服务</a>
    </div>
    <div class="accont">
      <a>登录 </a>
      <a> 注册 </a>
    </div>
  </div>
</div>


</body>
</html>
- 1
- 2
- 3
- 4
- 5
- 6
- 7
- 8
- 9
- 10
- 11
- 12
- 13
- 14
- 15
- 16
- 17
- 18
- 19
- 20
- 21
- 22
- 23
- 24
- 25
- 26
- 27
- 28
- 29
- 30
- 31
- 32
- 33
- 34
- 35
- 36
- 37
- 38
- 39
- 40
- 41
- 42
- 43
- 44
- 45
- 46
- 47
- 48
- 49
- 50
- 51
- 52
- 53
- 54
- 55
- 56
- 57
- 58

2.案例2:二级菜单
<!DOCTYPE html>
<html lang="en">
<head>
    <meta charset="UTF-8">
    <title>Title</title>

  <style>
    .body{
      margin:0;
     }
    .sub_header{
      height:100px;
    }
    .container{
      width:1128px;
      margin:0 auto;
  }

    .sub_header .logo_mi{
        width:234px;
        float:left;
     }
    .sub_header .logo_mi a{
        margin-top:22px;
        display:inline-block;
     }
     .sub_header .logo_mi a img{
        height:56px;
        width:56px;
     }

    .sub_header .menu{
        float:left;
        line-height:100px;


     }
     .sub_header .menu a{
        display:inline-block;
        padding:0 15px;
        color:#333;
        font-size: 16px;
        text-decoration:none;

     }
     .sub_header .menu a:hover{
        color:#ff6700;

     }

    .sub_header .search{

        float:left;
     }
  </style>

</head>
<body>


<div class="sub_header">
  <div class="container">
      <div class="hw logo_mi">
        <!--a行内标签;默认设置高度、边距无效,转成块级&行内+块级-->
        <a href="https://www.mi.com/" >
          <img src="static/img_1.png">
        </a>
      </div>

      <div class="hw menu">
        <a href="https://www.mi.com/">xiaomi手机</a>
        <a href="https://www.mi.com/">redmi手机</a>
        <a href="https://www.mi.com/">电视</a>
        <a href="https://www.mi.com/">笔记本</a>
      </div>
      <div class="hw search"></div>
      <div style="clear:both;"></div>
  </div>

</div>


</body>
</html>
- 1
- 2
- 3
- 4
- 5
- 6
- 7
- 8
- 9
- 10
- 11
- 12
- 13
- 14
- 15
- 16
- 17
- 18
- 19
- 20
- 21
- 22
- 23
- 24
- 25
- 26
- 27
- 28
- 29
- 30
- 31
- 32
- 33
- 34
- 35
- 36
- 37
- 38
- 39
- 40
- 41
- 42
- 43
- 44
- 45
- 46
- 47
- 48
- 49
- 50
- 51
- 52
- 53
- 54
- 55
- 56
- 57
- 58
- 59
- 60
- 61
- 62
- 63
- 64
- 65
- 66
- 67
- 68
- 69
- 70
- 71
- 72
- 73
- 74
- 75
- 76
- 77
- 78
- 79
- 80
- 81
- 82
- 83
- 84
- 85

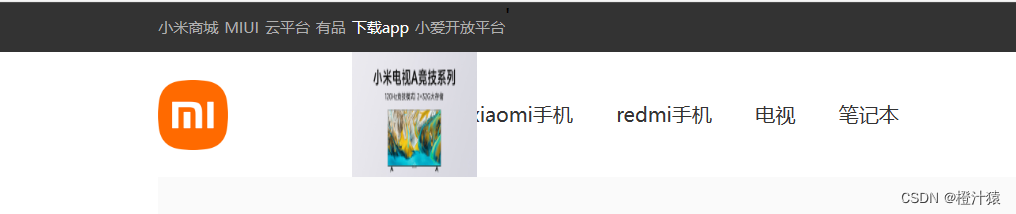
3.案例3:顶部和菜单整合
<!DOCTYPE html>
<html lang="en">
<head>
    <meta charset="UTF-8">
    <title>小米商城</title>
    <style>
        /* 去掉body的边距 */
        body {
            margin: 0;
        }

        .header {
            background-color: #333;
        }

        /* 让中间内容居中 */
        .container {
            width: 1226px;
            margin: 0 auto;     /* 上下为0, 左右为auto */
        }

        /* header class 下的标签 a 自动应用这个样式 */
        .header a {
            color: #b0b0b0;
            line-height: 40px;
            display: inline-block;
            font-size: 12px;
        }

        .header .menu {
            float: left;
            color: white;
        }

        .header a {
            text-decoration: none;
        }

        .header a:hover {
            color: white;
        }

        .header .account {
            float: right;
            color: white;
        }

    .sub_header{
      height:100px;
    }

    .sub_header .logo_mi{
        width:234px;
        float:left;
     }
    .sub_header .logo_mi a{
        margin-top:22px;
        display:inline-block;
     }
     .sub_header .logo_mi a img{
        height:56px;
        width:56px;
     }

    .sub_header .menu{
        float:left;
        line-height:100px;


     }
     .sub_header .menu a{
        display:inline-block;
        padding:0 15px;
        color:#333;
        font-size: 16px;
        text-decoration:none;

     }
     .sub_header .menu a:hover{
        color:#ff6700;

     }

    .sub_header .search{

        float:left;
     }
    </style>

</head>
<body>
    <div class="header">
        <div class="container">
            <div class="menu">
                <a href="https://www.mi.com">小米商城</a>
                <a href="https://www.mi.com">MIUI</a>
                <a href="https://www.mi.com">云平台</a>
                <a href="https://www.mi.com">有品</a>
                <a href="https://www.mi.com">小爱开放平台</a>
            </div>
            <div class="account">
                <a href="https://www.mi.com">登录</a>
                <a href="https://www.mi.com">注册</a>
                <a href="https://www.mi.com">消息通知</a>
            </div>'
            <div style="clear: both;"></div>
        </div>
    </div>
<div class="sub_header">
  <div class="container">
      <div class="hw logo_mi">
        <!--a行内标签;默认设置高度、边距无效,转成块级&行内+块级-->
        <a href="https://www.mi.com/" >
          <img src="static/img_1.png">
        </a>
      </div>

      <div class="hw menu">
        <a href="https://www.mi.com/">xiaomi手机</a>
        <a href="https://www.mi.com/">redmi手机</a>
        <a href="https://www.mi.com/">电视</a>
        <a href="https://www.mi.com/">笔记本</a>
      </div>
      <div class="hw search"></div>
      <div style="clear:both;"></div>
  </div>

</div>
</body>
</html>
- 1
- 2
- 3
- 4
- 5
- 6
- 7
- 8
- 9
- 10
- 11
- 12
- 13
- 14
- 15
- 16
- 17
- 18
- 19
- 20
- 21
- 22
- 23
- 24
- 25
- 26
- 27
- 28
- 29
- 30
- 31
- 32
- 33
- 34
- 35
- 36
- 37
- 38
- 39
- 40
- 41
- 42
- 43
- 44
- 45
- 46
- 47
- 48
- 49
- 50
- 51
- 52
- 53
- 54
- 55
- 56
- 57
- 58
- 59
- 60
- 61
- 62
- 63
- 64
- 65
- 66
- 67
- 68
- 69
- 70
- 71
- 72
- 73
- 74
- 75
- 76
- 77
- 78
- 79
- 80
- 81
- 82
- 83
- 84
- 85
- 86
- 87
- 88
- 89
- 90
- 91
- 92
- 93
- 94
- 95
- 96
- 97
- 98
- 99
- 100
- 101
- 102
- 103
- 104
- 105
- 106
- 107
- 108
- 109
- 110
- 111
- 112
- 113
- 114
- 115
- 116
- 117
- 118
- 119
- 120
- 121
- 122
- 123
- 124
- 125
- 126
- 127
- 128
- 129
- 130

4.小结
a. a标签是行内标签,行内标签的高度、内外边距、默认无效
b. 垂直方向居中
1)文本—>line-height
2)图片 —> 边距
c. a标签默认有下划线。
1)通过加样式去除。text-decoration:none
d.鼠标放上去之后可变色
1)增加hover
.header a:hover {
        color: white;
    }
- 1
- 2
- 3
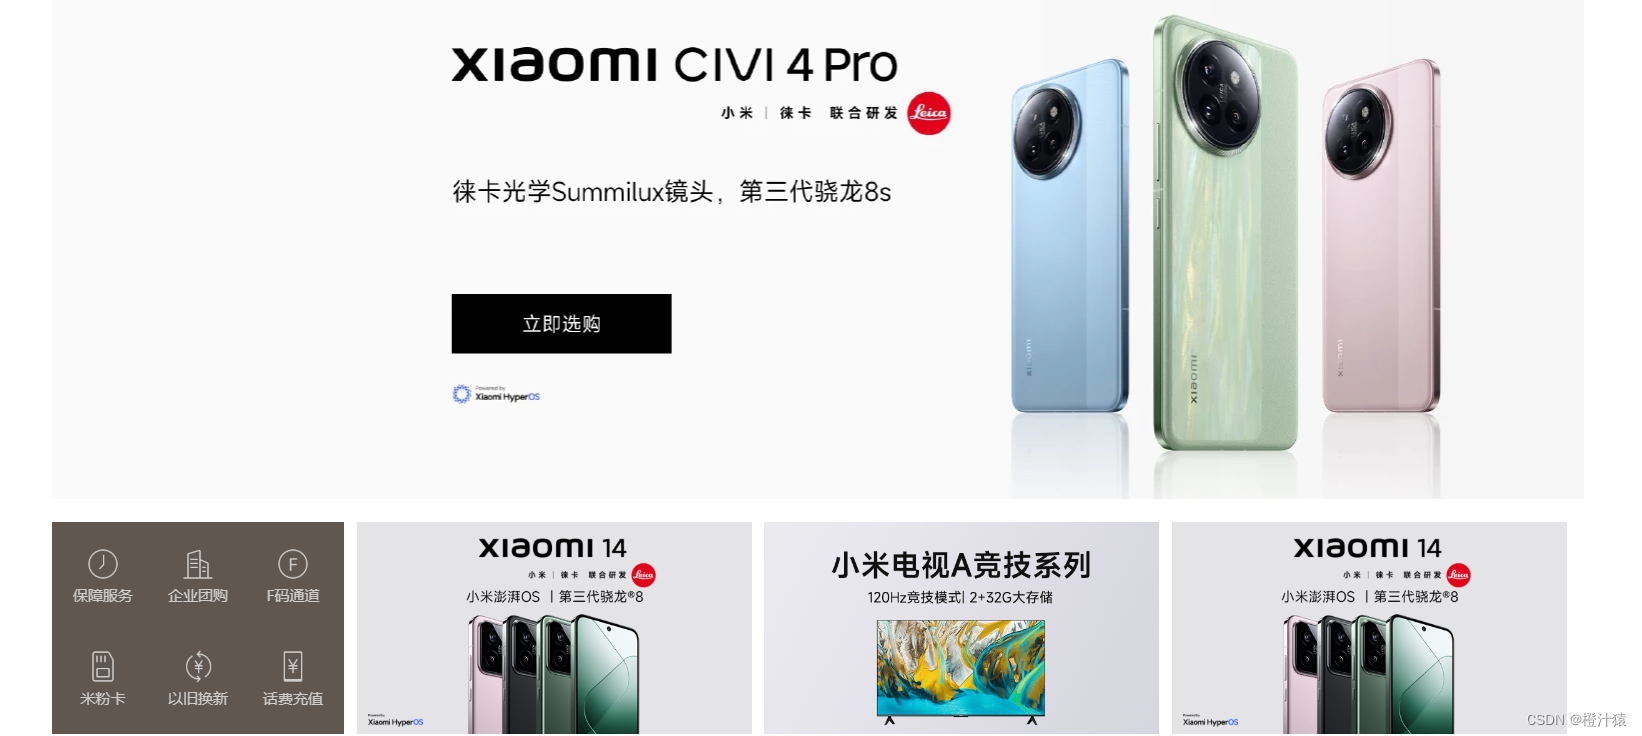
5.案例4:推荐区域
<!DOCTYPE html>
<html lang="en">
<head>
    <meta charset="UTF-8">
    <title>小米商城</title>
    <style>
        body {
            margin: 0;
        }
        img{
            width:100%;
            height:100%;
        }
        .left{
            float:left;
        }
        .header {
            background-color: #333;
        }


        /* 让中间内容居中 */
        .container {
            width: 1226px;
            margin: 0 auto;     /* 上下为0, 左右为auto */
        }

        /* header class 下的标签 a 自动应用这个样式 */
        .header a {
            color: #b0b0b0;
            line-height: 40px;
            display: inline-block;
            font-size: 12px;
        }

        .header .menu {
            float: left;
            color: white;
        }

        .header a {
            text-decoration: none;
        }

        .header a:hover {
            color: white;
        }

        .header .account {
            float: right;
            color: white;
        }

    .sub_header{
      height:100px;
    }

    .sub_header .logo_mi{
        width:234px;
        float:left;
     }
    .sub_header .logo_mi a{
        margin-top:22px;
        display:inline-block;
     }
     .sub_header .logo_mi a img{
        height:56px;
        width:56px;
     }

    .sub_header .menu{
        float:left;
        line-height:100px;


     }
     .sub_header .menu a{
        display:inline-block;
        padding:0 15px;
        color:#333;
        font-size: 16px;
        text-decoration:none;

     }
     .sub_header .menu a:hover{
        color:#ff6700;

     }

    .sub_header .search{

        float:left;
     }


     .slider img{
        width: 1226px;
        height: 460px;
     }

     .news{
      margin-top: 14px;
     }
     .news .channel{
        width:228px;
        height:164px;
        background-color:#5f5750;
        padding:3px;
     }
      .news .list-item{
        width:316px;
        height:170px;
     }

     .news .channel .item{
        height:82px;
        width:76px;
        float:left;
        text-align:center;

     }
    .news .channel .item img{
        height:26px;
        width:26px;
        display:block;
        margin:0 auto 4px;
     }
         .news .channel .item a{
        display:inline-block;
        font-size:12px;
        padding-top:18px;
        color:#fff;
        opacity:0.7;
        text-decoration:none;
     }
  .news .channel .item a:hover{
    opacity:1;
  }

    </style>

</head>
<body>
    <div class="header">
        <div class="container">
            <div class="menu">
                <a href="https://www.mi.com">小米商城</a>
                <a href="https://www.mi.com">MIUI</a>
                <a href="https://www.mi.com">云平台</a>
                <a href="https://www.mi.com">有品</a>
                <a href="https://www.mi.com">小爱开放平台</a>
            </div>
            <div class="account">
                <a href="https://www.mi.com">登录</a>
                <a href="https://www.mi.com">注册</a>
                <a href="https://www.mi.com">消息通知</a>
            </div>'
            <div style="clear: both;"></div>
        </div>
    </div>
    <div class="sub_header">
  <div class="container">
      <div class="hw logo_mi">
        <!--a行内标签;默认设置高度、边距无效,转成块级&行内+块级-->
        <a href="https://www.mi.com/" >
          <img src="static/img_1.png">
        </a>
      </div>

      <div class="hw menu">
        <a href="https://www.mi.com/">xiaomi手机</a>
        <a href="https://www.mi.com/">redmi手机</a>
        <a href="https://www.mi.com/">电视</a>
        <a href="https://www.mi.com/">笔记本</a>
      </div>
      <div class="hw search"></div>
      <div style="clear:both;"></div>
  </div>

</div>
    <div class="slider">
      <div class="container">
        <div class="sd_img">
          <a>
            <img src="static/img_3.png" alt="">
          </a>
        </div>
      </div>
    </div>

<div class="news">
  <div class="container">
      <div class="channel left">
          <div class="item">
              <a href="https://api.jr.mi.com/activity/scene/scenePCsearch.html?from=search">
                  <img src="static/img_6.png" alt="">
                  <span>保障服务</span>
              </a></div>
          <div class="item">
          <a href="https://api.jr.mi.com/activity/scene/scenePCsearch.html?from=search">
                  <img src="static/img_7.png" alt="">
                  <span>企业团购</span>
              </a></div>
          <div class="item"><a href="https://api.jr.mi.com/activity/scene/scenePCsearch.html?from=search">
                  <img src="static/img_8.png" alt="">
                  <span>F码通道</span>
              </a></div>
          <div class="item">
              <a href="https://api.jr.mi.com/activity/scene/scenePCsearch.html?from=search">
                  <img src="static/img_9.png" alt="">
                  <span>米粉卡</span>
              </a></div>
          <div class="item">
              <a href="https://api.jr.mi.com/activity/scene/scenePCsearch.html?from=search">
                  <img src="static/img_10.png" alt="">
                  <span>以旧换新</span>
              </a></div>
          <div class="item"><a href="https://api.jr.mi.com/activity/scene/scenePCsearch.html?from=search">
                  <img src="static/img_11.png" alt="">
                  <span>话费充值</span>
              </a></div>
      </div>
      <div class="list-item left" style="margin-left:10px">
          <img src="static/img_4.png" />
      </div>
      <div class="list-item left" style="margin-left:10px">
          <img src="static/img_5.png" />
      </div>
      <div class="list-item left" style="margin-left:10px">
          <img src="static/img_4.png" />
      </div>
      <div class="clear:both"></div>
  </div>
</div>

</body>
</html>
- 1
- 2
- 3
- 4
- 5
- 6
- 7
- 8
- 9
- 10
- 11
- 12
- 13
- 14
- 15
- 16
- 17
- 18
- 19
- 20
- 21
- 22
- 23
- 24
- 25
- 26
- 27
- 28
- 29
- 30
- 31
- 32
- 33
- 34
- 35
- 36
- 37
- 38
- 39
- 40
- 41
- 42
- 43
- 44
- 45
- 46
- 47
- 48
- 49
- 50
- 51
- 52
- 53
- 54
- 55
- 56
- 57
- 58
- 59
- 60
- 61
- 62
- 63
- 64
- 65
- 66
- 67
- 68
- 69
- 70
- 71
- 72
- 73
- 74
- 75
- 76
- 77
- 78
- 79
- 80
- 81
- 82
- 83
- 84
- 85
- 86
- 87
- 88
- 89
- 90
- 91
- 92
- 93
- 94
- 95
- 96
- 97
- 98
- 99
- 100
- 101
- 102
- 103
- 104
- 105
- 106
- 107
- 108
- 109
- 110
- 111
- 112
- 113
- 114
- 115
- 116
- 117
- 118
- 119
- 120
- 121
- 122
- 123
- 124
- 125
- 126
- 127
- 128
- 129
- 130
- 131
- 132
- 133
- 134
- 135
- 136
- 137
- 138
- 139
- 140
- 141
- 142
- 143
- 144
- 145
- 146
- 147
- 148
- 149
- 150
- 151
- 152
- 153
- 154
- 155
- 156
- 157
- 158
- 159
- 160
- 161
- 162
- 163
- 164
- 165
- 166
- 167
- 168
- 169
- 170
- 171
- 172
- 173
- 174
- 175
- 176
- 177
- 178
- 179
- 180
- 181
- 182
- 183
- 184
- 185
- 186
- 187
- 188
- 189
- 190
- 191
- 192
- 193
- 194
- 195
- 196
- 197
- 198
- 199
- 200
- 201
- 202
- 203
- 204
- 205
- 206
- 207
- 208
- 209
- 210
- 211
- 212
- 213
- 214
- 215
- 216
- 217
- 218
- 219
- 220
- 221
- 222
- 223
- 224
- 225
- 226
- 227
- 228
- 229
- 230
- 231
- 232
- 233
- 234
- 235
- 236
- 237
- 238
四、Bootstrap
简介:别人写好的CSS样式。
使用方式:
在页面上引入 Bootstrap
编写HTML时,按照Bootstrap的规定来编写或者自定制
4.1引入bootstrap
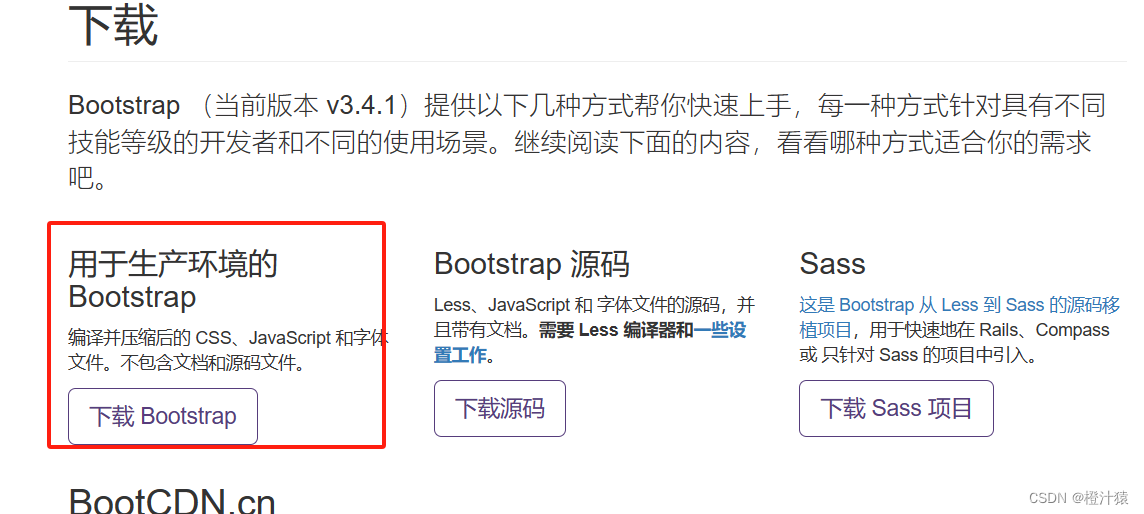
1. 下载bootstrap
https://v3.bootcss.com/getting-started/#download
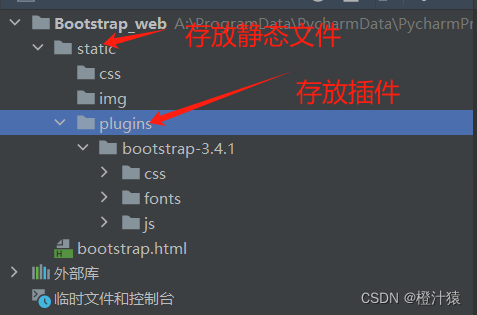
2. 项目结构:
将下载好的bootstrap放在plugins目录下。
3.引入bootstrap
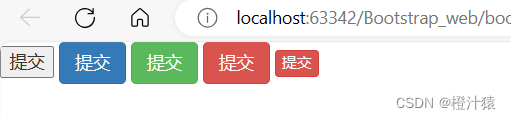
<!DOCTYPE html>
<html lang="en">
<head>
    <meta charset="UTF-8">
    <title>Document</title>

    <!-- 开发版本 -->
    <link rel="stylesheet" href="static/plugins/bootstrap-3.4.1/css/bootstrap.css">

    <!-- 生产版本 -->
    <link rel="stylesheet" href="static/plugins/bootstrap-3.4.1/css/bootstrap.min.css">

</head>
<body>
    <input type="button" value="提交">
    <input type="button" value="提交" class="btn btn-primary">
    <input type="button" value="提交" class="btn btn-success">
    <input type="button" value="提交" class="btn btn-danger">
    <input type="button" value="提交" class="btn btn-danger btn-xs">
</body>
</html>
- 1
- 2
- 3
- 4
- 5
- 6
- 7
- 8
- 9
- 10
- 11
- 12
- 13
- 14
- 15
- 16
- 17
- 18
- 19
- 20
- 21
4.2导航栏
地址:https://v3.bootcss.com/components/#nav
借用代码,进行开发成自己想要的页面。
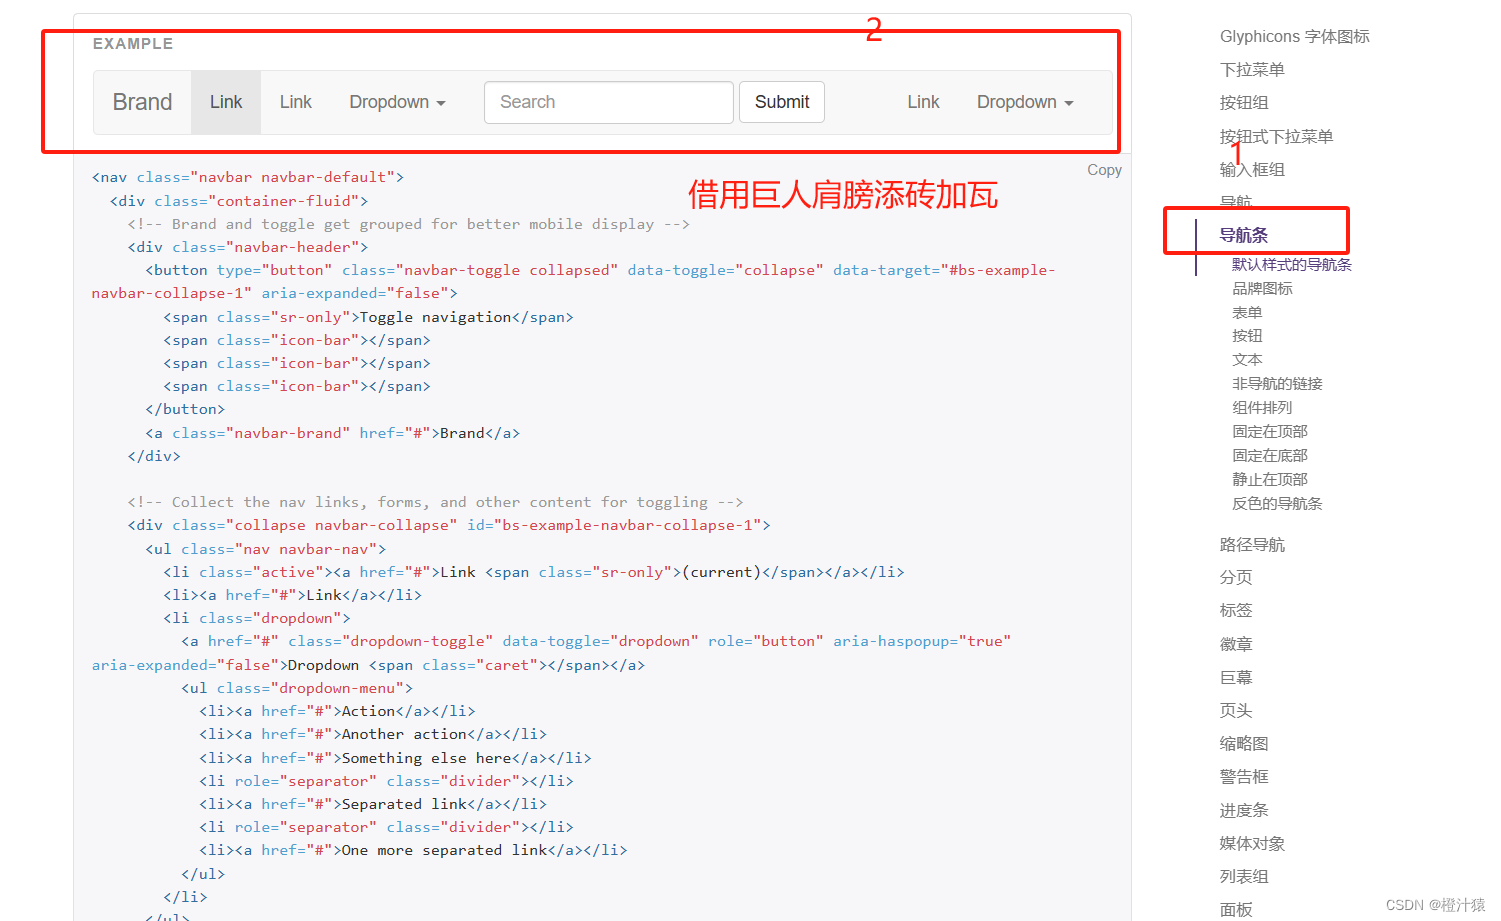
<!DOCTYPE html>
<html lang="en">
<head>
    <meta charset="UTF-8">
    <title>Title</title>
    <link rel="stylesheet" href="static/plugins/bootstrap-3.4.1/css/bootstrap.css">
</head>
<body>

<nav class="navbar navbar-default">
  <div class="container-fluid">
    <!-- Brand and toggle get grouped for better mobile display -->
    <div class="navbar-header">
      <button type="button" class="navbar-toggle collapsed" data-toggle="collapse" data-target="#bs-example-navbar-collapse-1" aria-expanded="false">
        <span class="sr-only">Toggle navigation</span>
        <span class="icon-bar"></span>
        <span class="icon-bar"></span>
        <span class="icon-bar"></span>
      </button>
      <a class="navbar-brand" href="#">Brand</a>
    </div>

    <!-- Collect the nav links, forms, and other content for toggling -->
    <div class="collapse navbar-collapse" id="bs-example-navbar-collapse-1">
      <ul class="nav navbar-nav">
        <li class="active"><a href="#">Link <span class="sr-only">(current)</span></a></li>
        <li><a href="#">Link</a></li>
        <li class="dropdown">
          <a href="#" class="dropdown-toggle" data-toggle="dropdown" role="button" aria-haspopup="true" aria-expanded="false">Dropdown <span class="caret"></span></a>
          <ul class="dropdown-menu">
            <li><a href="#">Action</a></li>
            <li><a href="#">Another action</a></li>
            <li><a href="#">Something else here</a></li>
            <li role="separator" class="divider"></li>
            <li><a href="#">Separated link</a></li>
            <li role="separator" class="divider"></li>
            <li><a href="#">One more separated link</a></li>
          </ul>
        </li>
      </ul>
      <form class="navbar-form navbar-left">
        <div class="form-group">
          <input type="text" class="form-control" placeholder="Search">
        </div>
        <button type="submit" class="btn btn-default">Submit</button>
      </form>
      <ul class="nav navbar-nav navbar-right">
        <li><a href="#">Link</a></li>
        <li class="dropdown">
          <a href="#" class="dropdown-toggle" data-toggle="dropdown" role="button" aria-haspopup="true" aria-expanded="false">Dropdown <span class="caret"></span></a>
          <ul class="dropdown-menu">
            <li><a href="#">Action</a></li>
            <li><a href="#">Another action</a></li>
            <li><a href="#">Something else here</a></li>
            <li role="separator" class="divider"></li>
            <li><a href="#">Separated link</a></li>
          </ul>
        </li>
      </ul>
    </div><!-- /.navbar-collapse -->
  </div><!-- /.container-fluid -->
</nav>

</body>
</html>
- 1
- 2
- 3
- 4
- 5
- 6
- 7
- 8
- 9
- 10
- 11
- 12
- 13
- 14
- 15
- 16
- 17
- 18
- 19
- 20
- 21
- 22
- 23
- 24
- 25
- 26
- 27
- 28
- 29
- 30
- 31
- 32
- 33
- 34
- 35
- 36
- 37
- 38
- 39
- 40
- 41
- 42
- 43
- 44
- 45
- 46
- 47
- 48
- 49
- 50
- 51
- 52
- 53
- 54
- 55
- 56
- 57
- 58
- 59
- 60
- 61
- 62
- 63
- 64
- 65

1. 修改样式
在head中添加相关的样式进行覆盖即可
 <head>
    <meta charset="UTF-8">
    <title>Title</title>
    <link rel="stylesheet" href="static/plugins/bootstrap-3.4.1/css/bootstrap.css">
    <style>
      .navbar {
        border-radius:0;
      }
    </style>
</head>
- 1
- 2
- 3
- 4
- 5
- 6
- 7
- 8
- 9
- 10
原本引用的插件的样式为border-radius:4; 将其改成了 border-radius:0;
2.修改body中的文本
修改相应的数据即可,

