
- 1基于微信小程序的餐厅点餐软件设计及开发_软件工程餐饮类的小程序设计方案
- 2算法在C语言编程中如何使用,算法的定义和特征,以及c语言在编程中如何应用?...
- 3小程序模拟更新微信_微信小程序模拟更新
- 4写一下EEMD+XGBoost+LightGBM+ConvLSTM可以用于多输入时间序列预测的代码
- 5mac无法读取移动硬盘怎么办?mac怎么使用ntfs硬盘_wd mac驱动 ntfs
- 6Docker中Kafka容器创建/更新Topic支持多分区_docker kafka 创建topic
- 7GitHub 移动端正式发布!
- 8Python游戏汇总:三十个pygame游戏代码【附源码免费分享】_游戏代码大全可复制
- 9Apache DolphinScheduler & 亚马逊云科技联合Meetup: 基于云上的最佳实践
- 10【踩坑】Flink无法使用Jedis连接redis服务器_flink map里不能序列化redis连接
Java自学之spring:注解方式IOC/DI
赞
踩
Part 1
学习目的:在spring初识和spring注入对象的学习中,主要是用到的XML配置文件,在本小节学习中,学会使用注解方式实现注入对象。
Part 2
修改XML配置文件,在第一个bean前面增加一行 <context:annotation-config/>,目的是告诉spring要使用注解的方式进行配置,同时将bean c中的 <property name="category" ref="c" />进行注释,因为要使用注解的方式进行注入对象。
- <?xml version="1.0" encoding="UTF-8"?>
- <beans xmlns="http://www.springframework.org/schema/beans"
- xmlns:xsi="http://www.w3.org/2001/XMLSchema-instance"
- xmlns:aop="http://www.springframework.org/schema/aop"
- xmlns:tx="http://www.springframework.org/schema/tx"
- xmlns:context="http://www.springframework.org/schema/context"
- xsi:schemaLocation="
- http://www.springframework.org/schema/beans
- http://www.springframework.org/schema/beans/spring-beans-3.0.xsd
- http://www.springframework.org/schema/aop
- http://www.springframework.org/schema/aop/spring-aop-3.0.xsd
- http://www.springframework.org/schema/tx
- http://www.springframework.org/schema/tx/spring-tx-3.0.xsd
- http://www.springframework.org/schema/context
- http://www.springframework.org/schema/context/spring-context-3.0.xsd">
-
- <context:annotation-config/>
-
-
- <bean name="c" class="cn.vaefun.pojo.Category">
- <property name="name" value="category 1" />
- </bean>
-
- <bean name="p" class="cn.vaefun.pojo.Product">
- <property name="name" value="product 1" />
- <!-- <property name="category" ref="c" /> -->
- </bean>
-
- </beans>

Part 3
修改cn.vaefun.pojo.Product类,在category属性前加@Autowired注解(在setCategory方法前加注解也可以),注意导包:import org.springframework.beans.factory.annotation.Autowired。
- package cn.vaefun.pojo;
-
- import org.springframework.beans.factory.annotation.Autowired;
-
- public class Product {
- private String name;
-
- @Autowired
- private Category category;
-
-
- public Category getCategory() {
- return category;
- }
- //@Autowired
- public void setCategory(Category category) {
- this.category = category;
- }
-
- public String getName() {
- return name;
- }
-
- public void setName(String name) {
- this.name = name;
- }
-
- }
Part 4
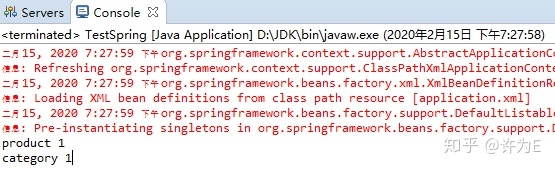
运行TestSpring,成功获取到Product对象以及注入的Category对象。
- package cn.vaefun.test;
-
- import org.springframework.context.ApplicationContext;
- import org.springframework.context.support.ClassPathXmlApplicationContext;
-
- import cn.vaefun.pojo.Product;
-
- public class TestSpring {
- public static void main(String[] args) {
- ApplicationContext context = new ClassPathXmlApplicationContext("application.xml");
- Product product = (Product)context.getBean("p");
- System.out.println(product.getName());
- System.out.println(product.getCategory().getName());
- }
- }
Part 5
使用Resource注解完成上述需求,同上修改cn.vaefun.pojo.Product类(XML文件与Part 2中保持一致),在category属性前加@Resource注解,同时告诉spring该属性是bean c(@Resource(name ="c")),注意导包import javax.annotation.Resource。运行测试也可以得到Part 4中的结果。
- package cn.vaefun.pojo;
-
- import javax.annotation.Resource;
-
- //import org.springframework.beans.factory.annotation.Autowired;
-
- public class Product {
- private String name;
-
- //@Autowired
- @Resource(name = "c")
- private Category category;
-
-
- public Category getCategory() {
- return category;
- }
- //@Autowired
- public void setCategory(Category category) {
- this.category = category;
- }
-
- public String getName() {
- return name;
- }
-
- public void setName(String name) {
- this.name = name;
- }
-
- }
上述例子是对 注入对象行为的注解,那么bean对象本身,比如Category,Product可不可以移出applicationContext.xml配置文件,也通过注解进行呢?
Part 6
修改applicationContext.xml配置文件,将配置文件的所有配置删除,并新增一句<context:component-scanbase-package="cn.vaefun.pojo"/>,目的是告诉spring,所有的bean对象都在cn.vaefun.pojo这个包里。
- <?xml version="1.0" encoding="UTF-8"?>
- <beans xmlns="http://www.springframework.org/schema/beans"
- xmlns:xsi="http://www.w3.org/2001/XMLSchema-instance"
- xmlns:aop="http://www.springframework.org/schema/aop"
- xmlns:tx="http://www.springframework.org/schema/tx"
- xmlns:context="http://www.springframework.org/schema/context"
- xsi:schemaLocation="
- http://www.springframework.org/schema/beans
- http://www.springframework.org/schema/beans/spring-beans-3.0.xsd
- http://www.springframework.org/schema/aop
- http://www.springframework.org/schema/aop/spring-aop-3.0.xsd
- http://www.springframework.org/schema/tx
- http://www.springframework.org/schema/tx/spring-tx-3.0.xsd
- http://www.springframework.org/schema/context
- http://www.springframework.org/schema/context/spring-context-3.0.xsd">
-
- <context:component-scan base-package="cn.vaefun.pojo"/>
-
- </beans>
Part 7
为Product、Category添加@Component注解,并分别命名为"p"、"c",同时分别为其对应的name赋值为product 1、category 1。运行TestSpring,得到与Part 4相同的结果。
Part 8
总结
- @Autowired注解可以放在属性上,也可以放在setter上,要配合配置了bean的xml配置文件使用,需要导入org.springframework.beans.factory.annotation.Autowired包。
- @Resource注解放在属性上使用,并指明该属性对应xml配置文件中的哪个bean(如:@Resource(name = "c")),需要导入javax.annotation.Resource包。
- @Componet注解放在类名上使用,并为该bean类进行命名(如:@Component("c")),且需要在xml配置文件中添加<context:component-scanbase-package="cn.vaefun.pojo"/>,用以告诉spring所有bean类所在的包,需要导入 org.springframework.stereotype.Component包。

