
- 1音乐创新的未来:探索MusicGPT的魔力
- 2数据格式转换(labelme、labelimg、yolo格式相互转换)_labelme转yolo
- 335岁难找工作,40岁没人要:年长的程序员都去哪里了?不要让环境同化了年轻的程序员_程序员40岁以后出路
- 4mysql 安装报错 unknown suffix ‘?’ used for variable ‘port’_unknown suffix '.' used for variable 'mysqlx-port'
- 5ireport 循环_ireport操作手册(中文).doc
- 6毕业设计 微信小程序选题大全(最新)_微信小程序毕设选题
- 7L3-011 直捣黄龙 (30 分)——25分,测试点2错误分析_l3-011 直捣黄龙 测试点2
- 8JAVA 数据导入导出(CSV、TXT、EXCL(读取大文件))_java读取超大csv excel 文件的实现方式
- 9DeepSpeed-Chat 打造类ChatGPT全流程 笔记一_deepspeed exits return code
- 10云桌面玩PC游戏,Steam游戏,ToDesk云电脑无感低延迟_可以玩steam的云电脑
Rust 实战丨并发构建倒排索引
赞
踩
引言
继上篇 Rust 实战丨倒排索引,本篇我们将参考《Rust 程序设计(第二版)》中并发编程篇章来实现高并发构建倒排索引。
本篇主要分为以下几个部分:
- 功能展示:展示我们最终实现的 2 个工具的效果(构建索引、搜索功能)
- 阅读源码:阅读书中源码的实现,理清大体思路。
- 构建索引:实战构建索引的每个具体环节,并对核心逻辑进行解释和阐述缘由。
- 搜索功能:这是书中未曾提供的功能,笔者根据自身理解,对齐上篇提供的功能,实现了一个搜索功能。
能学到:
- Rust 各种迭代器的使用
- Rust 文件常用操作
- Rust 字符串常用操作
- Rust channel 实战
- Rust 并发编程
- 多路合并文件实际应用
- 使用
byteorder进行位操作 - 使用
clap进行 CLI 开发 - 终端高亮输出
- 深入理解倒排索引高性能的核心细节
阅读建议
本篇内容较为冗长,涉及到的细节讲解可能比较啰嗦,推荐直接阅读源码,然后对不理解的地方再来本篇对应的章节进行阅读。
完成源码位于:https://github.com/hedon-rust-road/inverted-index-concurrency
版本声明
- Rust: 1.76
- byteordrr: 1.5.0
- clap: 4.5.0
- 运行环境:macbookPro Apple M2 Max
功能展示
create.rs
Usage: create [OPTIONS] <FILENAMES>...

Arguments:
  <FILENAMES>...

Options:
  -s, --single-threaded  Default false
  -h, --help             Print help
- 1
- 2
- 3
- 4
- 5
- 6
- 7
- 8
指定文件目录,构建索引,可以使用 -s 使用单线程构建,默认使用并发构建。
执行示例如下:
➜  inverted-index-concurrency git:(master) ✗ cargo run --bin create ./texts
    Finished dev [unoptimized + debuginfo] target(s) in 0.08s
     Running `/Users/wangjiahan/rust-target/debug/create ./texts`
indexed document 0:"./texts/text1.txt", 22 bytes, 5 words
indexed document 1:"./texts/text3.txt", 27 bytes, 5 words
indexed document 2:"./texts/text2.txt", 39 bytes, 6 words
word count: 16
351 bytes main, 736 bytes total
wrote file "./tmp00000001.dat"
- 1
- 2
- 3
- 4
- 5
- 6
- 7
- 8
- 9
search.rs
Usage: search --index-file <INDEX_FILE> --term <TERM>

Options:
  -i, --index-file <INDEX_FILE>  Specify index file path
  -t, --term <TERM>              Specify search term
  -h, --help                     Print help
- 1
- 2
- 3
- 4
- 5
- 6
指定索引文件和搜索词来进行搜索。
执行示例如下:

阅读源码
书中的源码位于:fingertips
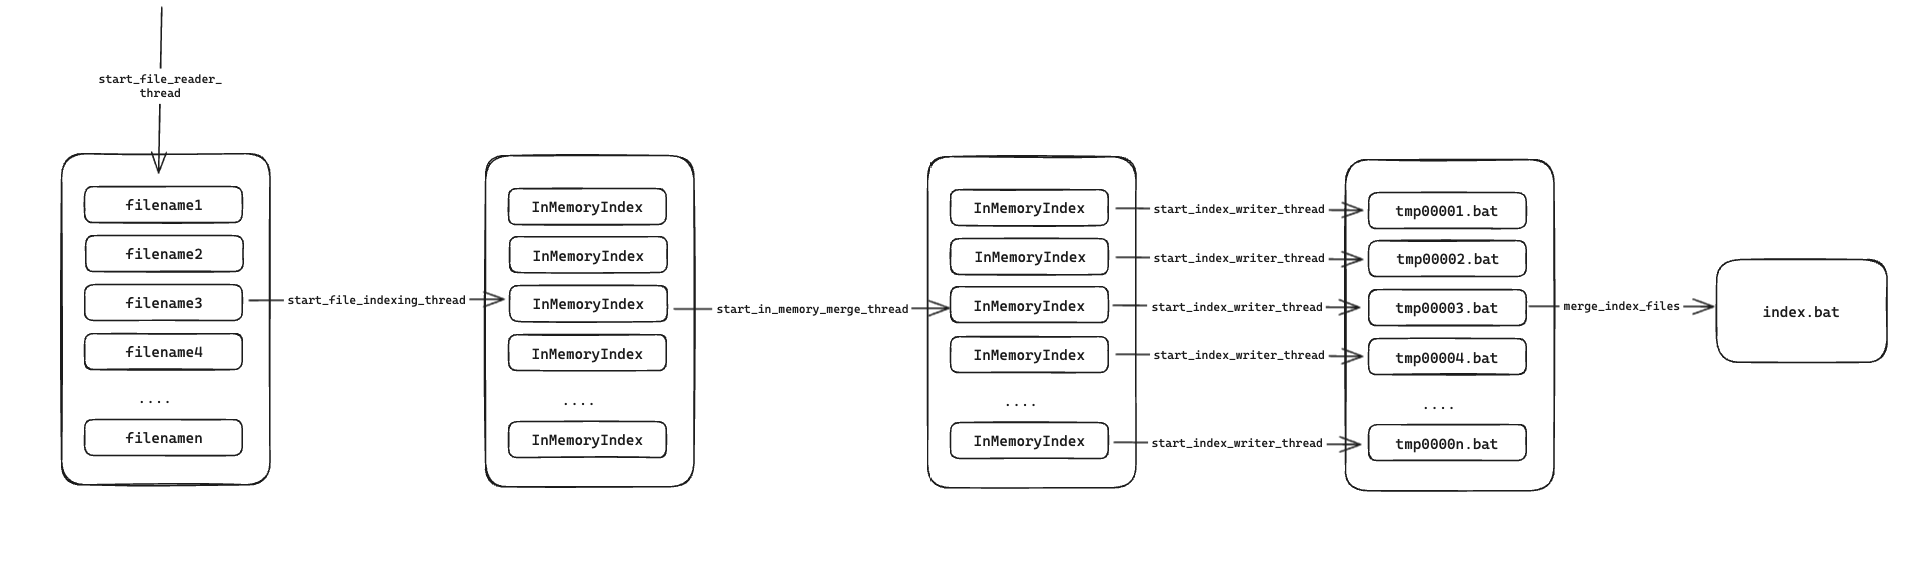
第一部分我们先来阅读源码,书中展示了这样一张图:

从这张图我们大概可以猜想本案例中构建并发索引的过程可能是:
- 读取文件内容;
- 根据文件内容构建索引;
- 多个索引进行合并;
- 将索引写入文件;
- 多个索引文件进行合并。
按照这个思路的指引,我们打开源码,从 main.rs 的 main() 出发:
fn main() {
    let mut single_threaded = false;
    let mut filenames = vec![];

  	// 命令行参数解析
    {
        let mut ap = ArgumentParser::new();
        ap.set_description("Make an inverted index for searching documents.");
        ap.refer(&mut single_threaded).add_option(
            &["-1", "--single-threaded"],
            StoreTrue,
            "Do all the work on a single thread.",
        );
        ap.refer(&mut filenames).add_argument(
            "filenames",
            Collect,
            "Names of files/directories to index. \
                           For directories, all .txt files immediately \
                           under the directory are indexed.",
        );
        ap.parse_args_or_exit();
    }

  	// 构建索引
    match run(filenames, single_threaded) {
        Ok(()) => {}
        Err(err) => println!("error: {}", err),
    }
}

- 1
- 2
- 3
- 4
- 5
- 6
- 7
- 8
- 9
- 10
- 11
- 12
- 13
- 14
- 15
- 16
- 17
- 18
- 19
- 20
- 21
- 22
- 23
- 24
- 25
- 26
- 27
- 28
- 29
- 解析命令行参数,这里使用
argparse这个比较古老的 crate 来解析,现在一般是使用clap。single_threaded:是否使用单线程,默认是多线程。filenames: 指定的文本文件或目录。
run函数执行构建索引。
看一下 run:
/// Generate an index for a bunch of text files.
fn run(filenames: Vec<String>, single_threaded: bool) -> io::Result<()> {
    let output_dir = PathBuf::from(".");
    let documents = expand_filename_arguments(filenames)?;

    if single_threaded {
        run_single_threaded(documents, output_dir)
    } else {
        run_pipeline(documents, output_dir)
    }
}
- 1
- 2
- 3
- 4
- 5
- 6
- 7
- 8
- 9
- 10
- 11
- 单线程:run_single_threaded
- 多线程:run_pipeline
先从简单看,单线程,忽略掉源码中定义的特殊数据结构,可以发现跟我们上篇介绍的简单版倒排索引思路基本是一致的,只不过本案例中数据是从文件中读,最后又会将索引写入到文件中。
fn run_single_threaded(documents: Vec<PathBuf>, output_dir: PathBuf) -> io::Result<()> {

    let mut accumulated_index = InMemoryIndex::new();
    let mut merge = FileMerge::new(&output_dir);
    let mut tmp_dir = TmpDir::new(&output_dir);

    // 迭代每个文本文件
    for (doc_id, filename) in documents.into_iter().enumerate() {
      	// 打开文件,并将内容读取到 `text` 上
        let mut f = File::open(filename)?;
        let mut text = String::new();
        f.read_to_string(&mut text)?;

        // 构建索引
        let index = InMemoryIndex::from_single_document(doc_id, text);
        accumulated_index.merge(index);
        if accumulated_index.is_large() {
            // 当索引足够大的时候,将其写到文件中
            let file = write_index_to_tmp_file(accumulated_index, &mut tmp_dir)?;
            merge.add_file(file)?;
            accumulated_index = InMemoryIndex::new();
        }
    }

    // 将最后一个索引写入到文件中
    if !accumulated_index.is_empty() {
        let file = write_index_to_tmp_file(accumulated_index, &mut tmp_dir)?;
        merge.add_file(file)?;
    }
    merge.finish()
}
- 1
- 2
- 3
- 4
- 5
- 6
- 7
- 8
- 9
- 10
- 11
- 12
- 13
- 14
- 15
- 16
- 17
- 18
- 19
- 20
- 21
- 22
- 23
- 24
- 25
- 26
- 27
- 28
- 29
- 30
- 31
再来看本文的重头戏,多线程:
fn run_pipeline(documents: Vec<PathBuf>, output_dir: PathBuf) -> io::Result<()> {
    // 将构建索引分为 5 个过程
    let (texts, h1) = start_file_reader_thread(documents);
    let (pints, h2) = start_file_indexing_thread(texts);
    let (gallons, h3) = start_in_memory_merge_thread(pints);
    let (files, h4) = start_index_writer_thread(gallons, &output_dir);
    let result = merge_index_files(files, &output_dir);

    // 等待所有线程执行完毕
    let r1 = h1.join().unwrap();
    h2.join().unwrap();
    h3.join().unwrap();
    let r4 = h4.join().unwrap();

    r1?;
    r4?;
    result
}
- 1
- 2
- 3
- 4
- 5
- 6
- 7
- 8
- 9
- 10
- 11
- 12
- 13
- 14
- 15
- 16
- 17
- 18
首先将索引构建分成 5 个阶段:
1. start_file_reader_thread
就是从文件中读取文本信息,并将其扔进 Receiver<String> channel 中,传到下一个阶段。
fn start_file_reader_thread(
    documents: Vec<PathBuf>,
) -> (Receiver<String>, JoinHandle<io::Result<()>>) {
    let (sender, receiver) = channel();
    let handle = spawn(move || {
        for filename in documents {
            let mut f = File::open(filename)?;
            let mut text = String::new();
          	// 读取文件内容
            f.read_to_string(&mut text)?;
            if sender.send(text).is_err() {
                break;
            }
        }
        Ok(())
    });
    (receiver, handle)
}
- 1
- 2
- 3
- 4
- 5
- 6
- 7
- 8
- 9
- 10
- 11
- 12
- 13
- 14
- 15
- 16
- 17
- 18
2. start_file_indexing_thread
从第 1 步传过来的文本信息中调用 InMemoryIndex::from_single_document 构建索引。
fn start_file_indexing_thread(
    texts: Receiver<String>,
) -> (Receiver<InMemoryIndex>, JoinHandle<()>) {
    let (sender, receiver) = channel();
    let handle = spawn(move || {
        for (doc_id, text) in texts.into_iter().enumerate() {
          	// 构建索引
            let index = InMemoryIndex::from_single_document(doc_id, text);
            if sender.send(index).is_err() {
                break;
            }
        }
    });
    (receiver, handle)
}
- 1
- 2
- 3
- 4
- 5
- 6
- 7
- 8
- 9
- 10
- 11
- 12
- 13
- 14
- 15
3. start_in_memory_merge_thread
将第 2 步构建的单一索引进行合并,并将合并后的索引传到下一个阶段。
fn start_in_memory_merge_thread(
    file_indexes: Receiver<InMemoryIndex>,
) -> (Receiver<InMemoryIndex>, JoinHandle<()>) {
    let (sender, receiver) = channel();
    let handle = spawn(move || {
        let mut accumulated_index = InMemoryIndex::new();
        for fi in file_indexes {
          	// 将索引进行合并
            accumulated_index.merge(fi);
            if accumulated_index.is_large() {
              	// 如果索引大小到达阈值,则传到下一阶段
                if sender.send(accumulated_index).is_err() {
                    return;
                }
                accumulated_index = InMemoryIndex::new();
            }
        }
        if !accumulated_index.is_empty() {
            let _ = sender.send(accumulated_index);
        }
    });
    (receiver, handle)
}
- 1
- 2
- 3
- 4
- 5
- 6
- 7
- 8
- 9
- 10
- 11
- 12
- 13
- 14
- 15
- 16
- 17
- 18
- 19
- 20
- 21
- 22
- 23
4. start_index_writer_thread
将第 3 步传来的内存索引写入到临时文件中。
fn start_index_writer_thread(
    big_indexes: Receiver<InMemoryIndex>,
    output_dir: &Path,
) -> (Receiver<PathBuf>, JoinHandle<io::Result<()>>) {
    let (sender, receiver) = channel();
    let mut tmp_dir = TmpDir::new(output_dir);
    let handle = spawn(move || {
        for index in big_indexes {
          	// 将索引写入临时文件中
            let file = write_index_to_tmp_file(index, &mut tmp_dir)?;
            if sender.send(file).is_err() {
                break;
            }
        }
        Ok(())
    });
    (receiver, handle)
}
- 1
- 2
- 3
- 4
- 5
- 6
- 7
- 8
- 9
- 10
- 11
- 12
- 13
- 14
- 15
- 16
- 17
- 18
5. merge_index_files
将临时文件进行合并,生成最终的索引文件。
fn merge_index_files(files: Receiver<PathBuf>, output_dir: &Path) -> io::Result<()> {
    let mut merge = FileMerge::new(output_dir);
    for file in files {
        merge.add_file(file)?;
    }
    merge.finish()
}
- 1
- 2
- 3
- 4
- 5
- 6
- 7
这 5 个步骤跟书中给出的示意图基本一致,我们再来看 run_pipeline 是如何合并并行的:
  // 使用 join() 等待所有线程完成
  let r1 = h1.join().unwrap();
  h2.join().unwrap();
  h3.join().unwrap();
  let r4 = h4.join().unwrap();

  // 阶段 2 和阶段 3 都是纯内存操作,不会有错误
  // 阶段 1 是读文件,阶段 4 是写文件,所以有可能会报错
  r1?;
  r4?;
- 1
- 2
- 3
- 4
- 5
- 6
- 7
- 8
- 9
- 10
源码阅读部分差不多就到这了,大的思想架构你应该都能 Get 到了,其中每个数据结构的具体实现细节,我们在后面的实战中进行拆解。
构建索引
代码结构
书中源码代码结构如下所示:
➜  fingertips git:(master) ✗ tree
.
├── Cargo.lock
├── Cargo.toml
├── LICENSE-MIT
├── README.md
├── src
│   ├── index.rs
│   ├── main.rs
│   ├── merge.rs
│   ├── read.rs
│   ├── tmp.rs
│   └── write.rs
- 1
- 2
- 3
- 4
- 5
- 6
- 7
- 8
- 9
- 10
- 11
- 12
- 13
书中给出的源码并没有实现使用构建好的索引文件进行搜索的功能,笔者将在此基础上实现该功能,所以对代码结构进行了简单的调整:
➜  inverted_index git:(master) ✗ tree
.
├── Cargo.lock
├── Cargo.toml
├── index.bat
├── src
│   ├── bin
│   │   ├── create.rs
│   │   └── search.rs
│   ├── index.rs
│   ├── lib.rs
│   ├── merge.rs
│   ├── read.rs
│   ├── tmp.rs
│   └── write.rs
└── texts
    ├── text1.txt
    ├── text2.txt
    └── text3.txt
- 1
- 2
- 3
- 4
- 5
- 6
- 7
- 8
- 9
- 10
- 11
- 12
- 13
- 14
- 15
- 16
- 17
- 18
- 19
可以看到我将核心代码从 bin 改成了 lib ,这是为了支持我后面要实现的两个 bin:
create: 构建索引,基本上就是源代码中的main.rssearch: 基于生成的索引文件实现搜索功能
texts 是我提供的文本文件样例。
src 目录中的代码阅读顺序及功能划分如下:
index: 定义了内存索引数据结构 InMemoryIndex,实现了从文件内容中构建内存索引的基本逻辑,也实现了从索引文件重建内存索引的功能。tmp: 定义了临时目录数据结构 TmpDir,用于存放临时索引文件。write: 定义了索引文件写入器 IndexFileWriter,实现了将 InMemoryIndex 写入文件中的逻辑。merge: 定义了文件合并器 FileMerge,用于合并 TmpDir 的所有索引文件。read: 定义了索引文件读取器 IndexFileWrite,实现了解析索引文件的逻辑。
项目准备
cargo new --lib inverted_index_concurrency
- 1
Cargo.toml
[package]
name = "inverted-index-concurrency"
version = "0.1.0"
edition = "2021"
license = "mit"
authors = ["hedon"]
description = "a tool to concurrently build an inverted index."

[[bin]]
name="create"
path="src/bin/create.rs"

[[bin]]
name="search"
path="src/bin/search.rs"

[dependencies]
byteorder = "1.5.0"
clap = { version = "4.5.4", features = ["derive"] }
- 1
- 2
- 3
- 4
- 5
- 6
- 7
- 8
- 9
- 10
- 11
- 12
- 13
- 14
- 15
- 16
- 17
- 18
- 19
lib.rs
pub mod index;
pub mod merge;
pub mod read;
pub mod tmp;
pub mod write;
- 1
- 2
- 3
- 4
- 5
在 lib.rs 中我们将这 5 个 mod 公开出去,这样就可以给 bin 目录中的 crate.rs 和 search.rs 使用了。
index.rs
完整源码:index.rs
第一部分是内存索引的构建。
tokenize
我们先定义一个分词函数:
fn tokenize(text: &str) -> Vec<(&str, usize, usize)> {
    let mut res = Vec::new();
    let mut token_start = None;
    for (idx, ch) in text.char_indices() {
        match (ch.is_alphanumeric(), token_start) {
            (true, None) => token_start = Some(idx),  // 每个单词的开始
            (false, Some(start)) => {  // 每个单词的结尾
                res.push((&text[start..idx], start, idx - 1));
                token_start = None
            }
            _ => {}
        }
    }
    if let Some(start) = token_start {
        res.push((&text[start..], start, text.len() - 1))
    }
    res
}
- 1
- 2
- 3
- 4
- 5
- 6
- 7
- 8
- 9
- 10
- 11
- 12
- 13
- 14
- 15
- 16
- 17
- 18
这个分词函数跟书中源码提供的不一样,为了实现文本高亮,我们需要记录每个分词在原文本中的起始位置和结束位置。它的核心逻辑如下:
-
通过
char_indices()获取text的字符迭代器,这是一种懒加载的方法,避免一次性将所有 char 加载到内存中。 -
匹配
(ch.is_alphanumeric(), token_start):- 如果是
(true, None)则表示这是一个单词的开始,我们纪录其开始的位置Some(idx); - 如果是
(false, Some(idx))则表示这是一个单词的结束,我们将其加入到res中,并记录起始位置和结束位置。 - 其他情况,不做处理,要么是非法字符,要么是处于单词中间。
从这个简单的理解中,你应该可以感受到 Rust 中 match pattern 的强大和便捷了,666
声明:本文内容由网友自发贡献,不代表【wpsshop博客】立场,版权归原作者所有,本站不承担相应法律责任。如您发现有侵权的内容,请联系我们。转载请注明出处:https://www.wpsshop.cn/w/煮酒与君饮/article/detail/744726 - 如果是
Copyright © 2003-2013 www.wpsshop.cn 版权所有,并保留所有权利。

