- 1linux 修改22默认端口和扩展其他端口_22端口和其他端口
- 2git@gitee.com: Permission denied (publickey)_git上传了公钥还是permission denied (publickey).
- 3CorelDRAW Graphics Suite2024简体中文版本发布更新介绍_coreldraw 2024 25.1.1.328
- 4【MySQL 基础知识】
- 5如何在 PyTorch 上进行性能分析_vtune和torch profiler
- 6区块链开发者观点:来自 Carbon 的 Nick Pai_hedera postgresql
- 7crt批量增加session模板与脚本_crt.session
- 8解决因jbd2导致mysql性能过低问题
- 9XML的三大解析方式解析_解析xml文件的三种方式
- 10什么是提示词注入攻击?大语言模型为Web安全带来的新风险!
(超全)python图像处理详细解析(3)
赞
踩
23.保存视频每一帧图像
import cv2
from skimage import io
import os

class AVILoader:
    def __init__(self, video_file):
        self.video_file = video_file
        self.cap = cv2.VideoCapture(self.video_file)

    def __call__(self, frame):
        self.cap.set(cv2.CAP_PROP_POS_FRAMES, frame)
        ret, frame = self.cap.read()
        if ret:
            return cv2.cvtColor(frame, cv2.COLOR_BGR2RGB)
        else:
            return None

video_file = 'sp.mp4'
av_loader = AVILoader(video_file)

frames = range(0, 100, 20)
output_folder = 'frames'
os.makedirs(output_folder, exist_ok=True)

# 保存每一帧为图像文件
for frame in frames:
    img = av_loader(frame)
    if img is not None:
        filename = os.path.join(output_folder, f'frame_{frame}.jpg')
        io.imsave(filename, img)
        io.imshow(img)  # 显示图像
        io.show()       # 显示图像窗口

# 创建图像集合
ic = io.ImageCollection(os.path.join(output_folder, '*.jpg'))
# 输出图像集合

- 1
- 2
- 3
- 4
- 5
- 6
- 7
- 8
- 9
- 10
- 11
- 12
- 13
- 14
- 15
- 16
- 17
- 18
- 19
- 20
- 21
- 22
- 23
- 24
- 25
- 26
- 27
- 28
- 29
- 30
- 31
- 32
- 33
- 34
- 35
- 36
24.把png图像转换成jpg并保存
from skimage import io, transform, color
import numpy as np

def convert_gray(f):
    rgb = io.imread(f)
    gray = color.rgb2gray(rgb)
    dst = transform.resize(gray, (256, 256))

    return dst

# 指定文件夹路径
#data_dir = 'D:\rgzn\wl'

# 读取文件夹中的所有png文件
image_dir = 'D:/rgzn/wl'
str=image_dir+'/*.png'
coll = io.ImageCollection(str, load_func=convert_gray)

# 保存处理后的图像
for i in range(len(coll)):
# 保存为jpg格式,注意文件路径和文件名的拼接
io.imsave("D:/rgzn/wl1" + np.str(i) + '.jpg', coll[i])
- 1
- 2
- 3
- 4
- 5
- 6
- 7
- 8
- 9
- 10
- 11
- 12
- 13
- 14
- 15
- 16
- 17
- 18
- 19
- 20
- 21
- 22
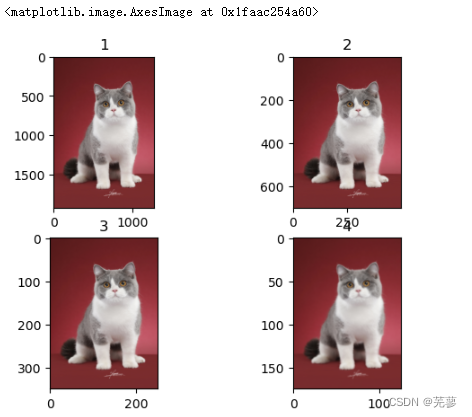
25.改变图像尺寸
改变图片尺寸resize(200,200)
函数格式为:
skimage.transform.resize(image, output_shape)
image: 需要改变尺寸的图片
output_shape: 新的图片尺寸
from skimage import transform,data,io
import matplotlib.pyplot as plt
img=io.imread('mao.jpg')
a=img.shape

plt.subplot(2,2,1)
plt.title('1')
plt.imshow(img)


plt.subplot(2,2,2)
plt.title('2')
dst=transform.resize(img,(700,500))
plt.imshow(dst)

plt.subplot(2,2,3)
plt.title('3')
dst=transform.resize(img,(350,250))
plt.imshow(dst)

plt.subplot(2,2,4)
plt.title('4')
dst=transform.resize(img,(175,125))
plt.imshow(dst)
- 1
- 2
- 3
- 4
- 5
- 6
- 7
- 8
- 9
- 10
- 11
- 12
- 13
- 14
- 15
- 16
- 17
- 18
- 19
- 20
- 21
- 22
- 23
- 24
26.改变图像比例
按比例缩放rescale
from skimage import transform,data,io
import matplotlib.pyplot as plt
img=io.imread('mao.jpg')

plt.subplot(1,2,1)
plt.title('1')
plt.imshow(img)

plt.subplot(1,2,2)
plt.title('2')
#将原始图像放缩到原来的0.1倍
dst=transform.rescale(img,0.1)
plt.imshow(dst)
- 1
- 2
- 3
- 4
- 5
- 6
- 7
- 8
- 9
- 10
- 11
- 12
- 13
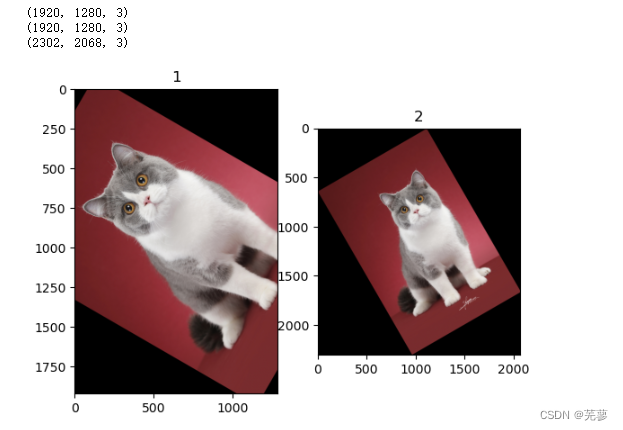
27.旋转图像
旋转 rotate
from skimage import transform,data,io
import matplotlib.pyplot as plt

# 读取图像
img = io.imread('mao.jpg')
print(img.shape)

# 旋转图像
img1 = transform.rotate(img, 60)
print(img1.shape)

img2 = transform.rotate(img, 30, resize=True)
print(img2.shape)

# 使用同一个窗口显示两个旋转后的图像
plt.figure('resize')

# 创建子图布局
plt.subplot(1, 2, 1)
plt.title('1')
plt.imshow(img1, plt.cm.gray)

plt.subplot(1, 2, 2)
plt.title('2')
plt.imshow(img2, plt.cm.gray)

# 显示窗口
plt.show()
- 1
- 2
- 3
- 4
- 5
- 6
- 7
- 8
- 9
- 10
- 11
- 12
- 13
- 14
- 15
- 16
- 17
- 18
- 19
- 20
- 21
- 22
- 23
- 24
- 25
- 26
- 27
- 28
- 29
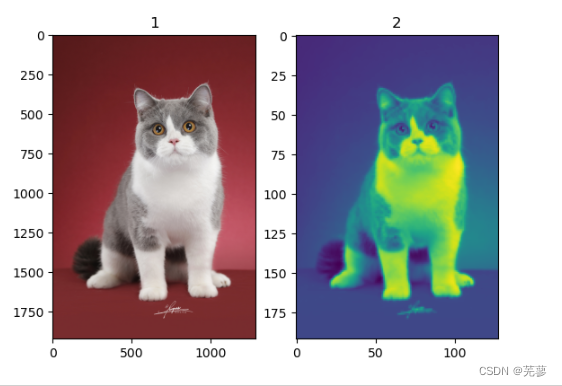
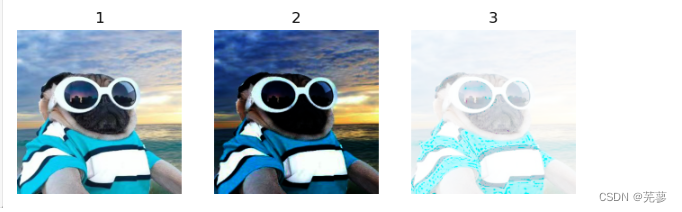
28.亮度调整
图像亮度与对比度的调整,是放在skimage包的exposure模块里面
对原图像的像素,进行幂运算,得到新的像素值。公式中的g就是gamma值。
如果gamma>1, 新图像比原图像暗
如果gamma<1,新图像比原图像亮
函数格式为:skimage.exposure.adjust_gamma(image, gamma=1)
gamma参数默认为1,原像不发生变化 。
import numpy as np
from skimage import transform,exposure,img_as_float
import matplotlib.pyplot as plt

img=io.imread('iii.jpg')
#gam1是原始图像调暗3倍,而gam2是原始图像调亮0.1倍。
gam1= exposure.adjust_gamma(img,3)  #调暗
gam2= exposure.adjust_gamma(img,0.1)  #调亮
plt.figure('adjust_gamma',figsize=(8,8))

plt.subplot(131)
plt.title('1')
plt.imshow(img,plt.cm.gray)
plt.axis('off')

plt.subplot(132)
plt.title('2')
plt.imshow(gam1,plt.cm.gray)
plt.axis('off')

plt.subplot(133)
plt.title('3')
plt.imshow(gam2,plt.cm.gray)
plt.axis('off')

plt.show()
- 1
- 2
- 3
- 4
- 5
- 6
- 7
- 8
- 9
- 10
- 11
- 12
- 13
- 14
- 15
- 16
- 17
- 18
- 19
- 20
- 21
- 22
- 23
- 24
- 25
- 26
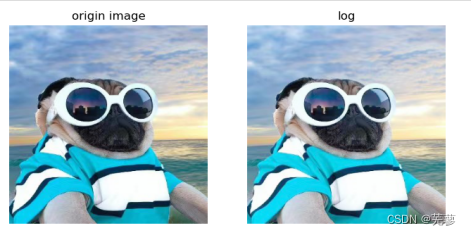
29.log对数调整
与gamma相反
import numpy as np
from skimage import transform,exposure,img_as_float,io
import matplotlib.pyplot as plt

img = io.imread('iii.jpg')
#使用exposure模块中的adjust_log函数对读取的图像进行对数变换
gam1 = exposure.adjust_log(img)
#创建一个名为'adjust_gamma'的图表,设置图表大小为(8,8)。
plt.figure('adjust_gamma',figsize=(8,8))

plt.subplot(121)
plt.title('origin image')
#图中显示变量img的图像,使用灰度色彩映射。
plt.imshow(img,plt.cm.gray)
plt.axis('off')

plt.subplot(122)
plt.title('log')
plt.imshow(gam1,plt.cm.gray)
plt.axis('off')

plt.show()
- 1
- 2
- 3
- 4
- 5
- 6
- 7
- 8
- 9
- 10
- 11
- 12
- 13
- 14
- 15
- 16
- 17
- 18
- 19
- 20
- 21
- 22
30.判断图像对比度
函数:is_low_contrast(img)
from skimage import exposure,img_as_float,io
img1 = io.imread('liii.png')
#判断图像是否为低对比度图像
result=exposure.is_low_contrast(img1)
print(result)
- 1
- 2
- 3
- 4
- 5
运行结果:
False
31.调整强度
(1)强度调节
import numpy as np
from skimage import exposure
#创建一个包含三个元素的一维数组,元素值分别为51, 102, 153,数据类型为无符号8位整数。
image = np.array([51, 102, 153], dtype=np.uint8)
#rescale_intensity函数对输入的图像强度进行重新缩放
mat=exposure.rescale_intensity(image)
print(mat)
- 1
- 2
- 3
- 4
- 5
- 6
- 7
运行结果:
[ 0 127 255]
(2)uint8转float
通过img_as_float()函数将unit8类型转换为float型,实际上还有更简单的方法,就是乘以1.0
import numpy as np
image = np.array([51, 102, 153], dtype=np.uint8)
print(image*1.0)
- 1
- 2
- 3
运行结果:
[ 51. 102. 153.]
float类型的范围是[0,1],因此对float进行rescale_intensity 调整后,范围变为[0,1],而不是[0,255]
import numpy as np
from skimage import exposure
image = np.array([51, 102, 153], dtype=np.uint8)
tmp=image*1.0
#rescale_intensity函数对输入的图像强度进行重新缩放
mat=exposure.rescale_intensity(tmp)
print(mat)
- 1
- 2
- 3
- 4
- 5
- 6
- 7
运行结果:
[0. 0.5 1. ]
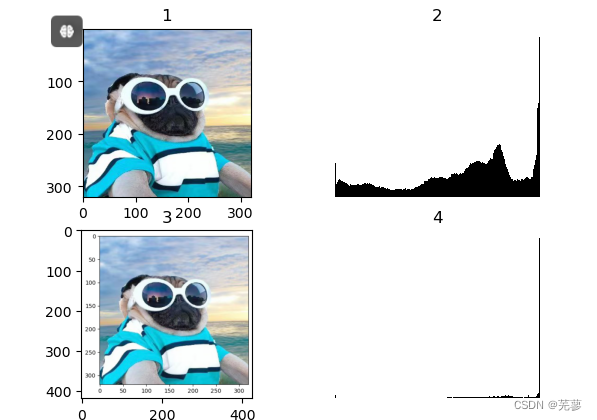
32.绘制直方图和均衡化
绘图都可以调用matplotlib.pyplot库来进行,其中的hist函数可以直接绘制直方图。
n, bins, patches = plt.hist(arr, bins=10, normed=0, facecolor='black', edgecolor='black',alpha=1,histtype='bar')
- 1
hist的参数非常多,但常用的就这六个,只有第一个是必须的,后面四个可选
arr: 需要计算直方图的一维数组
bins: 直方图的柱数,可选项,默认为10
normed: 是否将得到的直方图向量归一化。默认为0
facecolor: 直方图颜色
edgecolor: 直方图边框颜色
alpha: 透明度
histtype: 直方图类型,‘bar’, ‘barstacked’, ‘step’, ‘stepfilled’
from skimage import io
import matplotlib.pyplot as plt


img = io.imread('iii.jpg')
img1 = io.imread('liii.png')

plt.figure('hist')

plt.subplot(221)
plt.title('1')
plt.imshow(img)
plt.subplot(222)
plt.title('2')
#绘制图像直方图
n, bins, patches = plt.hist(img.ravel(), bins=256, density=True, edgecolor='None', facecolor='black')
plt.axis('off')

plt.subplot(223)
plt.title('3')
plt.imshow(img1)
plt.subplot(224)
plt.title('4')
#绘制图像直方图
n, bins, patches = plt.hist(img1.ravel(), bins=256, density=True, edgecolor='None', facecolor='black')
plt.axis('off')

plt.show()
- 1
- 2
- 3
- 4
- 5
- 6
- 7
- 8
- 9
- 10
- 11
- 12
- 13
- 14
- 15
- 16
- 17
- 18
- 19
- 20
- 21
- 22
- 23
- 24
- 25
- 26
- 27
- 28
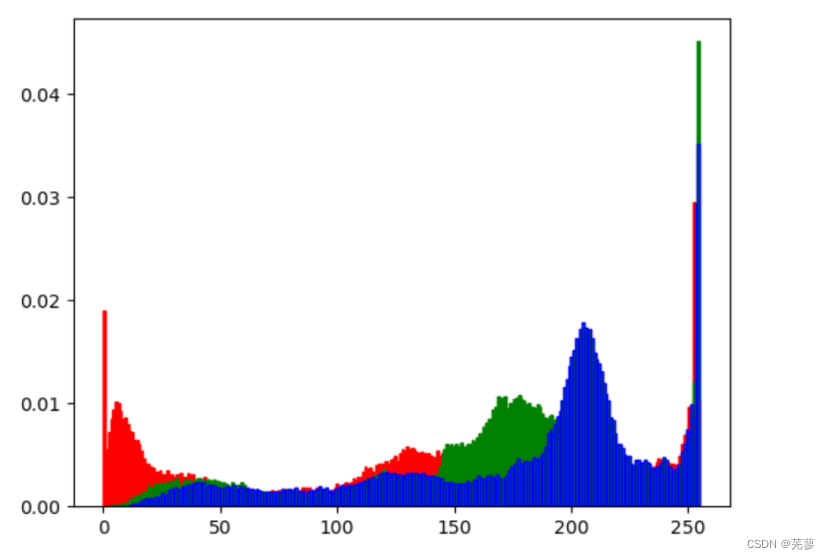
33.彩色图片三通道直方图
from skimage import io
import matplotlib.pyplot as plt

img=io.imread('iii.jpg')
ar=img[:,:,0].flatten()
plt.hist(ar,bins=256,density=True,facecolor='r',edgecolor='r')
ag=img[:,:,1].flatten()
plt.hist(ag,bins=256,density=True,facecolor='g',edgecolor='g')
ab=img[:,:,2].flatten()
plt.hist(ab,bins=256,density=True,facecolor='g',edgecolor='b')
plt.show()
- 1
- 2
- 3
- 4
- 5
- 6
- 7
- 8
- 9
- 10
- 11