
- 1c语言建立循环链表,C语言实现循环链表
- 2网络安全攻击数据的多维度可视化分析_网络安全可视化数据集
- 3springboot将数据库中数据以excel的形式传到前端_web中如何操作excel文件并返回给前端
- 4网络安全—部署CA证书服务器
- 5LangChain - 回调函数_langchain回调函数
- 6科技云报道:人工智能“顶流”齐聚WAIC 2024,他们都做了什么?_上海世界ai大会 隐私计算 助力大模型与数据可信融合
- 7圆桌对话 - AI时代,品牌如何打造超级生产力
- 810个优秀的Spring Boot开源项目整理分享_10个vue springboot开源项目
- 9HMM的学习_hmm训练学习算法
- 10【CS.SE】从源码到实践:探索日常对话的生成性语音模型ChatTTS_chattts 代码分析 源码
python-tkinter_w.config(width=20, bg='black', fg='white') #设置宽度、背
赞
踩
浅谈tkinter知识点
geometry(‘wxh±x±y’)
w为宽度,h为高度,+x表示距离屏幕左边的距离,-x表示距离屏幕右边的距离;+y表示距离屏幕上边的距离,-y表示距离屏幕下边的距离
Frame框架
是一个tkinter组件,表示一个矩形的区域。Frame一般作为容器使用,可以放置其他组件,从而实现复杂的布局。通常用于对组件进行分组
Label标签
Label 可以用来显示文本,也可以用来显示图片

import tkinter as tk

root = tk.Tk()  # 创建窗体对象
root.title("tkinter")  # 窗体的标题
root.geometry("400x150+200+100")  # 设置窗口大小和位置

lbl = tk.Label(root, text="欢迎来到.DoubleBean.的博客")  # 标签
lbl.pack()  # 打包,打包的组件可以显示在窗口中,否则不会显示

root.mainloop()  # 调用组件的mainloop()方法,开始事件循环
- 1
- 2
- 3
- 4
- 5
- 6
- 7
- 8
- 9
- 10
- 11
可以通过 foreground (或 fg) 和 background (或 bg) 选项来设置 Label 的前景色和背景色
lbl = tk.Label(root, text="欢迎来到.DoubleBean.的博客", fg='white', bg='pink') # 标签
- 1

通过font来设定字体属性(字体的样式,字体大小等等)
lbl = tk.Label(root, text="欢迎来到.DoubleBean.的博客", font=('华文楷体', 18), fg='white', bg='pink') # 标签
- 1

Label可以用来显示图片

import tkinter as tk

root = tk.Tk()  # 创建窗体对象

Photo = tk.PhotoImage(file="longmao.gif")  # 支持gif格式,但jpg格式的图片就无法识别

lbl = tk.Label(root, image=Photo)
lbl.pack()  # 打包

root.mainloop()  # 调用组件的mainloop()方法,开始事件循环
- 1
- 2
- 3
- 4
- 5
- 6
- 7
- 8
- 9
- 10
pack()布局
通过help来看下pack()方法支持的选项

expand: 默认为不展开,YES则表示可拉伸
fill: 在expand参数设置为YES时才有效,取值有: NONE: 无、X: 水平拉伸、Y: 垂直拉伸、 BOTH: 水平垂直都拉伸
ipadx: 指定该组件在x方向上的内部留白
ipady: 指定该组件在y方向上的内部留白
padx: 指定该组件在x方向与其他组件的间距
pady: 指定该组件在y方向与其他组件的间距
side: 设置该组件的添加位置,可设置为TOP, BOTTOM, LEFT 或 RIGHT 这四个选项中的其中一个
anchor: 对齐方式,在窗体中八个方位设置组件,默认为 center


import tkinter as tk

root = tk.Tk()  # 创建窗体对象
root.geometry("350x200+200+100")  # 设置窗体大小和位置

lbl = tk.Label(root, text='Welcome to My World!', font=('华文楷体', 16), fg='white', bg='pink')
lbl.pack(side='left', padx=15)  # x方向与其他组件的间距为15

root.mainloop()  # 调用组件的mainloop()方法,开始事件循环
- 1
- 2
- 3
- 4
- 5
- 6
- 7
- 8
- 9
grid()布局
rowspan: 行合并数量,即组件占用的行数
columnspan: 列合并数量,即组件占用的列数
ipadx或ipady: 组件内部左右或上下边框预留空白宽度
padx或pady: 组件外部左右或上下边框预留空白宽度
grid布局类似于excel表格,在网格中将组件依照行和列信息来布局

现在要将(0,1)和(0,2)合并成一个单元格
在excel中的操作: 选中这两个单元格 -> 右键 -> 设置单元格式 -> 对齐 -> 合并单元格(M)
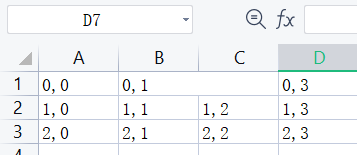
这时候(1,1)和(1,2)所占的列总和就是(0,1)所占的列数
在 grid() 中则是由 rowspan 来实现行合并,同理,columnspan 则是对列进行合并
eg: 将两张图片一张放在(0, 0),另一张放在(1, 1)

import tkinter as tk
root = tk.Tk()
root.title("Image")
root.maxsize(1200, 1200)  # 设置窗口可以显示的最大尺寸
photo1 = tk.PhotoImage(file="yinhua1.gif")
photo2 = tk.PhotoImage(file='yinhua2.gif')
image_label1 = tk.Label(root, image=photo1)
image_label2 = tk.Label(root, image=photo2)

# grid布局时按照行列来进行布局
image_label1.grid(row=0, column=0)
image_label2.grid(row=1, column=1)

root.mainloop()
- 1
- 2
- 3
- 4
- 5
- 6
- 7
- 8
- 9
- 10
- 11
- 12
- 13
- 14
注意: pack()、grid()、place() 不同种布局管理器作用在同一个父容器中会冲突(混用失败),即在对一个父容器是root的控件使用gird之后,又对一个父容器为root的控件使用pack会报以下的错误
_tkinter.TclError: cannot use geometry manager pack inside . which already has slaves managed by grid
- 1
Button按钮

import tkinter as tk

root = tk.Tk()
root.geometry("300x200+200+100")

# 点击事件
def hit_button():
    print("You hit me!")


btn = tk.Button(root, text='Button', command=hit_button)  # 点击按钮后将调用 hit_button函数
btn.pack(pady=20)

root.mainloop()
- 1
- 2
- 3
- 4
- 5
- 6
- 7
- 8
- 9
- 10
- 11
- 12
- 13
- 14
禁用按钮
btn = tk.Button(root, text='Button', command=hit_button, state='disabled')
- 1
我们使用Button传递数值时,需要用:
lambda: 功能函数(var1, var2, ……)

import tkinter as tk

root = tk.Tk()
root.geometry("300x200+200+100")

# 点击事件
def hit_button(a, b):
    print("{} + {} = {}".format(a, b, a+b))


btn = tk.Button(root, text='Button', command=lambda: hit_button(12, 13))

btn.pack(pady=20)

root.mainloop()
- 1
- 2
- 3
- 4
- 5
- 6
- 7
- 8
- 9
- 10
- 11
- 12
- 13
- 14
- 15
让窗口进行震动: 其实就是窗口位置来回移动
import tkinter as tk

root = tk.Tk()
root.geometry("300x200+200+100")  # 设置窗口的大小和位置
root.resizable(width=False, height=False)  # 禁止改变窗口大小

# 震动事件
def Shake():
    flag = 10  # 用来记录震动的方向以及移动的距离,初始时设置为正数,表示向右移动
    for i in range(200):
        # 震动其实就是让窗口的位置发生变化
        # root.winfo_x() 获取窗口距离屏幕左边的距离
        # root.winfo_y() 获取窗口距离屏幕上边的距离
        root.geometry("+{}".format(str(root.winfo_x()+flag)) + "+{}".format(str(root.winfo_y())))
        root.update()  # 刷新窗口状态
        flag = -flag  # 取相反数


btn = tk.Button(root, text='让窗口震动', command=Shake)
btn.pack()

root.mainloop()

- 1
- 2
- 3
- 4
- 5
- 6
- 7
- 8
- 9
- 10
- 11
- 12
- 13
- 14
- 15
- 16
- 17
- 18
- 19
- 20
- 21
- 22
实现多张图片浏览

import tkinter as tk

root = tk.Tk()
root.geometry("+450+150")

Photo = [
    tk.PhotoImage(file="beautiful1.gif"),
    tk.PhotoImage(file="beautiful2.gif"),
    tk.PhotoImage(file="beautiful3.gif"),
    tk.PhotoImage(file="beautiful4.gif"),
]

current = 0

"""
图像翻页
参数:
    direction: 方向
"""
def shift_image(direction: str):
    global current
    if direction == "prev":
        current -= 1
    if direction == "next":
        current += 1
    display_image(current)


"""
显示指定索引的图片
参数:
    index: 索引
"""
def display_image(index: int):
    global lbl_img
    print(index)
    lbl_img['image'] = Photo[index]  # 将图片进行更新

    # 当图片到达第一页时就不能再向前翻,即禁用向前的按钮
    # 当图片到达最后一页时就不能再向后翻,即禁用向后的按钮
    btn_prev['state'] = tk.DISABLED if index <= 0 else tk.NORMAL
    btn_next['state'] = tk.DISABLED if index >= len(Photo)-1 else tk.NORMAL


lbl_img = tk.Label(root, image=Photo[current])
lbl_img.grid(row=0, column=0, columnspan=3, padx=20, pady=20)

btn_prev = tk.Button(root, text="《《《", pady=10, bg='#FFE4E1', command=lambda: shift_image("prev"))
btn_exit = tk.Button(root, text="结束程序", pady=10, bg='#FFE4E1', command=root.quit)
btn_next = tk.Button(root, text="》》》", pady=10, bg='#FFE4E1', command=lambda: shift_image("next"))

btn_prev.grid(row=1, column=0, sticky=tk.W+tk.E)
btn_exit.grid(row=1, column=1, sticky=tk.W+tk.E)
btn_next.grid(row=1, column=2, sticky=tk.W+tk.E)

display_image(current)  # 显示图片

root.mainloop()
- 1
- 2
- 3
- 4
- 5
- 6
- 7
- 8
- 9
- 10
- 11
- 12
- 13
- 14
- 15
- 16
- 17
- 18
- 19
- 20
- 21
- 22
- 23
- 24
- 25
- 26
- 27
- 28
- 29
- 30
- 31
- 32
- 33
- 34
- 35
- 36
- 37
- 38
- 39
- 40
- 41
- 42
- 43
- 44
- 45
- 46
- 47
- 48
- 49
- 50
- 51
- 52
- 53
- 54
- 55
- 56
- 57
- 58
bind绑定控件
控件.bind(事件名称,函数名称)
常用的鼠标和键盘事件名称如下:
<Button-n>: 单击鼠标键,n为1表示左键,2表示中间键,3表示右键
<B1-Motion>: 按住鼠标左键拖拽
<Double-Button-1>: 双击左键
<Enter>: 鼠标指针进入控件区域
<Leave>: 鼠标指针离开控件区域
<MouseWheel>: 滚动滚轮
<KeyPress-A>: 按下[A]键,"A"可用其他键替代
<Alt-KeyPress-A>: 按下[Alt+A]组合键,"alt"可用"Ctrl"和"Shift"等替代
事件对象常用的属性:
char: 按键字符,仅对键盘事件有效
keycode: 按键名,仅对键盘事件有效
keysym: 按键编码,仅对键盘事件有效
num: 鼠标按键,仅对鼠标事件有效
type: 所触发的事件类型
widget: 引起事件的组件
x、y: 鼠标当前位置,相对于窗口
x_root、y_root: 鼠标当前位置,相对于整个屏幕
这里只展示了部分内容,想要了解更多,最实用的方法便是在代码里, 按住ctrl,然后鼠标左键点击bind,会自动跳转到相应函数,里面有详细的介绍
eg: 通过点击,获取鼠标当前位置
import tkinter as tk

root = tk.Tk()

# 点击事件
def Click(event):
    print("点击位置: ", event.x, event.y)

frame = tk.Frame(root, width=200, height=200)
frame.bind("<Button-1>", Click)
frame.pack()

root.mainloop()
- 1
- 2
- 3
- 4
- 5
- 6
- 7
- 8
- 9
- 10
- 11
- 12
- 13
messagebox – 对话框
tkinter的 messagebox、filedialog 和 colorchooser 子模块提供了各种通用对话框
- 消息对话框
showinfo(title, message, options): 显示普通信息对话框
showarning(title, message, options): 显示警告信息对话框
showerror(title, message, options): 显示错误信息对话框
askquestion(title, message, options): 显示问题对话框
askokcancel(title, message, options): 显示确认取消对话框
askyesno(title, message, options): 显示是否对话框
askyesnocancel(title, message, options): 显示是否取消对话框
askretrycancel(title, message, options): 显示重试对话框
使用非常简单
from tkinter import messagebox  # 导入对话框模块
messagebox.showinfo("通用消息对话框", "这是普通信息对话框")  # 参数: 标题、内容
- 1
- 2
只用更改 showinfo 为上面任意一条命令即可
我们需要注意的细节其实在于当使用 askxxxx 询问命令时,选择 ”是“, “确定”, ”否“, “重试”, “取消”, … 返回的结果是什么
比如: 一般的,“是”返回的是"True",“否"返回的是"False”,“重试"返回的是"True”…
但当我们使用 askquestion 时,“是"返回的是"yes”,“否"返回的是"no”
所以我们最好 print() 下看看点击后返回的是什么,以便接下来写 if-else判断
这里自己写了个互动形式的代码,没必要读懂,我们其实主要关注就只有 messagebox 返回什么,“True”、“False” 还是 “yes”、“no”
import tkinter as tk
from tkinter import messagebox  # 导入对话框模块

root = tk.Tk()
root.title("My GUI")
root.geometry("400x300+200+100")

# 信息形式的对话框
def btn1_Click():
    messagebox.showinfo("通用消息对话框", "这是普通信息对话框")  # 参数: 标题、内容
    messagebox.showwarning("通用消息对话框", "这时警告信息对话框")
    messagebox.showerror("通用消息对话框", "这时错误信息对话框")
    pass


# 互动形式的对话框
def btn2_Click():
    flag = False
    res1 = messagebox.askquestion("通用消息对话框", "你要玩游戏吗?")
    print("res1=", res1)  # askquestion 返回点击的结果  是: yes  否: no
    if(res1=='yes'):
        while flag == False:
            res2 = messagebox.askyesnocancel("通用消息对话框", "这个问题正确吗?")
            print("res2=", res2)  # askyesnocancel 返回点击的结果  是: True  否: False  取消: None
            res3 = messagebox.askokcancel("通用信息对话框", "你确定选择这个答案吗")
            print("res3=", res3)  # askokcancel 返回点击的结果  确定: True  取消: False
            if (res3 == True):  # 表明确定选择这个答案
                flag = True
                if(res2 == True):
                    messagebox.showinfo("反馈", "你猜对了,这个问题确实正确!")
                elif(res2 == False):
                    messagebox.showwarning("警告", "你猜错了,这个问题应该是正确的!")
                elif(res2 == None):
                    messagebox.showerror("错误", "您必须选择一项!")

                res4 = messagebox.askretrycancel("通用信息对话框", "还要再猜一次吗")
                print("res4=", res4)  # askretrycancel 返回点击的结果  重试: True  取消: False
                if(res4 == True):
                    flag = False  # 点击 重试 将重新玩一次,即把flag重新设为False,游戏将再次陷入循环,否则flag为True,将退出循环,表示游戏结束


btn1 = tk.Button(root, text='信息形式', command=btn1_Click)
btn1.pack(pady=10)

btn2 = tk.Button(root, text='互动形式', command=btn2_Click)
btn2.pack()

root.mainloop()
- 1
- 2
- 3
- 4
- 5
- 6
- 7
- 8
- 9
- 10
- 11
- 12
- 13
- 14
- 15
- 16
- 17
- 18
- 19
- 20
- 21
- 22
- 23
- 24
- 25
- 26
- 27
- 28
- 29
- 30
- 31
- 32
- 33
- 34
- 35
- 36
- 37
- 38
- 39
- 40
- 41
- 42
- 43
- 44
- 45
- 46
- 47
- 48
值得一提的是: 对话框是一种模态
模态: 当前弹出的对话框与用户进行互动中,只能点击当前对话框,而不能点击这个软件中其他窗体
- 1
简单来说,就是弹出对话框,你必须做出选择,在没做出选择时,你是无法点击其他窗口的,但如果你是使用tk.Tk()创建一个新的窗口,你既可以点击旧的窗口,也可以点击新的窗口


Listbox – 列表框组件
insert(index, *elements): 在index位置插入一个或多个列表项
curselection(): 以元组的形式返回当前选中项的索引,无选中项时返回空元组
get(first, last=None): 返回包含[first, last]范围内的列表项的文本元组,省略last参数时只返回first对应的项的文本
delete(first, last=None): 除[first, last]范围内的列表项,省略last参数时只删除first对应的项
size(): 返回列表项个数
eg: 将 [‘韩信’, ‘刘邦’, ‘项羽’] 添加到Listbox组件中

import tkinter as tk
root = tk.Tk()
root.title("Listbox组件使用")

lbox = tk.Listbox(root)  # 创建Listbox对象
names = ['韩信', '刘邦', '项羽']
# 将names中的三个姓名依次添加到Listbox组件对象中
for name in names:
    lbox.insert(0, name)

lbox.pack()  # 使用包坐标管理器放置Listbox组件对象
root.mainloop()
- 1
- 2
- 3
- 4
- 5
- 6
- 7
- 8
- 9
- 10
- 11
- 12
Scrollbar – 滚动条组件
Scrollbar 一般和其他控件联合使用,当被显示的控件的内容大于可显示区域时,使用Scrollbar可显示更多的内容。一般垂直滚动条(vertical scrollbar)和Listbox, Text and Canvas联合使用;水平滚动条(horizontal scrollbar)也可作用于Entry
orient: 滚动条方向属性,通常有两个值 “vertical(默认值)” 和 “horizontal” 。即垂直滚动条和水平滚动条
command: 设置滚动条滚动时调用的函数,通常在函数中实现其他组件内容的滚动,将原来不可见的内容移动到可视范围内。通常用于指定可滚动控件 (scrollable widget) 的 xview 或 yview 函数
xscrollcommand 属性: 如果想让用户水平滚动列表框,你可以链接你的 listbox widget 到一个水平滚动条
yscrollcommand属性: 如果想让用户垂直滚动列表框,你可以链接你的 listbox widget 到垂直滚动条。
eg: 实现如图所示的滚动列表框
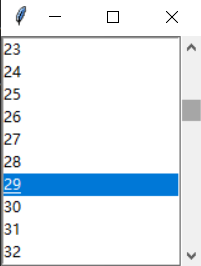
import tkinter as tk

root = tk.Tk()

sb = tk.Scrollbar(root)
sb.pack(side='right', fill='y')

lbox = tk.Listbox(root, yscrollcommand=sb.set)

for i in range(100):
    lbox.insert(tk.END, i)

lbox.pack(side='left', fill='both')
sb.config(command=lbox.yview)

root.mainloop()
- 1
- 2
- 3
- 4
- 5
- 6
- 7
- 8
- 9
- 10
- 11
- 12
- 13
- 14
- 15
- 16
Radiobutton – 单选按钮组件
tkinter.Radiobutton类用于创建单选按钮
多个单选按钮组成一组选项,一次只能从中选中一项,选中一项时,其他项则被取消。
command: 设置在改变单选按钮状态时执行的函数
indicatoron: 默认值为1,单选按钮为默认样式。设置为0时,单选按钮外观为按钮样式,选中时凹陷下去
value: 设置为等于关联控制变量的值时,该选项被选中。关联控制变量为IntVar类型时,同组中单选按钮的value属性都应设置为整数;关联控制变量为StringVar类型时,同组中单选按钮的value属性都应设置为字符串
variable: 设置关联的控制变量,控制变量可以是IntVar或StringVar类型。多个单选按钮关联到一个控制变量时,这些单选按钮属于一个功能组,一次只能从中选中一项。这与VB、VC、Java等使用框架来实现单选按钮分组不同。可以使用框架为一个单选按钮组显示一个外观边界
eg: 实现单选按钮内容,鼠标点击选项,会在下方的 “显示选中项” 那一行,显示选中项信息

import tkinter as tk

# 点击事件函数
def showSelect():
    curlabel.set(Select_label.get())
    pass


root = tk.Tk()
root.title("My GUI")
root.geometry("300x200+200+100")

# Radiobutton单选框: 多个选项中,同一时间只能选中一项
Select_label = tk.StringVar()  # 关联控制变量为StringVar类型
r1 = tk.Radiobutton(root, text='一场红尘恋', variable=Select_label, value='一场红尘恋', command=showSelect)
r1.pack(anchor='w', padx=10)

r2 = tk.Radiobutton(root, text='浮生三月初', variable=Select_label, value='浮生三月初', command=showSelect)
r2.pack(anchor='w', padx=10)

r3 = tk.Radiobutton(root, text='北柠陌寒', variable=Select_label, value='北柠陌寒', command=showSelect)
r3.pack(anchor='w', padx=10)

r4 = tk.Radiobutton(root, text='倾城如梦未必阑珊', variable=Select_label, value='倾城如梦未必阑珊', command=showSelect)
r4.pack(anchor='w', padx=10)

r5 = tk.Radiobutton(root, text='南城不落梅花', variable=Select_label, value='南城不落梅花', command=showSelect)
r5.pack(anchor='w', padx=10)
# 注: value属性不可缺少       variable绑定的都是同一个变量Select_label       绑定的都是同一个事件showSelect()

lbl = tk.Label(root, text='显示选中项: ')
lbl.pack(anchor='n', side='left', padx=10)

# 显示选中的信息
curlabel=tk.StringVar()
lb2 = tk.Label(root, textvariable=curlabel)  # 绑定curlabel控制变量
lb2.pack(anchor='n', side='left', padx=10)

root.mainloop()
- 1
- 2
- 3
- 4
- 5
- 6
- 7
- 8
- 9
- 10
- 11
- 12
- 13
- 14
- 15
- 16
- 17
- 18
- 19
- 20
- 21
- 22
- 23
- 24
- 25
- 26
- 27
- 28
- 29
- 30
- 31
- 32
- 33
- 34
- 35
- 36
- 37
- 38
- 39
运行时会发现刚开始没有点击时,所有选项都是显示 已选中 状态。只有点击后,才变成单个选项被选中的状态

解决办法就是,Select_label初始时就设置为一个选项,比如:
Select_label.set('浮生三月初')
- 1
那么在开始还没选择时,只有 ‘浮生三月初’ 这一选项是被选中
如果想让刚开始还没选择时,全部选项都是 未选择 状态,只需要 Select_label.set() 初始时设置为选项中没有的信息即可,比如
Select_label.set('1') # 选项中没有'1'这一选项,所以初始时全部选项都显示 未选择 的状态
- 1
Checkbutton – 复选框/多选框组件
大部分命令跟Radiobutton相同,区别是多了两个:
onvalue: 设置选中时候的值
offvalue: 设置未选中时候的值,习惯上选中值设为1,未选中值设为0
eg: 多选框,将选中项的信息呈现在 “显示选中项” 那一行

import tkinter as tk

root = tk.Tk()
root.title("My GUI")
root.geometry("400x200+200+100")

# 点击事件函数
def show_select():
    str = ""
    if (cur_choice_1.get() == 1):      # 如果愿望一该选项已被选中
        str += ck1.cget("text") + " "  # 获取ck1中text的信息,并添加到str字符串中

    if (cur_choice_2.get() == 1):      # 如果愿望二该选项已被选中
        str += ck2.cget("text") + " "  # 获取ck2中text的信息,并添加到str字符串中

    if (cur_choice_3.get() == 1):      # 如果愿望三该选项已被选中
        str += ck3.cget("text") + " "  # 获取ck3中text的信息,并添加到str字符串中

    cur_label.set(str)
    pass


# 愿望一
cur_choice_1 = tk.IntVar()  # 该变量是用来判断是否选中,选中为1,未选中为0
ck1 = tk.Checkbutton(root, text='愿望一: 环游世界', variable=cur_choice_1, onvalue=1, offvalue=0, command=show_select)
ck1.pack(anchor='w')

# 愿望二
cur_choice_2 = tk.IntVar()
ck2 = tk.Checkbutton(root, text='愿望二: 时光倒流', variable=cur_choice_2, onvalue=1, offvalue=0, command=show_select)
ck2.pack(anchor='w')

# 愿望三
cur_choice_3 = tk.IntVar()
ck3 = tk.Checkbutton(root, text='愿望三: 脑瓜变聪明', variable=cur_choice_3, onvalue=1, offvalue=0, command=show_select)
ck3.pack(anchor='w')
# 注: variable绑定的是不同的复选框变量     onvalue设置选中时候的值     offvalue设置未选中时候的值

lbl_1 = tk.Label(root, text='选中项为: ')
lbl_1.pack(anchor='n', side='left')

# 显示选中的信息
cur_label = tk.StringVar()
lbl_2 = tk.Label(root, textvariable=cur_label)
lbl_2.pack(anchor='n', side='left', padx=10)

root.mainloop()
- 1
- 2
- 3
- 4
- 5
- 6
- 7
- 8
- 9
- 10
- 11
- 12
- 13
- 14
- 15
- 16
- 17
- 18
- 19
- 20
- 21
- 22
- 23
- 24
- 25
- 26
- 27
- 28
- 29
- 30
- 31
- 32
- 33
- 34
- 35
- 36
- 37
- 38
- 39
- 40
- 41
- 42
- 43
- 44
- 45
- 46
- 47
简单实例(有注释)
送花 – 掌握Button的应用
需要实现的基本功能:
点击 hit me 按钮,将弹出对话框,显示"送你一朵玫瑰"

import tkinter as tk
from tkinter import messagebox
'''
步骤:
 1.创建窗体对象
 2.在主窗口中添加各种可视化组件,例如: 按钮(Button),文本框(Label)等
 3.通过几何布局管理器,管理组件的大小和位置
 4.响应用户操作所触发的事件,例如: 单击,双击等
'''
def songhua():
    messagebox.showinfo("Message", "送你一朵玫瑰")  # 弹出对话框
    print("送你99朵玫瑰花")


root = tk.Tk()  # 创建窗体对象
root.title("我的第一个GUI程序")  # 窗口标题
root.geometry("500x300-400+300")  # 设置窗口大小和位置

theLabel = tk.Label(root, text='My Demo')
theLabel.pack()

bt1 = tk.Button(root, text='hit me', command=songhua)
bt1.pack()

root.mainloop()
- 1
- 2
- 3
- 4
- 5
- 6
- 7
- 8
- 9
- 10
- 11
- 12
- 13
- 14
- 15
- 16
- 17
- 18
- 19
- 20
- 21
- 22
- 23
- 24
- 25
用类实现GUI
通常写比较大程序一般都要把代码进行封装,在面向对象的编程语言中就是封装成类
import tkinter as tk

class Application:
    def __init__(self, master):
        frame = tk.Frame(master)
        frame.pack(side=tk.LEFT)  # 默认是调整在最上面,可以自定义调整位置: LEFT, RIGHT, TOP, BOTTOM
        # frame.pack(side=tk.LEFT, padx=10, pady=10)  # 距离窗口

        self.label = tk.Label(frame, text="Hello Python", fg='white', bg='black')
        self.label.pack(expand='YES', fill='x')  # 水平拉伸

        self.bt = tk.Button(frame, text="打招呼", fg="orange", command=self.say_hello)
        # 前景色fg: foreground   背景色bg: background  command: 按钮关联的函数,当按钮被点击时,执行该函数
        self.bt.pack()

    def say_hello(self):
        self.label.config(text="互联网的广大朋友们大家好!")


root = tk.Tk()
app = Application(root)
root.mainloop()
- 1
- 2
- 3
- 4
- 5
- 6
- 7
- 8
- 9
- 10
- 11
- 12
- 13
- 14
- 15
- 16
- 17
- 18
- 19
- 20
- 21
- 22
pack的应用
完成下面这张图的布局

import tkinter as tk

root = tk.Tk()
root.title("My GUI")
root.geometry("400x300+200+100")
root["background"] = "pink"  # 设置背景色

lbl_1 = tk.Label(root, text="编程改变世界")
lbl_1.pack(fill='x', ipady=10, side='top')

lbl_2 = tk.Label(root, text="DoubleBean博客", bg='#8FBC8F', fg='white')
lbl_2.pack(fill='x', ipady=10, side='bottom')

lbl_3 = tk.Label(root, text="B站", bg='#87CEEB', fg='black')
lbl_3.pack(fill='y', ipadx=10, side='left')

lbl_4 = tk.Label(root, text="优酷", bg='#F08080', fg='white')
lbl_4.pack(ipadx=10, padx=10, side='left')  # 区分ipadx和padx,一个是内部留白,一个是外部组件与组件之间留白

lbl_5 = tk.Label(root, text="爱奇艺", bg='#F0E68C', fg='black')
lbl_5.pack(ipadx=10, padx=10, side='left')  # padx=10是为了让组件不要互相紧挨着

root.mainloop()

'''
注意:
  lbl_2那两行代码需放在lbl_1的代码下面,之后再写B站,优酷,爱奇艺 代码,否则会被他们占用
  TOP: 窗口剩余空间最上方水平居中
  BOTTOM: 窗口剩余空间最下方水平居中
  LEFT: 窗口剩余空间最左侧垂直居中
  RIGHT: 窗口剩余空间最右侧垂直居中

  pack()控制组件位置命令是在窗口剩余空间进行几何布局
  所以如果先写 B站,优酷,爱奇艺 这些代码,会发现 DoubleBean博客 无法填充底部整一行,你可以试着调换代码位置来验证
'''
- 1
- 2
- 3
- 4
- 5
- 6
- 7
- 8
- 9
- 10
- 11
- 12
- 13
- 14
- 15
- 16
- 17
- 18
- 19
- 20
- 21
- 22
- 23
- 24
- 25
- 26
- 27
- 28
- 29
- 30
- 31
- 32
- 33
- 34
- 35
模拟用户登录
需要实现的基本功能:
登录用户名为: Python 密码: py
点击 登录 按钮,若输入信息正确则显示一个新的窗体,并且在新窗口的顶部显示"编程改变世界"。若输入信息错误则弹出报错对话框,显示"用户名或密码错误"
点击 重置 按钮,将会把输入的用户名和密码信息清空


import tkinter as tk
from tkinter import messagebox

# 创建窗体对对象
root = tk.Tk()
root.title("填写个人信息")
root.geometry("300x150+200+200")

# 点击 登录 按钮将执行 btn_issuccess() 函数
def btn_issuccess():
    # 如果输入的用户名和密码正确,则打开一个新的窗体,否则弹出对话框
    if entryName.get() == "Python" and entryPass.get() == "py":
        label1 = tk.Label(root, text='用户名为: %s\n密码为: %s' % (entryName.get(), entryPass.get()))
        label1.grid(row=3, column=1, rowspan=2)  # 输入正确时显示输入的信息

        mainWindow = tk.Tk()  # 创建新的主窗体
        mainWindow.geometry("400x100+550+200")
        mainWindow.title("登录成功")
        label2 = tk.Label(mainWindow, text="编程改变世界", font=("Arial", 20))
        label2.pack()
    else:
        messagebox.showerror("消息", "用户或密码错误")  # 弹出对话框


# 点击 重置 按钮将执行 btn_Click_Rest() 函数
def btn_Click_Rest():
    # 将输入的信息全部置为空
    varName.set("")
    varpass.set("")  # 设置为空对象


# 创建用户标签
lbname = tk.Label(root, text="用户名")
lbname.grid(row=0, column=0, ipadx=10, ipady=10)
# row表示行索引   column表示列索引   columnspan表示列合并数量   rowspan表示行合并数量

# 创建登录单行输入框
'''
  多行文本框: text控件
  单行文本框: Entry控件
'''
varName = tk.StringVar()  # 从tk库创建String类型的变量对象
entryName = tk.Entry(root, textvariable=varName)  # textvariable: 文本变量,绑定变量与控件
entryName.grid(row=0, column=1, columnspan=2)

# 创建密码标签
lblpassword = tk.Label(root, text="密码")
lblpassword.grid(row=1, column=0)

# 创建密码单行输入框
varpass = tk.StringVar()
entryPass = tk.Entry(root, show="*", textvariable=varpass)
entryPass.grid(row=1, column=1, columnspan=2)  # 占两列

# 创建登录按钮
btn = tk.Button(root, text="登录", width=8, command=btn_issuccess)
btn.grid(row=2, column=1)

# 创建重置按钮
btnRest = tk.Button(root, text="重置", width=8, command=btn_Click_Rest)
btnRest.grid(row=2, column=2)

root.mainloop()
- 1
- 2
- 3
- 4
- 5
- 6
- 7
- 8
- 9
- 10
- 11
- 12
- 13
- 14
- 15
- 16
- 17
- 18
- 19
- 20
- 21
- 22
- 23
- 24
- 25
- 26
- 27
- 28
- 29
- 30
- 31
- 32
- 33
- 34
- 35
- 36
- 37
- 38
- 39
- 40
- 41
- 42
- 43
- 44
- 45
- 46
- 47
- 48
- 49
- 50
- 51
- 52
- 53
- 54
- 55
- 56
- 57
- 58
- 59
- 60
- 61
- 62
- 63
列表框的增删操作
需要实现的基本功能:
排榜形式如图所示
在输入框输入信息,点击 插入 按钮,将信息添加到列表框末尾
鼠标点击列表框中的信息,能够在 选中项文本框 中显示出来 (即在测试显示区那一行显示出来)
点击 删除 按钮,将删除鼠标点击的选中项信息

import tkinter as tk
from tkinter import messagebox

# 点击 插入 按钮,将执行 btn_Click_insert() 函数,功能: 在列表框组件末尾添加名字
def btn_Click_insert():
    if varName.get() == '':  # varName 对 Tkinter.StringVar 对象的引用。您需要调用其 get 方法访问它代表的值
        messagebox.showinfo('Error', '输入的信息不能为空')
    else:
        lbox1.insert(tk.END, entry_name.get())
        varName.set("")  # 添加完信息后,将输入框清空,以便下次输入
    pass


# listbox点击事件函数,功能: 在选中项文本框显示选中项信息
def lbox1_Click(e):
    global cur_item  # 使用global关键字即可声明一个全局变量
    # print(e)
    w = e.widget  # 根据传入事件,获取相应的部件
    # print(w)
    # print(w.curselection())  # 返回当前选中项的索引,以元组的形式返回
    cur_item = w.curselection()
    label2.config(text=w.get(cur_item))  # 获取当前选中项,然后在选中项文本框中显示
    pass


# 点击 删除 按钮,将执行 btn_Click_delete() 函数,功能: 删除选中项
def btn_Click_delete():
    '''
      因为 lbox1_Click(e) 函数已经可以得到选中项,我们只需要删除掉选中项即可,即删除掉 cur_item
      将 cur_item 设置为全局变量,就可以在不同的def中使用该变量
    '''
    lbox1.delete(cur_item)
    pass


root = tk.Tk()
root.title("My GUI")
root.geometry("400x300+200+100")

# 载入 测试显示区 以及 选中项文本框
frame1 = tk.Frame(root)
frame1.pack(anchor=tk.W)
label1 = tk.Label(frame1, text="测试显示区")
label1.pack(anchor=tk.W, side='left')

label2 = tk.Label(frame1)
label2.pack(anchor=tk.W, after=label1)

# 载入listboox控件
frame2 = tk.Frame(root)
frame2.pack(anchor=tk.W)
lbox1 = tk.Listbox(frame2)
lbox1.pack(anchor=tk.W)
lbox1.bind("<<ListboxSelect>>", lbox1_Click)  # 绑定事件

# 载入单行文本框
varName = tk.StringVar()
entry_name = tk.Entry(root, textvariable=varName)
entry_name.pack(anchor=tk.W, side='left')

# "增加"按钮
btn_add = tk.Button(root, text="插入", command=btn_Click_insert)
btn_add.pack(anchor=tk.W, side='left')

# "删除"按钮
btn_delete = tk.Button(root, text="删除", command=btn_Click_delete)
btn_delete.pack(anchor=tk.W, side='left')

root.mainloop()
- 1
- 2
- 3
- 4
- 5
- 6
- 7
- 8
- 9
- 10
- 11
- 12
- 13
- 14
- 15
- 16
- 17
- 18
- 19
- 20
- 21
- 22
- 23
- 24
- 25
- 26
- 27
- 28
- 29
- 30
- 31
- 32
- 33
- 34
- 35
- 36
- 37
- 38
- 39
- 40
- 41
- 42
- 43
- 44
- 45
- 46
- 47
- 48
- 49
- 50
- 51
- 52
- 53
- 54
- 55
- 56
- 57
- 58
- 59
- 60
- 61
- 62
- 63
- 64
- 65
- 66
- 67
- 68
- 69
键盘打字统计实例
在Entry单行输入框中输入信息,将会实时统计输入字符串的长度

import tkinter as tk

# 定义键盘输入事件需要调用的函数
def printWords(event):  # 键盘事件函数必须传入事件参数
    # print(entry1.get()) # 发现有延时,每次只是获取上一次的字符串
    # print(event)  # 通过查看输出可以看到事件对象的常用属性,会发现有char这个属性
    # print(event.char)  # 这个就可以实时获得输入字符,不是字符串
    # print(entry1.get() + event.char)  # 这样子就可以实时得到字符串
    str = entry1.get() + event.char

    # varWords.set(str)  # 这是用来得到输入的字符串信息,但我们是要获取字符串长度
    varWords.set(len(str))
    pass


# 界面配置
root = tk.Tk()
root.title("My GUI")
root.geometry("300x200+200+100")

# 布局,使用grid布局
lbl1 = tk.Label(root, text='输入: ')
lbl1.grid(row=0, column=0, ipady=10)

entry1 = tk.Entry(root)
entry1.grid(row=0, column=1)
entry1.bind("<Key>", printWords)  # 键盘事件,使用bind方法对控件进行绑定
entry1.focus_set()

lbl2 = tk.Label(root, text='统计数字: ')
lbl2.grid(row=1, column=0)

varWords=tk.IntVar()
lbl3 = tk.Label(root, textvariable=varWords)
lbl3.grid(row=1, column=1)

root.mainloop()
- 1
- 2
- 3
- 4
- 5
- 6
- 7
- 8
- 9
- 10
- 11
- 12
- 13
- 14
- 15
- 16
- 17
- 18
- 19
- 20
- 21
- 22
- 23
- 24
- 25
- 26
- 27
- 28
- 29
- 30
- 31
- 32
- 33
- 34
- 35
- 36
- 37
会发现当删除输入的字符串时,统计数目会+1,它把删除符号也算进去了,如果要实现 删除 的功能,就得把删除符号过滤掉
参考资料
https://docs.python.org/zh-cn/3/library/tkinter.html#tkinter-modules
https://www.bilibili.com/video/BV1jW411Y7dL?p=2&share_source=copy_web
https://www.bilibili.com/video/BV1h441147ng?share_source=copy_web
https://www.bilibili.com/video/BV1h4411M7AC?share_source=copy_web
https://www.bilibili.com/video/BV144411n7Yk?share_source=copy_web
https://www.bilibili.com/video/BV1D4411n7mr?share_source=copy_web
https://www.bilibili.com/video/BV1x4411H7JP?share_source=copy_web
https://www.bilibili.com/video/BV1q4411N7SH?share_source=copy_web
https://www.bilibili.com/video/BV1p5411u7WH?share_source=copy_web

