
热门标签
热门文章
- 1STM32F103过零法测任意交流信号频率(小于40K)_stm32过零检测
- 2[LeetCode] Employee Free Time 职员的空闲时间
- 3腾讯云轻量云服务器打开报服务器暂时未响应,请刷新页面并重试问题解决
- 4Spring中是如何实现IoC和DI的?
- 5教你六个步骤完成本地知识库搭建_知识库怎么建立
- 6李宏毅自然语言处理学习笔记_李宏毅自然语言处理zstar
- 7蓝桥杯历年省赛真题汇总及题目详解_蓝桥杯省赛
- 8MySQL的concat()函数的用法_mysql中concat函数的用法
- 9iOS 系统获取 Bundle ID、平台公钥、签名 MD5 值的指引_ios bundleid
- 10如何开发一款流畅、稳定、有趣味性的棋类游戏?
当前位置: article > 正文
MySQL互为主备(双主)加keepalived实现故障自动转换_mysql主备切换排查
作者:木道寻08 | 2024-08-19 11:29:03
赞
踩
mysql主备切换排查
MySQL双主(互为主从)
环境:
| 主机名 | 系统环境 | 软件 | IP |
|---|---|---|---|
| DB1 | CentOS7.6 | MySQL5.7 ,keepalived | 192.168.66.63 |
| DB2 | CentOS7.6 | MySQL5.7 ,keepalived | 192.168.66.64 |
| Client | CentOS7.6 | MySQL5.7 | 192.168.66.61 |
| VIP | 192.168.66.200 |
一,实现MySQL主主同步
DB1、DB2都已安装MySQL,安装过程省略
MySQL安装见之前的文章:MySQL安装
1,修改MySQL配置文件
在/etc/my.ccnf文件中的[mysqld]段加配置信息
DB1:
[root@DB1 ~]# vim /etc/my.cnf
#mysql双主增加信息
#节点标识,每台的server—id不能一样,全局唯一
server-id=1
#开启binlg日志,用于主从数据复制
log-bin=mysql-bin
#开启relay-log日志
relay-log=mysql-relay-bin
#复制过滤选项
replicate-wild-ignore-table=mysql.%
replicate-wild-ignore-table=test.%
replicate-wild-ignore-table=information_schema.%
#字段一次递增多少
auto-increment-increment = 2
#自增字段的起始值:1、3、5、7、等奇数
auto-increment-offset = 1
slave-skip-errors = all
#保存配置,重启MySQL服务
[root@DB1 ~]# service mysqld restart
Shutting down MySQL.... SUCCESS!
Starting MySQL. SUCCESS!

- 1
- 2
- 3
- 4
- 5
- 6
- 7
- 8
- 9
- 10
- 11
- 12
- 13
- 14
- 15
- 16
- 17
- 18
- 19
- 20
- 21
DB2:
[root@dg ~]# vim /etc/my.cnf
#mysql双主新增内容
server-id=2
log-bin=mysql-bin
relay-log=mysql-relay-bin
replicate-wild-ignore-table=mysql.%
replicate-wild-ignore-table=test.%
replicate-wild-ignore-table=information_schema.%
auto-increment-increment = 2
auto-increment-offset = 2
slave-skip-errors = all

#保存配置,重启服务
[root@dg ~]# service mysqld restart
Shutting down MySQL.... SUCCESS!
Starting MySQL. SUCCESS!
- 1
- 2
- 3
- 4
- 5
- 6
- 7
- 8
- 9
- 10
- 11
- 12
- 13
- 14
- 15
- 16
- 17
2,配置DB1、DB2主主模式
2.1,查看log bin日志和pos位置
DB1:
[root@DB1 ~]# mysql -u root -p
Enter password:
mysql> show master status;
- 1
- 2
- 3

DB2:
[root@dg ~]# mysql -uroot -p
Enter password:
mysql> show master status;
- 1
- 2
- 3

2.2,DB1、DB2互相提升访问权限
DB1:
#创建DB2的复制用户并授权
mysql> grant replication slave on *.* to 'cproot'@'192.168.66.64' identified by 'cp123456';
Query OK, 0 rows affected, 1 warning (0.03 sec)

#刷新并查看log bin日志和pos位置
mysql> flush privileges;
Query OK, 0 rows affected (0.01 sec)

mysql> show master status;
- 1
- 2
- 3
- 4
- 5
- 6
- 7
- 8
- 9

DB2:
mysql> grant replication slave on *.* to 'cproot'@'192.168.66.63'identified by 'cp123456';
Query OK, 0 rows affected, 1 warning (0.02 sec)
mysql> flush privileges;
Query OK, 0 rows affected (0.01 sec)
mysql> show master status;
- 1
- 2
- 3
- 4
- 5

2.3,将对方都设置成自己的主服务器
注意:master_log_file和master_log_pos是对方服务器最新的数据
DB1:
mysql> change master to master_host='192.168.66.64',master_user='cproot',master_password='cp123456',master_log_file='mysql-bin.000001',master_log_pos=605;
Query OK, 0 rows affected, 2 warnings (0.20 sec)
- 1
- 2
- 3
DB2:
mysql> change master to master_host='192.168.66.63',master_user='cproot',master_password='cpp123456',master_log_file='mysql-bin.000001',master_log_pos=605;
Query OK, 0 rows affected, 2 warnings (0.17 sec)
- 1
- 2
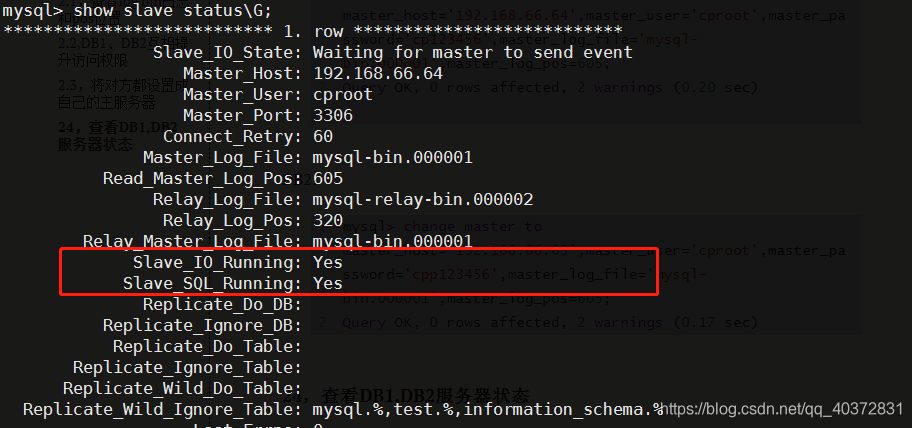
2.4,查看DB1,DB2服务器状态
DB1:
mysql> start slave;
Query OK, 0 rows affected (0.01 sec)

mysql> show slave status\G;
- 1
- 2
- 3
- 4
DB2:
mysql> start slave;
Query OK, 0 rows affected (0.00 sec)

mysql> show slave status\G;
- 1
- 2
- 3
- 4
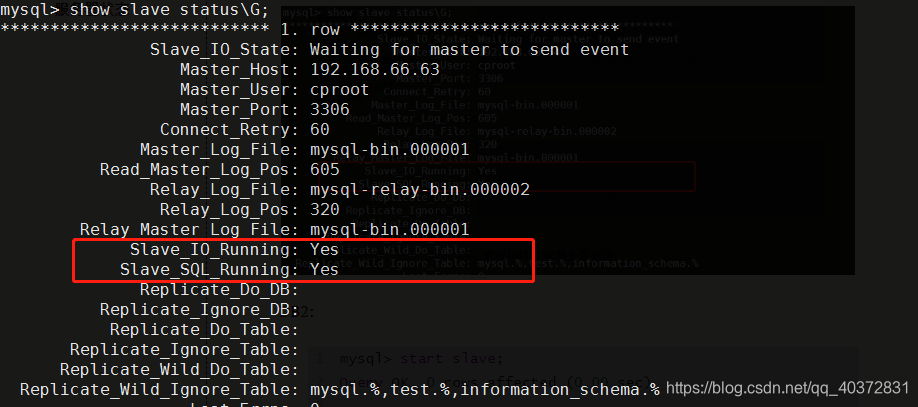
这两个地方都为yes说明主主同步成功,如果不是yes的话有以下几种排查思路:
1,网络不通
2,密码不正确
3,pos不对
4,防火墙没关
- 1
- 2
- 3
- 4
3,测试主主同步
在DB1服务器上新建数据库one,然后在DB2上查看是否同步
DB2删除one,查看DB1是否还存在
DB1:
mysql> create database one;
Query OK, 1 row affected (0.02 sec)

mysql> show databases;
+--------------------+
| Database           |
+--------------------+
| information_schema |
| mysql              |
| one                |
| performance_schema |
| sys                |
+--------------------+
5 rows in set (0.00 sec)
- 1
- 2
- 3
- 4
- 5
- 6
- 7
- 8
- 9
- 10
- 11
- 12
- 13
- 14
- 15
DB2:
推荐阅读
相关标签

