- 1后端实战教程:如何使用 Node.js 开发 RESTful API 接口(Node.js + Express + Sequelize + MySQL)_nodejs api
- 2汽车产业与技术链分析
- 3django网页按钮权限管理
- 4python输入多行linux命令_如何从python向终端(linux)发送多个命令? - python
- 5Java基础系列1——类与对象、数据类型、代码实战「用户登录」_java 基础数据对象
- 6今年秋招,彻底爆了!
- 7操作系统选择题及答案解析(川大) 第八章 虚拟内存_操作系统精髓与设计原理第九版答案第八章
- 8#698 (Div. 2)C. Nezzar and Symmetric Array(数学)_long time ago there was a symmetric array a1,a2,…,
- 9C/C++语言中的int a; int* a; int** a; int (*a)[]; int (*a)(int),重点介绍指针数组与数组指针_c++中*a
- 1011款搜索引擎_怪兽搜索
vue3 + ts+element-plus学习笔记
赞
踩
子组件通过defineProps方法接收父组件传递过来的数据,是vue3中提供的方法,不需要引入,直接使用
方法的写法:
const onClick = (){
	...
}
- 1
- 2
- 3
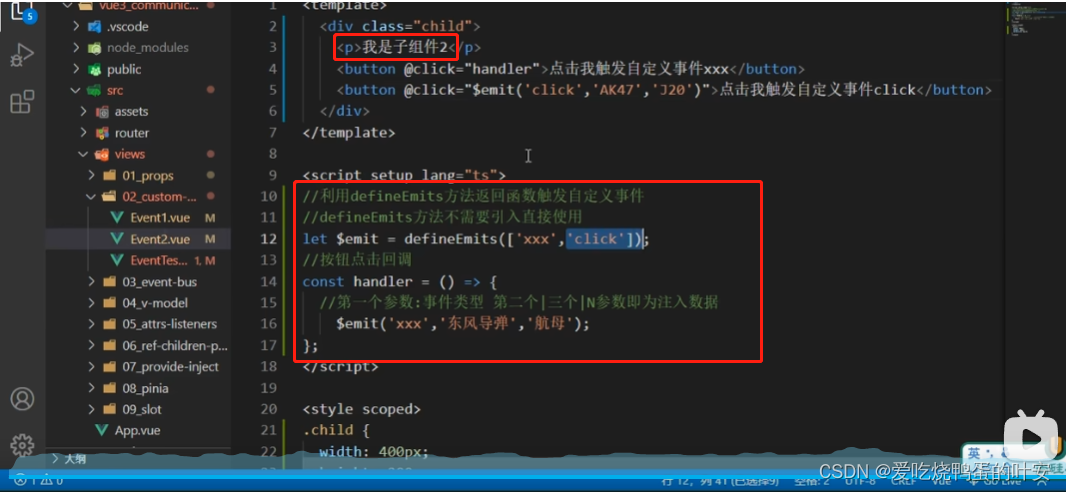
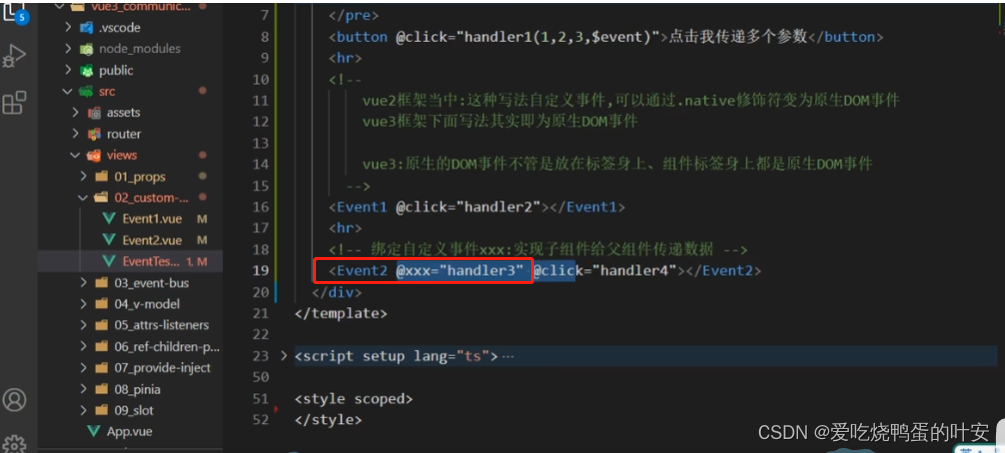
自定义事件:
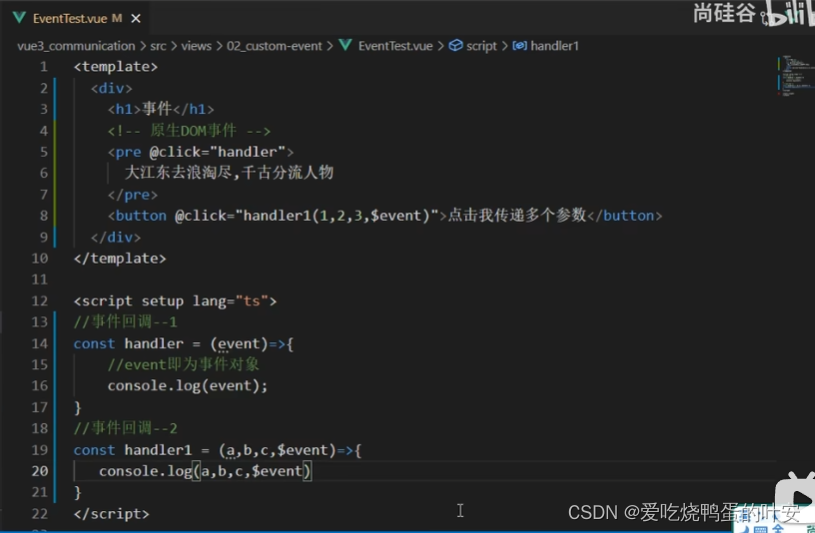
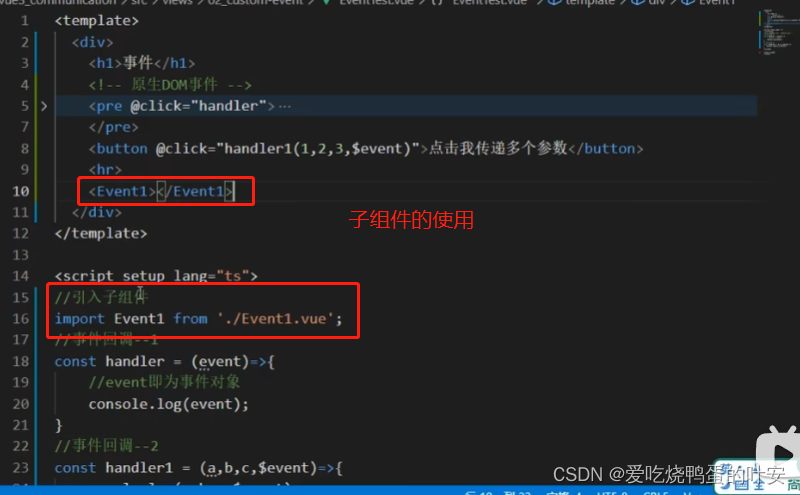
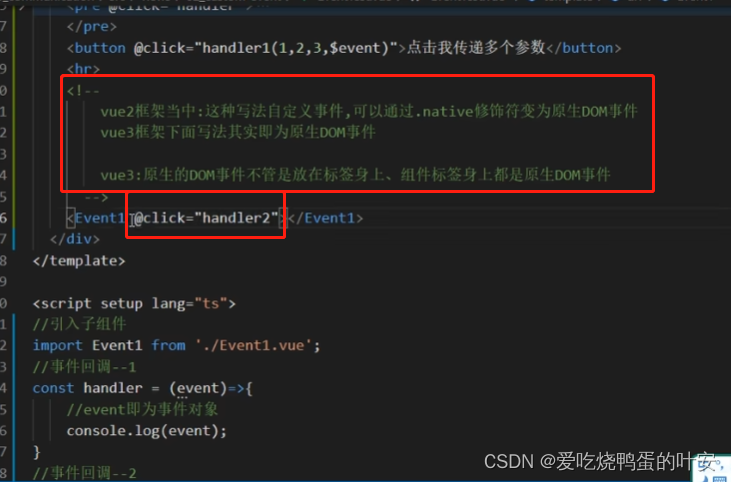
子组件点击事件
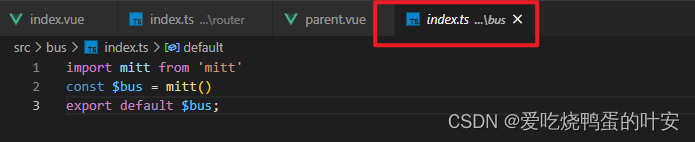
全局事件总线
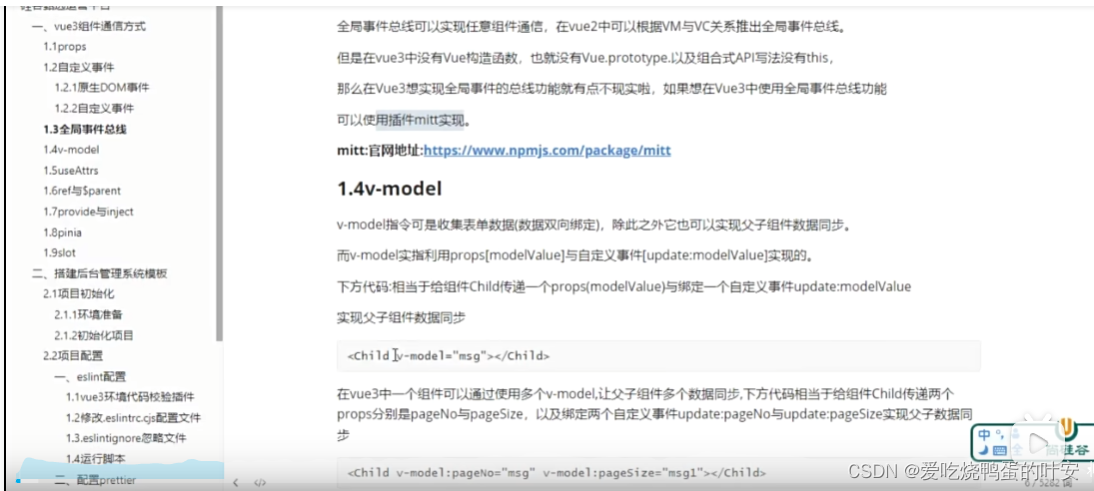
mitt
兄弟组件之间的事件(如下图)
通过$bus.emit触发事件,$bus.on接收

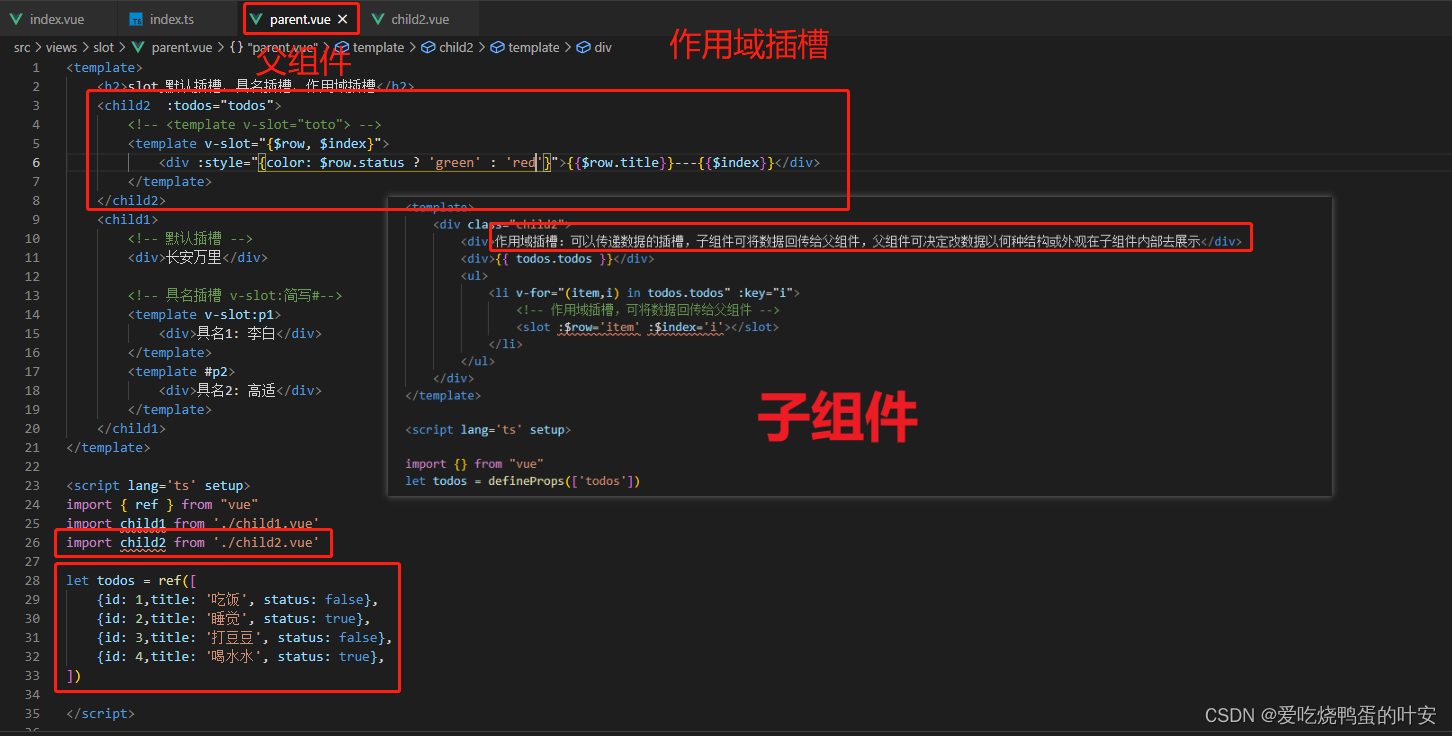
组件通讯-插槽
默认插槽、具名插槽
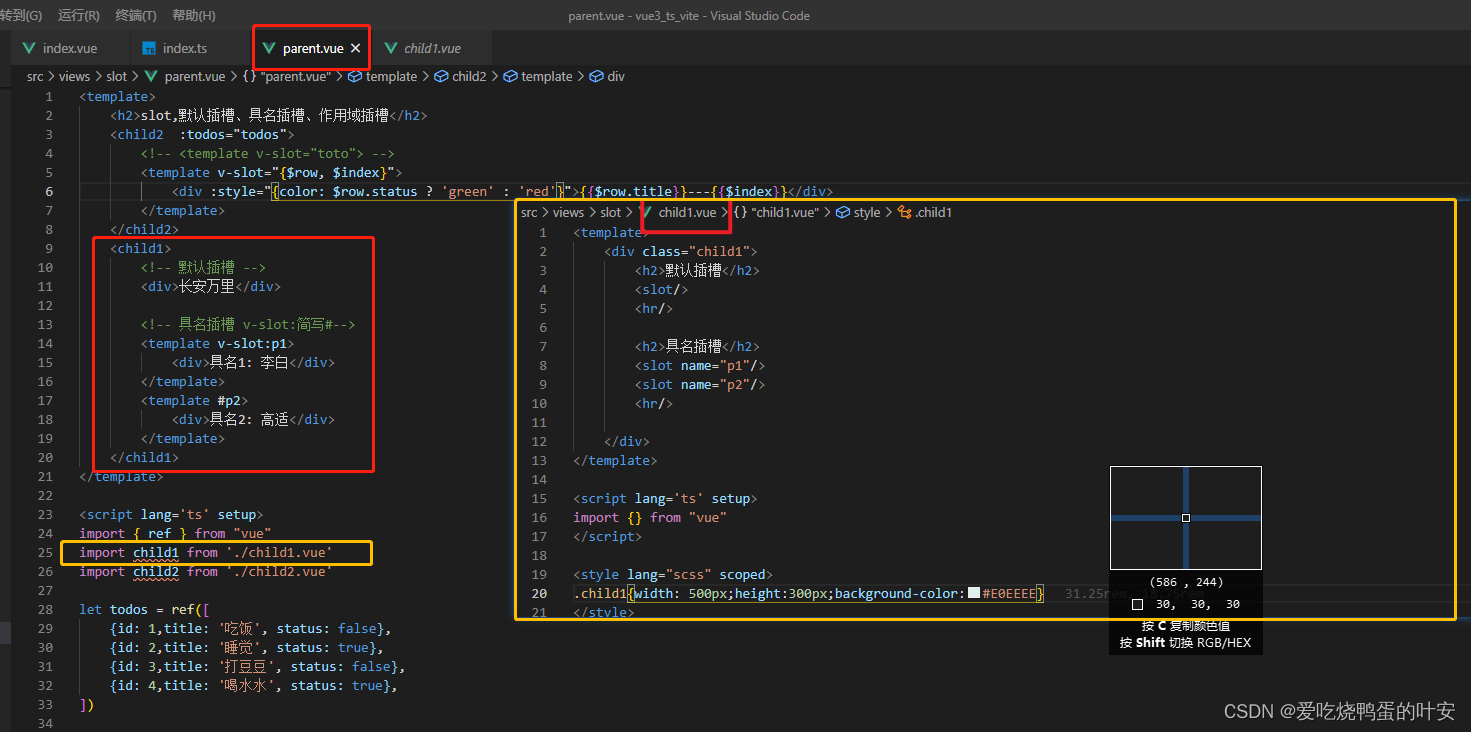
作用域插槽:可以传递数据的插槽,子组件可将数据回传给父组件,父组件可决定改数据以何种结构或外观在子组件内部去展示
用法如下:
搭建vue3+ts+element-plus+echarts商城管理项目
一、vite
1、vite 前端构建工具
二、项目准备、配置
从0开始搭建一个vue3版本的后台管理系统。一个项目要有统一的规范,需要使用eslint+stylelint+prettier来对代码质量做检测和修复,需要使用husky来做commit拦截,需要使用commitlint来统一提交规范,需要使用preinstall来统一包管理器工具;下面我们就用这一套规范来初始化我们的项目,继承一个规范的模板。
2.1、项目初始化
环境准备node v16.14.2、pnpm 8.6.10
pnpm安装指令:npm i -g pnpm
项目初始化: pnpm create vite
进入到根目录下pnpm install安装全部依赖,接着运行程序pnpm run dev,运行完可以在浏览器中 http://127.0.0.1:5173/ 访问项目。
2.2、项目配置
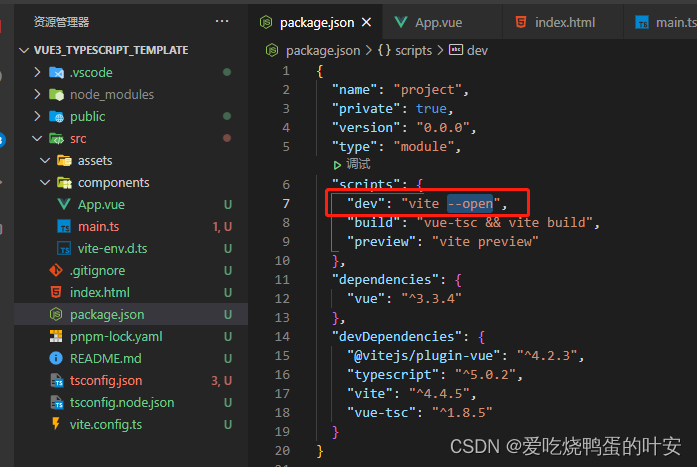
项目启动需要复制地址在浏览器中自行打开,可以在package.json中设置,启动后自动打开
添加--open
一、eslint配置
eslint中文官网:https://eslint.cn/
ESLint最初是由Nicholas C. Zakas 于2013年6月创建的开源项目。它的目标是提供一个插件化的javascript代码检测工具。
1. 安装依赖:
pnpm i eslint -D
2. 生成配置文件.eslintrc.cjs:
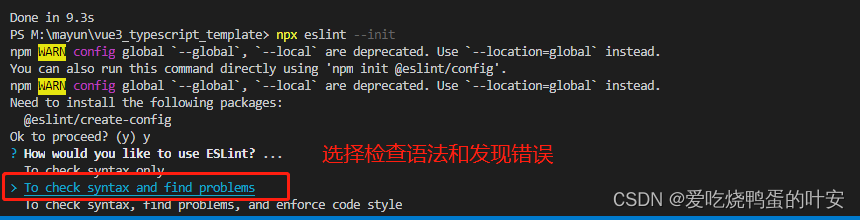
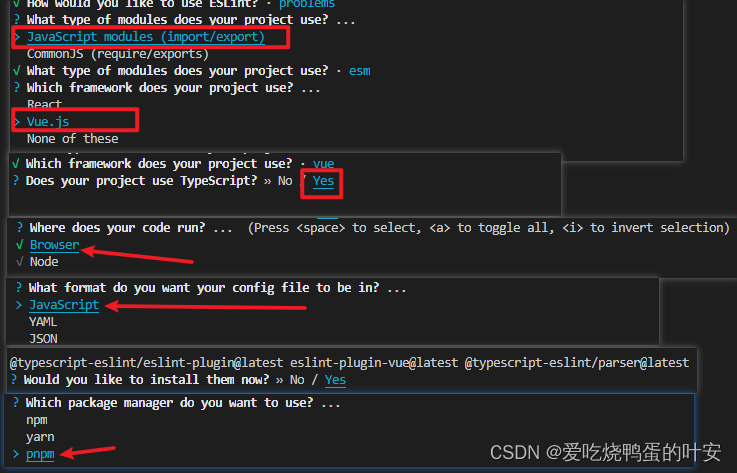
npx eslint --init,配置项选择如下:
3. vue3环境代码校验插件
安装指令
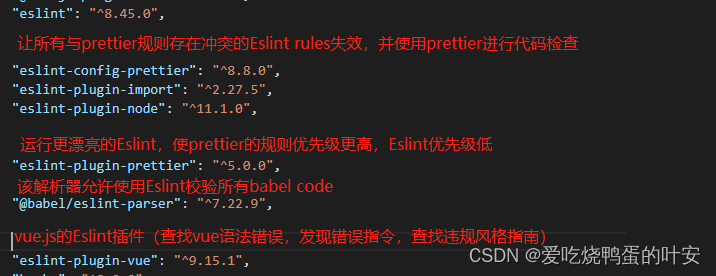
pnpm install -D eslint-plugin-import eslint-plugin-vue eslint-plugin-node eslint-plugin-prettier eslint-config-prettier eslint-plugin-node @babel/eslint-parser
4. 修改配置文件.eslintrc.cjs
// @see https://eslint.bootcss.com/docs/rules/

module.exports = {
  env: {
    browser: true,
    es2021: true,
    node: true,
    jest: true,
  },
  /* 指定如何解析语法 */
  parser: 'vue-eslint-parser',
  /** 优先级低于 parse 的语法解析配置 */
  parserOptions: {
    ecmaVersion: 'latest',
    sourceType: 'module',
    parser: '@typescript-eslint/parser',
    jsxPragma: 'React',
    ecmaFeatures: {
      jsx: true,
    },
  },
  /* 继承已有的规则 */
  extends: [
    'eslint:recommended',
    'plugin:vue/vue3-essential',
    'plugin:@typescript-eslint/recommended',
    'plugin:prettier/recommended',
  ],
  plugins: ['vue', '@typescript-eslint'],
  /*
   * "off" 或 0    ==>  关闭规则
   * "warn" 或 1   ==>  打开的规则作为警告(不影响代码执行)
   * "error" 或 2  ==>  规则作为一个错误(代码不能执行,界面报错)
   */
  rules: {
    // eslint(https://eslint.bootcss.com/docs/rules/)
    'no-var': 'error', // 要求使用 let 或 const 而不是 var
    'no-multiple-empty-lines': ['warn', { max: 1 }], // 不允许多个空行
    'no-console': process.env.NODE_ENV === 'production' ? 'error' : 'off',
    'no-debugger': process.env.NODE_ENV === 'production' ? 'error' : 'off',
    'no-unexpected-multiline': 'error', // 禁止空余的多行
    'no-useless-escape': 'off', // 禁止不必要的转义字符

    // typeScript (https://typescript-eslint.io/rules)
    '@typescript-eslint/no-unused-vars': 'error', // 禁止定义未使用的变量
    '@typescript-eslint/prefer-ts-expect-error': 'error', // 禁止使用 @ts-ignore
    '@typescript-eslint/no-explicit-any': 'off', // 禁止使用 any 类型
    '@typescript-eslint/no-non-null-assertion': 'off',
    '@typescript-eslint/no-namespace': 'off', // 禁止使用自定义 TypeScript 模块和命名空间。
    '@typescript-eslint/semi': 'off',

    // eslint-plugin-vue (https://eslint.vuejs.org/rules/)
    'vue/multi-word-component-names': 'off', // 要求组件名称始终为 “-” 链接的单词
    'vue/script-setup-uses-vars': 'error', // 防止<script setup>使用的变量<template>被标记为未使用
    'vue/no-mutating-props': 'off', // 不允许组件 prop的改变
    'vue/attribute-hyphenation': 'off', // 对模板中的自定义组件强制执行属性命名样式
  },
};
- 1
- 2
- 3
- 4
- 5
- 6
- 7
- 8
- 9
- 10
- 11
- 12
- 13
- 14
- 15
- 16
- 17
- 18
- 19
- 20
- 21
- 22
- 23
- 24
- 25
- 26
- 27
- 28
- 29
- 30
- 31
- 32
- 33
- 34
- 35
- 36
- 37
- 38
- 39
- 40
- 41
- 42
- 43
- 44
- 45
- 46
- 47
- 48
- 49
- 50
- 51
- 52
- 53
- 54
- 55
- 56
- 57
- 58
5. eslintignore忽略文件
dist
node_modules
- 1
- 2
6. 运行脚本
package.json新增两个运行脚本
"scripts": {
	"lint": "eslint src",
    "fix": "eslint src --fix"
}
- 1
- 2
- 3
- 4
如果不符合eslint配置的规则,可以运行
pnpm run fix进行修复,修复成符合规定的模式
二、配置prettier
有了eslint,为什么还要有prettier?eslint针对的是js,它是一个检测工具,包含js语法以及少部分格式问题,在eslint看来,语法对了就能保证代码正常运行,格式问题属于其次;
而prettier属于格式化工具,它看不惯格式不统一,所以它就把eslint没干好的事情接着干,另外,prettier支持包含js在内的多种语言。
总结起来,eslint和prettier这俩兄弟,一个保证js代码质量,一个保证代码美观。
1. 安装依赖包
pnpm install -D eslint-plugin-prettier prettier eslint-config-prettier
2. .prettierrc.json添加规则
{
  "singleQuote": true,
  "semi": false,
  "bracketSpacing": true,
  "htmlWhitespaceSensitivity": "ignore",
  "endOfLine": "auto",
  "trailingComma": "all",
  "tabWidth": 2
}
- 1
- 2
- 3
- 4
- 5
- 6
- 7
- 8
- 9
- 10
3..prettierignore忽略文件
/dist/*
/html/*
.local
/node_modules/**
**/*.svg
**/*.sh
/public/*
- 1
- 2
- 3
- 4
- 5
- 6
- 7
通过
pnpm run lint检测语法,如果出现不规范格式,通过pnpm run fix修复
三、配置stylelint
stylelint为css的lint工具,可以格式化css代码,检查css语法错误和不合理的写法,指定css书写顺序等。
1.安装依赖
该项目中使用scss作为预处理器,安装以下依赖
pnpm add sass sass-loader stylelint postcss postcss-scss postcss-html stylelint-config-prettier stylelint-config-recess-order stylelint-config-recommended-scss stylelint-config-standard stylelint-config-standard-vue stylelint-scss stylelint-order stylelint-config-standard-scss -D
2..stylelintrc.cjs
官网:https://stylelint.bootcss.com/
// @see https://stylelint.bootcss.com/

module.exports = {
  extends: [
    'stylelint-config-standard', // 配置stylelint拓展插件
    'stylelint-config-html/vue', // 配置 vue 中 template 样式格式化
    'stylelint-config-standard-scss', // 配置stylelint scss插件
    'stylelint-config-recommended-vue/scss', // 配置 vue 中 scss 样式格式化
    'stylelint-config-recess-order', // 配置stylelint css属性书写顺序插件,
    'stylelint-config-prettier', // 配置stylelint和prettier兼容
  ],
  overrides: [
    {
      files: ['**/*.(scss|css|vue|html)'],
      customSyntax: 'postcss-scss',
    },
    {
      files: ['**/*.(html|vue)'],
      customSyntax: 'postcss-html',
    },
  ],
  ignoreFiles: [
    '**/*.js',
    '**/*.jsx',
    '**/*.tsx',
    '**/*.ts',
    '**/*.json',
    '**/*.md',
    '**/*.yaml',
  ],
  /**
   * null  => 关闭该规则
   * always => 必须
   */
  rules: {
    'value-keyword-case': null, // 在 css 中使用 v-bind,不报错
    'no-descending-specificity': null, // 禁止在具有较高优先级的选择器后出现被其覆盖的较低优先级的选择器
    'function-url-quotes': 'always', // 要求或禁止 URL 的引号 "always(必须加上引号)"|"never(没有引号)"
    'no-empty-source': null, // 关闭禁止空源码
    'selector-class-pattern': null, // 关闭强制选择器类名的格式
    'property-no-unknown': null, // 禁止未知的属性(true 为不允许)
    'block-opening-brace-space-before': 'always', //大括号之前必须有一个空格或不能有空白符
    'value-no-vendor-prefix': null, // 关闭 属性值前缀 --webkit-box
    'property-no-vendor-prefix': null, // 关闭 属性前缀 -webkit-mask
    'selector-pseudo-class-no-unknown': [
      // 不允许未知的选择器
      true,
      {
        ignorePseudoClasses: ['global', 'v-deep', 'deep'], // 忽略属性,修改element默认样式的时候能使用到
      },
    ],
  },
}
- 1
- 2
- 3
- 4
- 5
- 6
- 7
- 8
- 9
- 10
- 11
- 12
- 13
- 14
- 15
- 16
- 17
- 18
- 19
- 20
- 21
- 22
- 23
- 24
- 25
- 26
- 27
- 28
- 29
- 30
- 31
- 32
- 33
- 34
- 35
- 36
- 37
- 38
- 39
- 40
- 41
- 42
- 43
- 44
- 45
- 46
- 47
- 48
- 49
- 50
- 51
- 52
- 53
- 54
3..stylelintignore
/node_modules/*
/dist/*
/html/*
/public/*
- 1
- 2
- 3
- 4
4.添加运行脚本package.json
"scripts": {
	"format": "prettier --write \"./**/*.{html,vue,ts,js,json,md}\"",
    "lint:eslint": "eslint src/**/*.{ts,vue} --cache --fix",
    "lint:style": "stylelint src/**/*.{css,scss,vue} --cache --fix"
}
- 1
- 2
- 3
- 4
- 5
当运行pnpm run format时,会把代码格式化
四、配置husky
上面我们已经集成好了代码校验工具,但需要每次手动的去执行命令才会格式化代码,如果有人没有格式化就提交到了远程仓库中,那设置这个规范就没有什么用处,所以我们需要强制让开发人员按照代码规范来提交
这就需要利用husky在代码提交之前出发git hook(git在客户端的狗子),然后执行pnpm run format来自动化格式我们的代码。
作用:在提交代码之前,触发机制,先格式化代码
1.安装husky
pnpm i -D husky
执行,init前没有空格哦
npx husky-init
会在根目录下生成一个.husky目录,在这个目录下面会有一个pre-commit文件,这个文件里面的命令在我们执行commit的时候会执行
执行npx husky-init时出错了,在.husky/pre-commit文件中添加以下命令pnpm commitlint
五、配置commitlint
对于我们提交代码信息的时候,commit,也是有统一规范的,不能随便写,要让每一个人都能按照统一的标准来执行,利用commitlint来实现。
1. 安装命令
pnpm add @commitlint/config-conventional @commitlint/cli -D
2. 添加配置文件commitlint.config.cjs,代码如下
module.exports = {
  ignores: [(commit) => commit.includes('init')],
  extends: ['@commitlint/config-conventional'],
  rules: {
    'body-leading-blank': [2, 'always'],
    'footer-leading-blank': [1, 'always'],
    'header-max-length': [2, 'always', 108],
    'subject-empty': [2, 'never'],
    'type-empty': [2, 'never'],
    'subject-case': [0],
  },
}
- 1
- 2
- 3
- 4
- 5
- 6
- 7
- 8
- 9
- 10
- 11
- 12
- 13
3.配置命令package.json
"scripts": {
	"commitlint": "commitlint --config commitlint.config.cjs -e -V"
}
- 1
- 2
- 3
配置结束;现在当我们要填写提交信息commit的时候,前面就需要带着下面的subject,必须是
git commit -m fix: xxx符合类型的才可以,需要注意的是类型后面需要用英文的冒号:,并且冒号后面需要一个空格,是不能省略的
‘feat’,//新特性、新功能
‘fix’,//修改bug
‘docs’,//文档修改
‘style’,//代码格式修改, 注意不是 css 修改
‘refactor’,//代码重构
‘perf’,//优化相关,比如提升性能、体验
‘test’,//测试用例修改
‘chore’,//其他修改, 比如改变构建流程、或者增加依赖库、工具等
‘revert’,//回滚到上一个版本
‘build’,//编译相关的修改,例如发布版本、对项目构建或者依赖的改动
配置husky
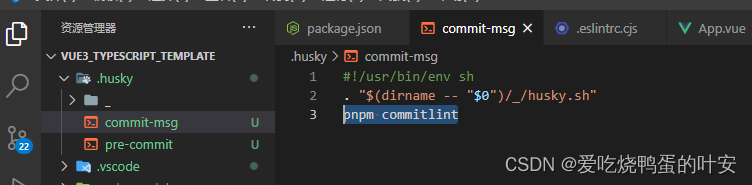
npx husky add .husky/commit-msg
.husky下会多出文件commit-msg,需要在里面添加pnpm commitlint
六、强制使用pnpm包管理器工具
团队开发项目的时候,需要统一包管理器工具,因为不同的包管理器工具下载同一个以来,可能版本不一样,导致项目出现bug,因此包管理器工具需要统一管理!!!
在根目录下创建scripts/preinstall.js文件,添加下面内容:
if (!/pnpm/.test(process.env.npm_execpath || '')) {
  console.warn(
    `\u001b[33mThis repository must using pnpm as the package manager ` +
      ` for scripts to work properly.\u001b[39m\n`,
  )
  process.exit(1)
}
- 1
- 2
- 3
- 4
- 5
- 6
- 7
- 8
配置命令
"scripts": {
	"preinstall": "node ./scripts/preinstall.js"
}
- 1
- 2
- 3
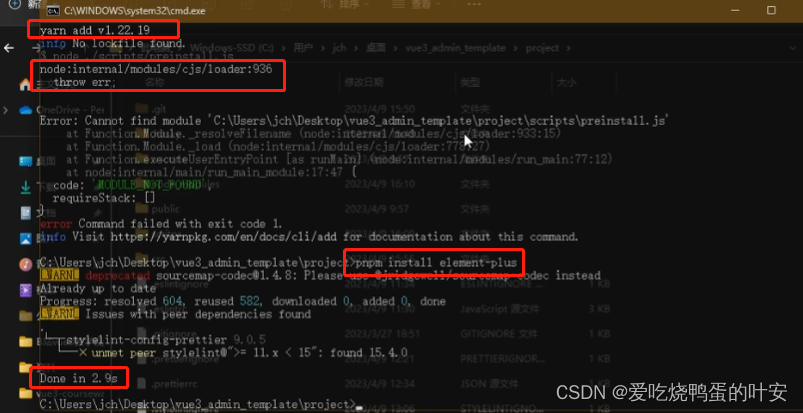
当我们使用npm或者yarn来安装依赖包的时候,就会报错了。
原理就是在安装的时候会触发preinstall文件里的代码(preinstall是npm提供的生命周期钩子)
如下图使用npm安装element-plus就会报错,需要使用pnpm安装依赖
三、项目集成
3.1 集成element-plus
官网地址:https://element-plus.gitee.io/zh-CN/
安装依赖
pnpm install element-plus
入口文件main.ts全局安装element-plus
Element Plus 组件 默认 使用英语,如果你希望使用其他语言,你可以设置为中文
const app = createApp(App)

import ElementPlus from 'element-plus'
import 'element-plus/dist/index.css'

import zhCn from 'element-plus/dist/locale/zh-cn.mjs'// 国际化


app.use(ElementPlus,{
	locale: zhCn
})
- 1
- 2
- 3
- 4
- 5
- 6
- 7
- 8
- 9
- 10
- 11
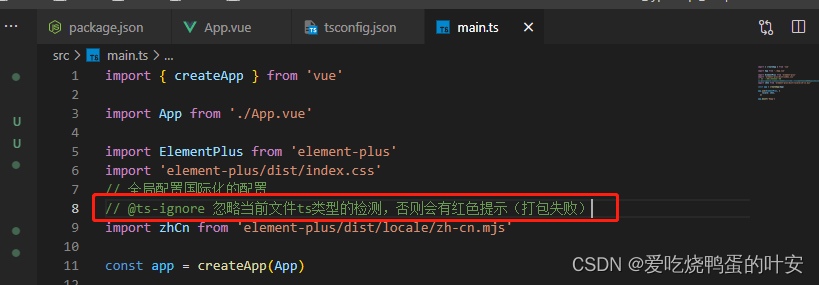
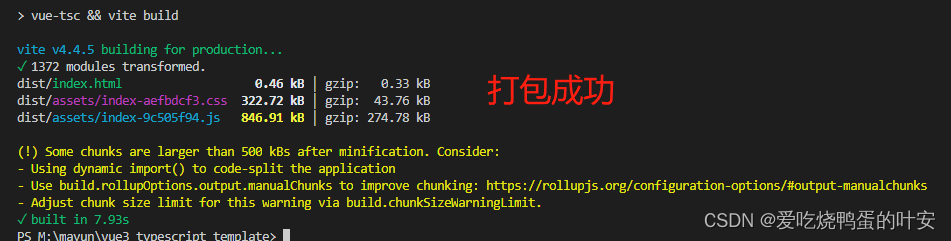
上面的中文转换方式,会在项目打包时,报错如下:

解决方式:
简单粗暴:引入时,直接加// @ts-ignore忽略,就不报红,也不报错了
全局组件类型说明
在tsconfig.json中配置如下:
"compilerOptions": {
    "types": [
      "element-plus/global"
    ]
}
- 1
- 2
- 3
- 4
- 5
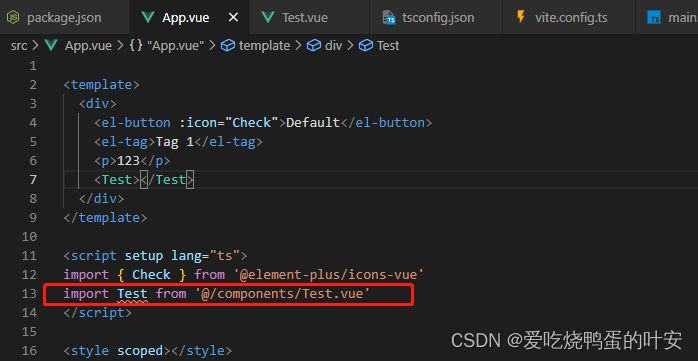
3.2 src别名的配置
在开发项目的时候文件与文件之间的关系可能很复杂,比如找某一个文件需要’…/…/…/xxx.ts’,路径不太友好,因此我们需要给src文件夹配置一个别名
在
vite.config.ts中,导入路径,并配置相对路径
import path from 'path'

export default defineConfig({
  plugins: [vue()],
  resolve: {
    alias: {
      "@": path.resolve("./src") // 相对路径别名配置,使用 @ 代替 src
    }
  }
})
- 1
- 2
- 3
- 4
- 5
- 6
- 7
- 8
- 9
- 10
typeScript编译配置,在
tsconfig.json中,在compilerOptions下添加以下代码:
"baseUrl": "./", // 解析非相对模块的基地址,默认是当前目录
"paths": {
  //路径映射,相对于baseUrl
  "@/*": ["src/*"]
},
- 1
- 2
- 3
- 4
- 5
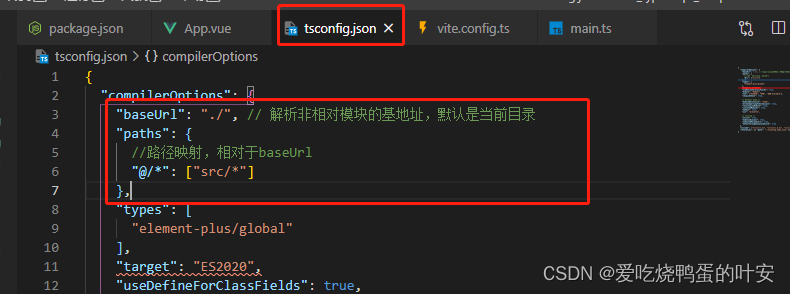
配置好后,接下来在引入js、css、图片等文件就可以使用@,如下图
3.3 环境变量的配置
项目开发过程中,至少经历开发、测试、生产三个阶段,不同阶段请求的状态(如接口地址等)不尽相同,若手动切换接口地址是相当繁琐且容易出错的,于是乎环境变量配置的需求就应运而生,只需要做简单的配置,把环境状态切换工作交给代码
开发环境(development)
顾名思义,开发使用的环境,开发人员在自己的dev分支上干活,开发到一定程度,同事会合并代码,进行联调
测试环境(testing)
测试同事干活的环境,一般由测试同事自己来部署,然后在此环境进行测试
生产环境(production)
正式提供对外服务的环境,一般会关掉错误报告,打开错误日志(正式提供给客户使用的环境)
注:一般情况下,一个环境对应一台服务器,也有的公司开发与测试环境是一台服务器
项目根目录分别添加开发、生产、测试环境的文件
.env.development
# 变量必须以 VITE_ 为前缀才能暴露给外部读取
NODE_ENV = 'development'
VITE_APP_TITLE = '硅谷甄选运营平台'
VITE_APP_BASE_API = '/dev-api'
- 1
- 2
- 3
- 4
.env.production
NODE_ENV = 'production'
VITE_APP_TITLE = '硅谷甄选运营平台'
VITE_APP_BASE_API = '/prod-api'
- 1
- 2
- 3
.env.test
# 变量必须以 VITE_ 为前缀才能暴露给外部读取
NODE_ENV = 'test'
VITE_APP_TITLE = '硅谷甄选运营平台'
VITE_APP_BASE_API = '/test-api'
- 1
- 2
- 3
- 4
配置运行命令,打包对应环境的包:package.json
"scripts": {
	"build:test": "vue-tsc && vite build --mode test",
    "build:pro": "vue-tsc && vite build --mode production"
}
- 1
- 2
- 3
- 4
3.4 SVG图标配置
在开发项目的时候会经常使用到svg矢量图,使用svg以后,页面上加载的不再是图片资源
对也页面的性能来说是个很大的提升,而且svg文件要比图片小很多,放在项目中几乎不占用资源
1. 安装svg插件
pnpm install vite-plugin-svg-icons -D
- 1
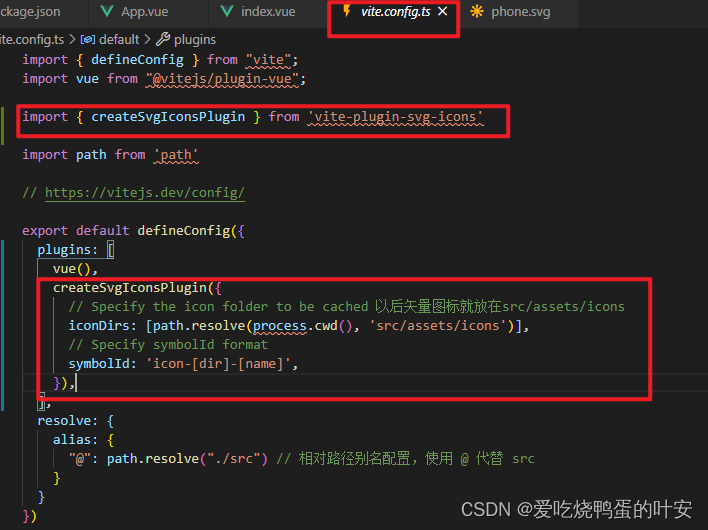
2. 配置插件vite.config.ts
先导入插件
import { createSvgIconsPlugin } from 'vite-plugin-svg-icons'
- 1
配置路径,在暴露出的defineConfig中的插件plugins数据中插入如下代码
createSvgIconsPlugin({
      // Specify the icon folder to be cached 以后矢量图标就放在src/assets/icons
      iconDirs: [path.resolve(process.cwd(), 'src/assets/icons')],
      // Specify symbolId format
      symbolId: 'icon-[dir]-[name]',
    }),
- 1
- 2
- 3
- 4
- 5
- 6
3.入口文件中导入插件
main.ts
import 'virtual:svg-icons-register'
- 1
4.svg的使用
根据配置的路径在src/assets/下新建icons目录,把svg文件全部放到icons下
图标库,强大的阿里图标库
选择图标,复制svg代码
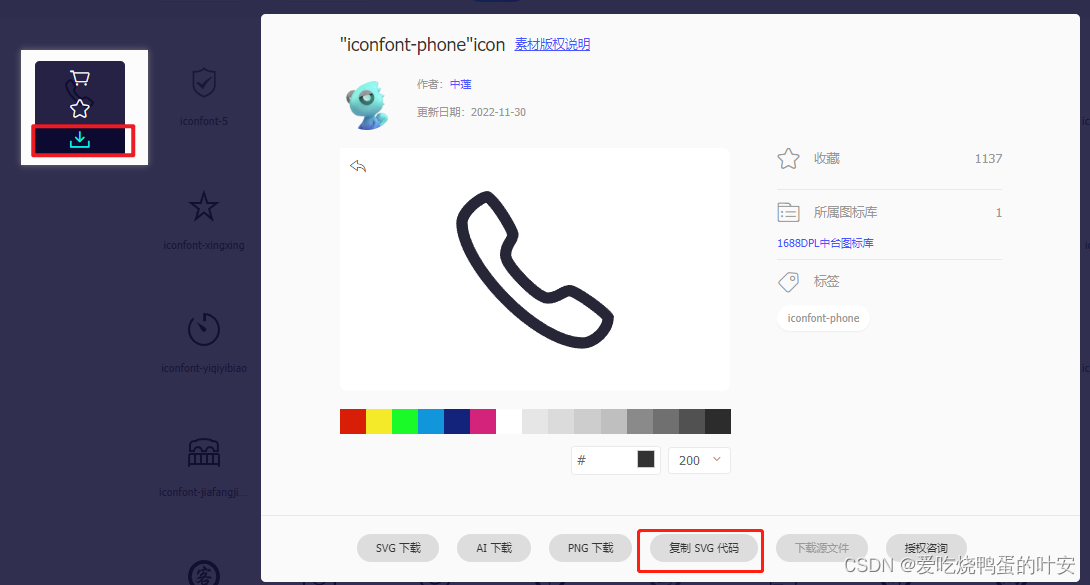
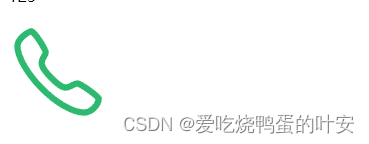
在icon下新建文件phone.svg并把svg代码粘贴到phone.svg文件中
注:需要把该文件中填充的颜色 fill="#272636"删除掉,影响到后期封装组件填充颜色了

接下来在component目录下封装组件SvgIcon,新建SvgIcon文件夹,并新建index.vue
<template>
    <!-- svg使用 -->
    <!-- svg 图标外侧容器节点 内部需要与use标签结合使用 -->
    <!-- xlink决定使用哪一个图标, 必须以#icon开始后面接src/assets/图标 -->
    <!-- style指定大小 fill指定颜色 -->
    <svg :style="{width: width, height: height}">
      <use :xlink:href="prefix + name" :fill="color"></use>
    </svg>
</template>

<script lang='ts' setup>

defineProps({
	name:String,
	prefix:{
		type:String,
		require:true,
		default:'#icon-'
	},
    color:{
		type:String,
		default:''
	},
    width: {
        type: String,
        default: '16px'
    },
    //svg高度
    height: {
        type: String,
        default: '16px'
    }
})


</script>

<style lang="scss" scoped></style>
- 1
- 2
- 3
- 4
- 5
- 6
- 7
- 8
- 9
- 10
- 11
- 12
- 13
- 14
- 15
- 16
- 17
- 18
- 19
- 20
- 21
- 22
- 23
- 24
- 25
- 26
- 27
- 28
- 29
- 30
- 31
- 32
- 33
- 34
- 35
- 36
- 37
- 38
- 39
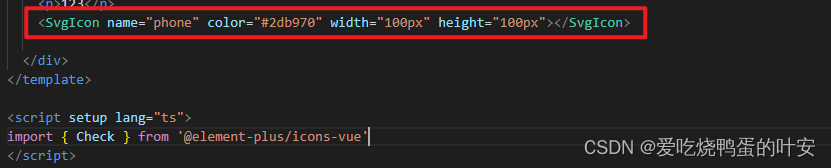
使用组件:
import SvgIcon from '@/components/SvgIcon/index.vue'
<SvgIcon name="phone" color="#2db970" width="100px" height="100px"></SvgIcon>
- 1
- 2
也可以
在入口文件main.ts中导入并注册为全局组件
import SvgIcon from '@/components/SvgIcon/index.vue';
app.component('SvgIcon', SvgIcon)
- 1
- 2
还可以这样做;
将项目中的所有全局组件配置为一个对象,在入口文件引入自定义插件对象并安装,步骤如下
在components目录下新建index.ts文件,在此引入全部的全局组件,并对外暴露,通过循环注册全局组件,代码如下
// 引入项目中全部的“全局组件”
import SvgIcon from './SvgIcon/index.vue'

//全局对象
const allGloablComponent = { SvgIcon }

//对外暴露插件对象
export default {
    //务必叫install方法
    install(app) {
        //注册项目全部的全局组件
        Object.keys(allGloablComponent).forEach(key => {
            //注册为全局组件
            app.component(key, allGloablComponent[key])
        })
    }
}
- 1
- 2
- 3
- 4
- 5
- 6
- 7
- 8
- 9
- 10
- 11
- 12
- 13
- 14
- 15
- 16
- 17
在入口文件main.ts下引入并安装所有的全局组件
//引入自定义插件对象,注册整个项目的全局组件
import gloablComponent from '@/components'
//安装自定义插件
app.use(gloablComponent)
- 1
- 2
- 3
- 4
直接在文件中使用即可,全局组件无需再次引用
3.5 集成sass
目前项目组件内部已经可以使用scss样式,因为在配置eslint工具的时候,项目当中已经安装过sass sass-loder,所以在组件中可以使用scss语法,需要加上lang="scss"
<style scoped lang="scss"></style>
- 1
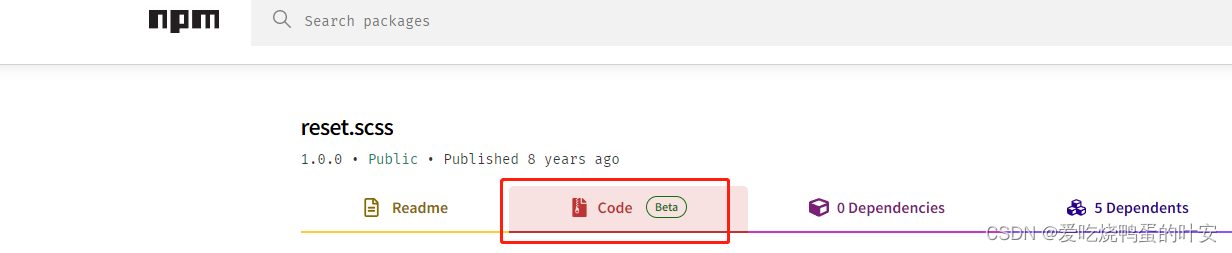
在src下新建styles目录,创建index.scss文件,并引入清除默认样式的文件reset.scss
@import './reset.scss'
清除默认样式的参考官网https://www.npmjs.com/package/reset.scss
如下:
/**
 * ENGINE
 * v0.2 | 20150615
 * License: none (public domain)
 */
*,*:after,*:before {
    box-sizing: border-box;
    outline: none;
}
html,body,div,span,applet,object,iframe,h1,h2,h3,h4,h5,h6,p,blockquote,pre,a,abbr,acronym,address,big,cite,code,del,dfn,em,img,ins,kbd,q,
s,samp,small,strike,strong,sub,sup,tt,var,b,u,i,center,dl,dt,dd,ol,ul,li,fieldset,form,label,legend,table,caption,tbody,tfoot,thead,tr,
th,td,article,aside,canvas,details,embed,figure,figcaption,footer,header,hgroup,menu,nav,output,ruby,section,summary,time,mark,audio,
video {
    font: inherit;
    font-size: 100%;
    margin: 0;
    padding: 0;
    vertical-align: baseline;
    border: 0;
}
article,aside,details,figcaption,figure,footer,header,hgroup,menu,nav,section {
    display: block;
}
body {
    line-height: 1;
}
ol,ul {
    list-style: none;
}
blockquote,q {
    quotes: none;
    &:before,
    &:after {
        content: '';
        content: none;
    }
}
sub,sup {
    font-size: 75%;
    line-height: 0;
    position: relative;
    vertical-align: baseline;
}
sup {
    top: -.5em;
}
sub {
    bottom: -.25em;
}
table {
    border-spacing: 0;
    border-collapse: collapse;
}
input,textarea,button {
    font-family: inhert;
    font-size: inherit;
    color: inherit;
}
select {
    text-indent: .01px;
    text-overflow: '';
    border: 0;
    border-radius: 0;
    -webkit-appearance: none;
    -moz-appearance: none;
}
select::-ms-expand {
    display: none;
}
code,pre {
    font-family: monospace, monospace;
    font-size: 1em;
}
- 1
- 2
- 3
- 4
- 5
- 6
- 7
- 8
- 9
- 10
- 11
- 12
- 13
- 14
- 15
- 16
- 17
- 18
- 19
- 20
- 21
- 22
- 23
- 24
- 25
- 26
- 27
- 28
- 29
- 30
- 31
- 32
- 33
- 34
- 35
- 36
- 37
- 38
- 39
- 40
- 41
- 42
- 43
- 44
- 45
- 46
- 47
- 48
- 49
- 50
- 51
- 52
- 53
- 54
- 55
- 56
- 57
- 58
- 59
- 60
- 61
- 62
- 63
- 64
- 65
- 66
- 67
- 68
- 69
- 70
- 71
- 72
- 73
在scss文件中无法使用
变量,需要在项目中国引入全局变量
变量,需要在项目中国引入全局变量
变量,需要在项目中国引入全局变量
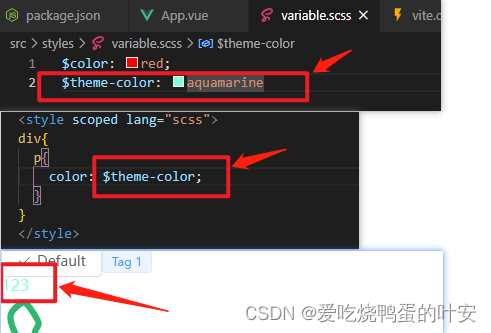
在styles/创建variable.scss
$color: red;
$theme-color: aquamarine
- 1
- 2
并在vite.config.ts中配置css全局变量
// scss全局变量配置 全局变量配置在/variable.scss
  css: {
    preprocessorOptions: {
      scss: {
        javascriptEnabled: true,
        additionalData: '@import "./src/styles/variable.scss";'
      }
    }
  }
- 1
- 2
- 3
- 4
- 5
- 6
- 7
- 8
- 9
位置如下:
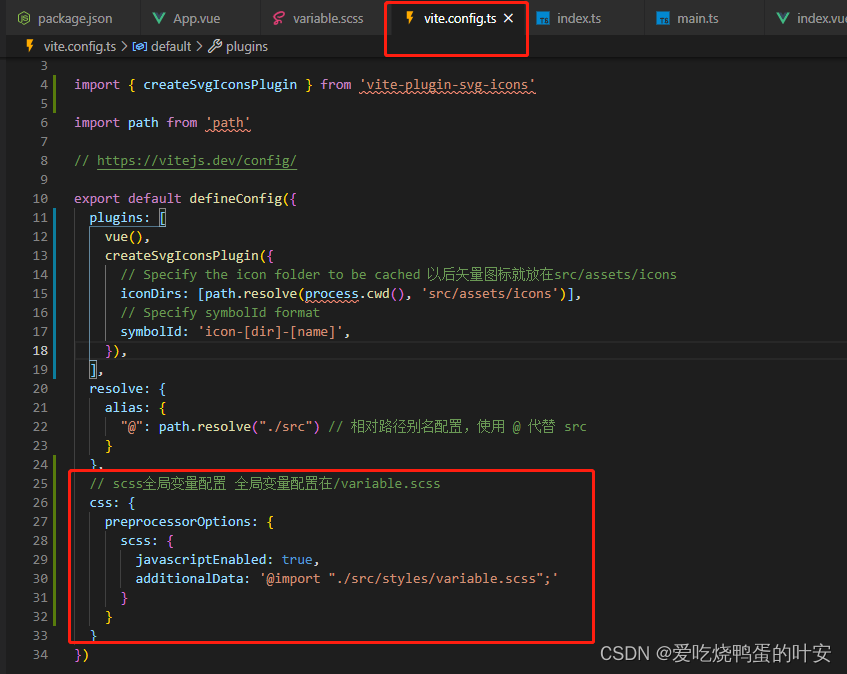
@import "./src/styles/variable.less";后面的;不要忘记,不然会报错!
配置完毕你会发现scss提供这些全局变量可以在组件样式中使用了!!!
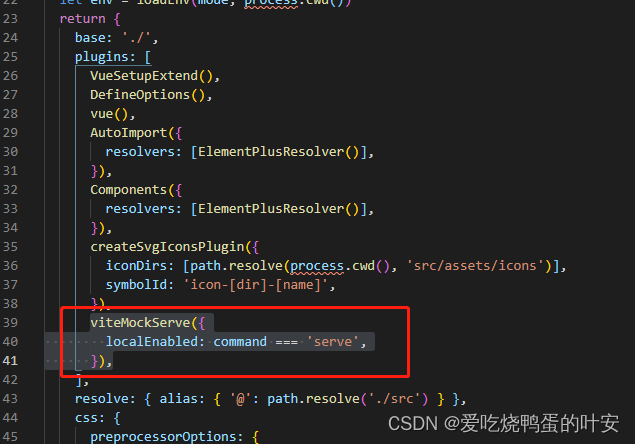
3.6 mock数据
安装依赖:https://www.npmjs.com/package/vite-plugin-mock
pnpm install -D vite-plugin-mock mockjs
- 1
并在vite.config.ts中配置文件,启用插件
import { viteMockServe } from 'vite-plugin-mock'

viteMockServe({
   localEnabled: command === 'serve',
 }),
- 1
- 2
- 3
- 4
- 5
根目录下新建mock文件夹,并新建user.ts编写接口
// createUserList此函数执行返回一个数组,数组包含两个用户信息
function createUserList() {
    return [
        {
            userId: 1,
            avatar:
                'https://wpimg.wallstcn.com/f778738c-e4f8-4870-b634-56703b4acafe.gif',
            username: 'admin',
            password: '123456',
            desc: '平台管理员',
            roles: ['平台管理员'],
            buttons: ['cuser.detail'],
            routes: ['home'],
            token: 'Admin Token',
        },
        {
            userId: 2,
            avatar:
                'https://wpimg.wallstcn.com/f778738c-e4f8-4870-b634-56703b4acafe.gif',
            username: 'system',
            password: '123456',
            desc: '系统管理员',
            roles: ['系统管理员'],
            buttons: ['cuser.detail', 'cuser.user'],
            routes: ['home'],
            token: 'System Token',
        },
    ]
}

export default [
    // 用户登录接口
    {
        url: '/api/user/login', //请求地址
        method: 'post', //请求方式
        response: ({ body }) => {
            //获取请求体携带过来的用户名与密码
            const { username, password } = body
            //调用获取用户信息函数,用于判断是否有此用户
            const checkUser = createUserList().find(
                (item) => item.username === username && item.password === password,
            )
            //没有用户返回失败信息
            if (!checkUser) {
                return { code: 201, data: { message: '账号或者密码不正确' } }
            }
            //如果有返回成功信息
            const { token } = checkUser
            return { code: 200, data: { token } }
        },
    },
    // 获取用户信息
    {
        url: '/api/user/info',
        method: 'get',
        response: (request) => {
            //获取请求头携带token
            const token = request.headers.token
            //查看用户信息是否包含有次token用户
            const checkUser = createUserList().find((item) => item.token === token)
            //没有返回失败的信息
            if (!checkUser) {
                return { code: 201, data: { message: '获取用户信息失败' } }
            }
            //如果有返回成功信息
            return { code: 200, data: { checkUser } }
        },
    },
]
- 1
- 2
- 3
- 4
- 5
- 6
- 7
- 8
- 9
- 10
- 11
- 12
- 13
- 14
- 15
- 16
- 17
- 18
- 19
- 20
- 21
- 22
- 23
- 24
- 25
- 26
- 27
- 28
- 29
- 30
- 31
- 32
- 33
- 34
- 35
- 36
- 37
- 38
- 39
- 40
- 41
- 42
- 43
- 44
- 45
- 46
- 47
- 48
- 49
- 50
- 51
- 52
- 53
- 54
- 55
- 56
- 57
- 58
- 59
- 60
- 61
- 62
- 63
- 64
- 65
- 66
- 67
- 68
- 69
- 70
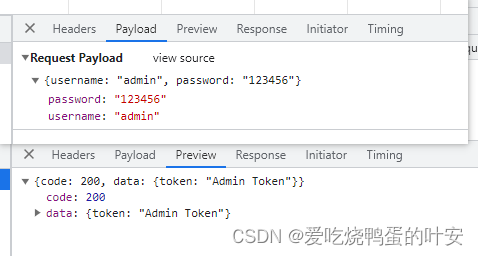
安装axios,在入口函数中测试接口的调用
pnpm i axios
import axios from 'axios'
axios({
  url:'/api/user/login',
  method:'post',
  data:{
    username: 'admin',
    password: '123456'
  }
})
- 1
- 2
- 3
- 4
- 5
- 6
- 7
- 8
- 9
3.7 axios二次封装
在开发项目时,避免不了与后端交互,因此需要使用axios插件实现发送网络请求;在开发项目的时候,经常对axios进行二次封装。
目的:
1、使用请求拦截器,并处理一些业务(开始进度条、请求头携带公共参数、超时时间)
2、使用响应拦截器,处理一些业务(进度条就结束 、简化服务器返回的数据、处理http网络错误)
根目录下新建utils/request.ts
- 1
- 2
- 3
- 4
- 5
// axios二次封装:使用请求与响应拦截器
import axios from 'axios'
import { ElMessage } from 'element-plus'

// 第一步:利用axios对象的create方法,创建axios实例(其他配置:基础路径、超时时间)
let request = axios.create({
    //基础路径
    baseURL: import.meta.env.VITE_APP_BASE_API,
    timeout: 5000
})

//第二步: request实例添加请求与响应拦截器
request.interceptors.request.use(config => {
    //config配置对象,headers属性请求头,常给服务器携带公共参数
    return config
})

//第三步: 响应拦截器
request.interceptors.response.use((response) => {
    //成功回调
    return response.data
}, (error) => {
    //失败回调 一般处理网络http错误
    // 定义一个变量:存储网络错误信息
    let message = ''
    switch (error.response.status) {
        case 401:
            message = 'TOKEN过期'
            break;
        case 403:
            message = '无权访问'
            break;
        case 404:
            message = '请求地址找不到'
            break;
        case 500:
            message = '服务器出现问题'
            break;
        default:
            message = '网络出现问题'
            break;
    }
    ElMessage({
        type: 'error',
        message
    })
    return Promise.reject(error)
})

export default request
- 1
- 2
- 3
- 4
- 5
- 6
- 7
- 8
- 9
- 10
- 11
- 12
- 13
- 14
- 15
- 16
- 17
- 18
- 19
- 20
- 21
- 22
- 23
- 24
- 25
- 26
- 27
- 28
- 29
- 30
- 31
- 32
- 33
- 34
- 35
- 36
- 37
- 38
- 39
- 40
- 41
- 42
- 43
- 44
- 45
- 46
- 47
- 48
- 49
- 50
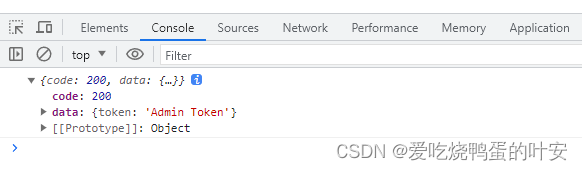
app.vue中测试使用接口
import request from '@/utils/request'
import { onMounted } from 'vue'

onMounted(()=>{
  request({
    url:'/user/login',
    method: 'post',
    data:{
      username: 'admin',
      password: '123456'
    }
  }).then(res=>{
    console.log(res)
  })
})
- 1
- 2
- 3
- 4
- 5
- 6
- 7
- 8
- 9
- 10
- 11
- 12
- 13
- 14
- 15