
热门标签
热门文章
- 1宝塔搭建站点(无域名版本、解决80端口占用)_宝塔没有域名直接做网站怎么弄
- 2大数据分析-用户画像详解_大数据画像隐患多
- 3新修订的《中华人民共和国保守国家秘密法》完善了定密授权制度,明确特殊情况下“()保密行政管理部门或者()保密行政管理部门可以授予机关、单位定密权限”。_特殊情况下保密行政部门或者
- 4华为OD机试C卷-- 最长子字符串的长度(二)(Java & JS & Python & C)
- 5axios拦截器和token_axios 拦截器 token
- 6Windows10下安装解压版MySQL8.0.12_win10解压mysql8.0
- 7python tkinter控件_Python TKinter布局管理Place()Grid Pack详解
- 8Ambari-2.7.5.0 + HDP-3.1.5.0网盘地址_hdp3.1.5 ubuntu ambari 2.7.5
- 9在linux中重启网络服务的命令,linux重启网络命令
- 10数据分析案例-基于亚马逊智能产品评论的探索性数据分析_08亚马逊评论数据集教程
当前位置: article > 正文
基于深度学习神经网络YOLOv4目标检测的车牌识别系统_yolo 车牌识别
作者:我家自动化 | 2024-06-15 21:55:47
赞
踩
yolo 车牌识别
第一步:YOLOv4介绍
YOLOv4是一种目标检测算法,它在精度和速度之间取得了最佳的平衡。它是YOLO(You Only Look Once)系列算法的最新版本,通过将目标检测任务转化为一个回归问题,实现了实时目标检测。YOLOv4采用了一系列的调优手段,使得其在目标检测任务中表现出色。
YOLOv4的框架原理主要包括以下几个方面:
- BackBone:YOLOv4使用了CSPDarknet53作为其主干网络,该网络结构具有较强的特征提取能力。
- 训练策略:YOLOv4采用了多尺度训练和数据增强等策略来提高模型的泛化能力和检测精度。
- 推理策略:YOLOv4使用了多尺度推理和后处理技术来提高检测速度和准确性。
- 检测头训练策略:YOLOv4使用了Mosaic数据增强和CIoU损失函数等策略来提高小目标的检测精度。
- 检测头推理策略:YOLOv4使用了YOLOv3和YOLOv4的检测头结合策略,提高了模型的检测能力。
总之,YOLOv4是一种高效准确的目标检测算法,具有较好的精度和速度表现。它在目标检测领域具有广泛的应用前景。
标注数据,YOLOv4的训练和测试步骤,各路大神都已经做了很多工作,我就不再写了,这里有几个写的比较好的博客可以参考:
【项目实践】YOLO V4万字原理详细讲解并训练自己的数据集(pytorch完整项目打包下载)-腾讯云开发者社区-腾讯云
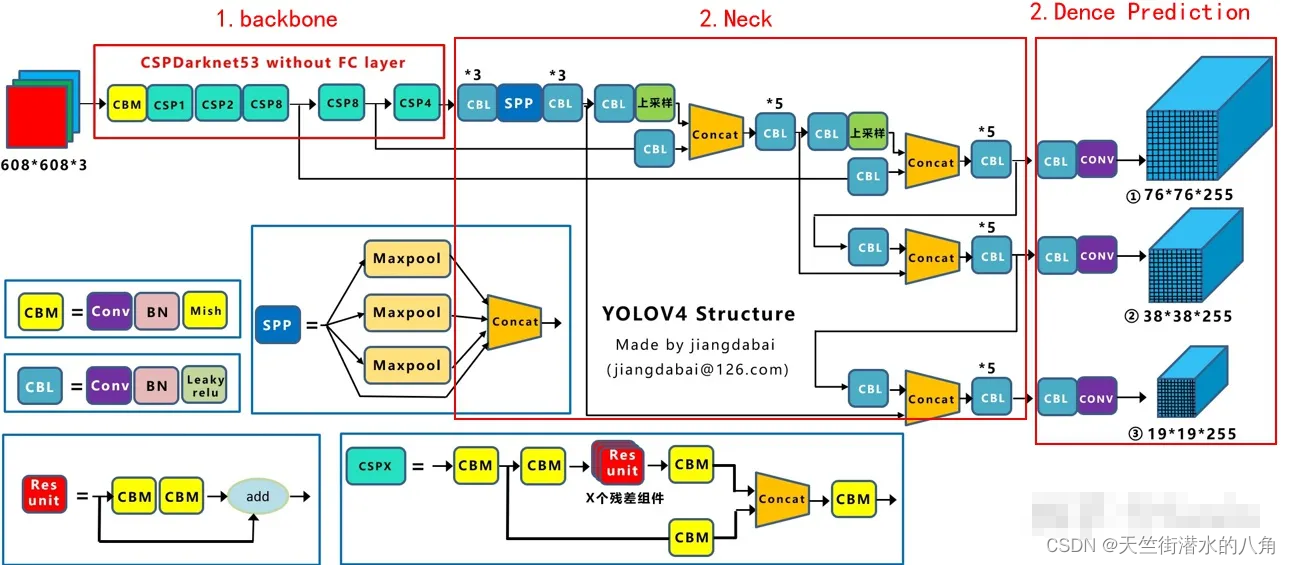
第二步:YOLOv4网络结构
第三步:代码展示
- import colorsys
- import os
- import time
-
- import numpy as np
- import torch
- import torch.nn as nn
- import cv2
- from PIL import ImageDraw, ImageFont, Image
-
- from nets.yolo import YoloBody
- from utils.utils import (cvtColor, get_anchors, get_classes, preprocess_input,
- resize_image, show_config)
- from utils.utils_bbox import DecodeBox, DecodeBoxNP
-
- '''
- 训练自己的数据集必看注释!
- '''
- class YOLO(object):
- _defaults = {
- #--------------------------------------------------------------------------#
- # 使用自己训练好的模型进行预测一定要修改model_path和classes_path!
- # model_path指向logs文件夹下的权值文件,classes_path指向model_data下的txt
- #
- # 训练好后logs文件夹下存在多个权值文件,选择验证集损失较低的即可。
- # 验证集损失较低不代表mAP较高,仅代表该权值在验证集上泛化性能较好。
- # 如果出现shape不匹配,同时要注意训练时的model_path和classes_path参数的修改
- #--------------------------------------------------------------------------#
- "model_path" : 'logs\ep160-loss0.020-val_loss0.018.pth',
- "classes_path" : 'model_data/voc_classes.txt',
- #---------------------------------------------------------------------#
- # anchors_path代表先验框对应的txt文件,一般不修改。
- # anchors_mask用于帮助代码找到对应的先验框,一般不修改。
- #---------------------------------------------------------------------#
- "anchors_path" : 'model_data/yolo_anchors.txt',
- "anchors_mask" : [[6, 7, 8], [3, 4, 5], [0, 1, 2]],
- #---------------------------------------------------------------------#
- # 输入图片的大小,必须为32的倍数。
- #---------------------------------------------------------------------#
- "input_shape" : [416, 416],
- #---------------------------------------------------------------------#
- # 只有得分大于置信度的预测框会被保留下来
- #---------------------------------------------------------------------#
- "confidence" : 0.5,
- #---------------------------------------------------------------------#
- # 非极大抑制所用到的nms_iou大小
- #---------------------------------------------------------------------#
- "nms_iou" : 0.3,
- #---------------------------------------------------------------------#
- # 该变量用于控制是否使用letterbox_image对输入图像进行不失真的resize,
- # 在多次测试后,发现关闭letterbox_image直接resize的效果更好
- #---------------------------------------------------------------------#
- "letterbox_image" : False,
- #-------------------------------#
- # 是否使用Cuda
- # 没有GPU可以设置成False
- #-------------------------------#
- "cuda" : True,
- }
-
- @classmethod
- def get_defaults(cls, n):
- if n in cls._defaults:
- return cls._defaults[n]
- else:
- return "Unrecognized attribute name '" + n + "'"
-
- #---------------------------------------------------#
- # 初始化YOLO
- #---------------------------------------------------#
- def __init__(self, **kwargs):
- self.__dict__.update(self._defaults)
- for name, value in kwargs.items():
- setattr(self, name, value)
- self._defaults[name] = value
-
- #---------------------------------------------------#
- # 获得种类和先验框的数量
- #---------------------------------------------------#
- self.class_names, self.num_classes = get_classes(self.classes_path)
- self.anchors, self.num_anchors = get_anchors(self.anchors_path)
- self.bbox_util = DecodeBox(self.anchors, self.num_classes, (self.input_shape[0], self.input_shape[1]), self.anchors_mask)
-
- #---------------------------------------------------#
- # 画框设置不同的颜色
- #---------------------------------------------------#
- hsv_tuples = [(x / self.num_classes, 1., 1.) for x in range(self.num_classes)]
- self.colors = list(map(lambda x: colorsys.hsv_to_rgb(*x), hsv_tuples))
- self.colors = list(map(lambda x: (int(x[0] * 255), int(x[1] * 255), int(x[2] * 255)), self.colors))
- self.generate()
-
- show_config(**self._defaults)
-
- #---------------------------------------------------#
- # 生成模型
- #---------------------------------------------------#
- def generate(self, onnx=False):
- #---------------------------------------------------#
- # 建立yolo模型,载入yolo模型的权重
- #---------------------------------------------------#
- self.net = YoloBody(self.anchors_mask, self.num_classes)
- device = torch.device('cuda' if torch.cuda.is_available() else 'cpu')
- self.net.load_state_dict(torch.load(self.model_path, map_location=device))
- self.net = self.net.eval()
- print('{} model, anchors, and classes loaded.'.format(self.model_path))
- if not onnx:
- if self.cuda:
- self.net = nn.DataParallel(self.net)
- self.net = self.net.cuda()
-
- #---------------------------------------------------#
- # 检测图片
- #---------------------------------------------------#
- def detect_image(self, image, crop = True, count = False):
- #---------------------------------------------------#
- # 计算输入图片的高和宽
- #---------------------------------------------------#
- image_shape = np.array(np.shape(image)[0:2])
- #---------------------------------------------------------#
- # 在这里将图像转换成RGB图像,防止灰度图在预测时报错。
- # 代码仅仅支持RGB图像的预测,所有其它类型的图像都会转化成RGB
- #---------------------------------------------------------#
- image = cvtColor(image)
- #---------------------------------------------------------#
- # 给图像增加灰条,实现不失真的resize
- # 也可以直接resize进行识别
- #---------------------------------------------------------#
- image_data = resize_image(image, (self.input_shape[1],self.input_shape[0]), self.letterbox_image)
- #---------------------------------------------------------#
- # 添加上batch_size维度
- #---------------------------------------------------------#
- image_data = np.expand_dims(np.transpose(preprocess_input(np.array(image_data, dtype='float32')), (2, 0, 1)), 0)
-
- with torch.no_grad():
- images = torch.from_numpy(image_data)
- if self.cuda:
- images = images.cuda()
- #---------------------------------------------------------#
- # 将图像输入网络当中进行预测!
- #---------------------------------------------------------#
- outputs = self.net(images)
- outputs = self.bbox_util.decode_box(outputs)
- #---------------------------------------------------------#
- # 将预测框进行堆叠,然后进行非极大抑制
- #---------------------------------------------------------#
- results = self.bbox_util.non_max_suppression(torch.cat(outputs, 1), self.num_classes, self.input_shape,
- image_shape, self.letterbox_image, conf_thres = self.confidence, nms_thres = self.nms_iou)
-
- if results[0] is None:
- return image
-
- top_label = np.array(results[0][:, 6], dtype = 'int32')
- top_conf = results[0][:, 4] * results[0][:, 5]
- top_boxes = results[0][:, :4]
- #---------------------------------------------------------#
- # 设置字体与边框厚度
- #---------------------------------------------------------#
- font = ImageFont.truetype(font='model_data/simhei.ttf', size=np.floor(3e-2 * image.size[1] + 0.5).astype('int32'))
- thickness = int(max((image.size[0] + image.size[1]) // np.mean(self.input_shape), 1))
- #---------------------------------------------------------#
- # 计数
- #---------------------------------------------------------#
- if count:
- print("top_label:", top_label)
- classes_nums = np.zeros([self.num_classes])
- for i in range(self.num_classes):
- num = np.sum(top_label == i)
- if num > 0:
- print(self.class_names[i], " : ", num)
- classes_nums[i] = num
- print("classes_nums:", classes_nums)
- #---------------------------------------------------------#
- # 是否进行目标的裁剪
- #---------------------------------------------------------#
- if crop:
- for i, c in list(enumerate(top_label)):
- top, left, bottom, right = top_boxes[i]
- top = max(0, np.floor(top).astype('int32'))
- left = max(0, np.floor(left).astype('int32'))
- bottom = min(image.size[1], np.floor(bottom).astype('int32'))
- right = min(image.size[0], np.floor(right).astype('int32'))
-
- dir_save_path = "img_crop"
- if not os.path.exists(dir_save_path):
- os.makedirs(dir_save_path)
- crop_image = image.crop([left, top, right, bottom])
- crop_image.save(os.path.join(dir_save_path, "crop_" + str(i) + ".png"), quality=95, subsampling=0)
- print("save crop_" + str(i) + ".png to " + dir_save_path)
- #---------------------------------------------------------#
- # 图像绘制
- #---------------------------------------------------------#
- resdict = {}
- for i, c in list(enumerate(top_label)):
- predicted_class = self.class_names[int(c)]
- box = top_boxes[i]
- score = top_conf[i]
-
- top, left, bottom, right = box
-
- top = max(0, np.floor(top).astype('int32'))
- left = max(0, np.floor(left).astype('int32'))
- bottom = min(image.size[1], np.floor(bottom).astype('int32'))
- right = min(image.size[0], np.floor(right).astype('int32'))
-
- label = '{}'.format(predicted_class)
- draw = ImageDraw.Draw(image)
- label_size = draw.textsize(label, font)
- label = label.encode('utf-8')
- print(label, top, left, bottom, right)
-
- if top - label_size[1] >= 0:
- text_origin = np.array([left, top - label_size[1]])
- else:
- text_origin = np.array([left, top + 1])
-
- for i in range(thickness):
- draw.rectangle([left + i, top + i, right - i, bottom - i], outline=self.colors[c])
- draw.rectangle([tuple(text_origin), tuple(text_origin + label_size)], fill=self.colors[c])
- draw.text(text_origin, str(label,'UTF-8'), fill=(0, 0, 0), font=font)
- resdict[left] = str(label,'UTF-8')
- del draw
- sorted_by_key = dict(sorted(resdict.items(), key=lambda item: item[0]))
- res = ''
- cnt = 0
- for key in sorted_by_key:
- if cnt == 0:
- cnt += 1
- continue
- res += sorted_by_key[key]
-
- print(res)
- return image,res
-
- def get_FPS(self, image, test_interval):
- image_shape = np.array(np.shape(image)[0:2])
- #---------------------------------------------------------#
- # 在这里将图像转换成RGB图像,防止灰度图在预测时报错。
- # 代码仅仅支持RGB图像的预测,所有其它类型的图像都会转化成RGB
- #---------------------------------------------------------#
- image = cvtColor(image)
- #---------------------------------------------------------#
- # 给图像增加灰条,实现不失真的resize
- # 也可以直接resize进行识别
- #---------------------------------------------------------#
- image_data = resize_image(image, (self.input_shape[1],self.input_shape[0]), self.letterbox_image)
- #---------------------------------------------------------#
- # 添加上batch_size维度
- #---------------------------------------------------------#
- image_data = np.expand_dims(np.transpose(preprocess_input(np.array(image_data, dtype='float32')), (2, 0, 1)), 0)
-
- with torch.no_grad():
- images = torch.from_numpy(image_data)
- if self.cuda:
- images = images.cuda()
- #---------------------------------------------------------#
- # 将图像输入网络当中进行预测!
- #---------------------------------------------------------#
- outputs = self.net(images)
- outputs = self.bbox_util.decode_box(outputs)
- #---------------------------------------------------------#
- # 将预测框进行堆叠,然后进行非极大抑制
- #---------------------------------------------------------#
- results = self.bbox_util.non_max_suppression(torch.cat(outputs, 1), self.num_classes, self.input_shape,
- image_shape, self.letterbox_image, conf_thres=self.confidence, nms_thres=self.nms_iou)
-
- t1 = time.time()
- for _ in range(test_interval):
- with torch.no_grad():
- #---------------------------------------------------------#
- # 将图像输入网络当中进行预测!
- #---------------------------------------------------------#
- outputs = self.net(images)
- outputs = self.bbox_util.decode_box(outputs)
- #---------------------------------------------------------#
- # 将预测框进行堆叠,然后进行非极大抑制
- #---------------------------------------------------------#
- results = self.bbox_util.non_max_suppression(torch.cat(outputs, 1), self.num_classes, self.input_shape,
- image_shape, self.letterbox_image, conf_thres=self.confidence, nms_thres=self.nms_iou)
-
- t2 = time.time()
- tact_time = (t2 - t1) / test_interval
- return tact_time
-
- def detect_heatmap(self, image, heatmap_save_path):
- import cv2
- import matplotlib.pyplot as plt
- def sigmoid(x):
- y = 1.0 / (1.0 + np.exp(-x))
- return y
- #---------------------------------------------------------#
- # 在这里将图像转换成RGB图像,防止灰度图在预测时报错。
- # 代码仅仅支持RGB图像的预测,所有其它类型的图像都会转化成RGB
- #---------------------------------------------------------#
- image = cvtColor(image)
- #---------------------------------------------------------#
- # 给图像增加灰条,实现不失真的resize
- # 也可以直接resize进行识别
- #---------------------------------------------------------#
- image_data = resize_image(image, (self.input_shape[1],self.input_shape[0]), self.letterbox_image)
- #---------------------------------------------------------#
- # 添加上batch_size维度
- #---------------------------------------------------------#
- image_data = np.expand_dims(np.transpose(preprocess_input(np.array(image_data, dtype='float32')), (2, 0, 1)), 0)
-
- with torch.no_grad():
- images = torch.from_numpy(image_data)
- if self.cuda:
- images = images.cuda()
- #---------------------------------------------------------#
- # 将图像输入网络当中进行预测!
- #---------------------------------------------------------#
- outputs = self.net(images)
-
- plt.imshow(image, alpha=1)
- plt.axis('off')
- mask = np.zeros((image.size[1], image.size[0]))
- for sub_output in outputs:
- sub_output = sub_output.cpu().numpy()
- b, c, h, w = np.shape(sub_output)
- sub_output = np.transpose(np.reshape(sub_output, [b, 3, -1, h, w]), [0, 3, 4, 1, 2])[0]
- score = np.max(sigmoid(sub_output[..., 4]), -1)
- score = cv2.resize(score, (image.size[0], image.size[1]))
- normed_score = (score * 255).astype('uint8')
- mask = np.maximum(mask, normed_score)
-
- plt.imshow(mask, alpha=0.5, interpolation='nearest', cmap="jet")
-
- plt.axis('off')
- plt.subplots_adjust(top=1, bottom=0, right=1, left=0, hspace=0, wspace=0)
- plt.margins(0, 0)
- plt.savefig(heatmap_save_path, dpi=200, bbox_inches='tight', pad_inches = -0.1)
- print("Save to the " + heatmap_save_path)
- plt.show()
-
- def convert_to_onnx(self, simplify, model_path):
- import onnx
- self.generate(onnx=True)
-
- im = torch.zeros(1, 3, *self.input_shape).to('cpu') # image size(1, 3, 512, 512) BCHW
- input_layer_names = ["images"]
- output_layer_names = ["output"]
-
- # Export the model
- print(f'Starting export with onnx {onnx.__version__}.')
- torch.onnx.export(self.net,
- im,
- f = model_path,
- verbose = False,
- opset_version = 12,
- training = torch.onnx.TrainingMode.EVAL,
- do_constant_folding = True,
- input_names = input_layer_names,
- output_names = output_layer_names,
- dynamic_axes = None)
-
- # Checks
- model_onnx = onnx.load(model_path) # load onnx model
- onnx.checker.check_model(model_onnx) # check onnx model
-
- # Simplify onnx
- if simplify:
- import onnxsim
- print(f'Simplifying with onnx-simplifier {onnxsim.__version__}.')
- model_onnx, check = onnxsim.simplify(
- model_onnx,
- dynamic_input_shape=False,
- input_shapes=None)
- assert check, 'assert check failed'
- onnx.save(model_onnx, model_path)
-
- print('Onnx model save as {}'.format(model_path))
-
- def get_map_txt(self, image_id, image, class_names, map_out_path):
- f = open(os.path.join(map_out_path, "detection-results/"+image_id+".txt"),"w")
- image_shape = np.array(np.shape(image)[0:2])
- #---------------------------------------------------------#
- # 在这里将图像转换成RGB图像,防止灰度图在预测时报错。
- # 代码仅仅支持RGB图像的预测,所有其它类型的图像都会转化成RGB
- #---------------------------------------------------------#
- image = cvtColor(image)
- #---------------------------------------------------------#
- # 给图像增加灰条,实现不失真的resize
- # 也可以直接resize进行识别
- #---------------------------------------------------------#
- image_data = resize_image(image, (self.input_shape[1],self.input_shape[0]), self.letterbox_image)
- #---------------------------------------------------------#
- # 添加上batch_size维度
- #---------------------------------------------------------#
- image_data = np.expand_dims(np.transpose(preprocess_input(np.array(image_data, dtype='float32')), (2, 0, 1)), 0)
-
- with torch.no_grad():
- images = torch.from_numpy(image_data)
- if self.cuda:
- images = images.cuda()
- #---------------------------------------------------------#
- # 将图像输入网络当中进行预测!
- #---------------------------------------------------------#
- outputs = self.net(images)
- outputs = self.bbox_util.decode_box(outputs)
- #---------------------------------------------------------#
- # 将预测框进行堆叠,然后进行非极大抑制
- #---------------------------------------------------------#
- results = self.bbox_util.non_max_suppression(torch.cat(outputs, 1), self.num_classes, self.input_shape,
- image_shape, self.letterbox_image, conf_thres = self.confidence, nms_thres = self.nms_iou)
-
- if results[0] is None:
- return
-
- top_label = np.array(results[0][:, 6], dtype = 'int32')
- top_conf = results[0][:, 4] * results[0][:, 5]
- top_boxes = results[0][:, :4]
-
- for i, c in list(enumerate(top_label)):
- predicted_class = self.class_names[int(c)]
- box = top_boxes[i]
- score = str(top_conf[i])
-
- top, left, bottom, right = box
- if predicted_class not in class_names:
- continue
-
- f.write("%s %s %s %s %s %s\n" % (predicted_class, score[:6], str(int(left)), str(int(top)), str(int(right)),str(int(bottom))))
-
- f.close()
- return
-
- class YOLO_ONNX(object):
- _defaults = {
- #--------------------------------------------------------------------------#
- # 使用自己训练好的模型进行预测一定要修改onnx_path和classes_path!
- # onnx_path指向logs文件夹下的权值文件,classes_path指向model_data下的txt
- #
- # 训练好后logs文件夹下存在多个权值文件,选择验证集损失较低的即可。
- # 验证集损失较低不代表mAP较高,仅代表该权值在验证集上泛化性能较好。
- # 如果出现shape不匹配,同时要注意训练时的onnx_path和classes_path参数的修改
- #--------------------------------------------------------------------------#
- "onnx_path" : 'model_data/models.onnx',
- "classes_path" : 'model_data/coco_classes.txt',
- #---------------------------------------------------------------------#
- # anchors_path代表先验框对应的txt文件,一般不修改。
- # anchors_mask用于帮助代码找到对应的先验框,一般不修改。
- #---------------------------------------------------------------------#
- "anchors_path" : 'model_data/yolo_anchors.txt',
- "anchors_mask" : [[6, 7, 8], [3, 4, 5], [0, 1, 2]],
- #---------------------------------------------------------------------#
- # 输入图片的大小,必须为32的倍数。
- #---------------------------------------------------------------------#
- "input_shape" : [416, 416],
- #---------------------------------------------------------------------#
- # 只有得分大于置信度的预测框会被保留下来
- #---------------------------------------------------------------------#
- "confidence" : 0.5,
- #---------------------------------------------------------------------#
- # 非极大抑制所用到的nms_iou大小
- #---------------------------------------------------------------------#
- "nms_iou" : 0.3,
- #---------------------------------------------------------------------#
- # 该变量用于控制是否使用letterbox_image对输入图像进行不失真的resize,
- # 在多次测试后,发现关闭letterbox_image直接resize的效果更好
- #---------------------------------------------------------------------#
- "letterbox_image" : True
- }
-
- @classmethod
- def get_defaults(cls, n):
- if n in cls._defaults:
- return cls._defaults[n]
- else:
- return "Unrecognized attribute name '" + n + "'"
-
- #---------------------------------------------------#
- # 初始化YOLO
- #---------------------------------------------------#
- def __init__(self, **kwargs):
- self.__dict__.update(self._defaults)
- for name, value in kwargs.items():
- setattr(self, name, value)
- self._defaults[name] = value
-
- import onnxruntime
- self.onnx_session = onnxruntime.InferenceSession(self.onnx_path)
- # 获得所有的输入node
- self.input_name = self.get_input_name()
- # 获得所有的输出node
- self.output_name = self.get_output_name()
-
- #---------------------------------------------------#
- # 获得种类和先验框的数量
- #---------------------------------------------------#
- self.class_names, self.num_classes = self.get_classes(self.classes_path)
- self.anchors, self.num_anchors = self.get_anchors(self.anchors_path)
- self.bbox_util = DecodeBoxNP(self.anchors, self.num_classes, (self.input_shape[0], self.input_shape[1]), self.anchors_mask)
-
- #---------------------------------------------------#
- # 画框设置不同的颜色
- #---------------------------------------------------#
- hsv_tuples = [(x / self.num_classes, 1., 1.) for x in range(self.num_classes)]
- self.colors = list(map(lambda x: colorsys.hsv_to_rgb(*x), hsv_tuples))
- self.colors = list(map(lambda x: (int(x[0] * 255), int(x[1] * 255), int(x[2] * 255)), self.colors))
-
- show_config(**self._defaults)
-
- def get_classes(self, classes_path):
- with open(classes_path, encoding='utf-8') as f:
- class_names = f.readlines()
- class_names = [c.strip() for c in class_names]
- return class_names, len(class_names)
-
- def get_anchors(self, anchors_path):
- '''loads the anchors from a file'''
- with open(anchors_path, encoding='utf-8') as f:
- anchors = f.readline()
- anchors = [float(x) for x in anchors.split(',')]
- anchors = np.array(anchors).reshape(-1, 2)
- return anchors, len(anchors)
-
- def get_input_name(self):
- # 获得所有的输入node
- input_name=[]
- for node in self.onnx_session.get_inputs():
- input_name.append(node.name)
- return input_name
-
- def get_output_name(self):
- # 获得所有的输出node
- output_name=[]
- for node in self.onnx_session.get_outputs():
- output_name.append(node.name)
- return output_name
-
- def get_input_feed(self,image_tensor):
- # 利用input_name获得输入的tensor
- input_feed={}
- for name in self.input_name:
- input_feed[name]=image_tensor
- return input_feed
-
- #---------------------------------------------------#
- # 对输入图像进行resize
- #---------------------------------------------------#
- def resize_image(self, image, size, letterbox_image, mode='PIL'):
- if mode == 'PIL':
- iw, ih = image.size
- w, h = size
-
- if letterbox_image:
- scale = min(w/iw, h/ih)
- nw = int(iw*scale)
- nh = int(ih*scale)
-
- image = image.resize((nw,nh), Image.BICUBIC)
- new_image = Image.new('RGB', size, (128,128,128))
- new_image.paste(image, ((w-nw)//2, (h-nh)//2))
- else:
- new_image = image.resize((w, h), Image.BICUBIC)
- else:
- image = np.array(image)
- if letterbox_image:
- # 获得现在的shape
- shape = np.shape(image)[:2]
- # 获得输出的shape
- if isinstance(size, int):
- size = (size, size)
-
- # 计算缩放的比例
- r = min(size[0] / shape[0], size[1] / shape[1])
-
- # 计算缩放后图片的高宽
- new_unpad = int(round(shape[1] * r)), int(round(shape[0] * r))
- dw, dh = size[1] - new_unpad[0], size[0] - new_unpad[1]
-
- # 除以2以padding到两边
- dw /= 2
- dh /= 2
-
- # 对图像进行resize
- if shape[::-1] != new_unpad: # resize
- image = cv2.resize(image, new_unpad, interpolation=cv2.INTER_LINEAR)
- top, bottom = int(round(dh - 0.1)), int(round(dh + 0.1))
- left, right = int(round(dw - 0.1)), int(round(dw + 0.1))
-
- new_image = cv2.copyMakeBorder(image, top, bottom, left, right, cv2.BORDER_CONSTANT, value=(128, 128, 128)) # add border
- else:
- new_image = cv2.resize(image, (w, h))
-
- return new_image
-
- def detect_image(self, image):
- image_shape = np.array(np.shape(image)[0:2])
- #---------------------------------------------------------#
- # 在这里将图像转换成RGB图像,防止灰度图在预测时报错。
- # 代码仅仅支持RGB图像的预测,所有其它类型的图像都会转化成RGB
- #---------------------------------------------------------#
- image = cvtColor(image)
-
- image_data = self.resize_image(image, self.input_shape, True)
- #---------------------------------------------------------#
- # 添加上batch_size维度
- # h, w, 3 => 3, h, w => 1, 3, h, w
- #---------------------------------------------------------#
- image_data = np.expand_dims(np.transpose(preprocess_input(np.array(image_data, dtype='float32')), (2, 0, 1)), 0)
-
- input_feed = self.get_input_feed(image_data)
- outputs = self.onnx_session.run(output_names=self.output_name, input_feed=input_feed)
-
- feature_map_shape = [[int(j / (2 ** (i + 3))) for j in self.input_shape] for i in range(len(self.anchors_mask))][::-1]
- for i in range(len(self.anchors_mask)):
- outputs[i] = np.reshape(outputs[i], (1, len(self.anchors_mask[i]) * (5 + self.num_classes), feature_map_shape[i][0], feature_map_shape[i][1]))
-
- outputs = self.bbox_util.decode_box(outputs)
- #---------------------------------------------------------#
- # 将预测框进行堆叠,然后进行非极大抑制
- #---------------------------------------------------------#
- results = self.bbox_util.non_max_suppression(np.concatenate(outputs, 1), self.num_classes, self.input_shape,
- image_shape, self.letterbox_image, conf_thres = self.confidence, nms_thres = self.nms_iou)
-
- if results[0] is None:
- return image
-
- top_label = np.array(results[0][:, 6], dtype = 'int32')
- top_conf = results[0][:, 4] * results[0][:, 5]
- top_boxes = results[0][:, :4]
-
- #---------------------------------------------------------#
- # 设置字体与边框厚度
- #---------------------------------------------------------#
- font = ImageFont.truetype(font='model_data/simhei.ttf', size=np.floor(3e-2 * image.size[1] + 0.5).astype('int32'))
- thickness = int(max((image.size[0] + image.size[1]) // np.mean(self.input_shape), 1))
-
- #---------------------------------------------------------#
- # 图像绘制
- #---------------------------------------------------------#
- for i, c in list(enumerate(top_label)):
- predicted_class = self.class_names[int(c)]
- box = top_boxes[i]
- score = top_conf[i]
-
- top, left, bottom, right = box
-
- top = max(0, np.floor(top).astype('int32'))
- left = max(0, np.floor(left).astype('int32'))
- bottom = min(image.size[1], np.floor(bottom).astype('int32'))
- right = min(image.size[0], np.floor(right).astype('int32'))
-
- label = '{} {:.2f}'.format(predicted_class, score)
- draw = ImageDraw.Draw(image)
- label_size = draw.textsize(label, font)
- label = label.encode('utf-8')
- print(label, top, left, bottom, right)
-
- if top - label_size[1] >= 0:
- text_origin = np.array([left, top - label_size[1]])
- else:
- text_origin = np.array([left, top + 1])
-
- for i in range(thickness):
- draw.rectangle([left + i, top + i, right - i, bottom - i], outline=self.colors[c])
- draw.rectangle([tuple(text_origin), tuple(text_origin + label_size)], fill=self.colors[c])
- draw.text(text_origin, str(label,'UTF-8'), fill=(0, 0, 0), font=font)
- del draw
-
- return image

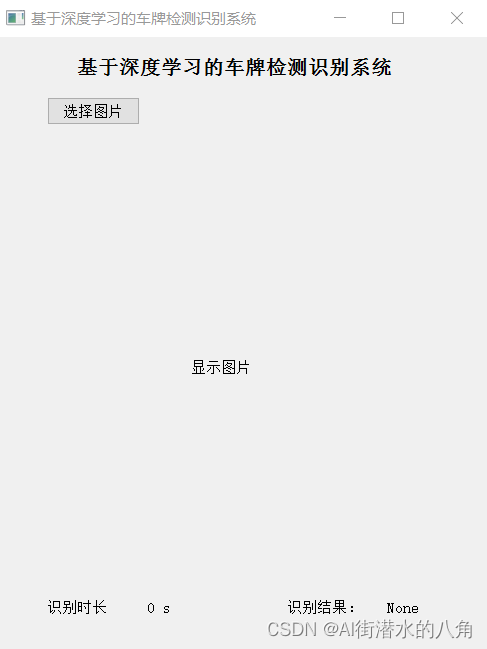
第四步:运行
运行界面:
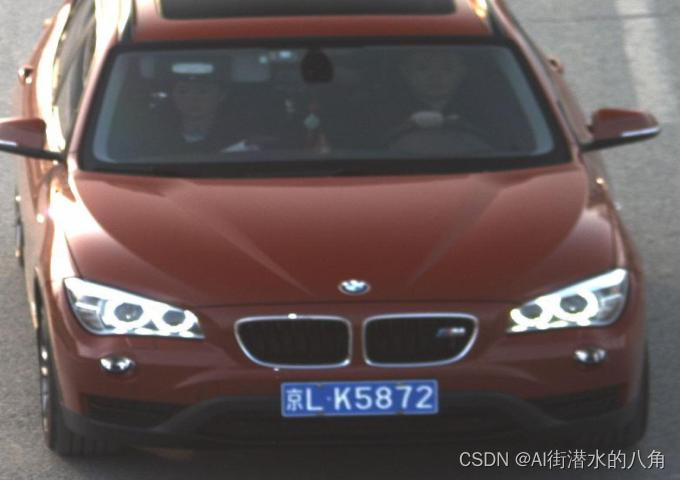
输入图片:
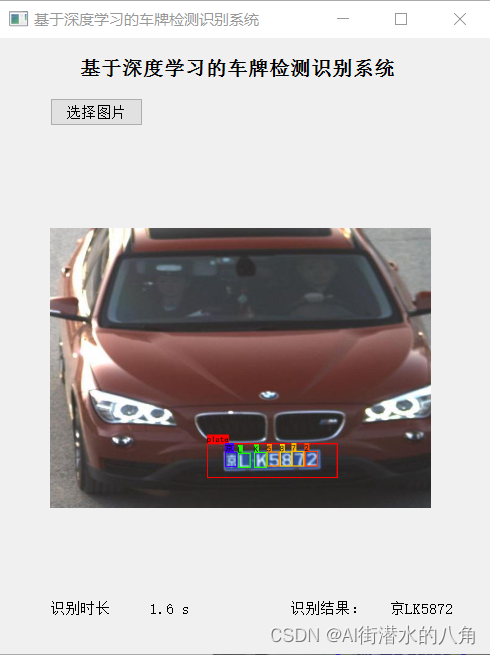
识别效果:
第五步:整个工程的内容(包括训练代码和数据)
代码的下载路径(新窗口打开链接):基于深度学习神经网络YOLOv4目标检测的车牌识别系统

有问题可以私信或者留言,有问必答
声明:本文内容由网友自发贡献,不代表【wpsshop博客】立场,版权归原作者所有,本站不承担相应法律责任。如您发现有侵权的内容,请联系我们。转载请注明出处:https://www.wpsshop.cn/w/我家自动化/article/detail/723989
推荐阅读
相关标签

