
热门标签
热门文章
- 1ifconfig 与永久修改MAC地址_if修改mac
- 22022年软件测试——精选金融银行面试真题_银行软件测试面试题
- 3基于Python_opencv的车牌识别系统_基于python-opencv的车牌识别系统
- 4SpringCloudNetflix-Eureka+Ribbon的初使用_spirng-cloud-netflix-ribbon使用
- 5jupyter 目录插件 jupyter_contrib_nbextensions_jupyter目录插件
- 6华为OD机试Js - 路口最短时间问题_假定街道是棋盘型的,每格距离相等,车辆通过每格街道需要时间均为 timeperroad;街
- 7[office] 如何在Excel中拉动单元格时表头不变形- #学习方法#职场发展#经验分享_如何让单元格拉宽后首字符不动
- 8hive--小文件问题_hive 文件大小
- 9英文面试:性格爱好篇 (转)_性格开朗,做事认真,爱好运动用英语怎么说
- 10github版本库使用详细教程(命令行及图形界面版)_sign in via ldap
当前位置: article > 正文
OpenHarmony实战开发-使用通用事件、触屏事件_openharmony 横竖屏切换触摸屏事件
作者:我家自动化 | 2024-06-11 13:18:00
赞
踩
openharmony 横竖屏切换触摸屏事件
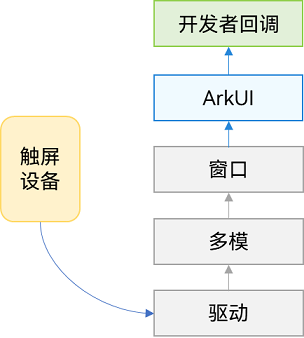
触屏事件指当手指/手写笔在组件上按下、滑动、抬起时触发的回调事件。包括点击事件、拖拽事件和触摸事件。
图1 触摸事件原理
点击事件
点击事件是指通过手指或手写笔做出一次完整的按下和抬起动作。当发生点击事件时,会触发以下回调函数:
onClick(event: (event?: ClickEvent) => void)
- 1
event参数提供点击事件相对于窗口或组件的坐标位置,以及发生点击的事件源。
例如通过按钮的点击事件控制图片的显示和隐藏。
@Entry
@Component
struct IfElseTransition {
  @State flag: boolean = true;
  @State btnMsg: string = 'show';

  build() {
    Column() {
      Button(this.btnMsg).width(80).height(30).margin(30)
        .onClick(() => {
          if (this.flag) {
            this.btnMsg = 'hide';
          } else {
            this.btnMsg = 'show';
          }
          // 点击Button控制Image的显示和消失
          this.flag = !this.flag;
        })
      if (this.flag) {
        Image($r('app.media.icon')).width(200).height(200)
      }
    }.height('100%').width('100%')
  }
}

- 1
- 2
- 3
- 4
- 5
- 6
- 7
- 8
- 9
- 10
- 11
- 12
- 13
- 14
- 15
- 16
- 17
- 18
- 19
- 20
- 21
- 22
- 23
- 24
图2 通过按钮的点击事件控制图片的显示和隐藏

拖拽事件
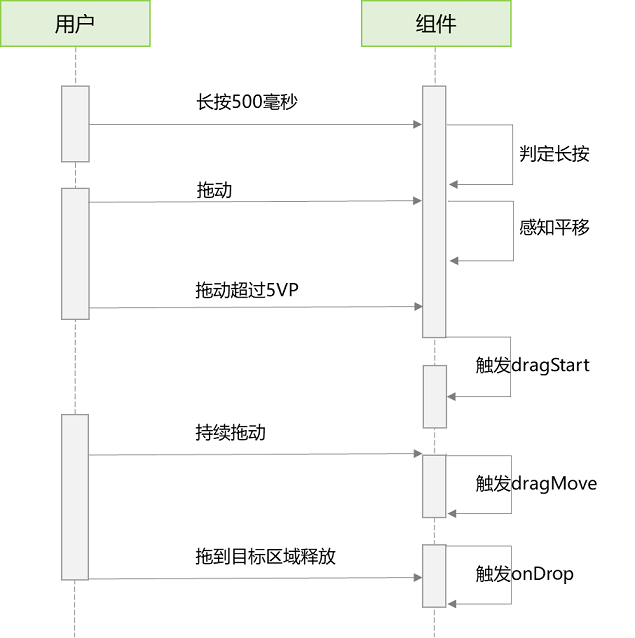
拖拽事件指手指/手写笔长按组件(>=500ms),并拖拽到接收区域释放的事件。
拖拽事件的触发通过长按、拖动平移判定,手指平移的距离达到5vp即可触发拖拽事件。ArkUI支持应用内、跨应用的拖拽事件。
拖拽事件触发流程:
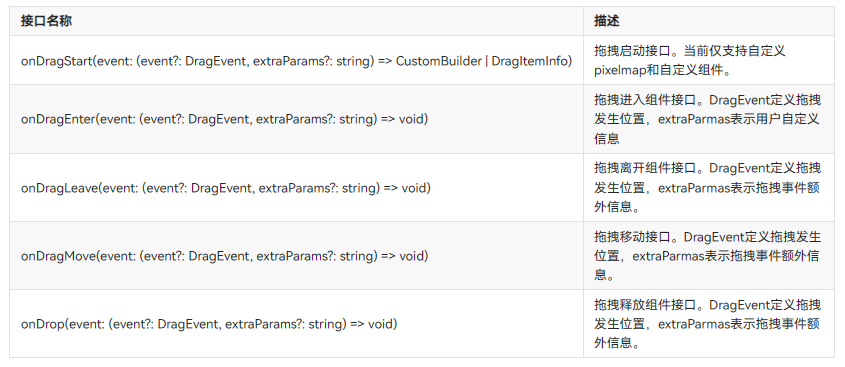
拖拽事件提供以下接口:
如下是跨窗口拖拽,拖出窗口示例:
import image from '@ohos.multimedia.image';

@Entry
@Component
struct Index {
  @State visible: Visibility = Visibility.Visible
  private pixelMapReader:image.PixelMap|undefined = undefined

  aboutToAppear() {
    console.info('begin to create pixmap has info message: ')
    this.createPixelMap()
  }

  createPixelMap() {
    let color = new ArrayBuffer(4 * 96 * 96);
    let buffer = new Uint8Array(color);
    for (let i = 0; i < buffer.length; i++) {
      buffer[i] = (i + 1) % 255;
    }
    class hw{
      height:number = 96
      width:number = 96
    }
    let hwo:hw = new hw()
    let ops:image.InitializationOptions|void = {
      'alphaType': 0,
      'editable': true,
      'pixelFormat': 4,
      'scaleMode': 1,
      'size': hwo
    }
    const promise: Promise<image.PixelMap> = image.createPixelMap(color, ops);
    promise.then((data:image.PixelMap|undefined) => {
      console.info('create pixmap has info message: ' + JSON.stringify(data))
      if(data){
        this.pixelMapReader = data;
      }
    })
  }

  @Builder pixelMapBuilder() {
    Text('drag item')
      .width('100%')
      .height(100)
      .fontSize(16)
      .textAlign(TextAlign.Center)
      .borderRadius(10)
      .backgroundColor(0xFFFFFF)
  }

  build() {
    Flex({ direction: FlexDirection.Column, alignItems: ItemAlign.Center, justifyContent: FlexAlign.Center }) {
      Text('App1')
        .width('40%')
        .height(80)
        .fontSize(20)
        .margin(30)
        .textAlign(TextAlign.Center)
        .backgroundColor(Color.Pink)
        .visibility(Visibility.Visible)

      Text('Across Window Drag This')
        .width('80%')
        .height(80)
        .fontSize(16)
        .margin(30)
        .textAlign(TextAlign.Center)
        .backgroundColor(Color.Pink)
        .visibility(this.visible)
        .onDragStart((event: DragEvent|undefined, extraParams: string|undefined):CustomBuilder | DragItemInfo => {
          console.info('Text onDrag start')
          return { pixelMap: this.pixelMapReader, extraInfo: 'custom extra info.' }
        })
        .onDrop((event: DragEvent|undefined, extraParams: string|undefined) => {
          console.info('Text onDragDrop,  ')
          this.visible = Visibility.None                    //拖动结束后,使源不可见
        })
    }

    .width('100%')
    .height('100%')
  }
}
- 1
- 2
- 3
- 4
- 5
- 6
- 7
- 8
- 9
- 10
- 11
- 12
- 13
- 14
- 15
- 16
- 17
- 18
- 19
- 20
- 21
- 22
- 23
- 24
- 25
- 26
- 27
- 28
- 29
- 30
- 31
- 32
- 33
- 34
- 35
- 36
- 37
- 38
- 39
- 40
- 41
- 42
- 43
- 44
- 45
- 46
- 47
- 48
- 49
- 50
- 51
- 52
- 53
- 54
- 55
- 56
- 57
- 58
- 59
- 60
- 61
- 62
- 63
- 64
- 65
- 66
- 67
- 68
- 69
- 70
- 71
- 72
- 73
- 74
- 75
- 76
- 77
- 78
- 79
- 80
- 81
- 82
- 83
跨窗口拖拽,拖入示例:
@Entry
@Component
struct Index {
  @State number: string[] = ['drag here']
  @State text: string = ''
  @State bool1: boolean = false
  @State bool2: boolean = false
  @State visible: Visibility = Visibility.Visible
  @State visible2: Visibility = Visibility.None
  scroller: Scroller = new Scroller()

  build() {
    Flex({ direction: FlexDirection.Column, alignItems: ItemAlign.Center, justifyContent: FlexAlign.Center }) {
      Text('App2')
        .width('40%')
        .height(80)
        .fontSize(20)
        .margin(30)
        .textAlign(TextAlign.Center)
        .backgroundColor(Color.Pink)
        .visibility(Visibility.Visible)

      List({ space: 20, initialIndex: 0 }) {
        ForEach(this.number, (item:string) => {
          ListItem() {
            Text('' + item)
              .width('100%')
              .height(80)
              .fontSize(16)
              .borderRadius(10)
              .textAlign(TextAlign.Center)
              .backgroundColor(0xFFFFFF)
          }
        }, (item:string):string => item)

        ListItem() {
          Text('Across Window Drag This')
            .width('80%')
            .height(80)
            .fontSize(16)
            .margin(30)
            .textAlign(TextAlign.Center)
            .backgroundColor(Color.Pink)
            .visibility(this.visible2)
        }
      }
      .height('50%')
      .width('90%')
      .border({ width: 1 })
      .divider({ strokeWidth: 2, color: 0xFFFFFF, startMargin: 20, endMargin: 20 })
      .onDragEnter((event: DragEvent|undefined, extraParams: string|undefined) => {                         //拖拽进去组件
        console.info('List onDragEnter, ' + extraParams)
      })
      .onDragMove((event: DragEvent|undefined, extraParams: string|undefined) => {                          //拖拽时移动
        console.info('List onDragMove, ' + extraParams)
      })
      .onDragLeave((event: DragEvent|undefined, extraParams: string|undefined) => {                         //拖拽离开组件
        console.info('List onDragLeave, ' + extraParams)
      })
      .onDrop((event: DragEvent|undefined, extraParams: string|undefined) => {                              //释放组件
        console.info('List onDragDrop, ' + extraParams)
        this.visible2 = Visibility.Visible                                              //拖拽完成使拖入目标可见
      })
    }
    .width('100%')
    .height('100%')
  }
}
- 1
- 2
- 3
- 4
- 5
- 6
- 7
- 8
- 9
- 10
- 11
- 12
- 13
- 14
- 15
- 16
- 17
- 18
- 19
- 20
- 21
- 22
- 23
- 24
- 25
- 26
- 27
- 28
- 29
- 30
- 31
- 32
- 33
- 34
- 35
- 36
- 37
- 38
- 39
- 40
- 41
- 42
- 43
- 44
- 45
- 46
- 47
- 48
- 49
- 50
- 51
- 52
- 53
- 54
- 55
- 56
- 57
- 58
- 59
- 60
- 61
- 62
- 63
- 64
- 65
- 66
- 67
- 68

触摸事件
当手指或手写笔在组件上触碰时,会触发不同动作所对应的事件响应,包括按下(Down)、滑动(Move)、抬起(Up)事件:
onTouch(event: (event?: TouchEvent) => void)
- 1
- event.type为TouchType.Down:表示手指按下。
- event.type为TouchType.Up:表示手指抬起。
- event.type为TouchType.Move:表示手指按住移动。
触摸事件可以同时多指触发,通过event参数可获取触发的手指位置、手指唯一标志、当前发生变化的手指和输入的设备源等信息。
// xxx.ets
@Entry
@Component
struct TouchExample {
  @State text: string = '';
  @State eventType: string = '';

  build() {
    Column() {
      Button('Touch').height(40).width(100)
        .onTouch((event?: TouchEvent) => {
          if(event){
            if (event.type === TouchType.Down) {
              this.eventType = 'Down';
            }
            if (event.type === TouchType.Up) {
              this.eventType = 'Up';
            }
            if (event.type === TouchType.Move) {
              this.eventType = 'Move';
            }
            this.text = 'TouchType:' + this.eventType + '\nDistance between touch point and touch element:\nx: '
            + event.touches[0].x + '\n' + 'y: ' + event.touches[0].y + '\nComponent globalPos:('
            + event.target.area.globalPosition.x + ',' + event.target.area.globalPosition.y + ')\nwidth:'
            + event.target.area.width + '\nheight:' + event.target.area.height
          }
        })
      Button('Touch').height(50).width(200).margin(20)
        .onTouch((event?: TouchEvent) => {
          if(event){
            if (event.type === TouchType.Down) {
              this.eventType = 'Down';
            }
            if (event.type === TouchType.Up) {
              this.eventType = 'Up';
            }
            if (event.type === TouchType.Move) {
              this.eventType = 'Move';
            }
            this.text = 'TouchType:' + this.eventType + '\nDistance between touch point and touch element:\nx: '
            + event.touches[0].x + '\n' + 'y: ' + event.touches[0].y + '\nComponent globalPos:('
            + event.target.area.globalPosition.x + ',' + event.target.area.globalPosition.y + ')\nwidth:'
            + event.target.area.width + '\nheight:' + event.target.area.height
          }
        })
      Text(this.text)
    }.width('100%').padding(30)
  }
}
- 1
- 2
- 3
- 4
- 5
- 6
- 7
- 8
- 9
- 10
- 11
- 12
- 13
- 14
- 15
- 16
- 17
- 18
- 19
- 20
- 21
- 22
- 23
- 24
- 25
- 26
- 27
- 28
- 29
- 30
- 31
- 32
- 33
- 34
- 35
- 36
- 37
- 38
- 39
- 40
- 41
- 42
- 43
- 44
- 45
- 46
- 47
- 48
- 49

如果大家还没有掌握鸿蒙,现在想要在最短的时间里吃透它,我这边特意整理了《鸿蒙语法ArkTS、TypeScript、ArkUI等…视频教程》以及《鸿蒙开发学习手册》(共计890页),希望对大家有所帮助:https://docs.qq.com/doc/DZVVBYlhuRkZQZlB3
鸿蒙语法ArkTS、TypeScript、ArkUI等…视频教程:https://docs.qq.com/doc/DZVVBYlhuRkZQZlB3
OpenHarmony APP开发教程步骤:https://docs.qq.com/doc/DZVVBYlhuRkZQZlB3
《鸿蒙开发学习手册》:
如何快速入门:https://docs.qq.com/doc/DZVVBYlhuRkZQZlB3
1.基本概念
2.构建第一个ArkTS应用
3.……

开发基础知识:https://docs.qq.com/doc/DZVVBYlhuRkZQZlB3
1.应用基础知识
2.配置文件
3.应用数据管理
4.应用安全管理
5.应用隐私保护
6.三方应用调用管控机制
7.资源分类与访问
8.学习ArkTS语言
9.……

基于ArkTS 开发:https://docs.qq.com/doc/DZVVBYlhuRkZQZlB3
1.Ability开发
2.UI开发
3.公共事件与通知
4.窗口管理
5.媒体
6.安全
7.网络与链接
8.电话服务
9.数据管理
10.后台任务(Background Task)管理
11.设备管理
12.设备使用信息统计
13.DFX
14.国际化开发
15.折叠屏系列
16.……

鸿蒙生态应用开发白皮书V2.0PDF:https://docs.qq.com/doc/DZVVkRGRUd3pHSnFG

声明:本文内容由网友自发贡献,不代表【wpsshop博客】立场,版权归原作者所有,本站不承担相应法律责任。如您发现有侵权的内容,请联系我们。转载请注明出处:https://www.wpsshop.cn/w/我家自动化/article/detail/703334
推荐阅读
相关标签

