
热门标签
热门文章
- 1Java ArrayList、LinkedList和Vector的使用及性能分析_java vector和arraylist 顺序
- 2【Linux】文件系统
- 3在Github搭建个人博客-详细步骤整理_github博客搭建
- 420240301-2-ZooKeeper面试题(二)
- 5文献 | fMRI入门指南_如何自学任务态fmri
- 6嵌入式多媒体播放器的设计与实现
- 7关于虚拟机安装macos时遇到的无限报错重启问题_虚拟机mac电脑因出现问题而重新启动
- 8【Android】Android开发启动app弹出一张广告图片,Dialog可以查看大图,查看某个图片功能...
- 9鸿蒙雄起!风口就在当下,你如何抉择?
- 10【Android】App 屏幕适配方案_安卓app是否会自动适应屏幕
当前位置: article > 正文
Flutter和Dart系列六:Widget(一)_dart语言重绘widget方法
作者:我家自动化 | 2024-03-26 00:09:19
赞
踩
dart语言重绘widget方法
-
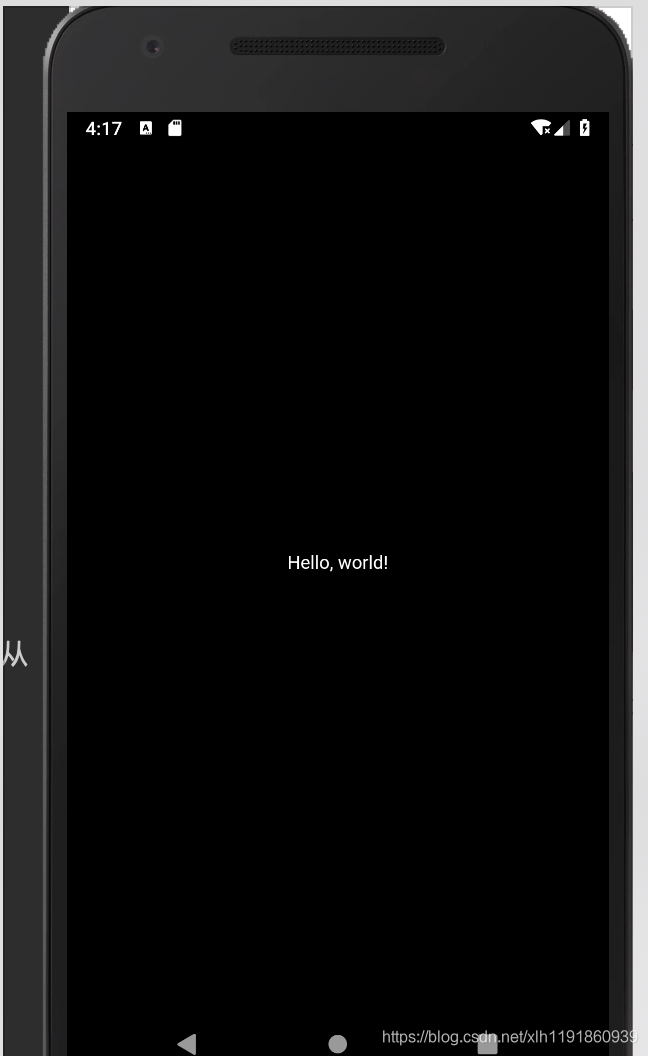
我们先编写一个简单的demo:
- import 'package:flutter/material.dart';
- void main() => runApp(Center(
- child: Text(
- 'Hello, world!',
- textDirection: TextDirection.ltr,
- ),
- ));
- import: 和Java中一样,导包
- function:见系列四
- 涉及的Widget对象:
- Center对象:对于子Widget有约束,即它的子Widget是居中的
- Text:可以类比TextView,第一个参数就是文本内容,textDirection参数指定文本内容是从左到右显示(ltr)还是从右往左(rtl)显示
截图:
-
我们来看一个更加优雅的demo:
-
编写我们的main函数:
- void main() {
- runApp(MaterialApp(
- home: MyScaffold(),
- ));
- }
- 将一个MaterialApp对象作为参数传递到了runApp函数中,runApp的作用我们之前的篇章提到过:传入到runApp的widget对象会被作为Widget tree的根节点,并且会显示在屏幕上。
- MaterialApp对象:它实际上也是一个Widget,它是用来实现Google的Material Design的便捷Widget,即它里面会封装一些其他的widget。一个不恰当的比方就是有点类似Application的主题。
- home属性:进入程序后显示的第一个页面
-
Dart语言本身相关:
a. 如何创建对象?像Java一样通过new关键字;像Kotlin一样,省略new关键字。这两种方式都ok
b. 关于可选的有名参数(optional named parameter),同样可以参考系列四
-
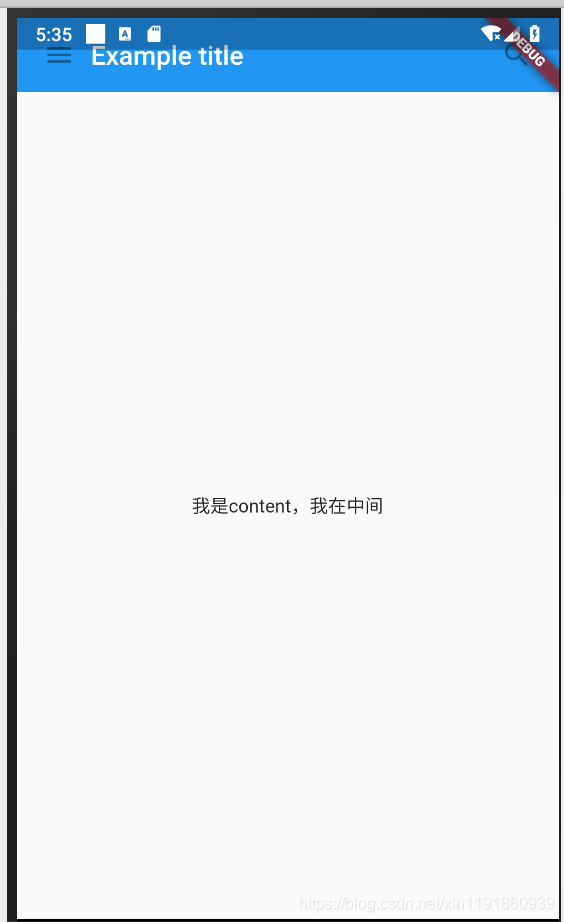
编写MyScaffold类:
- class MyScaffold extends StatelessWidget {
- @override
- Widget build(BuildContext context) {
- return Material(
- child: Column(
- children: <Widget>[
- MyAppBar(
- title: Text(
- 'Example title',
- style: Theme.of(context).primaryTextTheme.title,
- ),
- ),
- Expanded(
- child: Center(
- child: Text('我是content,我在中间'),
- ),
- ),
- ],
- ),
- );
- }
- }
- class MyAppBar extends StatelessWidget {
- final Widget title;
- MyAppBar({this.title});
- @override
- Widget build(BuildContext context) {
- return Container(
- height: 56.0,
- padding: const EdgeInsets.symmetric(horizontal: 8.0),
- decoration: BoxDecoration(color: Colors.blue[500]),
- child: Row(
- children: <Widget>[
- IconButton(
- icon: Icon(Icons.menu),
- onPressed: null,
- ),
- Expanded(
- child: title,
- ),
- IconButton(icon: Icon(Icons.search), onPressed: null)
- ],
- ),
- );
- }
- }

从MyScaffold中看起:
- Material:这个就是home页面的根Widget
- Column:设计理念来自于web中弹性盒子模型,类比到Android中来:就是orientation=vertical的LinearLayout;与之对应的就是Row,它是orientation=horizontal的LinearLayout。
-
Expanded:这个对象可以类比LinearLayout中的weight属性的作用,那么如何设置权重值呢?
- class Expanded extends Flexible {
- const Expanded({
- Key key,
- int flex = 1,
- @required Widget child,
- }) : super(key: key, flex: flex, fit: FlexFit.tight, child: child);
- }
通过flex来设置,默认是1
MyAppBarLayout中:
- Container:这个只能勉勉强强比喻成ViewGroup。这里用的属性有height、padding,这俩都好理解;至于这个decoration,可以理解成background.
- IconButton:类比成ImageButton/ImageView.这里需要注意的是一个onPressed属性,很明显我们可以在这指定点击事件的处理函数.
最终的运行效果为:
-
-
注意pubspec.yaml文件中
- flutter:
- uses-material-design: true
这个文件就相当于我们build.gradle文件一样,这里可以指定依赖、版本号等
-
在demo2中,MyScaffold、MyAppBar,这些都是我们自定义的Widget,实际上这些都有对应的Material组件已经定义好了。请看demo3:
- void main() {
- runApp(MaterialApp(
- home: MaterialHome(),
- ));
- }
- class MaterialHome extends StatelessWidget {
- @override
- Widget build(BuildContext context) {
- return Scaffold(
- appBar: AppBar(
- leading: IconButton(icon: Icon(Icons.menu), onPressed: null),
- title: Text("I'm title"),
- actions: <Widget>[
- IconButton(
- icon: Icon(Icons.search),
- onPressed: null,
- )
- ],
- ),
- body: Center(
- child: Text("I'm content and in center"),
- ),
- floatingActionButton: FloatingActionButton(
- onPressed: null,
- child: Icon(Icons.add),
- ),
- );
- }
- }
- Scaffold:脚手架,它实现了基本Material布局
- FloatingActionButton:就是我们常见的FAB 运行效果图:
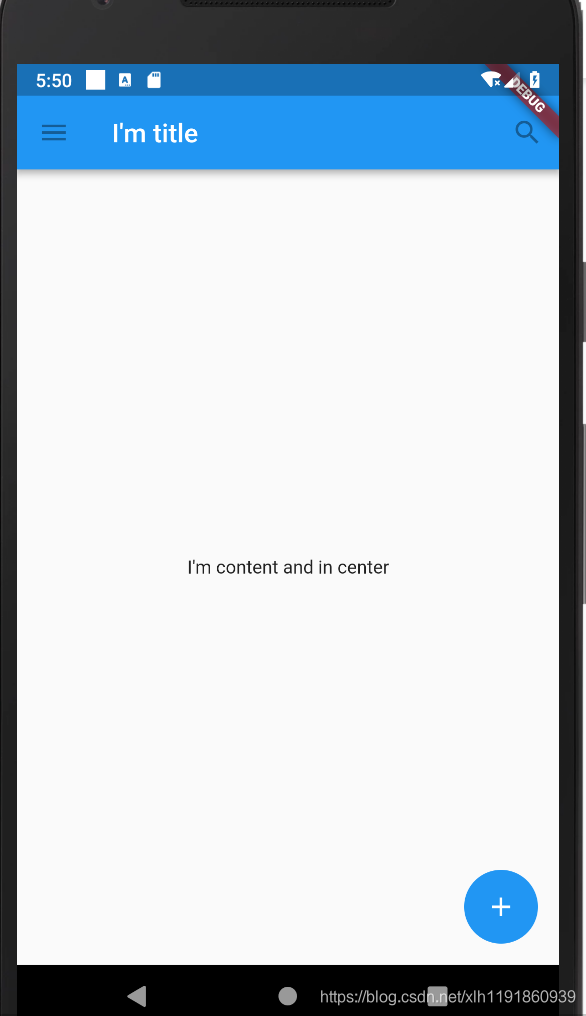
-
下面我想实现对按钮点击的响应:
- class MaterialHome extends StatelessWidget {
- @override
- Widget build(BuildContext context) {
- return Scaffold(
- appBar: AppBar(
- leading: IconButton(icon: Icon(Icons.menu), onPressed: null),
- title: Text("I'm title"),
- actions: <Widget>[
- IconButton(
- icon: Icon(Icons.search),
- onPressed: onSearchClick,
- )
- ],
- ),
- body: Center(
- child: Text("I'm content and in center"),
- ),
- floatingActionButton: FloatingActionButton(
- onPressed: onFabClick,
- child: Icon(Icons.add),
- ),
- );
- }
- void onSearchClick() {
- // 可以使用print函数输出日志
- print("search button clicked");
- }
- void onFabClick() {
- print("fab clicked");
- }
- }
注意两个onPressed属性的赋值:直接将我们定义好的函数名传递过去。在Function系列说过,在Dart语言中,所有的函数都是一个对象,它的类型为Function。点击按钮,我们就可以在控制台看到日志输出了,证明我们事件处理函数得到调用了。
参考文献:《Flutter Tutorial》
声明:本文内容由网友自发贡献,不代表【wpsshop博客】立场,版权归原作者所有,本站不承担相应法律责任。如您发现有侵权的内容,请联系我们。转载请注明出处:https://www.wpsshop.cn/w/我家自动化/article/detail/313332
推荐阅读
相关标签

