
热门标签
热门文章
- 1【apt-mirror 制作麒麟桌面版内网源】_内网搭建麒麟源
- 2kotlin-stdlib_使用Kotlin stdlib使您的生活更轻松
- 3Odoo中的模型继承机制_odoo 代理继承
- 4ProxySQL配置读写分离_proxysql 读写分离
- 5hashmap负载因子
- 6基于Web小区物业管理系统/物业管理系统的设计与实现_基于web小区物业管理系统需求分析报告
- 7MySQL 日期类型及默认设置_mysql datetime default
- 8真我V3 5G(RMX2200 RMX2201)解锁刷机全过程_realme v3自己如何进行刷机
- 9关于计算机人工智能的知识,《计算机科学导论》人工智能基础知识
- 10ssd 不支持fstrim_使用fstrim延长SSD驱动器的寿命
当前位置: article > 正文
【保姆级教程】YOLOv8_OBB旋转目标检测:训练自己的数据集_obb数据集自动制作,图片自动旋转360度
作者:我家自动化 | 2024-03-15 09:55:19
赞
踩
obb数据集自动制作,图片自动旋转360度
一、YOLOV8环境准备
1.1 下载安装最新的YOLOv8代码
仓库地址: https://github.com/ultralytics/ultralytics
- 1
1.2 配置环境
pip install -r requirements.txt -i https://pypi.tuna.tsinghua.edu.cn/simple
- 1
二、数据准备
2.1 安装roLabelImg标注软件(这里需要读者先预先安装好labelImg标注工具)
2.1.1 拉取roLabelImg源码
仓库地址:https://github.com/cgvict/roLabelImg
- 1
2.1.2 打开roLabelImg软件
步骤一:先使用Anaconda Prompt启动labeme标注工具
步骤二:然后,运行2.1.1节中roLabelImg文件下的roLabelImg.py文件
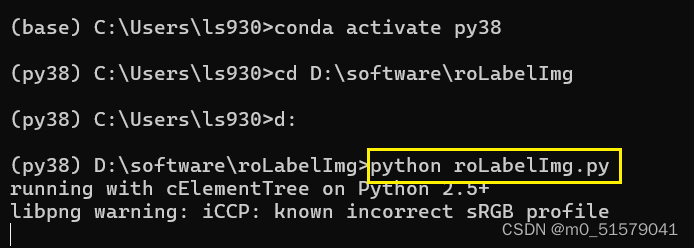
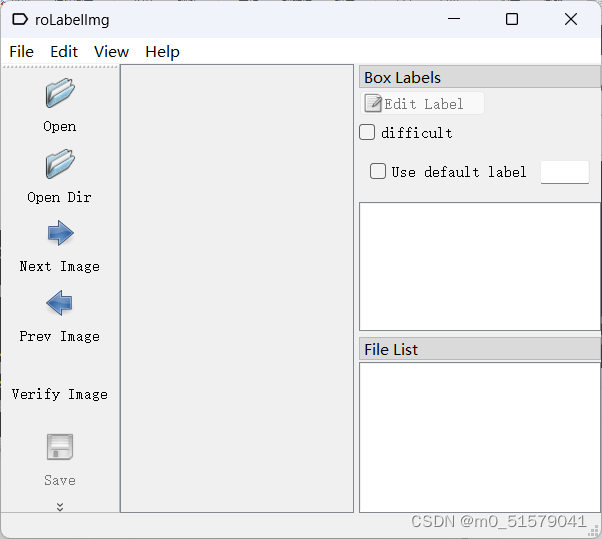
打开的roLabelImg标注软件界面如下:
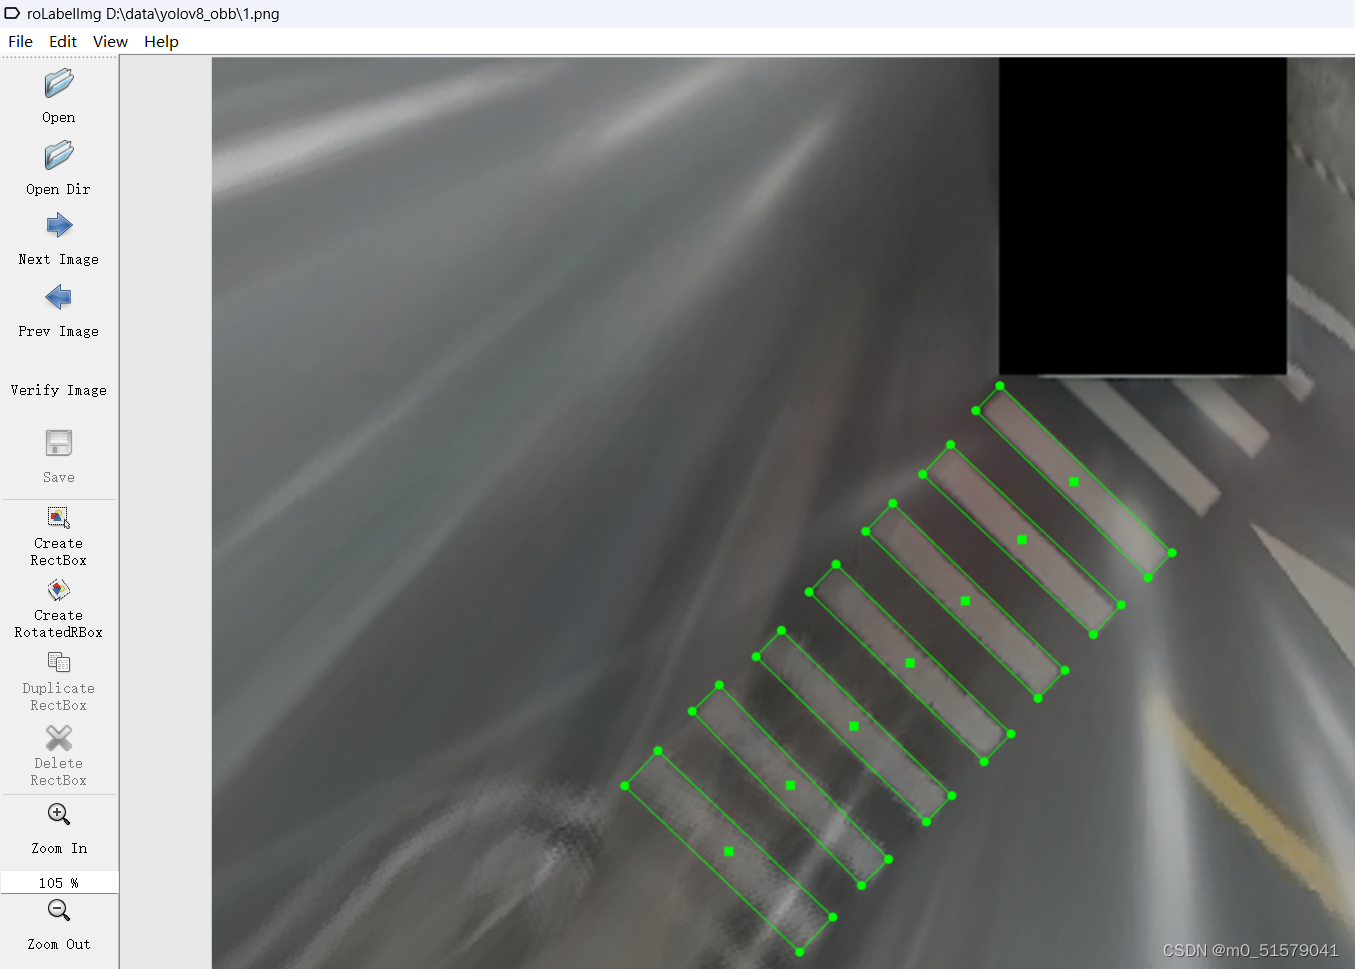
2.2 标注自己的数据
2.3 数据转换
2.3.1 运行下面代码,将xml标签格式转为txt标签格式
# 文件名称   :roxml_to_dota.py
# 功能描述   :把rolabelimg标注的xml文件转换成dota能识别的xml文件,
#             再转换成dota格式的txt文件
#            把旋转框 cx,cy,w,h,angle,或者矩形框cx,cy,w,h,转换成四点坐标x1,y1,x2,y2,x3,y3,x4,y4
import os
import xml.etree.ElementTree as ET
import math

cls_list = ['zebracrossing']  #修改为自己的标签


def edit_xml(xml_file, dotaxml_file):
    """
    修改xml文件
    :param xml_file:xml文件的路径
    :return:
    """

    # dxml_file = open(xml_file,encoding='gbk')
    # tree = ET.parse(dxml_file).getroot()

    tree = ET.parse(xml_file)
    objs = tree.findall('object')
    for ix, obj in enumerate(objs):
        x0 = ET.Element("x0")  # 创建节点
        y0 = ET.Element("y0")
        x1 = ET.Element("x1")
        y1 = ET.Element("y1")
        x2 = ET.Element("x2")
        y2 = ET.Element("y2")
        x3 = ET.Element("x3")
        y3 = ET.Element("y3")
        # obj_type = obj.find('bndbox')
        # type = obj_type.text
        # print(xml_file)

        if (obj.find('robndbox') == None):
            obj_bnd = obj.find('bndbox')
            obj_xmin = obj_bnd.find('xmin')
            obj_ymin = obj_bnd.find('ymin')
            obj_xmax = obj_bnd.find('xmax')
            obj_ymax = obj_bnd.find('ymax')
            # 以防有负值坐标
            xmin = max(float(obj_xmin.text), 0)
            ymin = max(float(obj_ymin.text), 0)
            xmax = max(float(obj_xmax.text), 0)
            ymax = max(float(obj_ymax.text), 0)
            obj_bnd.remove(obj_xmin)  # 删除节点
            obj_bnd.remove(obj_ymin)
            obj_bnd.remove(obj_xmax)
            obj_bnd.remove(obj_ymax)
            x0.text = str(xmin)
            y0.text = str(ymax)
            x1.text = str(xmax)
            y1.text = str(ymax)
            x2.text = str(xmax)
            y2.text = str(ymin)
            x3.text = str(xmin)
            y3.text = str(ymin)
        else:
            obj_bnd = obj.find('robndbox')
            obj_bnd.tag = 'bndbox'  # 修改节点名
            obj_cx = obj_bnd.find('cx')
            obj_cy = obj_bnd.find('cy')
            obj_w = obj_bnd.find('w')
            obj_h = obj_bnd.find('h')
            obj_angle = obj_bnd.find('angle')
            cx = float(obj_cx.text)
            cy = float(obj_cy.text)
            w = float(obj_w.text)
            h = float(obj_h.text)
            angle = float(obj_angle.text)
            obj_bnd.remove(obj_cx)  # 删除节点
            obj_bnd.remove(obj_cy)
            obj_bnd.remove(obj_w)
            obj_bnd.remove(obj_h)
            obj_bnd.remove(obj_angle)

            x0.text, y0.text = rotatePoint(cx, cy, cx - w / 2, cy - h / 2, -angle)
            x1.text, y1.text = rotatePoint(cx, cy, cx + w / 2, cy - h / 2, -angle)
            x2.text, y2.text = rotatePoint(cx, cy, cx + w / 2, cy + h / 2, -angle)
            x3.text, y3.text = rotatePoint(cx, cy, cx - w / 2, cy + h / 2, -angle)

        # obj.remove(obj_type)  # 删除节点
        obj_bnd.append(x0)  # 新增节点
        obj_bnd.append(y0)
        obj_bnd.append(x1)
        obj_bnd.append(y1)
        obj_bnd.append(x2)
        obj_bnd.append(y2)
        obj_bnd.append(x3)
        obj_bnd.append(y3)

        tree.write(dotaxml_file, method='xml', encoding='utf-8')  # 更新xml文件


# 转换成四点坐标
def rotatePoint(xc, yc, xp, yp, theta):
    xoff = xp - xc;
    yoff = yp - yc;
    cosTheta = math.cos(theta)
    sinTheta = math.sin(theta)
    pResx = cosTheta * xoff + sinTheta * yoff
    pResy = - sinTheta * xoff + cosTheta * yoff
    return str(int(xc + pResx)), str(int(yc + pResy))


def totxt(xml_path, out_path):
    # 想要生成的txt文件保存的路径,这里可以自己修改

    files = os.listdir(xml_path)
    i = 0
    for file in files:

        tree = ET.parse(xml_path + os.sep + file)
        root = tree.getroot()

        name = file.split('.')[0]

        output = out_path + '\\' + name + '.txt'
        file = open(output, 'w')
        i = i + 1
        objs = tree.findall('object')
        for obj in objs:
            cls = obj.find('name').text
            box = obj.find('bndbox')
            x0 = int(float(box.find('x0').text))
            y0 = int(float(box.find('y0').text))
            x1 = int(float(box.find('x1').text))
            y1 = int(float(box.find('y1').text))
            x2 = int(float(box.find('x2').text))
            y2 = int(float(box.find('y2').text))
            x3 = int(float(box.find('x3').text))
            y3 = int(float(box.find('y3').text))
            if x0 < 0:
                x0 = 0
            if x1 < 0:
                x1 = 0
            if x2 < 0:
                x2 = 0
            if x3 < 0:
                x3 = 0
            if y0 < 0:
                y0 = 0
            if y1 < 0:
                y1 = 0
            if y2 < 0:
                y2 = 0
            if y3 < 0:
                y3 = 0
            for cls_index, cls_name in enumerate(cls_list):
                if cls == cls_name:
                    file.write("{} {} {} {} {} {} {} {} {} {}\n".format(x0, y0, x1, y1, x2, y2, x3, y3, cls, cls_index))
        file.close()
        # print(output)
        print(i)


if __name__ == '__main__':
    # -----**** 第一步:把xml文件统一转换成旋转框的xml文件 ****-----
    roxml_path = r'D:\data\yolov8_obb\xml'
    dotaxml_path = r'D:\data\yolov8_obb\xml'
    out_path = r'D:\data\yolov8_obb\xml'
    filelist = os.listdir(roxml_path)
    for file in filelist:
        edit_xml(os.path.join(roxml_path, file), os.path.join(dotaxml_path, file))

    # -----**** 第二步:把旋转框xml文件转换成txt格式 ****-----
    totxt(dotaxml_path, out_path)
- 1
- 2
- 3
- 4
- 5
- 6
- 7
- 8
- 9
- 10
- 11
- 12
- 13
- 14
- 15
- 16
- 17
- 18
- 19
- 20
- 21
- 22
- 23
- 24
- 25
- 26
- 27
- 28
- 29
- 30
- 31
- 32
- 33
- 34
- 35
- 36
- 37
- 38
- 39
- 40
- 41
- 42
- 43
- 44
- 45
- 46
- 47
- 48
- 49
- 50
- 51
- 52
- 53
- 54
- 55
- 56
- 57
- 58
- 59
- 60
- 61
- 62
- 63
- 64
- 65
- 66
- 67
- 68
- 69
- 70
- 71
- 72
- 73
- 74
- 75
- 76
- 77
- 78
- 79
- 80
- 81
- 82
- 83
- 84
- 85
- 86
- 87
- 88
- 89
- 90
- 91
- 92
- 93
- 94
- 95
- 96
- 97
- 98
- 99
- 100
- 101
- 102
- 103
- 104
- 105
- 106
- 107
- 108
- 109
- 110
- 111
- 112
- 113
- 114
- 115
- 116
- 117
- 118
- 119
- 120
- 121
- 122
- 123
- 124
- 125
- 126
- 127
- 128
- 129
- 130
- 131
- 132
- 133
- 134
- 135
- 136
- 137
- 138
- 139
- 140
- 141
- 142
- 143
- 144
- 145
- 146
- 147
- 148
- 149
- 150
- 151
- 152
- 153
- 154
- 155
- 156
- 157
- 158
- 159
- 160
- 161
- 162
- 163
- 164
- 165
- 166
- 167
- 168
- 169
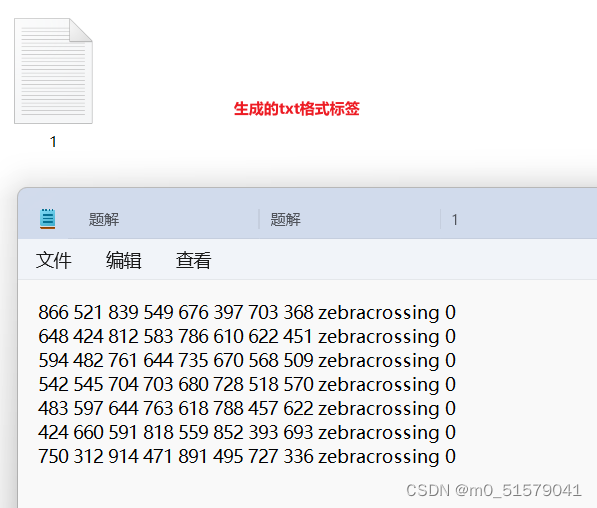
运行上面代码,就可以获得TXT格式标签文件
2.3.2 使用YOLOv8的标签转换工具
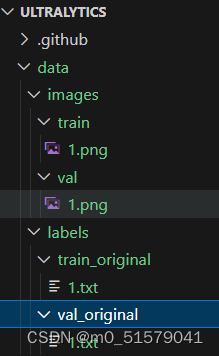
步骤一:在项目代码根目录下,创建下面的文件,并将图片和标签文件放到相应的文件夹中:
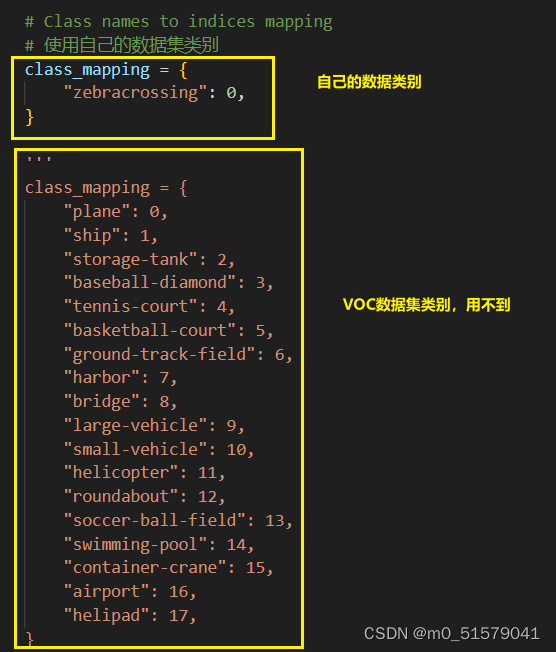
步骤二:由于官方源码的数据转换代码是用的VOC数据集,我们需要修改一下类别名,改成自己的数据集类别。修改ultralytics/ultralyticsdata/converter.py文件中的代码:
步骤三:运行下面的代码
import sys

sys.path.append('D:/study/cnn/yolo/ultralytics')

from ultralytics.data.converter import convert_dota_to_yolo_obb
convert_dota_to_yolo_obb('D:/study/cnn/yolo/ultralytics/data')
- 1
- 2
- 3
- 4
- 5
- 6
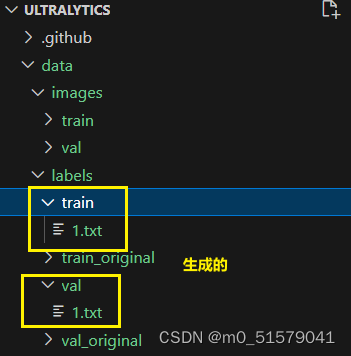
运行后,会在data/labels/路径下,生成train,val两个文件夹,以及转换好的标签文件
三、配置文件设置
3.1 新建my-data8-obb.yaml
ultralytics\ultralytics\cfg\datasets路径下,创建my-data8-obb.yaml:
path: D:/study/cnn/yolo/ultralytics/data # dataset root dir
train: images/train # train images (relative to 'path') 4 images
val: images/val # val images (relative to 'path') 4 images

# Classes for DOTA 1.0
names:
  0: zebracrossing
- 1
- 2
- 3
- 4
- 5
- 6
- 7
- 8
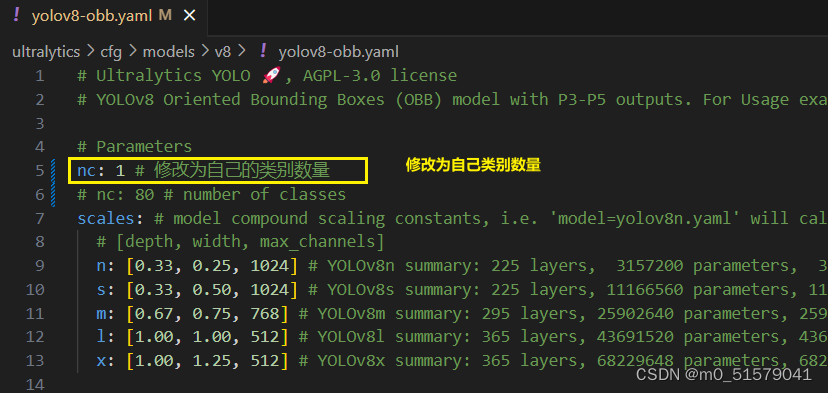
3.2 修改yolov8-obb.yaml
ultralytics\ultralytics\cfg\models\v8路径下,修改yolov8-obb.yaml:
四、训练
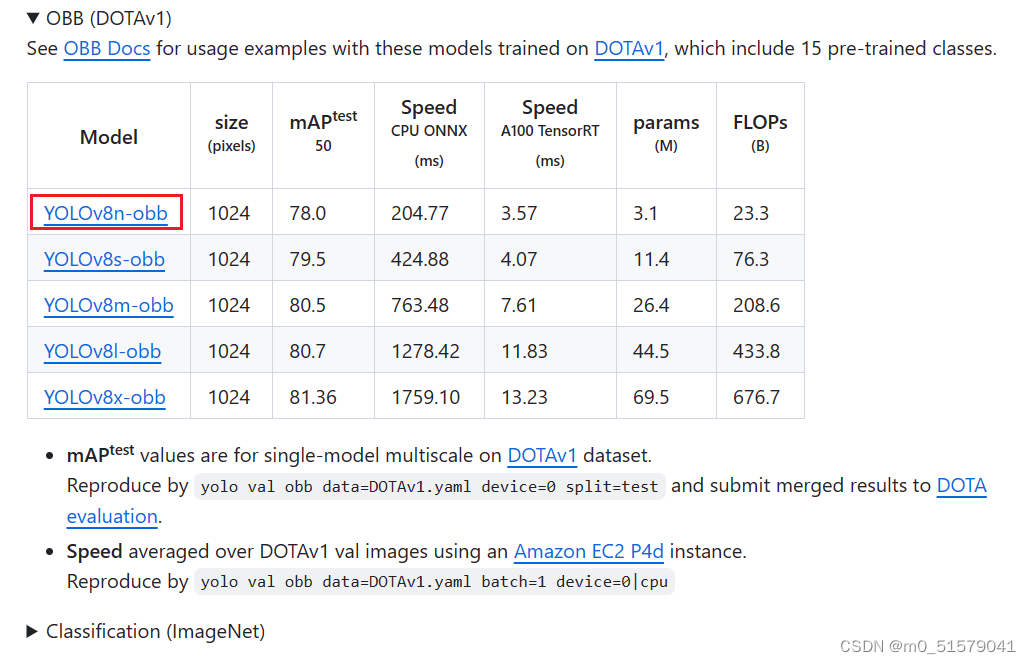
4.1 下载预训练权重
在YOLOv8 github上下载预训练权重:
4.2 训练
步骤一:修改ultralytics\ultralytics\cfg\default.yaml文件中的训练参数(根据自己的实际情况决定)
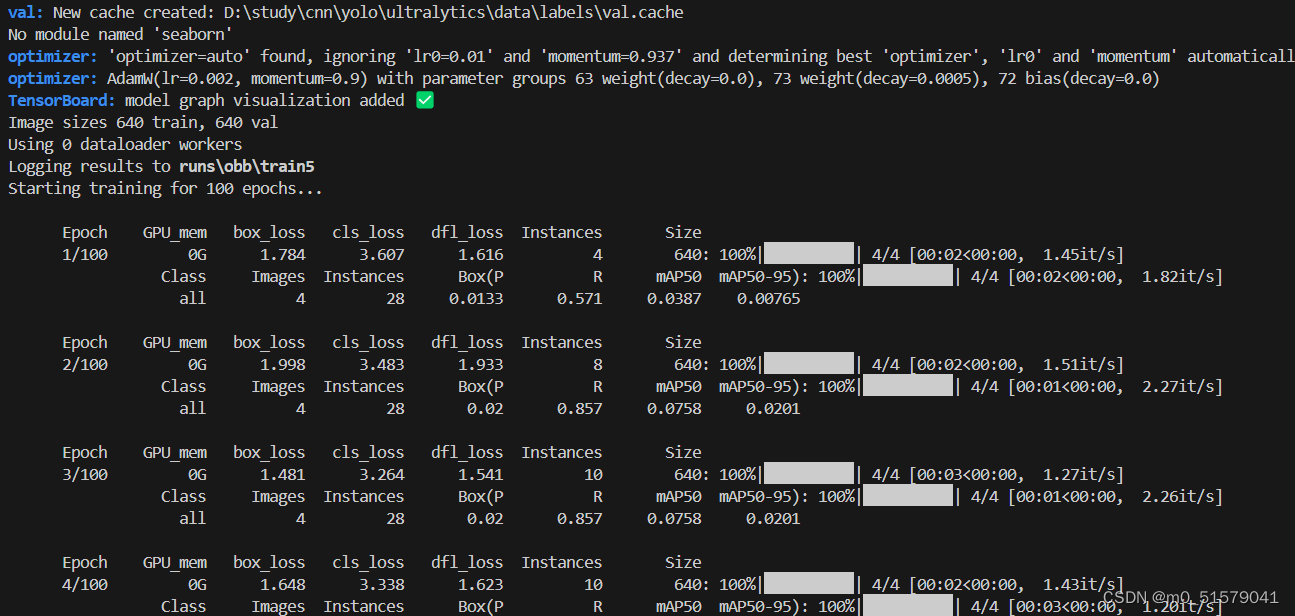
步骤二:执行下面代码:
from ultralytics import YOLO

# Load a model
model = YOLO('weights/yolov8n-obb.pt')  # load a pretrained model (recommended for training)

# Train the model
results = model.train(data='D:/study/cnn/yolo/ultralytics/ultralytics/cfg/datasets/my-data8-obb.yaml', epochs=100, imgsz=640)
- 1
- 2
- 3
- 4
- 5
- 6
- 7
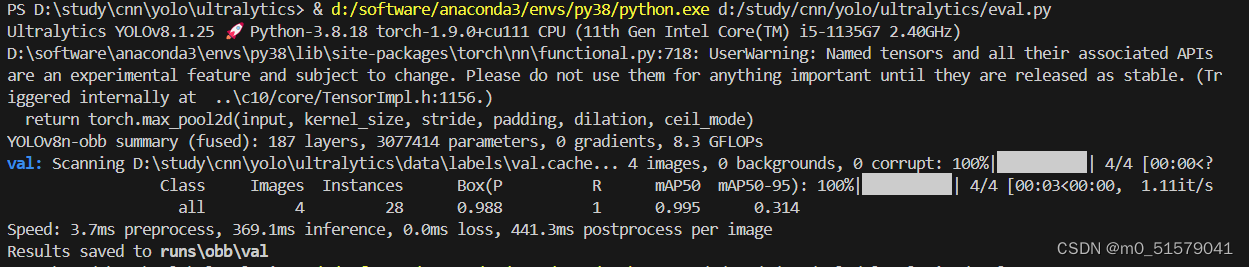
五、验证
from ultralytics import YOLO

def main():
    model = YOLO(r'runs/obb/train/weights/best.pt')
    model.val(data='dota8-obb.yaml', imgsz=1024, batch=4, workers=4)
if __name__ == '__main__':
    main()
- 1
- 2
- 3
- 4
- 5
- 6
- 7
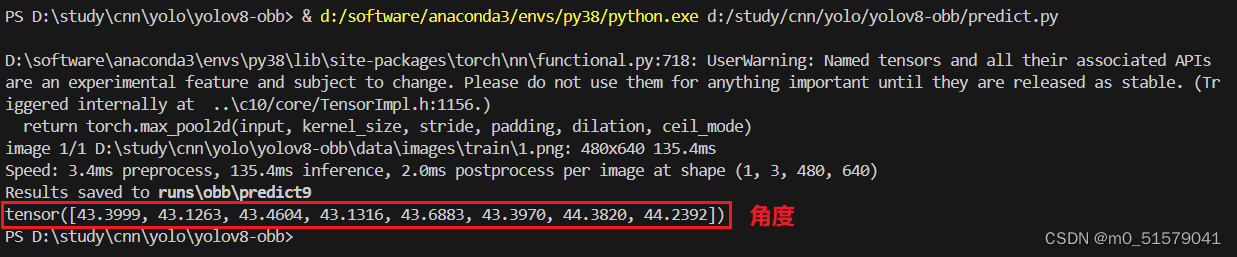
六、推理
from ultralytics import YOLO

model = YOLO('D:/study/cnn/yolo/ultralytics/runs/obb/train5/weights/best.pt')
results = model('D:/study/cnn/yolo/ultralytics/data/images/train/1.png', save=True)
print(results[0].obb.xywhr[:,-1]*180/3.1415)
- 1
- 2
- 3
- 4
- 5

声明:本文内容由网友自发贡献,不代表【wpsshop博客】立场,版权归原作者所有,本站不承担相应法律责任。如您发现有侵权的内容,请联系我们。转载请注明出处:https://www.wpsshop.cn/w/我家自动化/article/detail/239781
推荐阅读
相关标签

