
react---todoList案例
赞
踩
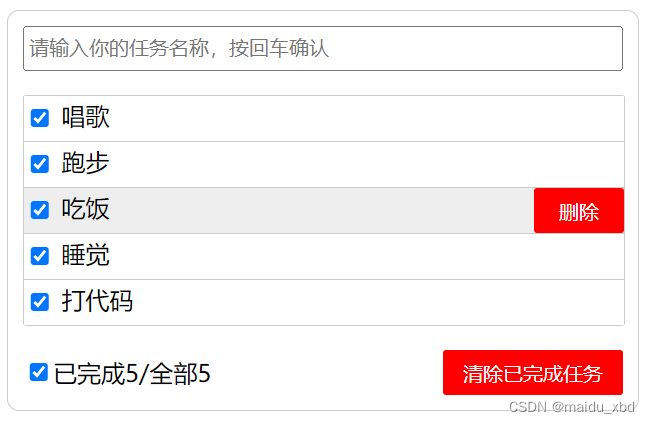
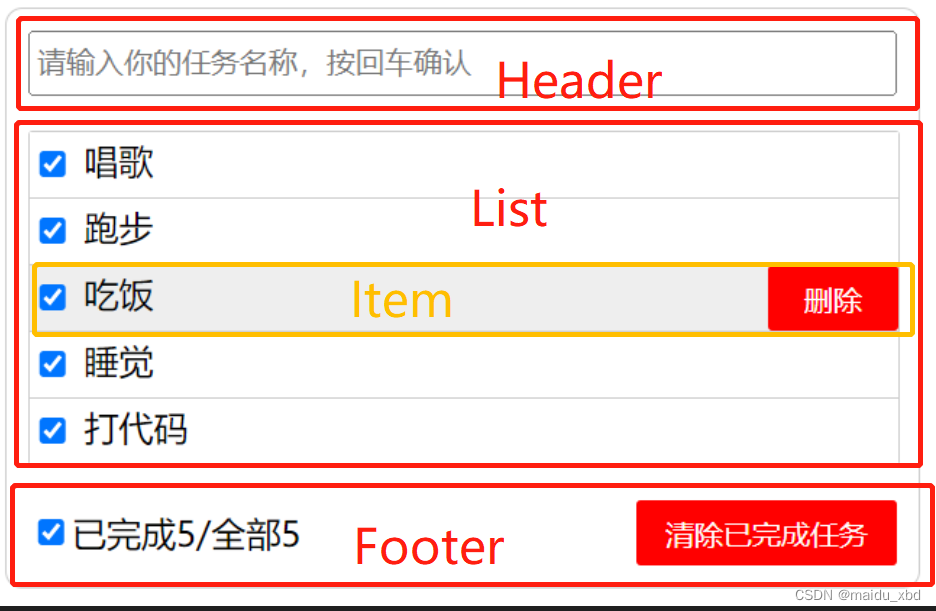
todoList案例效果图
1.组件拆分
2.操作state数据
state 放在哪个组件:
- 如果某个组件组件使用: 放在其自身的state中。
- 如果某些组件使用:放在他们共同的父组件state中(官方称此操作为状态提升)
状态(state)在哪,操作状态的方法就在哪里。
App.jsx维护状态(数据),因此操作状态的新增,删除,选择等方法 要放在App.jsx中
- addTodo = (todoObj) => {
- console.log("App接收的子组件Header传来的参数", todoObj);
- const { todoList } = this.state;
- const newList = [todoObj, ...todoList];
- this.setState({ todoList: newList });
- };
- <Header addTodo={this.addTodo}></Header>
3.父子通信
父子通信:父->子通过props传递;子->父通过props传递,要求父提前给子传递一个函数
- //App.jsx
- allCheck = (done) => {
- const { todoList } = this.state;
- console.log("接受子组件footer的值", done);
- const newList = todoList.map((item) => {
- return { ...item, done: done };
- });
- this.setState({ todoList: newList });
- };
- deleteCheck = () => {
- const { todoList } = this.state;
- const newList = todoList.filter((item) => !item.done);
- this.setState({ todoList: newList });
- };
-
- render() {
- const { todoList } = this.state;
- return (
- <div className="container">
- <Footer
- todoList={todoList}
- allCheck={this.allCheck}
- deleteCheck={this.deleteCheck}
- ></Footer>
- </div>
- );
- }

父到子传递数据:App向Footer传递列表数据通过props传递,在Footer标签中通过【todoList={todoList}】传递todoList的数据,在Footer中通过【 const {todoList}=this.props】接收数据。
子到父传递数据:以全选为例,Footer要向App传递全选按钮的checked状态值为false还是true,需要事先在App定义好一个方法,并传递给Footer【allCheck={this.allCheck}】,在Footer中通过【 this.props.allCheck(event.target.checked)】传递数据
- export default class Footer extends Component {
- handleAllCheck=(event)=>{
- this.props.allCheck(event.target.checked)
- }
- handleDeleteCheck=()=>{
- this.props.deleteCheck()
- }
- render() {
- const {todoList}=this.props
- const count=todoList.length;
- // reduce用来累加
- // const doneCount=todoList.reduce((prev,current)=>{return prev+(current.done?1:0)},0)
- // 精简以上写法
- const doneCount=todoList.reduce((prev,current)=>prev+(current.done?1:0),0)
- return (
- <div className="footer-wrapper">
- <input type="checkbox" checked={count==doneCount&&count!=0?true:false} onChange={this.handleAllCheck} />
- <span>已完成{doneCount}/全部{count}</span>
- <button className="btn btn-danger" onClick={this.handleDeleteCheck}>清除已完成任务</button>
- </div>
- )
- }
- }
4.defaultChecked和checked区别
defaultChecked:仅在第一次初次渲染时生效,更新时不受控制;
checked:始终受到控制,必须通过绑定 onChange 事件来控制选中情况。
类似的还有:defaultValue和value
5.关于案例中一些js用法
reduce---用来实现计算已完成的个数
- // reduce用来累加
- // const doneCount=todoList.reduce((prev,current)=>{return prev+(current.done?1:0)},0)
- // 精简以上写法
- const doneCount=todoList.reduce((prev,current)=>prev+(current.done?1:0),0)
JavaScript中Reduce() 的6个用例
nanoid---生成唯一的id
- import {nanoid} from "nanoid"
- const obj={id:nanoid(),name:target.value,done:false}
通过{...item}批量传值
- <ul>
- {
- todoList.map(item=>{
- return <Item key={item.id} {...item} updateTodo={updateTodo} deleteTodo= {deleteTodo}/>
- })
- }
- </ul>
传统的 HTML通过【οnclick="demo()"】绑定事件,
在react中【onClick={this.demo}】
或者【onClick={this.demo()}】,加了()必须在demo还有一个回调函数
- handleMouse = (flag) => {
- // 注意这里要return一个回调,因为标签中调用时加了()
- return () => {
- this.setState({ mouse: flag });
- };
- };
- <button
- onClick={this.handleMouse(flag)}
- className="btn btn-danger"
- style={{ display: mouse ? "block" : "none" }}
- >
- 删除
- </button>
- 相关标签
Copyright © 2003-2013 www.wpsshop.cn 版权所有,并保留所有权利。

