
- 1C#初级——List 容器_c# 初始化list容器
- 2Congested Crowd Instance Localization with Dilated Convolutional Swin Transformer
- 3深度学习环境配置下载速度慢,下载加速教程_warning: the repository located at pypi.tuna.tsing
- 4android fragment ,fragment中的控件操作_fragment implements view.onclicklistener
- 5Mac电脑下载软件的几个网站_mac软件下载网站推荐
- 6SPI原理超详细讲解---值得一看
- 7物 理 学 简 介(二)
- 8IC设计企业如何真正实现便捷又高效地云租户文件传输?
- 9大数据生态系统的主要开源技术和框架_大数据生态技术框架知识
- 102024年 计算机毕业设计选题指导题目 200例_基于android的招聘系统的设计与实现
【SpringCloud学习笔记】RabbitMQ(上)_rabbitmq官网
赞
踩
1. RabbitMQ简介
2. 安装方式
安装前置准备:
此处基于Linux平台 + Docker进行安装,前置准备如下:
- Linux云服务器 / 虚拟机
- Docker环境
安装命令:
docker run \
 -e RABBITMQ_DEFAULT_USER=ricejson \
 -e RABBITMQ_DEFAULT_PASS=123321 \
 -v mq-plugins:/plugins \
 --name mq \
 --hostname mq \
 -p 15672:15672 \
 -p 5672:5672 \
 -d \
 rabbitmq:3.12.10-management-alpine
- 1
- 2
- 3
- 4
- 5
- 6
- 7
- 8
- 9
- 10
我们观察一下安装命令可以发现,配置了两个端口映射:
- 15672:该端口是RabbitMQ的控制台端口,用户可以在浏览器地址栏进行登录
- 5672:该端口用户不可见,供RabbitMQ内部数据传输使用
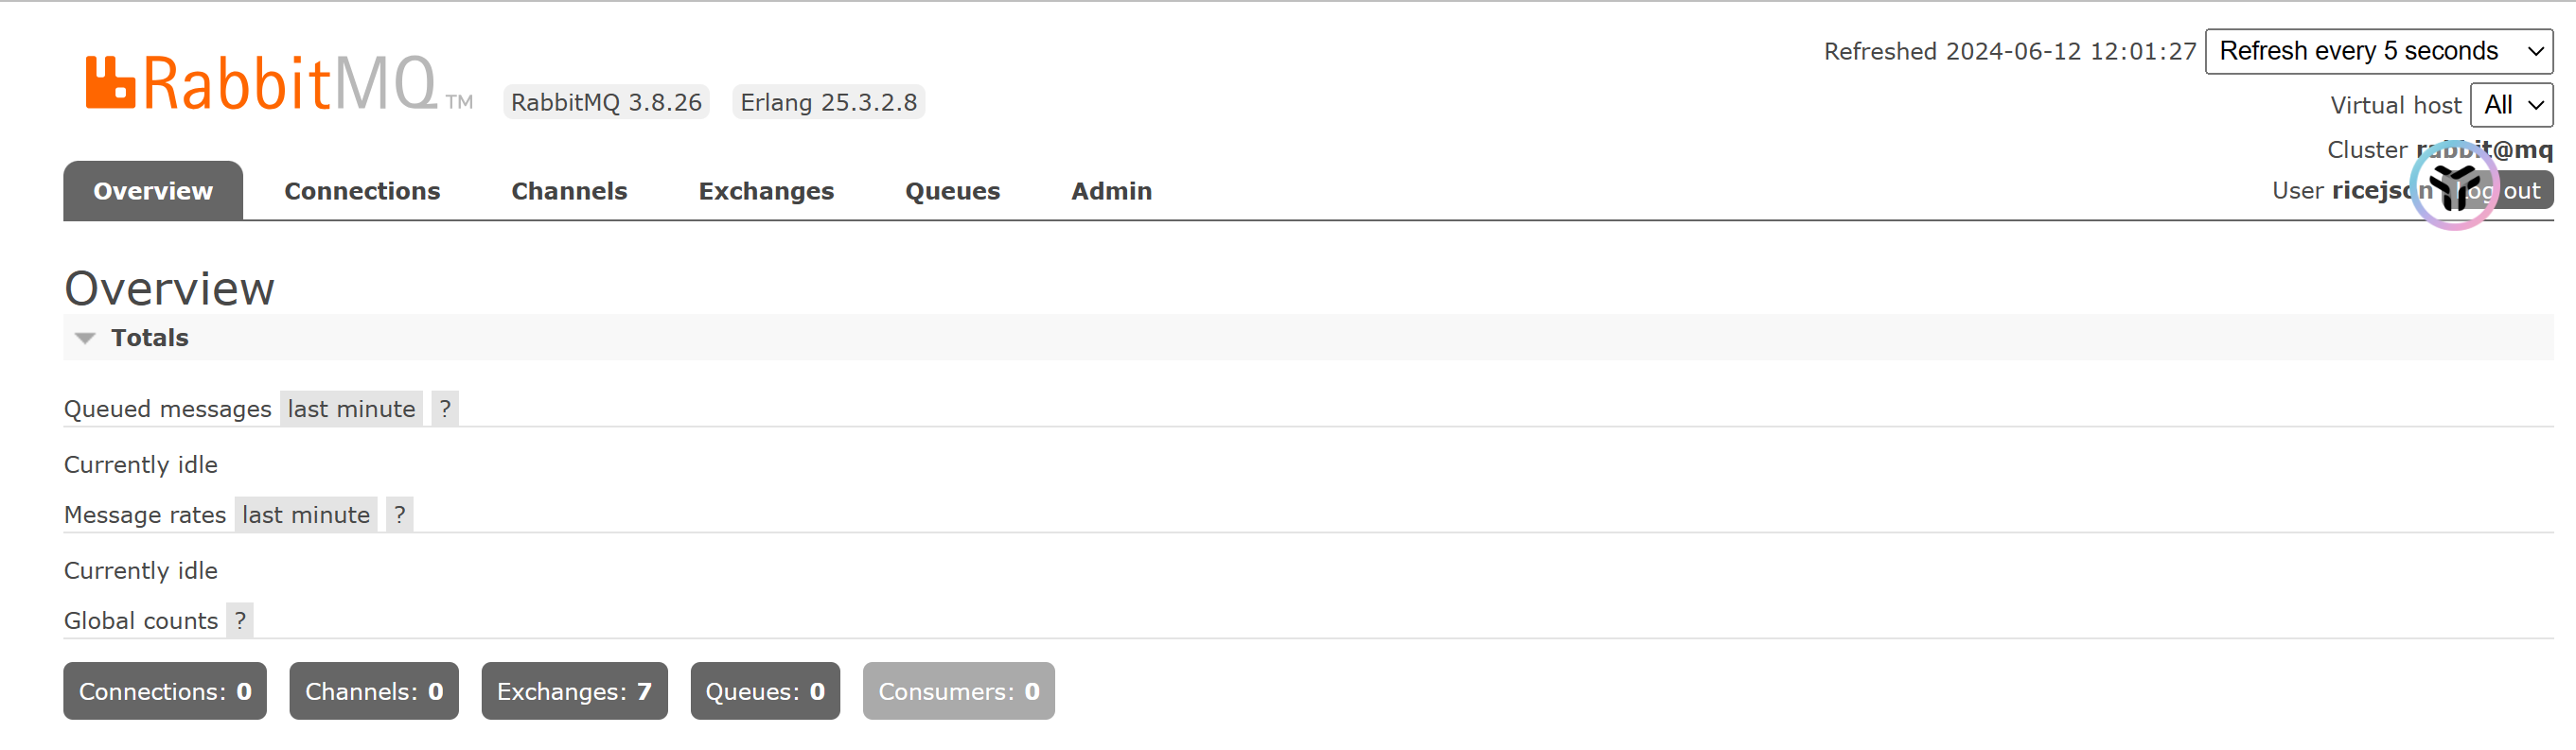
如果在地址栏中输入http://{ip}:15672能够观察到如下界面,证明安装成功!
2.1 配置参考文档
需要验证:https://blog.csdn.net/dzqxwzoe/article/details/138517406
3. 快速入门
3.1 RabbitMQ架构图
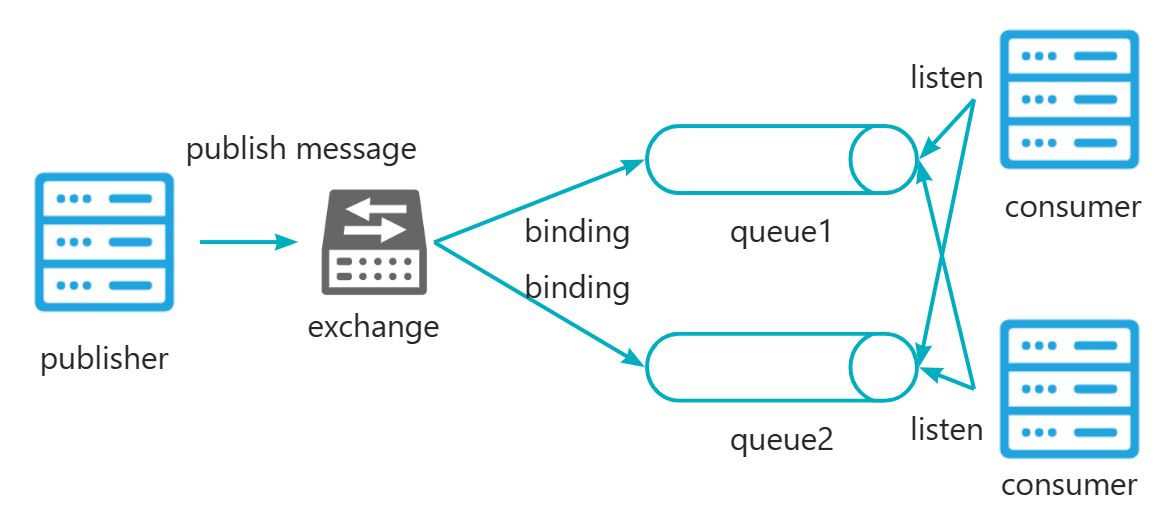
上述就是RabbitMQ的架构图,其中涉及到几个重要角色:
- publisher:生产者,即发送消息的一方
- consumer:消费者,即接收消息进行业务处理的一方
- queue:队列,用于暂存生产者投递的消息,等待消费者处理
- exchange:交换机,负责将生产者投递的消息路由给具有binding关系的queue
3.2 收发消息
Step1:配置queue:
- 在RabbitMQ的控制台中选择
Queues - 配置两个队列,名称例如
hello.queue1、hello.queue2 - 点击
Add queue添加该队列

Step2:配置exchange:
- 在RabbitMQ控制台中选择
Exchanges - 配置交换机信息,例如名称:
hello.exchange,类型为fanout - 点击
Add exchange添加交换机

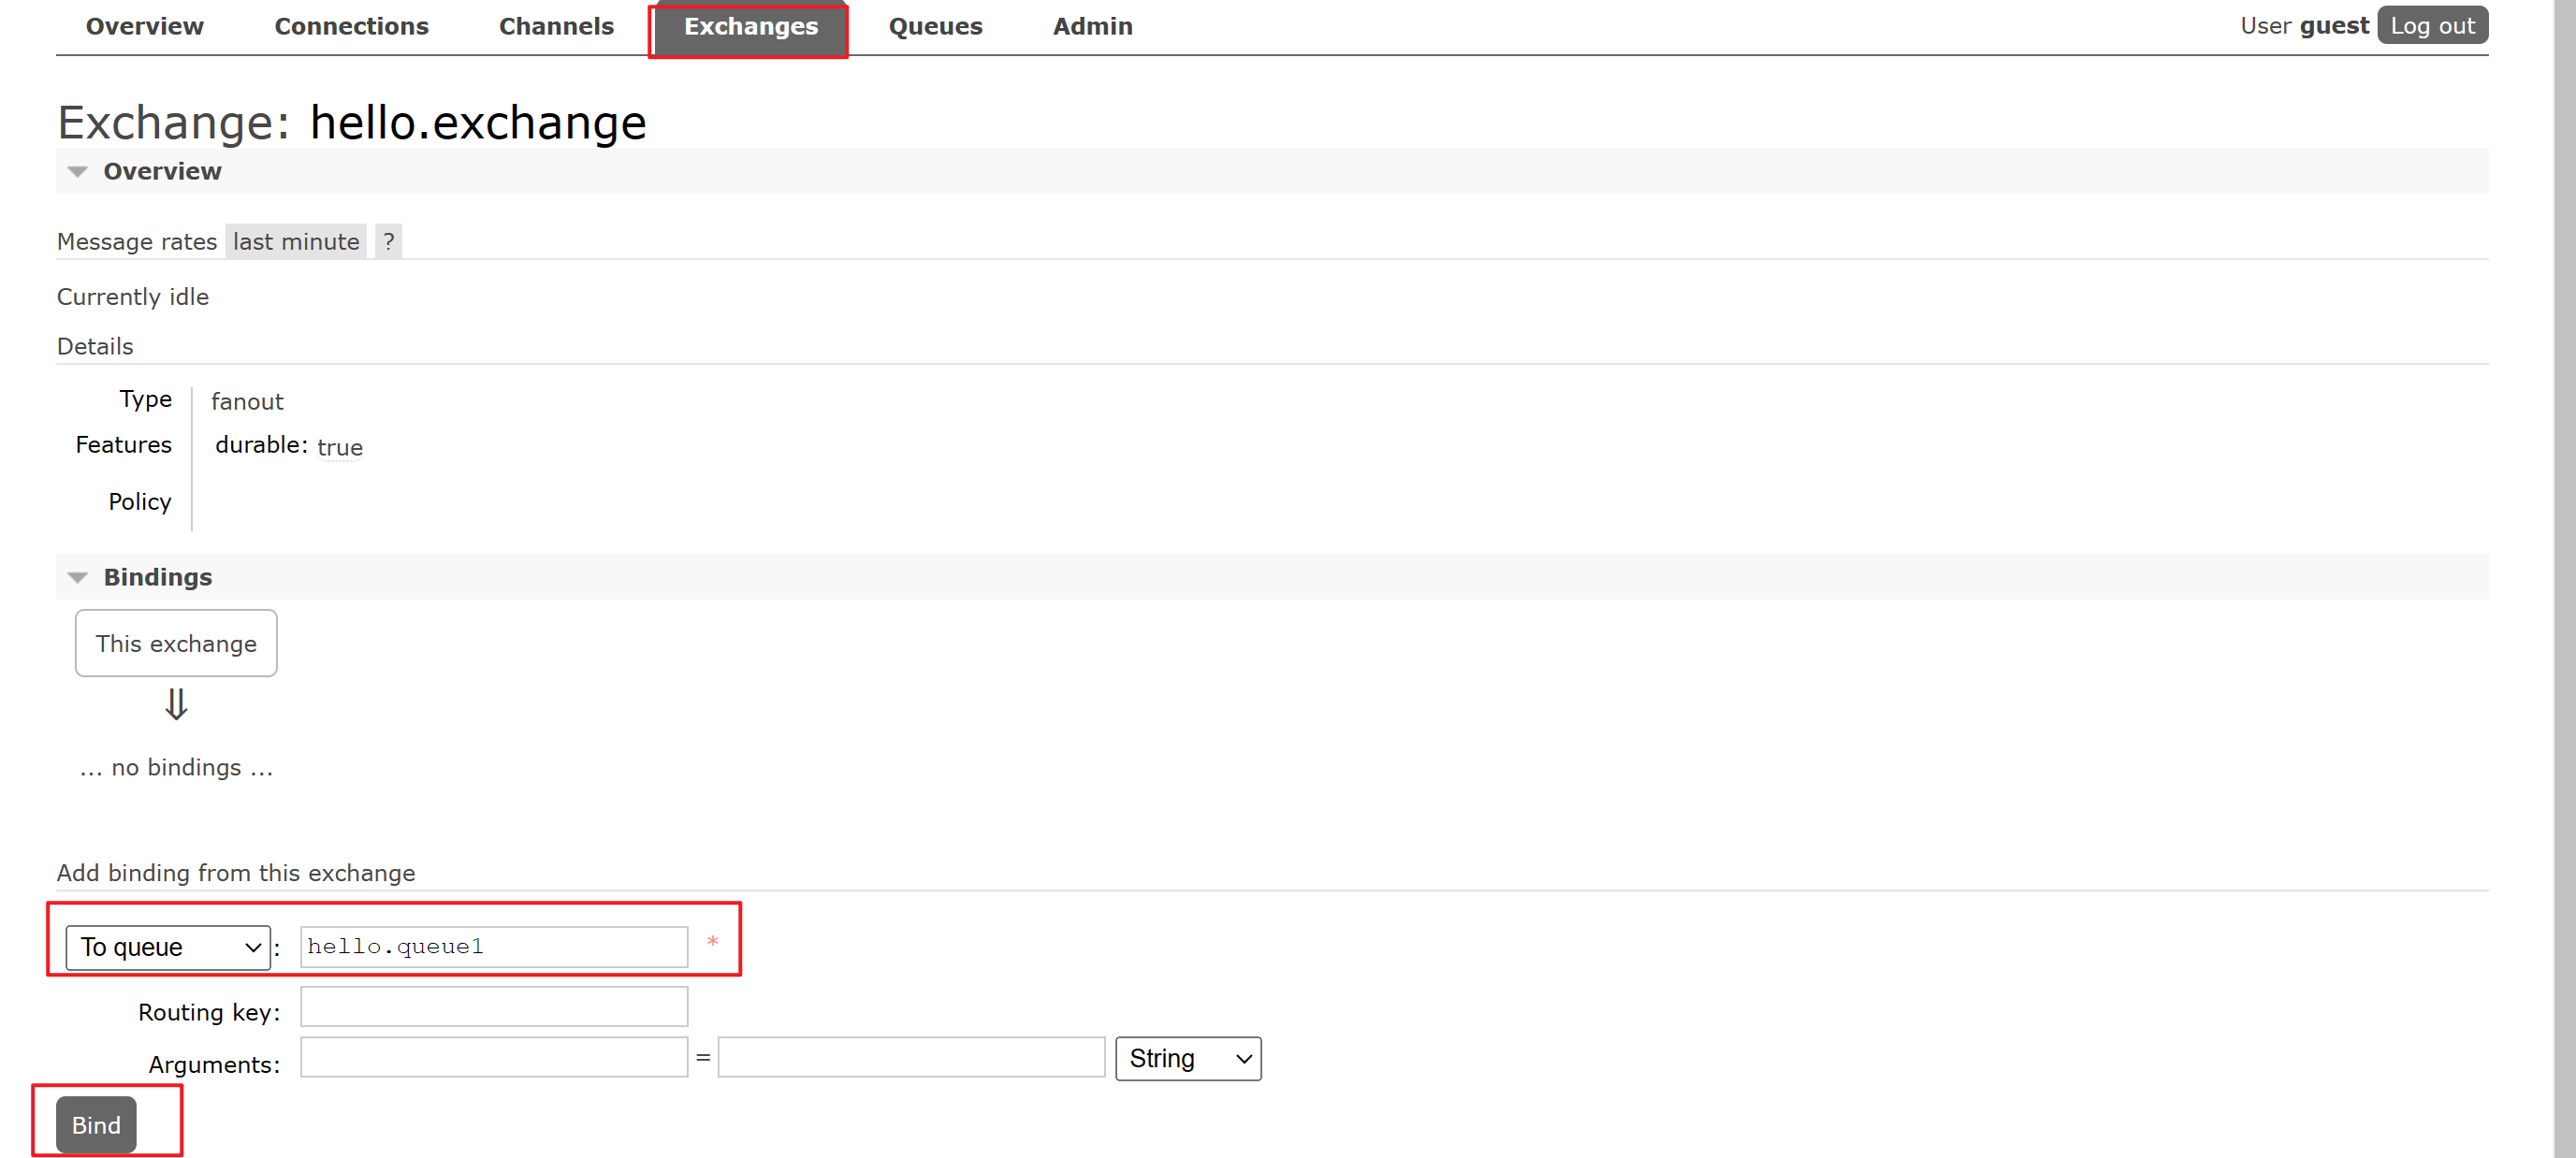
Step3:配置binding关系:
就像在架构图中所示,我们的exchange会根据一定规则将生产者生产的消息路由给特定的queue,因此此处我们需要配置对应的绑定关系:
- 在exchange显示台中选择新添加的
hello.exchange - 进入其中,选择
binding项,配置两个binding规则,分别将hello.queue1与hello.queue2绑定到hello.exchange上
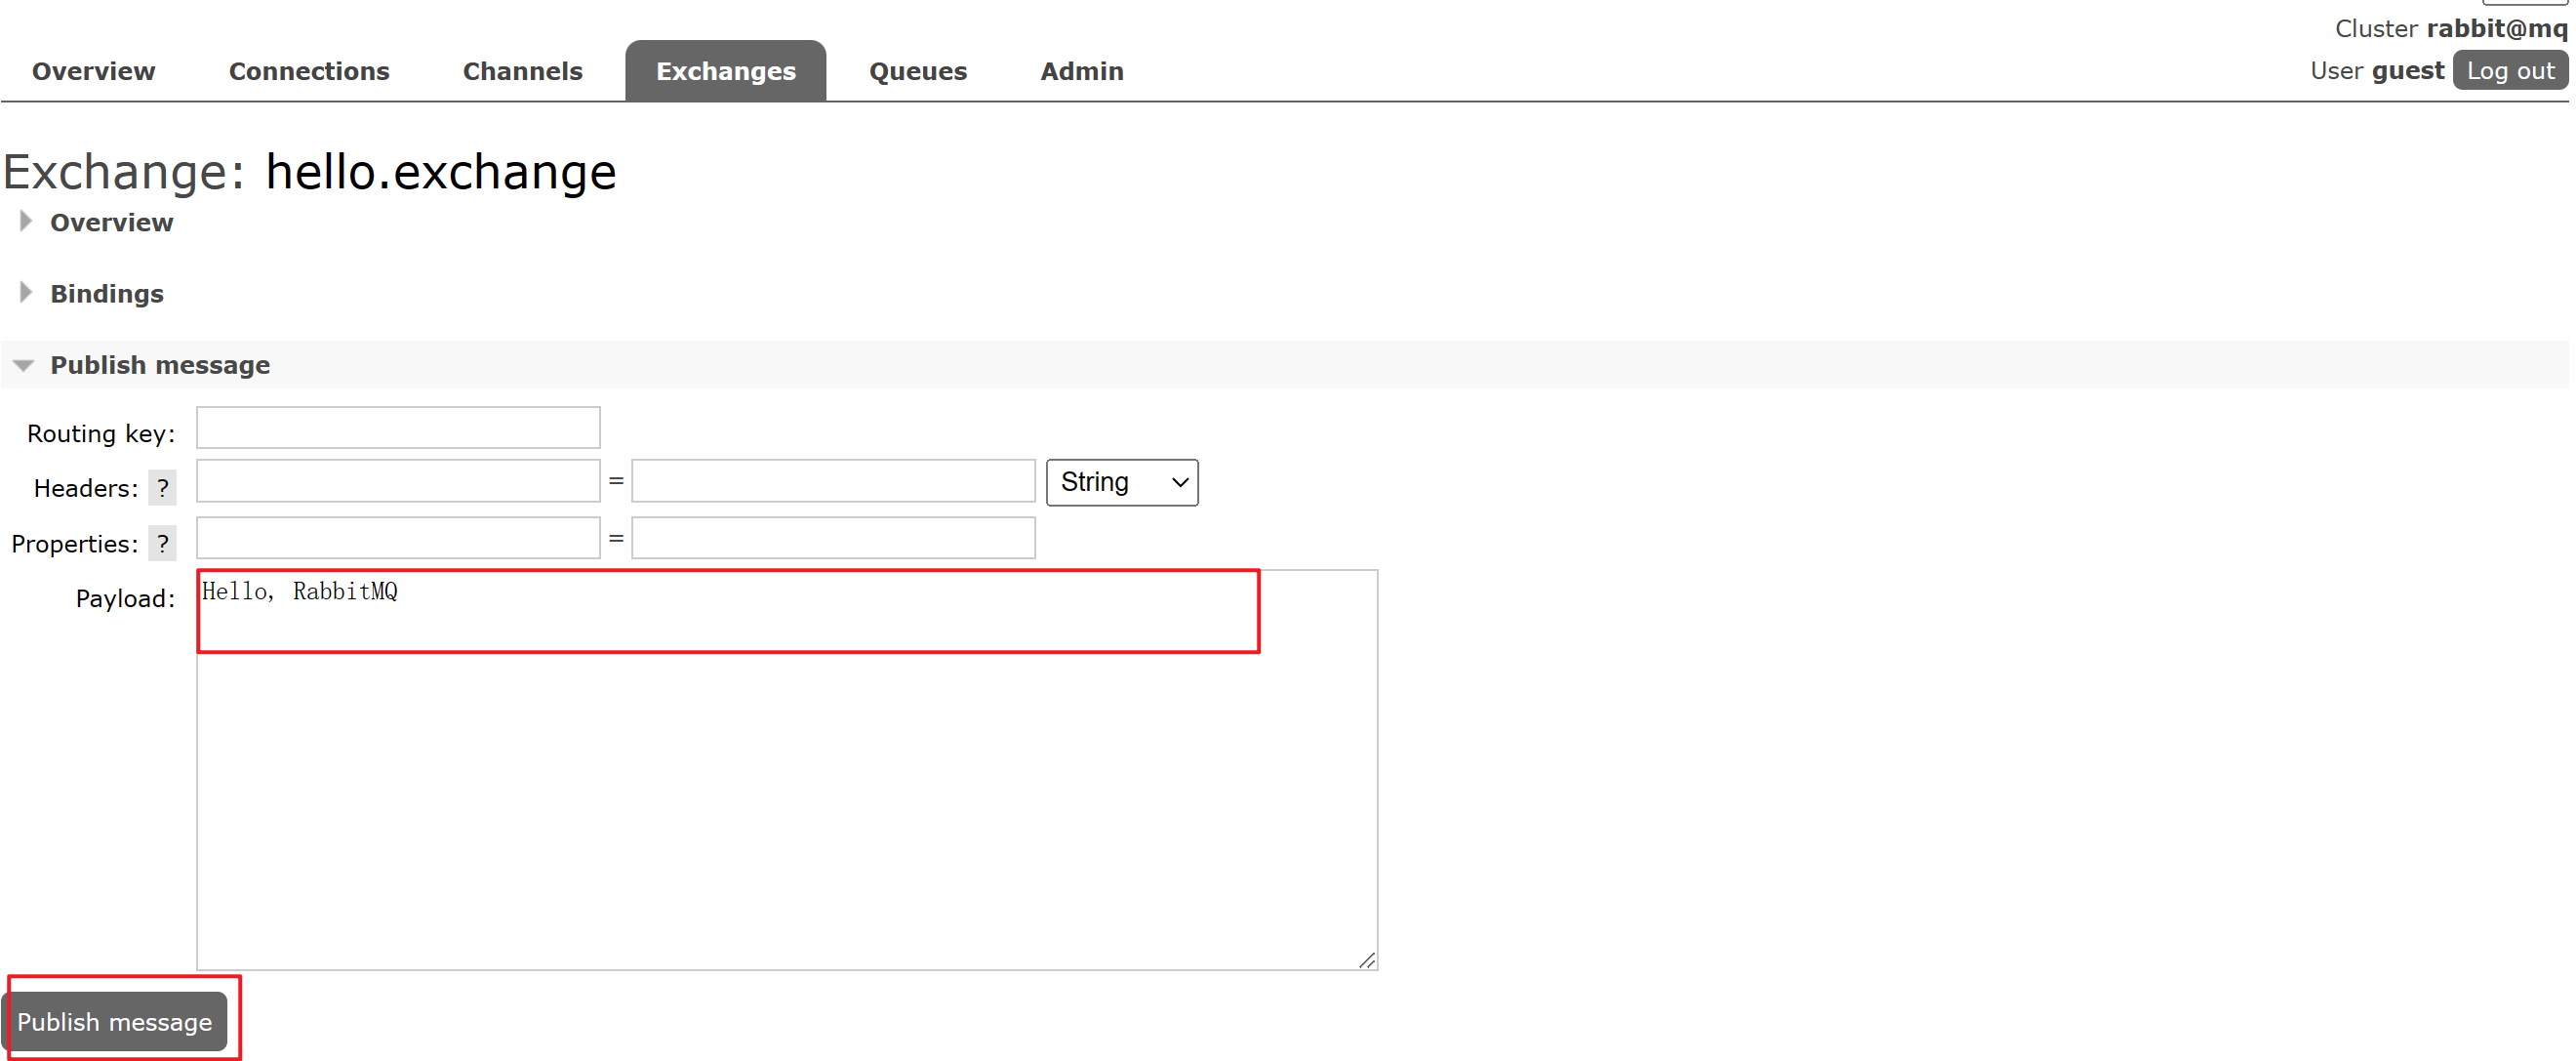
Step4:publish投递消息:
- 在配置的exchange中选择
publish message列表 - 配置message的payload载荷字段
- 点击
Publish message发送消息
Step5:验证结果:
- 选择
Queues,选择其中一个queue例如hello.queue1进入其中 - 查看
Get Message选项,查看接收到的消息
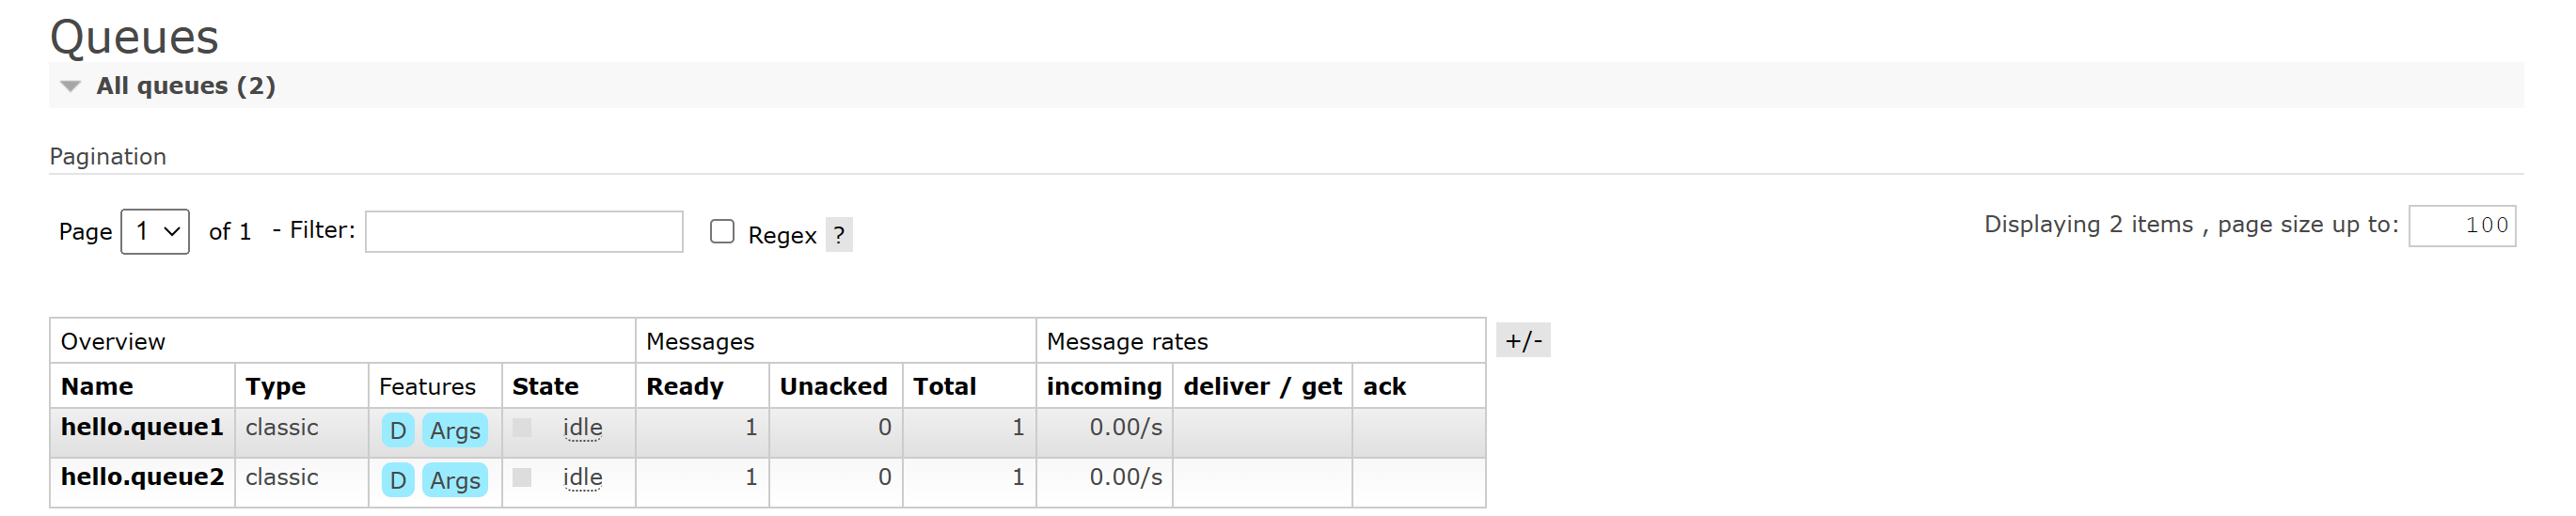

此时我们就完成了基于RabbitMQ提供的控制台来完成收发消息的操作!
3.3 SpringAMQP
我们已经实现了基于控制台的方式完成消息的收发,但是我们实际开发中仍然选用编程的方式来实现消息的收发,因此接下来就要学习如何使用RabbitMQ系列的客户端完成Java代码的编写。事实上,RabbitMQ针对不同的语言提供了不同的客户端可供使用,而针对Java语言提供的客户端编码较为复杂,因此此处使用Spring整合后的 **SpringAMQP **客户端进行Java编程!
- 在maven配置文件中引入
SpringAMQP依赖
<!--AMQP依赖,包含RabbitMQ-->
<dependency>
    <groupId>org.springframework.boot</groupId>
    <artifactId>spring-boot-starter-amqp</artifactId>
</dependency>
- 1
- 2
- 3
- 4
- 5
- 在
application.yml配置RabbitMQ连接地址(publisher以及consumer均需要配置)
# 配置RabbitMQ地址
spring:
  rabbitmq:
    host: 127.0.0.1
    port: 5672
    username: guest
    password: guest
- 1
- 2
- 3
- 4
- 5
- 6
- 7
- 在
publisher模块中编写单元测试,测试消息发送
@SpringBootTest
@Slf4j
class PublisherApplicationTest {
    @Resource
    private RabbitTemplate rabbitTemplate;

    @Test
    public void testPublish() {
        // 1. 定义发送队列名
        String queueName = "hello.queue1";
        // 2. 定义消息内容
        String msg = "hello, SpringAMQP";
        // 3. 发送消息
        rabbitTemplate.convertAndSend(queueName, msg);
    }
}

- 1
- 2
- 3
- 4
- 5
- 6
- 7
- 8
- 9
- 10
- 11
- 12
- 13
- 14
- 15
- 16
- 在
consumer模块中编写组件类,使用@RabbitListener注解接收消息
@Component
@Slf4j
public class RabbitMQListener {
    @RabbitListener(queues = "hello.queue1")
    public void listen(String msg) {
        log.info("从【hello.queue1】接收到消息:" + msg);
    }
}
- 1
- 2
- 3
- 4
- 5
- 6
- 7
- 8
启动项目后,观察日志文件,发现消费者确实监听到了Queuehello.queue1中的消息:

4. WorkQueues模型
**WorkQueues模型:**即任务模型,简单来说就是让多个消费者监听同一个队列中的消息,共同消费队列中的消息,该模型可用于防止消息堆积,在消息处理速度慢以及消息量大的情况非常适用,下面我们就来模拟这种场景:
需求:
- 创建一个新的队列
work.queue - 创建两个消费者监听同一个队列
work.queue - 创建一个生产者,生产50条消息,观察结果
步骤:
- 在RabbitMQ控制台中创建一个新的Queue:
work.queue

- 在RabbitMQListener类中创建两个方法用于模拟两个消费者监听同一个队列
@RabbitListener(queues = "work.queue")
public void listenWorkQueue1(String msg) {
    log.info("listener1 从【work.queue】接收到消息:" + msg);
}

@RabbitListener(queues = "work.queue")
public void listenWorkQueue2(String msg) {
    log.info("listener2 从【work.queue】接收到消息:" + msg);
}
- 1
- 2
- 3
- 4
- 5
- 6
- 7
- 8
- 9
- 在PublisherApplicationTest类中创建一个测试方法,模拟一个生产者生产50条消息
@Test
public void testWorkQueue() {
    // 1. 定义发送队列名
    String queueName = "work.queue";
    for (int i = 1; i <= 50; i++) {
        // 2. 定义消息内容
        String msg = "消息" + i;
        // 3. 发送消息
        rabbitTemplate.convertAndSend(queueName, msg);
    }
}
- 1
- 2
- 3
- 4
- 5
- 6
- 7
- 8
- 9
- 10
- 11
观察消费者结果如下:

可以发现默认的工作模式是采用类似于轮询方式的,那么这种方式在两个消费者消费速率相当的场景下没有问题,但是以后如果多个消费者部署在不同的机器上,多个机器性能不同造成,效率最低的及其拖慢了整个消费进程,下面就来模拟该情况:
@RabbitListener(queues = "work.queue")
public void listenWorkQueue1(String msg) throws InterruptedException {
    log.info("listener1 从【work.queue】接收到消息:" + msg);
    Thread.sleep(40);
}

@RabbitListener(queues = "work.queue")
public void listenWorkQueue2(String msg) throws InterruptedException {
    log.info("listener2 从【work.queue】接收到消息:" + msg);
    Thread.sleep(200);
}
- 1
- 2
- 3
- 4
- 5
- 6
- 7
- 8
- 9
- 10
- 11
此时发现消费者1消费速度很快,1s内就完成了,但是消费者2消费速度很慢,需要5s完成,基于默认的工作模型,消息仍旧均摊给两个消费者,拖慢了整体效率。

解决方案:
- 在消费者配置文件中引入如下配置:
spring:
  rabbitmq:
    listener:
      simple:
        prefetch: 1
- 1
- 2
- 3
- 4
- 5
这样一来就改成了"能者多劳"的工作模式了

