
- 1自动化产线 搭配数据采集监控平台 创新与突破
- 2汽车功能安全---ISO26262_芯片asil 登记划分
- 3[Git]当拉取错误的代码到本地时,进行撤销操作_git拉取远程代码到本地 回退
- 4【Spring Boot 使用记录】kafka自动配置和自定义配置_spring.kafka.consumer.auto-offset-reset
- 5鼠标拖拽调整div大小_div 拖拽调整尺寸
- 6使用OpenAI和中专API构建查询代理
- 7解决“adb server is out of date. killing... ”的办法_adb server is out of date. killing... * daemon sta
- 8一文带你搞懂CC1链(小白入门必看文章)
- 9leetcode刷题笔记(Golang)--236. Lowest Common Ancestor of a Binary Tree_golang lowest common ancestor of a binary tree iii
- 10以太坊Dapp项目-网页钱包开发手册
07--分布式事务之Seata AT 事务_分布式事务seata at
赞
踩
1. Seata介绍
Seata 是一款开源的分布式事务解决方案,致力于提供高性能和简单易用的分布式事务服务。Seata 将为用户提供了 AT、TCC、SAGA 和 XA 事务模式,为用户打造一站式的分布式解决方案。
1.1 Seata AT事务方案
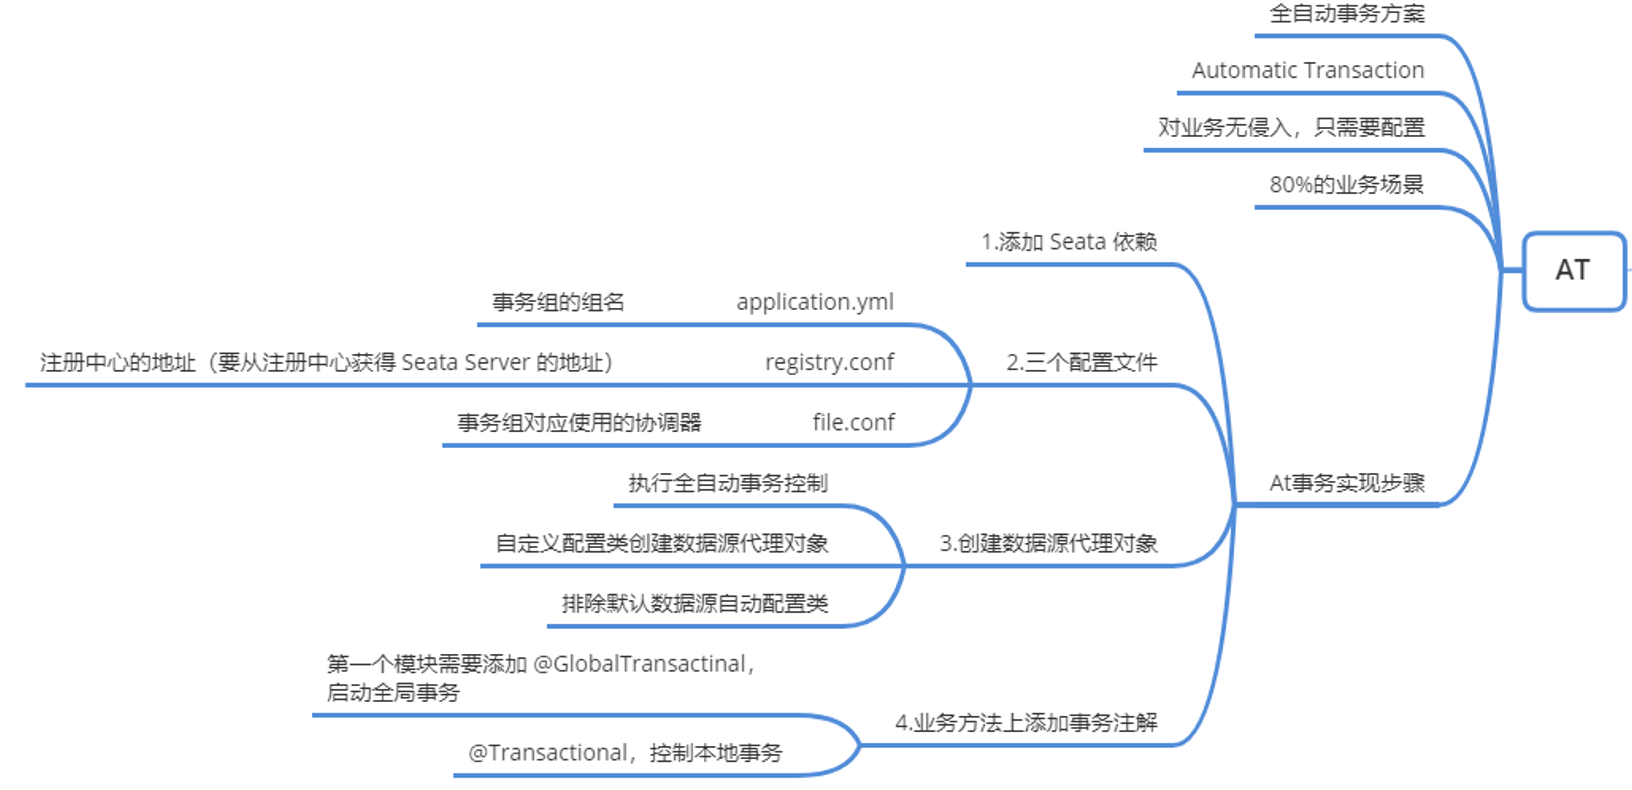
Seata 的 AT 模式(Automatic Transaction)是一种无侵入的分布式事务解决方案。下面结合具体业务场景来分析其执行的原理。
1.1.1 业务场景
订单系统
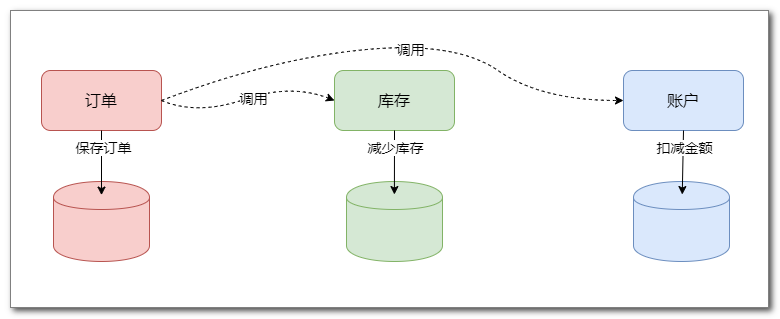
当用户下订单时,执行以下三步流程:
(1)订单系统保存订单
(2)订单系统调用库存服务,减少商品库存
(3)订单系统调用账户服务,扣减用户金额
这三步要作为一个整体事务进行管理,要么整体成功,要么整体失败。
1.2 Seata AT基本原理
1.2.1 第一阶段:执行各分支事务
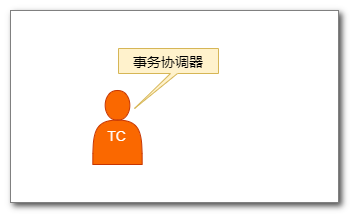
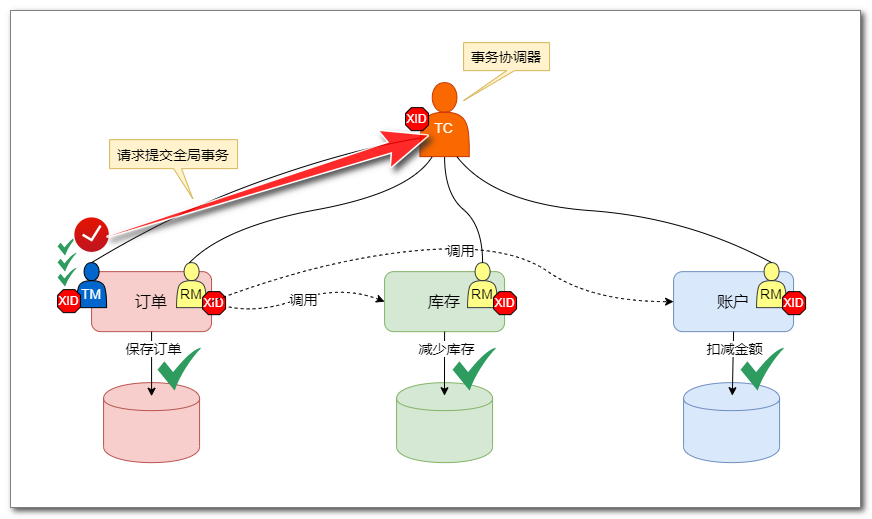
- 微服务系统中,各服务之间无法相互感知事务是否执行成功,这时就需要一个专门的服务,来协调各个服务的运行状态。这个服务称为 TC(Transaction Coordinator),事务协调器。
- 订单系统开始执行保存订单之前,首先启动 TM(Transaction Manager,事务管理器),由 TM 向 TC 申请开启一个全局事务:

- 这时TC会产生一个全局事务ID,称为 XID,并将 XID 传回 TM,自此开启全局事务。

- 全局事务开启后,开始执行创建订单的业务。首先执行保存订单,这时会先启动一个 RM(Resource Manager,资源管理器),并将 XID 传递给 RM。
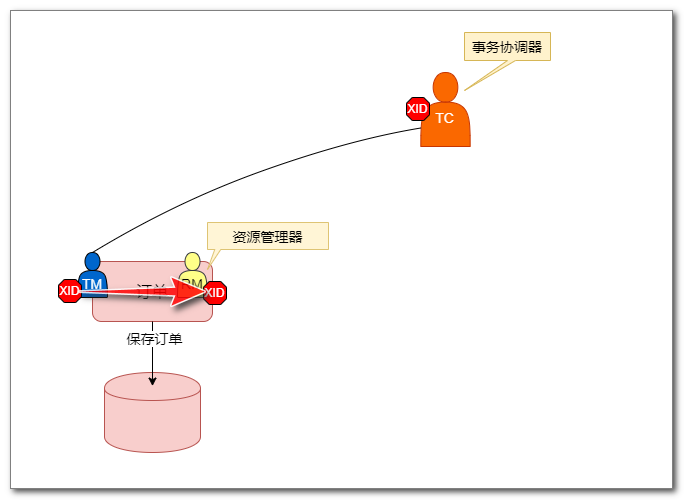
- RM 负责对分支事务(即微服务的本地事务)进行管理,并与 TC 通信,上报分支事务的执行状态、接收全局事务的提交或回滚指令。
RM 首先会使用 XID 向 TC 注册分支事务,将分支事务纳入对应的全局事务管辖。
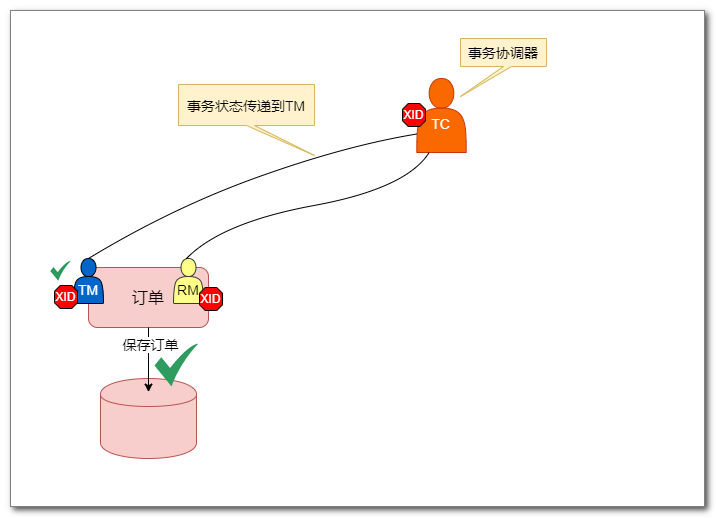
- 现在可以执行保存订单的分支事务了。一旦分支事务执行成功,RM 会上报事务状态:
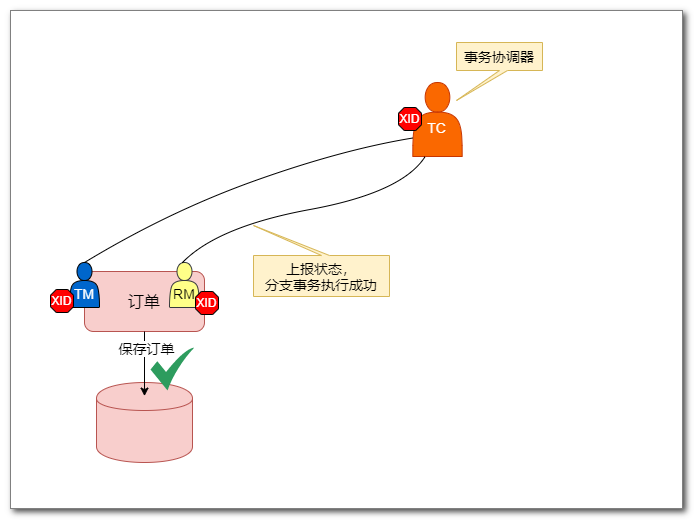
- TC 收到后,会将该状态信息传递到 TM,到此,保存订单过程结束。
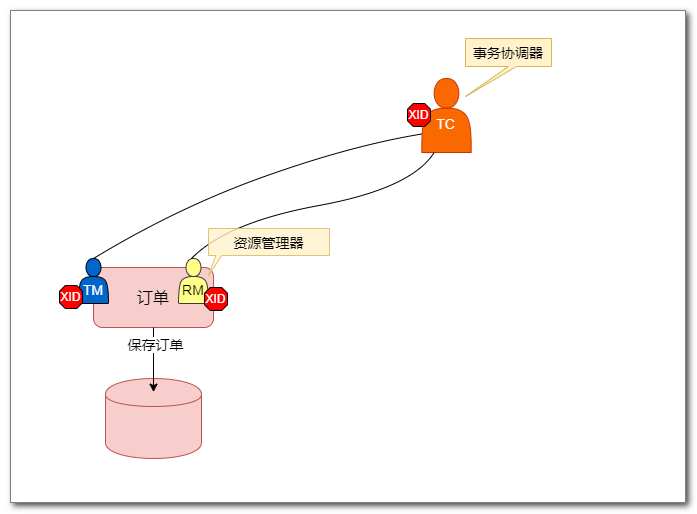
- 下面是调用库存服务,减少商品库存,与订单的执行过程相同。首先调用库存服务,启动 RM,并传递 XID:
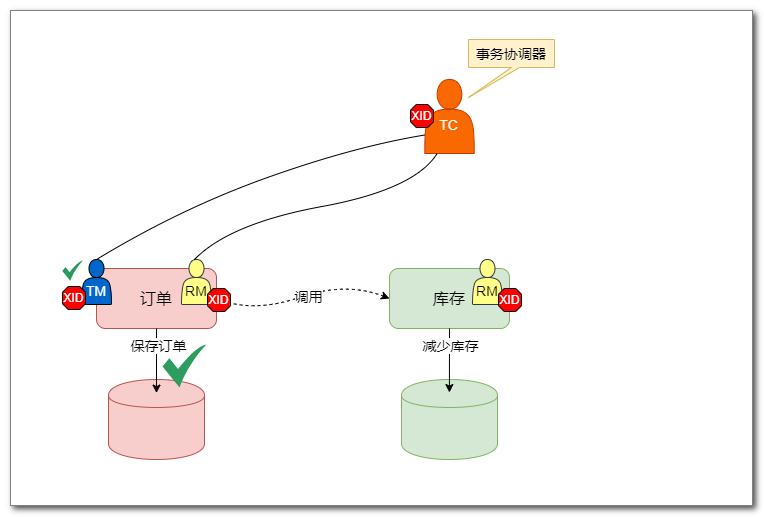
- 库存服务的 RM 使用 XID 向 TC 进行注册,纳入全局事务管辖:

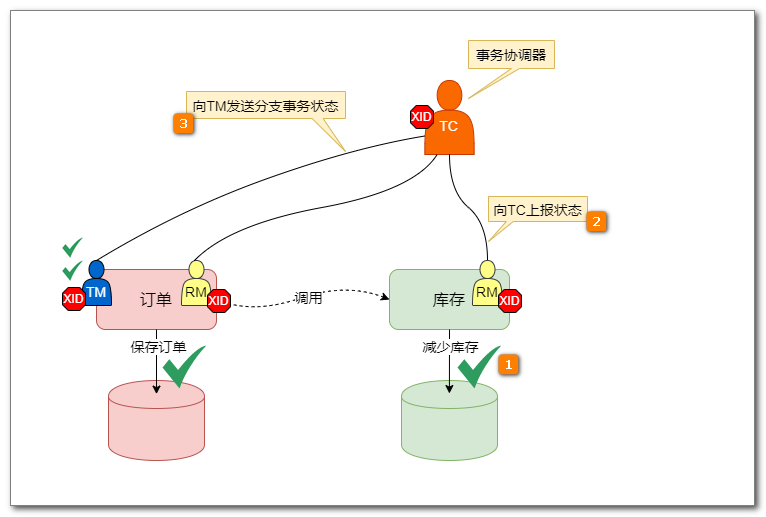
- 执行本地事务成功后上报状态,TC会将状态发送给TM,到此调用库存就完成了。
- 完成账户分支事务:

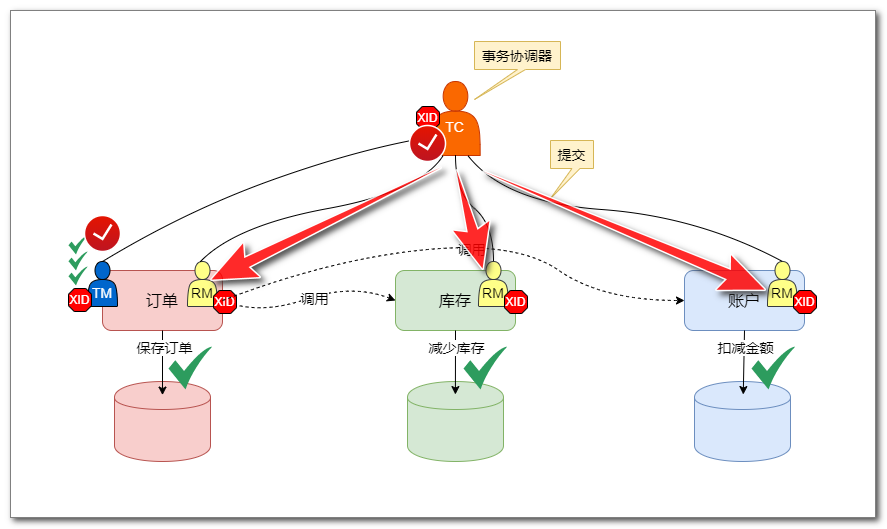
1.2.2 第二阶段:控制全局事务最终提交
- 现在,TM(全局事务管理器)收集齐了全部分支事务的成功状态,它会进行决策,确定全局事务成功,向 TC 发送全局事务的提交请求:
- 然后,TC 会向所有 RM 发送提交操作指令,RM 会完成最终提交操作。到此,全局事务全部提交完成!
1.2.3 第二阶段:控制全局事务最终回滚
下面是事务执行失败的情况,需要回滚。
- 假设订单业务执行过程中,扣减账户金额这一步分支事务执行失败,那么失败状态对TC上报,然后再发送给TM:
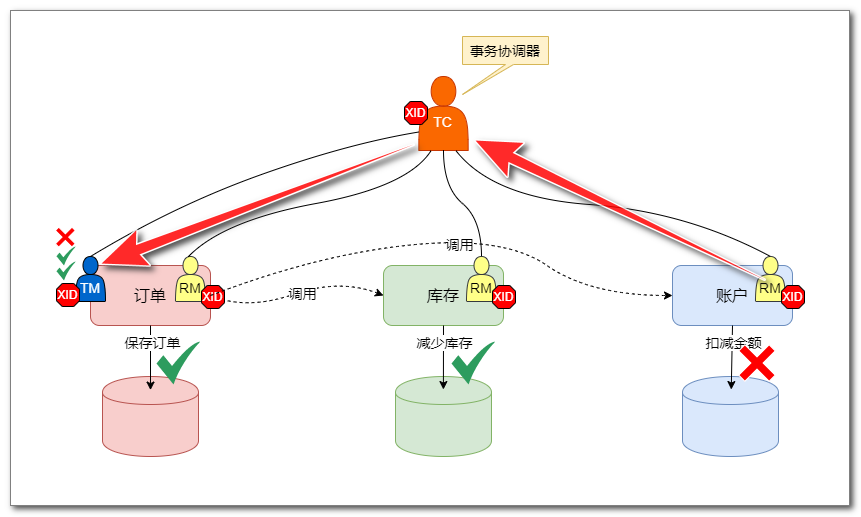
- TM 会进行决策,确定全局事务失败,向 TC 发送全局事务的回滚请求:
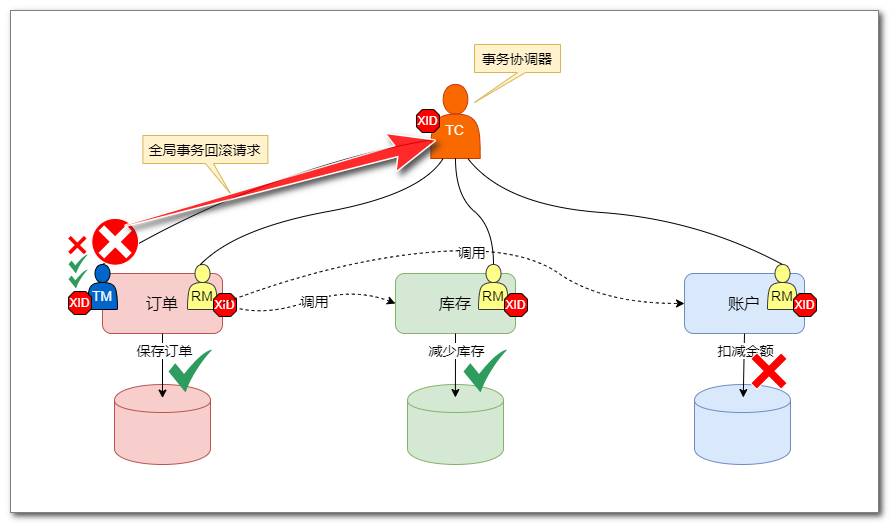
- 然后,TC 会向所有 RM 发送回滚操作指令,RM 会完成最终回滚操作:

1.3 Seata AT具体工作机制
1.3.1 第一阶段:执行分支事务
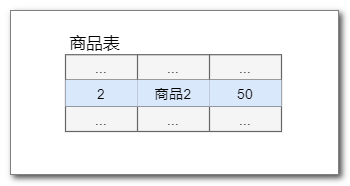
- 以订单业务中的库存服务为例:
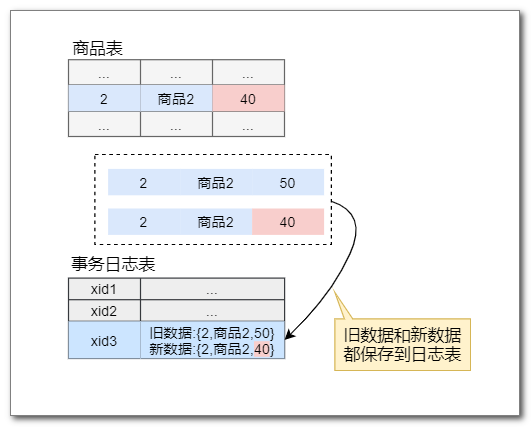
库存表中存在一条商品的库存信息:
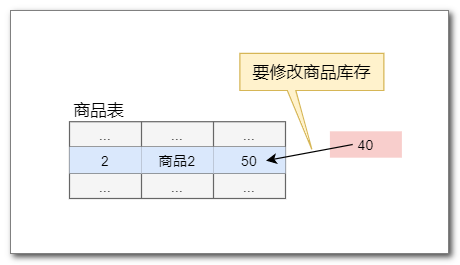
- 现在要执行业务操作减少库存,从50件减少到40件:
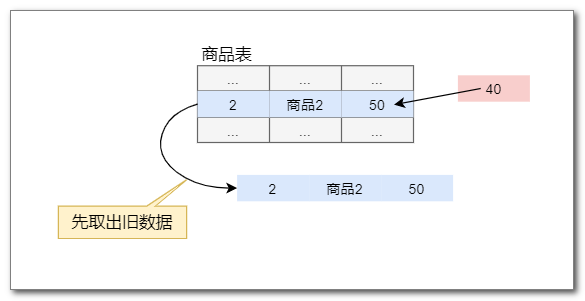
- 执行修改库存业务操作前, 会先取出旧的库存信息:
- 现在开始修改库存
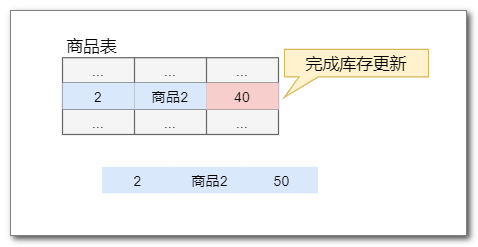
- 接着,取出更新后的新数据:

- 接下来,会把旧数据和新数据合并起来,保存到一个事务回滚日志表:undo_log表:
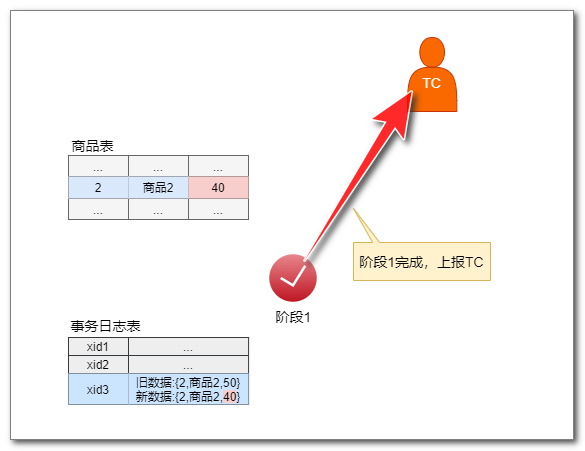
- 至此,第一阶段,分支事务完成,将状态上报给TC:
1.3.2 第二阶段:控制全局事务最终回滚
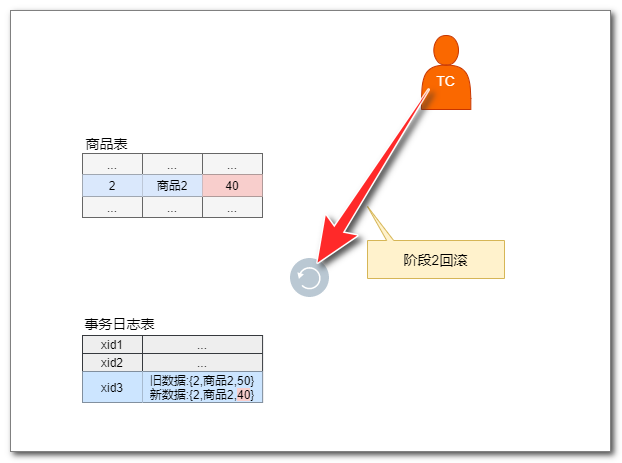
- 假如全局事务失败,那么第一阶段已提交的分支事务要执行回滚操作。首先会收到来自 TC 的全局事务回滚指令:
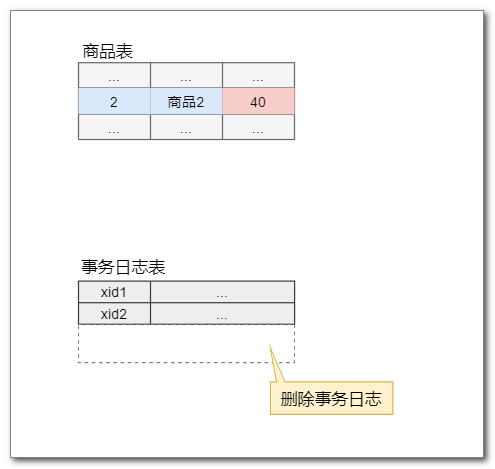
- 接下来,根据事务回滚日志(undo_log)表的记录,将商品恢复成旧的库存数据:
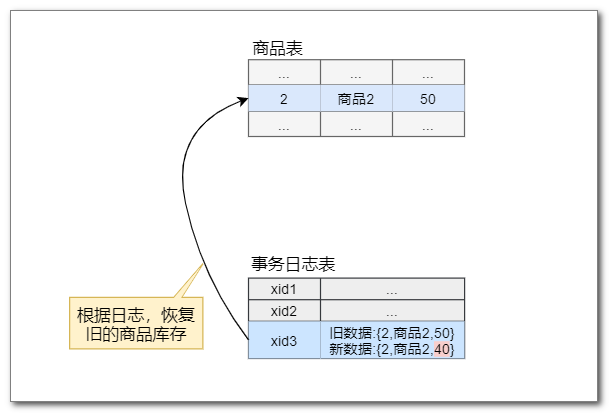
- 然后删除事务日志,最终完成第二阶段回滚操作:

1.3.3 第二阶段:控制全局事务最终提交
- 如果全局事务成功,要完成最终提交,AT模式最终提交操作非常简单,只需要删除日志数据即可。
首先接收到 TC 的全局事务提交指令:

- 接着,直接删除事务日志,就完成了第二阶段提交操作:
2. Seata Server - TC全局事务协调器
2.1 概述
在Seata AT 事务中,有三个AT 事务的角色:TC(事务协调器)、TM(事务管理器)和RM(资源管理器),其中 TM 和 RM 是嵌入在业务应用中的,而 TC 则是一个独立服务。
2.2 下载
Seata Server 就是 TC,直接从官方仓库下载启动即可,下载地址:https://github.com/seata/seata/releases
3. seata-server相关的配置与启动
3.1 启动参数设置
启动文件:seata-server.bat
用文本编辑器打开文件,找到文件中这一行:
%JAVACMD% %JAVA_OPTS% -server -Xmx2048m -Xms2048m -Xmn1024m -Xss512k -XX:Sur......
- 1
看到 Seata Server 默认使用 2G 内存,测试环境我们可以把内存调低:
%JAVACMD% %JAVA_OPTS% -server -Xmx256m -Xms256m -Xmn128m -Xss512k -XX:Sur......
- 1
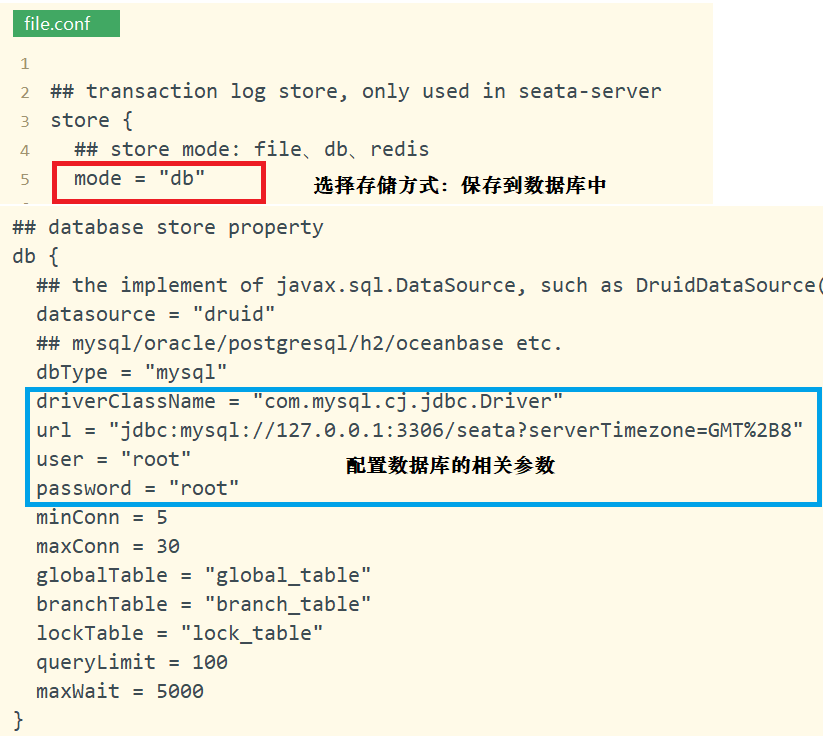
3.2 file.conf 配置数据的存储位置
Seata 需要存储全局事务信息、分支事务信息、全局锁信息,这些数据需要设定存储的位置。
可以放在本地文件、配置中心、db数据库、redis缓存中,这里我们选择db数据库,还需要配置数据库的相关参数信息。
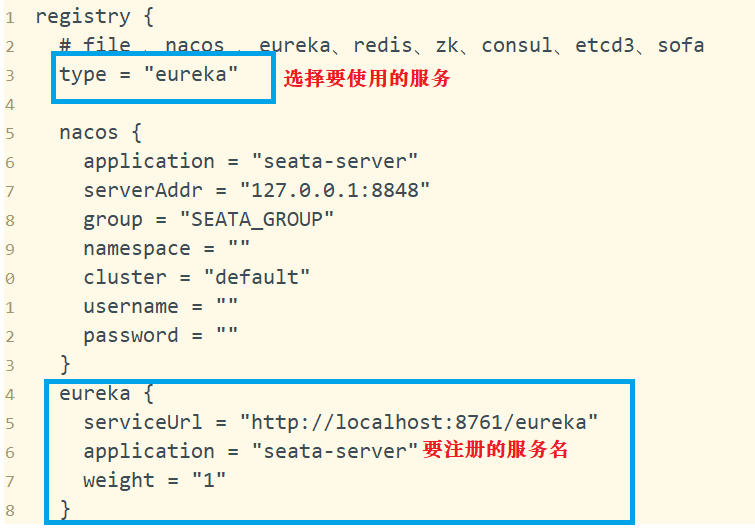
3.3 registry.conf 配置注册中心
Seata Server 要向注册中心进行注册,这样,其他服务就可以通过注册中心去发现 Seata Server,与 Seata Server 进行通信。
Seata 支持多款注册中心服务:nacos 、eureka、redis、zk、consul、etcd3、sofa。
项目中我们使用 eureka 注册中心,这还需要在 registry.conf 文件中配置:eureka服务的连接地址、注册的服务名。
3.4 启动seata-server
双击 seata-server.bat 启动 Seata Server。
可查看 Eureka 注册中心 Seata Server 的注册信息:

4. 入门案例
4.1 order订单服务添加 Seata AT 事务
在订单项目中要启动全局事务,还要执行订单保存的分支事务。
4.1.1 order-parent 添加 seata 依赖
打开父工程的pom.xml文件,把其中注释的代码取消注释,其即为seata依赖。
<dependency>
          <groupId>com.alibaba.cloud</groupId>
          <artifactId>spring-cloud-alibaba-seata</artifactId>
          <version>${spring-cloud-alibaba-seata.version}</version>
          <exclusions>
            <exclusion>
              <artifactId>seata-all</artifactId>
              <groupId>io.seata</groupId>
            </exclusion>
          </exclusions>
        </dependency>
        <dependency>
          <groupId>io.seata</groupId>
          <artifactId>seata-all</artifactId>
          <version>${seata.version}</version>
        </dependency>

- 1
- 2
- 3
- 4
- 5
- 6
- 7
- 8
- 9
- 10
- 11
- 12
- 13
- 14
- 15
- 16
4.1.2 三个配置文件
1. application.yml
TC 事务协调器通过“事务组”的方式将多个服务组织成一个全局事务。每个服务启动时要向TC注册,加入同一个事务组。
spring:
  application:
    name: order
  datasource:
    driver-class-name: com.mysql.cj.jdbc.Driver
    url: jdbc:mysql://localhost/seata_order?useUnicode=true&characterEncoding=UTF-8&serverTimezone=GMT%2B8
    jdbcUrl: ${spring.datasource.url}
    username: root
    password: root

  cloud:
    alibaba:
      seata:
        tx-service-group: order_tx_group

server:
  port: 8083
eureka:
  client:
    service-url:
      defaultZone: http://localhost:8761/eureka

mybatis-plus:
      mapper-locations: classpath:mapper/*.xml
      type-aliases-package: cn.tedu.entity
      configuration:
        map-underscore-to-camel-case: true
logging:
  level:
    cn.tedu.mapper: debug
- 1
- 2
- 3
- 4
- 5
- 6
- 7
- 8
- 9
- 10
- 11
- 12
- 13
- 14
- 15
- 16
- 17
- 18
- 19
- 20
- 21
- 22
- 23
- 24
- 25
- 26
- 27
- 28
- 29
- 30
2. registry.conf
需要从注册中心获得 TC 的地址,这里配置注册中心的地址。
TC 在注册中心注册的服务ID在 file.conf 中指定。
registry {
  # file 、nacos 、eureka、redis、zk、consul、etcd3、sofa
  type = "eureka"

  nacos {
    serverAddr = "localhost"
    namespace = ""
    cluster = "default"
  }
  eureka {
    serviceUrl = "http://localhost:8761/eureka"
    # application = "default"
    # weight = "1"
  }
  redis {
    serverAddr = "localhost:6379"
    db = "0"
    password = ""
    cluster = "default"
    timeout = "0"
  }
  zk {
    cluster = "default"
    serverAddr = "127.0.0.1:2181"
    session.timeout = 6000
    connect.timeout = 2000
    username = ""
    password = ""
  }
  consul {
    cluster = "default"
    serverAddr = "127.0.0.1:8500"
  }
  etcd3 {
    cluster = "default"
    serverAddr = "http://localhost:2379"
  }
  sofa {
    serverAddr = "127.0.0.1:9603"
    application = "default"
    region = "DEFAULT_ZONE"
    datacenter = "DefaultDataCenter"
    cluster = "default"
    group = "SEATA_GROUP"
    addressWaitTime = "3000"
  }
  file {
    name = "file.conf"
  }
}

config {
  # file、nacos 、apollo、zk、consul、etcd3、springCloudConfig
  type = "file"

  nacos {
    serverAddr = "localhost"
    namespace = ""
    group = "SEATA_GROUP"
  }
  consul {
    serverAddr = "127.0.0.1:8500"
  }
  apollo {
    app.id = "seata-server"
    apollo.meta = "http://192.168.1.204:8801"
    namespace = "application"
  }
  zk {
    serverAddr = "127.0.0.1:2181"
    session.timeout = 6000
    connect.timeout = 2000
    username = ""
    password = ""
  }
  etcd3 {
    serverAddr = "http://localhost:2379"
  }
  file {
    name = "file.conf"
  }
}
- 1
- 2
- 3
- 4
- 5
- 6
- 7
- 8
- 9
- 10
- 11
- 12
- 13
- 14
- 15
- 16
- 17
- 18
- 19
- 20
- 21
- 22
- 23
- 24
- 25
- 26
- 27
- 28
- 29
- 30
- 31
- 32
- 33
- 34
- 35
- 36
- 37
- 38
- 39
- 40
- 41
- 42
- 43
- 44
- 45
- 46
- 47
- 48
- 49
- 50
- 51
- 52
- 53
- 54
- 55
- 56
- 57
- 58
- 59
- 60
- 61
- 62
- 63
- 64
- 65
- 66
- 67
- 68
- 69
- 70
- 71
- 72
- 73
- 74
- 75
- 76
- 77
- 78
- 79
- 80
- 81
- 82
3. file.conf
在这里我们指定 TC 的服务ID seata-server:
vgroupMapping.order_tx_group = "seata-server"
- 1
order_tx_group 对应 application.yml 中注册的事务组名。
transport {
  # tcp udt unix-domain-socket
  type = "TCP"
  #NIO NATIVE
  server = "NIO"
  #enable heartbeat
  heartbeat = true
  # the client batch send request enable
  enableClientBatchSendRequest = true
  #thread factory for netty
  threadFactory {
    bossThreadPrefix = "NettyBoss"
    workerThreadPrefix = "NettyServerNIOWorker"
    serverExecutorThread-prefix = "NettyServerBizHandler"
    shareBossWorker = false
    clientSelectorThreadPrefix = "NettyClientSelector"
    clientSelectorThreadSize = 1
    clientWorkerThreadPrefix = "NettyClientWorkerThread"
    # netty boss thread size,will not be used for UDT
    bossThreadSize = 1
    #auto default pin or 8
    workerThreadSize = "default"
  }
  shutdown {
    # when destroy server, wait seconds
    wait = 3
  }
  serialization = "seata"
  compressor = "none"
}
service {
  #transaction service group mapping
  # order_tx_group 与 yml 中的 “tx-service-group: order_tx_group” 配置一致
  # “seata-server” 与 TC 服务器的注册名一致
  # 从eureka获取seata-server的地址,再向seata-server注册自己,设置group
  # 事务组对应使用的协调器:seata-server
  vgroupMapping.order_tx_group = "seata-server"
  #only support when registry.type=file, please don't set multiple addresses
  order_tx_group.grouplist = "127.0.0.1:8091"
  #degrade, current not support
  enableDegrade = false
  #disable seata
  disableGlobalTransaction = false
}

client {
  rm {
    asyncCommitBufferLimit = 10000
    lock {
      retryInterval = 10
      retryTimes = 30
      retryPolicyBranchRollbackOnConflict = true
    }
    reportRetryCount = 5
    tableMetaCheckEnable = false
    reportSuccessEnable = false
  }
  tm {
    commitRetryCount = 5
    rollbackRetryCount = 5
  }
  undo {
    dataValidation = true
    logSerialization = "jackson"
    logTable = "undo_log"
  }
  log {
    exceptionRate = 100
  }
}
- 1
- 2
- 3
- 4
- 5
- 6
- 7
- 8
- 9
- 10
- 11
- 12
- 13
- 14
- 15
- 16
- 17
- 18
- 19
- 20
- 21
- 22
- 23
- 24
- 25
- 26
- 27
- 28
- 29
- 30
- 31
- 32
- 33
- 34
- 35
- 36
- 37
- 38
- 39
- 40
- 41
- 42
- 43
- 44
- 45
- 46
- 47
- 48
- 49
- 50
- 51
- 52
- 53
- 54
- 55
- 56
- 57
- 58
- 59
- 60
- 61
- 62
- 63
- 64
- 65
- 66
- 67
- 68
- 69
- 70
- 71
4.1.3 创建 seata 数据源代理对象
Seata AT 事务对业务代码无侵入,全自动化处理全局事务,其功能是靠 Seata 的数据源代理工具实现的。
这里我们创建 Seata 的数据源代理,并排除 Spring 默认的数据源。
注意:
需要在业务层的业务方法上添加注解:
@Transactional //本地事务
@GlobalTransactional //开启全局事务
需要在启动类上添加注解:排除默认数据源。
@SpringBootApplication(exclude = DataSourceAutoConfiguration.class) //排除默认的数据源自动配置类,使用自定义的自动配置
- 1
package cn.tedu;

import com.zaxxer.hikari.HikariDataSource;
import io.seata.rm.datasource.DataSourceProxy;
import org.springframework.boot.context.properties.ConfigurationProperties;
import org.springframework.context.annotation.Bean;
import org.springframework.context.annotation.Configuration;
import org.springframework.context.annotation.Primary;

import javax.sql.DataSource;

/**
 * 自定义的数据源自动配置类
 * 用来创建AT事务的数据源代理对象
 */
@Configuration
public class DSAutoConfiguration {
    @ConfigurationProperties(prefix = "spring.datasource") //注入数据库参数
    @Bean //自定义数据源
    public DataSource dataSource(){
        return new HikariDataSource();
    }

    @Primary //首选对象
    @Bean //数据源代理对象
    public DataSource dataSourceProxy(DataSource ds){
        return new DataSourceProxy(ds);
    }
}
- 1
- 2
- 3
- 4
- 5
- 6
- 7
- 8
- 9
- 10
- 11
- 12
- 13
- 14
- 15
- 16
- 17
- 18
- 19
- 20
- 21
- 22
- 23
- 24
- 25
- 26
- 27
- 28
- 29
4.2 account账户和storage库存添加Seata AT事务
4.2.1 三个配置文件
1. application.yml
仿照order中的yml文件,把以下代码添加至相应的位置即可。
 jdbcUrl: ${spring.datasource.url}

cloud:
    alibaba:
      seata:
        tx-service-group: order_tx_group
- 1
- 2
- 3
- 4
- 5
- 6
2. registry.conf与file.conf 文件
这两个文件与order模块中的文件完全相同,可直接复制到对应的目录下。
4.2.2 创建seata数据源代理对象
直接复制order中的DSAutoConfiguration类,到相应的目录下即可。
注意:
还需在业务层的实现类的业务方法上添加注解:@Transactional //本地事务控制
还需在启动类上,添加排除默认数据源的注解:@SpringBootApplication(exclude = DataSourceAutoConfiguration.class) //排除默认数据源
4.3 测试
-
按顺序启动项目:
Eureka
Seata Server
Easy Id Generator
Storage
Account
Order -
访问:http://localhost:8083/order/create?userId=1&productId=1&count=10&money=100
-
订单会调用库存和账户,这三个服务会分别启动一个分支事务,三个分支事务一起组成一个全局事务。
观察三个项目的控制台都有Seata AT事务的日志。

