
热门标签
热门文章
- 1计算机视觉应用期末试卷,计算机视觉复习题
- 2uniapp打包成app 华为上架申请权限添加使用说明_uniapp权限申请说明
- 3Unity Apple Vision Pro 开发(一):开发前期准备【软硬件要求 | 开发者模式 | 无线调试打包】_苹果visual pro开发
- 4java中foreach 用法_java的foreach()如何打印出流
- 5Redis_redis csdn
- 6Llama改进之——均方根层归一化RMSNorm
- 7springboot整合rabbitMQ系列9 消费者Consumer限流_springboot rabbitmq 消费者最小数量
- 8AGM AG32 MCU用于Mini-LED背光控制应用方案_agm32
- 9【记录6】axios常见的四种请求方式_axios请求放肆
- 10GitHub上拉取并运行一个go项目--go-admin(基于Gin + Vue + Element UI的前后端分离权限管理系统脚手架)_go前后端分离 架构
当前位置: article > 正文
SpringBoot-Cache整合redis_spring-boot-starter-cache spring-boot-starter-data
作者:我家小花儿 | 2024-06-22 02:48:34
赞
踩
spring-boot-starter-cache spring-boot-starter-data-redis
前言
SpringBoot的众多Starter有两个很重要的缓存Starter,其中一个是我们经常用到的Redis(spring-boot-starter-data-redis)还有一个是 spring-boot-starter-cache。
今天主要是简单介绍一个如何整合这两个组件,达到相互合作的关系。
开始
引入相关的依赖
这里redis需要注意几点,详细可以参考:SpringBoot整合Redis要注意的那些
<dependency>
    <groupId>org.springframework.boot</groupId>
    <artifactId>spring-boot-starter-data-redis</artifactId>
</dependency>

<dependency>
    <groupId>org.springframework.boot</groupId>
    <artifactId>spring-boot-starter-cache</artifactId>
</dependency>

<!-- lettuce默认连接池使用 common-pool2 -->
<dependency>
    <groupId>org.apache.commons</groupId>
    <artifactId>commons-pool2</artifactId>
</dependency>

<dependency>
    <groupId>org.springframework.boot</groupId>
    <artifactId>spring-boot-configuration-processor</artifactId>
    <optional>true</optional>
</dependency>

- 1
- 2
- 3
- 4
- 5
- 6
- 7
- 8
- 9
- 10
- 11
- 12
- 13
- 14
- 15
- 16
- 17
- 18
- 19
- 20
- 21
yml配置
spring:
  redis:
    host: 127.0.0.1
    port: 6379
    database: 0
    password: 123456
    # 连接超时时间
    timeout: 10s
    lettuce:
      pool:
        # 连接池中的最小空闲连接
        min-idle: 0
        # 连接池中的最大空闲连接
        max-idle: 8
        # 连接池的最大数据库连接数
        max-active: 8
        # #连接池最大阻塞等待时间(使用负值表示没有限制)
        max-wait: -1ms
- 1
- 2
- 3
- 4
- 5
- 6
- 7
- 8
- 9
- 10
- 11
- 12
- 13
- 14
- 15
- 16
- 17
- 18
配置类
@Configuration
@EnableCaching
@RequiredArgsConstructor
public class CacheConfiguration implements CachingConfigurer {

    /**
     * redis连接工厂
     * 由于使用的lettuce
     * 所以由LettuceConnectionFactory创建
     */
    private final RedisConnectionFactory factory;

    /**
     * 此处使用的lettuce连接池
     * factory初始化位置在 LettuceConnectionConfiguration
     */
    @Bean
    public RedisTemplate<Object, Object> redisTemplate() {

        RedisTemplate<Object, Object> template = new RedisTemplate<>();
        template.setConnectionFactory(factory);
        // 序列化器
        template.setValueSerializer(serializer());
        // 使用StringRedisSerializer来序列化和反序列化redis的key值
        template.setKeySerializer(new StringRedisSerializer());
        template.afterPropertiesSet();
        return template;
    }

    /**
     * 缓存管理器
     * -> 使用redis做cache缓存注解管理
     * -> 修改原生的序列化方式改为json方式
     */
    @Override
    public CacheManager cacheManager() {
        RedisCacheConfiguration cacheConfiguration = RedisCacheConfiguration.defaultCacheConfig()
                .disableCachingNullValues()
                .serializeValuesWith(RedisSerializationContext.SerializationPair.fromSerializer(serializer()));

        return RedisCacheManager.builder(factory).cacheDefaults(cacheConfiguration).build();
    }

    /**
     * json序列化器
     */
    private Jackson2JsonRedisSerializer<Object> serializer() {
        Jackson2JsonRedisSerializer<Object> jackson2JsonRedisSerializer = new Jackson2JsonRedisSerializer<>(Object.class);
        ObjectMapper objectMapper = new ObjectMapper();
        objectMapper.setVisibility(PropertyAccessor.ALL, JsonAutoDetect.Visibility.ANY);
        objectMapper.activateDefaultTyping(LaissezFaireSubTypeValidator.instance, ObjectMapper.DefaultTyping.NON_FINAL, JsonTypeInfo.As.PROPERTY);

        jackson2JsonRedisSerializer.setObjectMapper(objectMapper);
        return jackson2JsonRedisSerializer;
    }
}
- 1
- 2
- 3
- 4
- 5
- 6
- 7
- 8
- 9
- 10
- 11
- 12
- 13
- 14
- 15
- 16
- 17
- 18
- 19
- 20
- 21
- 22
- 23
- 24
- 25
- 26
- 27
- 28
- 29
- 30
- 31
- 32
- 33
- 34
- 35
- 36
- 37
- 38
- 39
- 40
- 41
- 42
- 43
- 44
- 45
- 46
- 47
- 48
- 49
- 50
- 51
- 52
- 53
- 54
- 55
- 56
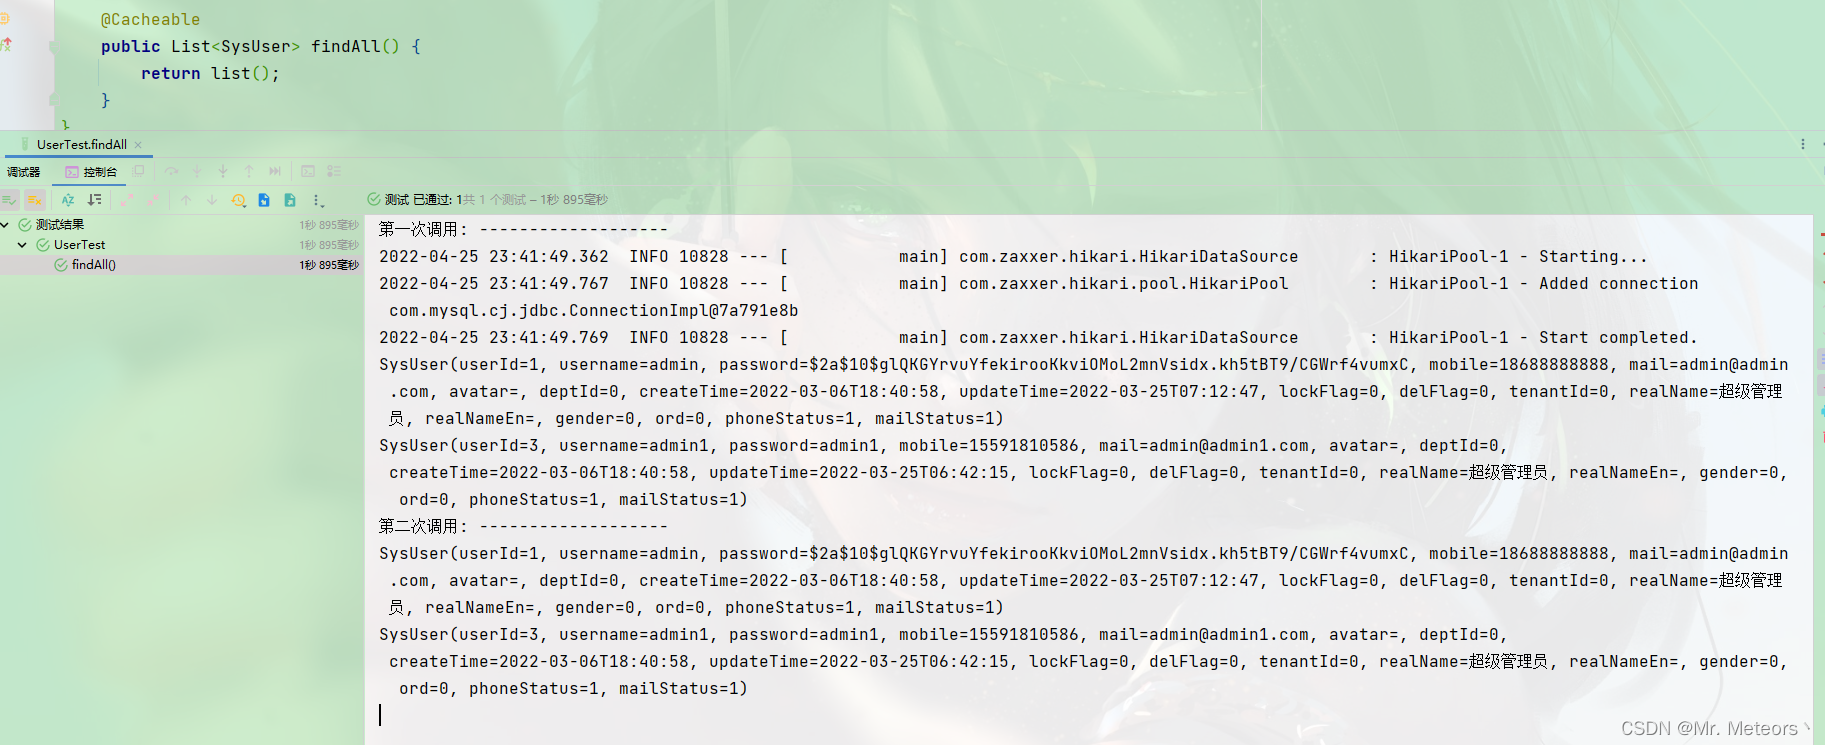
验证
简单介绍下思路:首先我们平时使用redis时,都会先将redisTemplate注入到spring容器中。 这是为什么呢,因为我们需要修改默认的序列化方式,让序列化而成的数据更加的直观,而不是领人发指的数据结构。
在未重写CacheManage时,序列化生成的数据如下图所示:
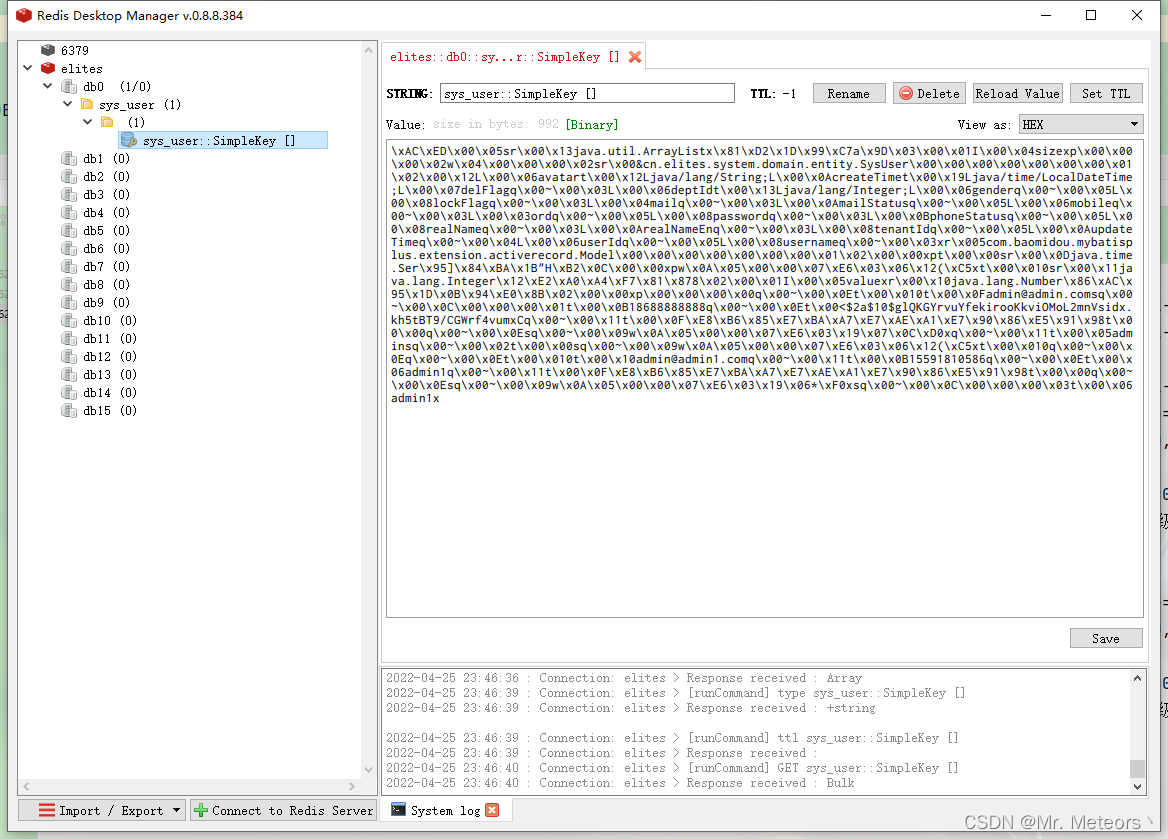
可以明显看到保存在redis中的数据格式。这种格式无法让我们直观的看到redis中的数据是否正确,所以需要将数据加工。。这个时候根据以往的redisTemplate经验,就知道这里需要定义一个序列化器来完成这一操作
重写 CachingConfigurer 实现类提供的cacheManage()方法。将redisTemplate使用的序列化器,交给他使用转化我们要保存的值。
/**
     * 缓存管理器
     * -> 使用redis做cache缓存注解管理
     * -> 修改原生的序列化方式改为json方式
     */
    @Override
    public CacheManager cacheManager() {
        RedisCacheConfiguration cacheConfiguration = RedisCacheConfiguration.defaultCacheConfig()
                .disableCachingNullValues()
                .serializeValuesWith(RedisSerializationContext.SerializationPair.fromSerializer(serializer()));

        return RedisCacheManager.builder(factory).cacheDefaults(cacheConfiguration).build();
    }
- 1
- 2
- 3
- 4
- 5
- 6
- 7
- 8
- 9
- 10
- 11
- 12
- 13
》 修改后结果如下
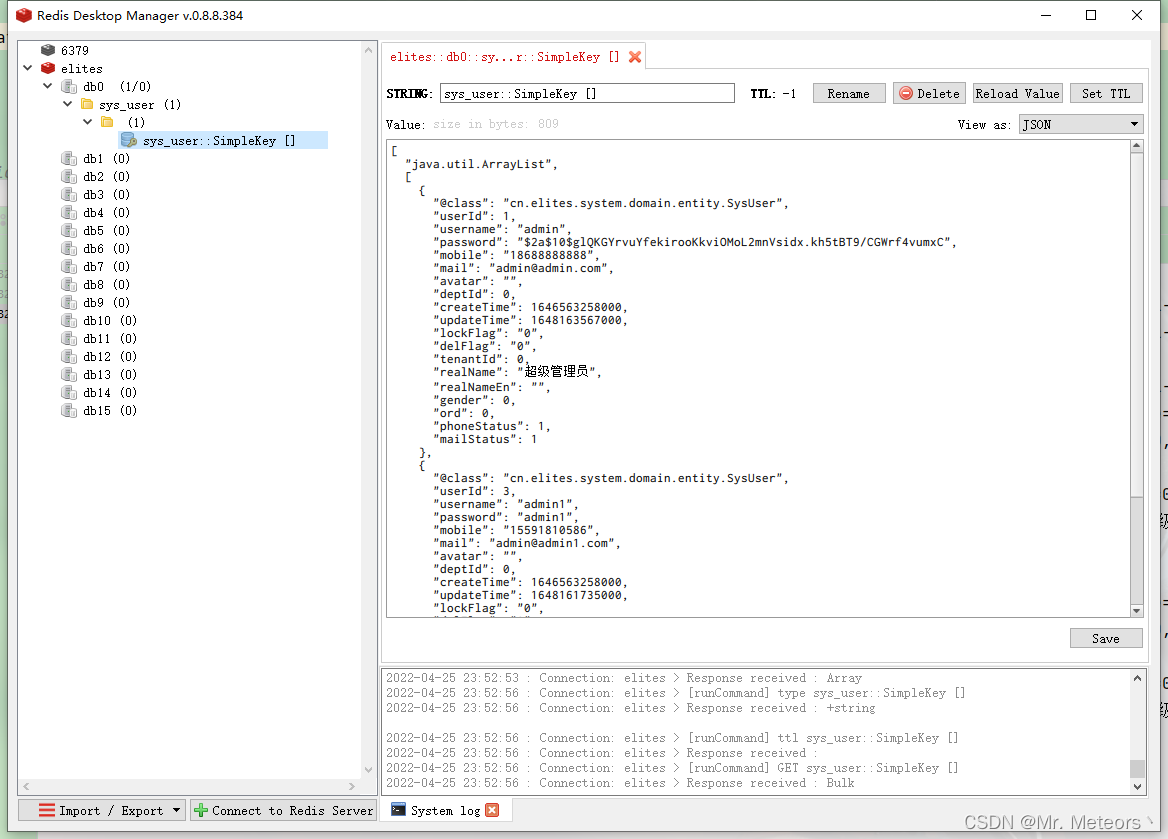
可以看到想法成立。将原生的序列化器改为json格式的序列化器,来优化我们的日常开发是必不可少的一步。
结束
感谢朋友看到这篇文章。希望我的文章能对你有所帮助,后续在补充更多cache的相关使用操作。拜拜~~
声明:本文内容由网友自发贡献,不代表【wpsshop博客】立场,版权归原作者所有,本站不承担相应法律责任。如您发现有侵权的内容,请联系我们。转载请注明出处:https://www.wpsshop.cn/w/我家小花儿/article/detail/745079
推荐阅读
相关标签

