
热门标签
热门文章
- 1人脸识别系统真的不难?今天手把手教你用Python写,程序员开发指南_智慧教育人脸识别项目设计python
- 2SVG、D3.js、Echarts.js_d3.js下载
- 3数据结构----排序总结_数据结构排序总结
- 4求n以内最大的k个素数以及它们的和_18个必背经典C语言程序,收藏备用
- 5用CodePen实现JavaScript程序动态在线开发
- 6Oracle 12c创建用户时出现“ORA-65096: invalid common user or role name”的错误
- 7学习计划|一个月学会 Python,零基础入门数据分析_python学习计划
- 8Unit2_1:动态规划DP
- 9计算机视觉——基于OpenCV和Python进行模板匹配_python opencv 模板匹配
- 10【教学赛】金融数据分析赛题1:银行客户认购产品预测(0.9676)
当前位置: article > 正文
python实现车牌识别系统_车牌识别python
作者:我家小花儿 | 2024-06-17 17:18:52
赞
踩
车牌识别python
车牌识别系统
算法参考:http://www.zengqiang.club/blog/34
GUI参考:https://blog.csdn.net/wzh191920/article/details/79589506
基于opencv的模板识别来实现的车牌识别功能。用pycharm写的。
车牌识别的步骤:定位车牌,矫正车牌,识别颜色,分割字符,识别字符。
算法:
定位车牌
通过对输出图片进行一系列的处理后,筛选出矩形区域
- 1
        if type(car_pic) == type(""):
            img = imreadex(car_pic)
        else:
            img = car_pic
        pic_hight, pic_width = img.shape[:2]

        if pic_width > MAX_WIDTH:
            resize_rate = MAX_WIDTH / pic_width
            img = cv2.resize(img, (MAX_WIDTH, int(pic_hight * resize_rate)), interpolation=cv2.INTER_AREA)

        blur = self.cfg["blur"]
        # 高斯去噪
        if blur > 0:
            img = cv2.GaussianBlur(img, (blur, blur), 0)  # 图片分辨率调整
        oldimg = img
        gray_image = cv2.cvtColor(img, cv2.COLOR_BGR2GRAY)  #灰度处理
        Sobel_x = cv2.Sobel(gray_image, cv2.CV_16S, 1, 0)   #sobel算子边缘检测
        absX = cv2.convertScaleAbs(Sobel_x)   #转回uint8
        image = absX
        ret, image = cv2.threshold(image, 0, 255, cv2.THRESH_OTSU)  #自适应阈值处理
        kernelX = cv2.getStructuringElement(cv2.MORPH_RECT, (14, 5))  #闭运算,白色部分练成整体
        image = cv2.morphologyEx(image, cv2.MORPH_CLOSE, kernelX, iterations=1)
        kernelX = cv2.getStructuringElement(cv2.MORPH_RECT, (20, 1))  #去除小白点
        kernelY = cv2.getStructuringElement(cv2.MORPH_RECT, (1, 19))
        image = cv2.dilate(image, kernelX)  #膨胀
        image = cv2.erode(image, kernelX)   #腐蚀
        image = cv2.erode(image, kernelY)   #腐蚀
        image = cv2.dilate(image, kernelY)  #膨胀
        image = cv2.medianBlur(image, 15)  #中值滤波去除噪点
        contours, hierarchy = cv2.findContours(image, cv2.RETR_EXTERNAL, cv2.CHAIN_APPROX_SIMPLE)#轮廓检测
        # 一一排除不是车牌的矩形区域
        car_contours = []  #筛选车牌位置的轮廓
        for cnt in contours:
            rect = cv2.minAreaRect(cnt)
            area_width, area_height = rect[1]
            if area_width < area_height:
                area_width, area_height = area_height, area_width
            wh_ratio = area_width / area_height
            # print(wh_ratio)
            # 要求矩形区域长宽比在2到5.5之间,2到5.5是车牌的长宽比,其余的矩形排除
            if wh_ratio > 2 and wh_ratio < 5.5:
                car_contours.append(rect)
                box = cv2.boxPoints(rect)
                box = np.int0(box)
        print("精确定位")

- 1
- 2
- 3
- 4
- 5
- 6
- 7
- 8
- 9
- 10
- 11
- 12
- 13
- 14
- 15
- 16
- 17
- 18
- 19
- 20
- 21
- 22
- 23
- 24
- 25
- 26
- 27
- 28
- 29
- 30
- 31
- 32
- 33
- 34
- 35
- 36
- 37
- 38
- 39
- 40
- 41
- 42
- 43
- 44
- 45
矫正矩形
card_imgs = []
        # 矩形区域可能是倾斜的矩形,需要矫正,以便使用颜色定位
        for rect in car_contours:
            if rect[2] > -1 and rect[2] < 1:  # 创造角度,使得左、高、右、低拿到正确的值
                angle = 1
            else:
                angle = rect[2]
            rect = (rect[0], (rect[1][0] + 5, rect[1][1] + 5), angle)  # 扩大范围,避免车牌边缘被排除

            box = cv2.boxPoints(rect)
            heigth_point = right_point = [0, 0]
            left_point = low_point = [pic_width, pic_hight]
            for point in box:
                if left_point[0] > point[0]:
                    left_point = point
                if low_point[1] > point[1]:
                    low_point = point
                if heigth_point[1] < point[1]:
                    heigth_point = point
                if right_point[0] < point[0]:
                    right_point = point

            if left_point[1] <= right_point[1]:  # 正角度
                new_right_point = [right_point[0], heigth_point[1]]
                pts2 = np.float32([left_point, heigth_point, new_right_point])  # 字符只是高度需要改变
                pts1 = np.float32([left_point, heigth_point, right_point])
                M = cv2.getAffineTransform(pts1, pts2)
                dst = cv2.warpAffine(oldimg, M, (pic_width, pic_hight))
                point_limit(new_right_point)
                point_limit(heigth_point)
                point_limit(left_point)
                card_img = dst[int(left_point[1]):int(heigth_point[1]), int(left_point[0]):int(new_right_point[0])]
                card_imgs.append(card_img)
            elif left_point[1] > right_point[1]:  # 负角度

                new_left_point = [left_point[0], heigth_point[1]]
                pts2 = np.float32([new_left_point, heigth_point, right_point])  # 字符只是高度需要改变
                pts1 = np.float32([left_point, heigth_point, right_point])
                M = cv2.getAffineTransform(pts1, pts2)
                dst = cv2.warpAffine(oldimg, M, (pic_width, pic_hight))
                point_limit(right_point)
                point_limit(heigth_point)
                point_limit(new_left_point)
                card_img = dst[int(right_point[1]):int(heigth_point[1]), int(new_left_point[0]):int(right_point[0])]
                card_imgs.append(card_img)
- 1
- 2
- 3
- 4
- 5
- 6
- 7
- 8
- 9
- 10
- 11
- 12
- 13
- 14
- 15
- 16
- 17
- 18
- 19
- 20
- 21
- 22
- 23
- 24
- 25
- 26
- 27
- 28
- 29
- 30
- 31
- 32
- 33
- 34
- 35
- 36
- 37
- 38
- 39
- 40
- 41
- 42
- 43
- 44
- 45
颜色定位
 colors = []
        for card_index, card_img in enumerate(card_imgs):
                    green = yello = blue = black = white = 0
                    card_img_hsv = cv2.cvtColor(card_img, cv2.COLOR_BGR2HSV)
                    # 有转换失败的可能,原因来自于上面矫正矩形出错
                    if card_img_hsv is None:
                        continue
                    row_num, col_num = card_img_hsv.shape[:2]
                    card_img_count = row_num * col_num

                    for i in range(row_num):
                        for j in range(col_num):
                            H = card_img_hsv.item(i, j, 0)
                            S = card_img_hsv.item(i, j, 1)
                            V = card_img_hsv.item(i, j, 2)
                            if 11 < H <= 34 and S > 34:  # 图片分辨率调整
                                yello += 1
                            elif 35 < H <= 99 and S > 34:  # 图片分辨率调整
                                green += 1
                            elif 99 < H <= 124 and S > 34:  # 图片分辨率调整
                                blue += 1

                            if 0 < H < 180 and 0 < S < 255 and 0 < V < 46:
                                black += 1
                            elif 0 < H < 180 and 0 < S < 43 and 221 < V < 225:
                                white += 1
                    color = "no"

                    limit1 = limit2 = 0
                    if yello * 2 >= card_img_count:
                        color = "yello"
                        limit1 = 11
                        limit2 = 34  # 有的图片有色偏偏绿
                    elif green * 2 >= card_img_count:
                        color = "green"
                        limit1 = 35
                        limit2 = 99
                    elif blue * 2 >= card_img_count:
                        color = "blue"
                        limit1 = 100
                        limit2 = 124  # 有的图片有色偏偏紫
                    elif black + white >= card_img_count * 0.7:  # TODO
                        color = "bw"
                    print(color)
                    colors.append(color)
                    print(blue, green, yello, black, white, card_img_count)

                    if limit1 == 0:
                        continue
- 1
- 2
- 3
- 4
- 5
- 6
- 7
- 8
- 9
- 10
- 11
- 12
- 13
- 14
- 15
- 16
- 17
- 18
- 19
- 20
- 21
- 22
- 23
- 24
- 25
- 26
- 27
- 28
- 29
- 30
- 31
- 32
- 33
- 34
- 35
- 36
- 37
- 38
- 39
- 40
- 41
- 42
- 43
- 44
- 45
- 46
- 47
- 48
- 49
识别车牌字符
predict_result = []
                    word_images = []
                    roi = None
                    card_color = None
                    for i, color in enumerate(colors):
                        if color in ("blue", "yello", "green"):
                            card_img = card_imgs[i]  # 定位的车牌
                            gray_img = cv2.cvtColor(card_img, cv2.COLOR_BGR2GRAY)
                            # 黄、绿车牌字符比背景暗、与蓝车牌刚好相反,所以黄、绿车牌需要反向
                            if color == "green" or color == "yello":
                                gray_img = cv2.bitwise_not(gray_img)
                            ret, gray_img = cv2.threshold(gray_img, 0, 255, cv2.THRESH_BINARY + cv2.THRESH_OTSU)
                            # 查找水平直方图波峰
                            x_histogram = np.sum(gray_img, axis=1)
                            x_min = np.min(x_histogram)
                            x_average = np.sum(x_histogram) / x_histogram.shape[0]
                            x_threshold = (x_min + x_average) / 2
                            wave_peaks = find_waves(x_threshold, x_histogram)
                            if len(wave_peaks) == 0:
                                print("peak less 0:")
                                continue
                            # 认为水平方向,最大的波峰为车牌区域
                            wave = max(wave_peaks, key=lambda x: x[1] - x[0])
                            gray_img = gray_img[wave[0]:wave[1]]
                            # 查找垂直直方图波峰
                            row_num, col_num = gray_img.shape[:2]
                            # 去掉车牌上下边缘1个像素,避免白边影响阈值判断
                            gray_img = gray_img[1:row_num - 1]
                            y_histogram = np.sum(gray_img, axis=0)
                            y_min = np.min(y_histogram)
                            y_average = np.sum(y_histogram) / y_histogram.shape[0]
                            y_threshold = (y_min + y_average) / 5  # U和0要求阈值偏小,否则U和0会被分成两半

                            wave_peaks = find_waves(y_threshold, y_histogram)

                            # for wave in wave_peaks:
                            #	cv2.line(card_img, pt1=(wave[0], 5), pt2=(wave[1], 5), color=(0, 0, 255), thickness=2)
                            # 车牌字符数应大于6
                            if len(wave_peaks) <= 6:
                                print("peak less 1:", len(wave_peaks))
                                continue

                            wave = max(wave_peaks, key=lambda x: x[1] - x[0])
                            max_wave_dis = wave[1] - wave[0]
                            # 判断是否是左侧车牌边缘
                            if wave_peaks[0][1] - wave_peaks[0][0] < max_wave_dis / 3 and wave_peaks[0][0] == 0:
                                wave_peaks.pop(0)

                            # 组合分离汉字
                            cur_dis = 0
                            for i, wave in enumerate(wave_peaks):
                                if wave[1] - wave[0] + cur_dis > max_wave_dis * 0.6:
                                    break
                                else:
                                    cur_dis += wave[1] - wave[0]
                            if i > 0:
                                wave = (wave_peaks[0][0], wave_peaks[i][1])
                                wave_peaks = wave_peaks[i + 1:]
                                wave_peaks.insert(0, wave)

                            # 去除车牌上的分隔点
                            point = wave_peaks[2]
                            if point[1] - point[0] < max_wave_dis / 3:
                                point_img = gray_img[:, point[0]:point[1]]
                                if np.mean(point_img) < 255 / 5:
                                    wave_peaks.pop(2)

                            if len(wave_peaks) <= 6:
                                print("peak less 2:", len(wave_peaks))
                                continue
                            part_cards = seperate_card(gray_img, wave_peaks)
                            for i, part_card in enumerate(part_cards):
                                # 可能是固定车牌的铆钉
                                if np.mean(part_card) < 255 / 5:
                                    print("a point")
                                    continue
                                part_card_old = part_card
                                w = abs(part_card.shape[1] - SZ) // 2

                                part_card = cv2.copyMakeBorder(part_card, 0, 0, w, w, cv2.BORDER_CONSTANT,
                                                               value=[0, 0, 0])
                                part_card = cv2.resize(part_card, (SZ, SZ), interpolation=cv2.INTER_AREA)
                                word_images.append(part_card)
                            word_images_ = word_images.copy()
                            predict_result = template_matching(word_images_)
                            roi = card_img
                            card_color = color
                            print(predict_result)
                            break
- 1
- 2
- 3
- 4
- 5
- 6
- 7
- 8
- 9
- 10
- 11
- 12
- 13
- 14
- 15
- 16
- 17
- 18
- 19
- 20
- 21
- 22
- 23
- 24
- 25
- 26
- 27
- 28
- 29
- 30
- 31
- 32
- 33
- 34
- 35
- 36
- 37
- 38
- 39
- 40
- 41
- 42
- 43
- 44
- 45
- 46
- 47
- 48
- 49
- 50
- 51
- 52
- 53
- 54
- 55
- 56
- 57
- 58
- 59
- 60
- 61
- 62
- 63
- 64
- 65
- 66
- 67
- 68
- 69
- 70
- 71
- 72
- 73
- 74
- 75
- 76
- 77
- 78
- 79
- 80
- 81
- 82
- 83
- 84
- 85
- 86
- 87
- 88
- 89
GUI界面:
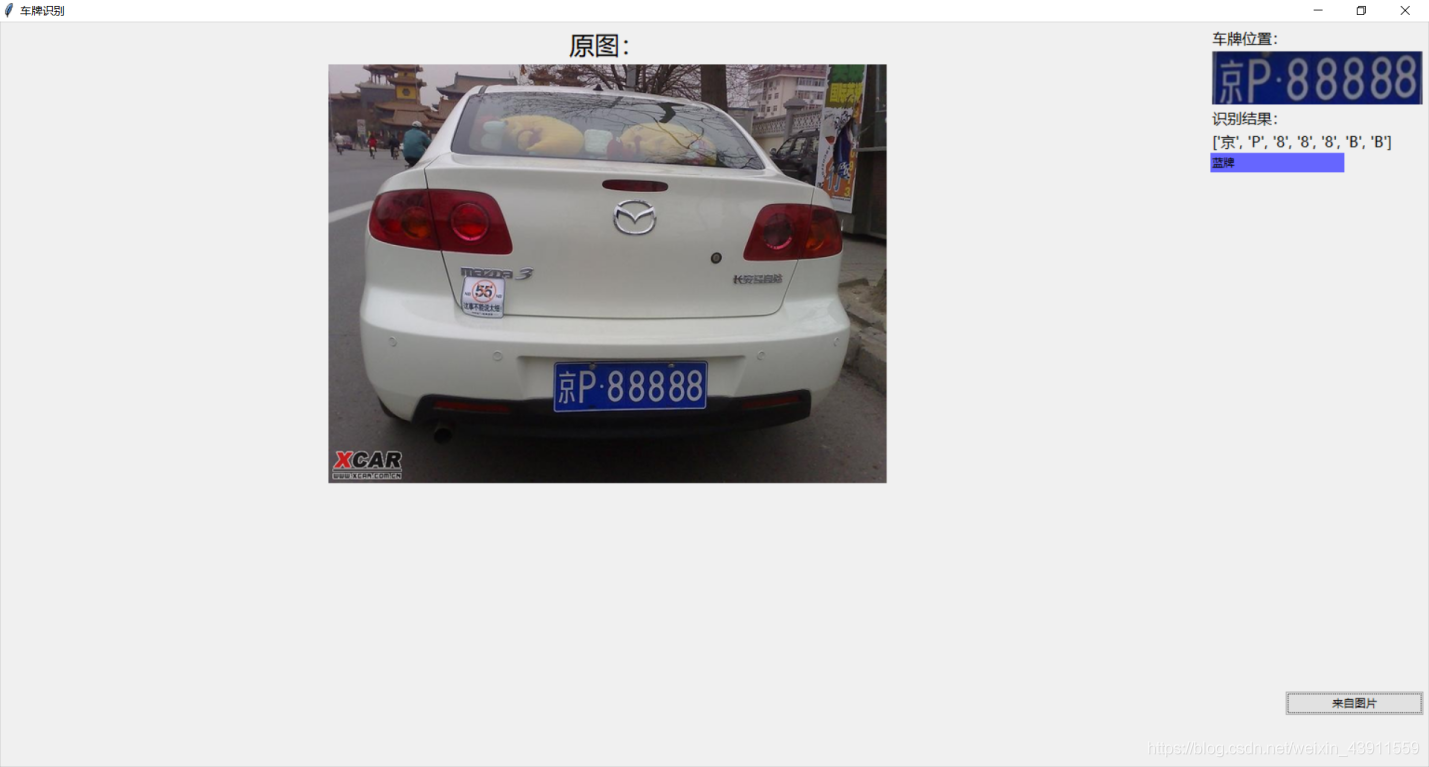
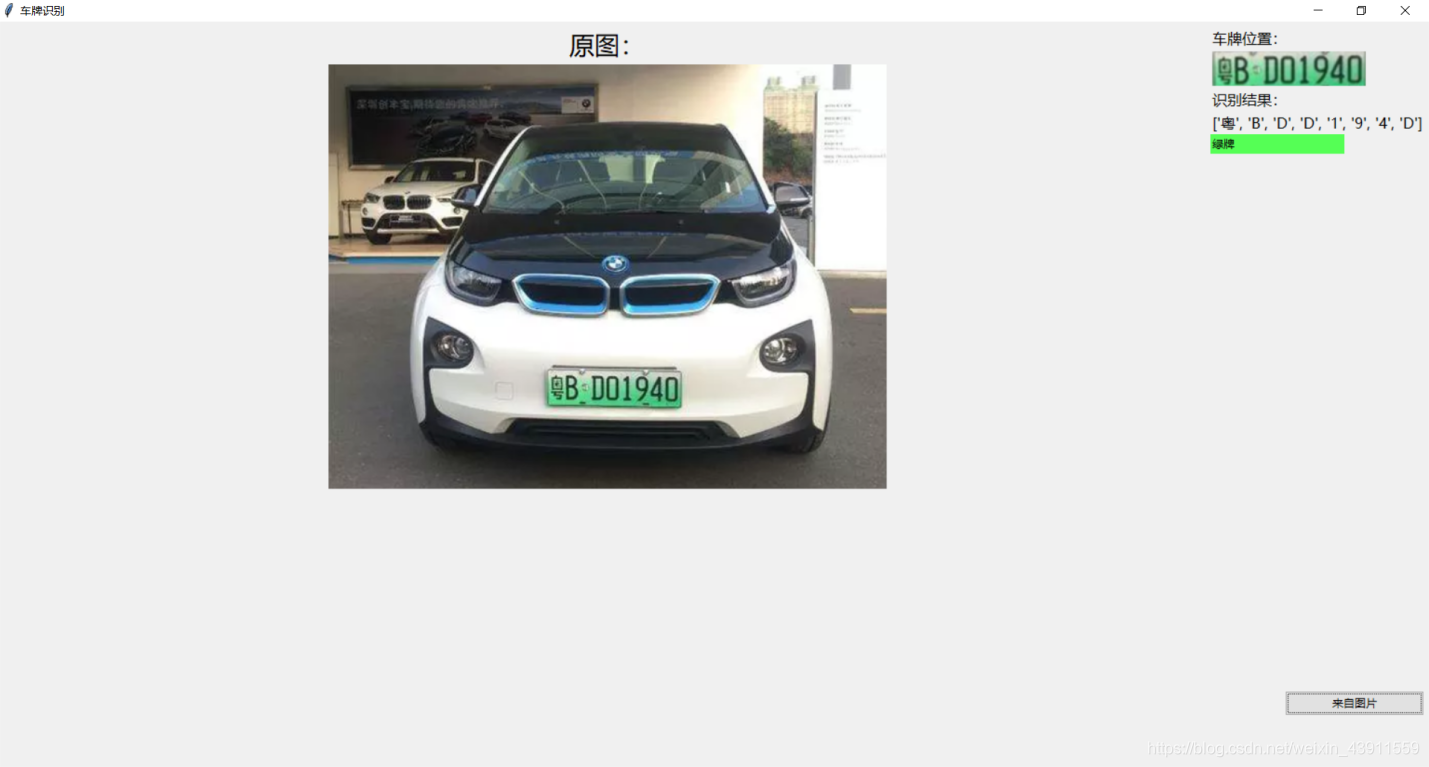
总结
这是一个比较简单粗糙的车牌识别系统,由于采用的是模板识别,模板数量越大,识别速度越慢,差不多识别一次要20s,并且受图片的质量影响,识别准确度不高甚至会出现无法识别的情况。但应付课程设计的话应该是足够了。要想做的更好的话建议识别字符采用opencv的SVM或者用tesseract.
算法和界面都参考了别人的博客,自己做了些整合和改动。
全部代码和模板放在github:https://github.com/panboshui/-
测试图片:


声明:本文内容由网友自发贡献,不代表【wpsshop博客】立场,版权归原作者所有,本站不承担相应法律责任。如您发现有侵权的内容,请联系我们。转载请注明出处:https://www.wpsshop.cn/w/我家小花儿/article/detail/732107
推荐阅读
相关标签

