- 15分钟 NLP :Hugging Face 主要类和函数介绍_huggingface 发生概率模型
- 201-JVM与Java体系结构_宋红康jvm与java体系结构
- 3计算机网络——响应请求状态码_访问网页成功代码
- 4Kafka_kafka发送数据指定partition
- 5开源OA_phprojekt
- 6【密码学】常见密码算法分类和运用
- 7linux基础篇:Linux中磁盘的管理(分区、格式化、挂载)_linux格式化磁盘
- 8Idea怎么从git拉代码?_idea拉取git代码
- 9pdf文件如何保存指定页面?_pdf保存首页
- 10最新2023基于微信小程序的音乐播放器+后台管理系统(SSM+mysql)-JAVA.VUE毕业设计源码论文(毕业设计+论文+开题报告+运行)_基于微信小程序的音乐播放器设计和毕业论文
Python TKinter 布局管理 (Pack Place Grid)_python pack grid place 混用
赞
踩
Tkinter是Python常用的一个GUI库,本文主要介绍了Tkinter的布局管理部分。
Tkinter有三种布局管理方式:
- pack
- grid
- place
这三种布局管理在同一个 master window 里是不可以混用的。
pack布局管理
pack布局非常简单,不用做过多的设置,直接使用一个 pack 函数就可以了。
1、我们使用 pack 函数的时候,默认先使用的放到上面,然 后依次向下排,它会给我们的组件一个自认为合适的位置和大小,这是默认方式。
2、可接受的参数:
side:停靠在哪个方向
left: 左
top: 上
right: 右
botton: 下
fill:填充
x:水平方向填充
y:竖直方向填充
both:水平和竖直方向填充
none:不填充
expand:
True:随主窗体的大小变化
False:不随主窗体的大小变化
anchor:
N:北 下
E:东 右
S:南 下
W:西 左
CENTER:中间
padx:x方向的外边距
pady:y方向的外边距
ipadx:x方向的内边距
ipady:y方向的内边距
示例代码:
- #!/usr/bin/env python
- # _*_ coding:utf-8 _*_
- from tkinter import *
- root = Tk()
- Button(root,text='A').pack(side=LEFT,expand=YES,fill=Y)
- Button(root,text='B').pack(side=TOP,expand=YES,fill=BOTH)
- Button(root,text='C').pack(side=RIGHT,expand=YES,fill=NONE)
- Button(root,text='D').pack(side=LEFT,expand=NO,fill=Y)
- Button(root,text='E').pack(side=TOP,expand=YES,fill=BOTH)
- Button(root,text='F').pack(side=BOTTOM,expand=YES)
- Button(root,text='G').pack(anchor=SE)
- root.mainloop()
参考博文:https://blog.csdn.net/liuxu0703/article/details/54428405
Grid 布局管理
Pack 作为首选的布局管理方式,其运作方式并不是特别易于理解,已经由 Pack 布局完成的设计也很难做出改变。Grid 布局在1996年作为另一种可供选择的布局方式被引入,Grid 布局方式易学易用,但似乎大家还是习惯用 Pack。
Grid 在很多场景下是最好用的布局方式,相比而言,Pack 布局在控制细节方面有些力不从心。Place 布局虽然可以完全控制控件位置,但这也导致使用 Place 会比其他两种布局方式更加复杂。
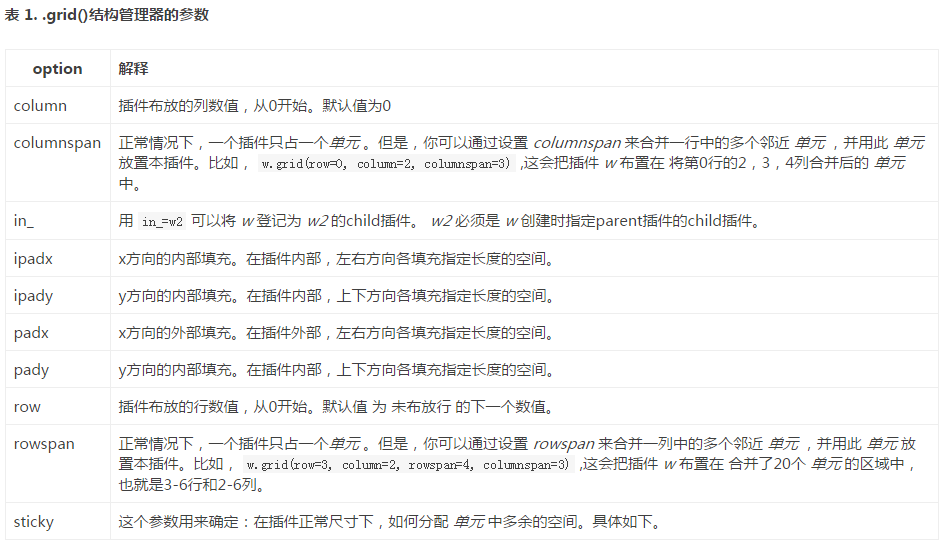
Grid 把控件位置作为一个二维表结构来维护,即按照行列的方式排列控件:控件位置由其所在的行号和列号决定。行号相同而列号不同的几个控件会被彼此上下排列,列号相同而行号不同的几个控件会被彼此左右排列。
使用 Grid 布局的过程就是为各个控件指定行号和列号的过程,不需要为每个格子指定大小,Grid 布局会自动设置一个合适的大小。


参考博文:https://www.cnblogs.com/ruo-li-suo-yi/p/7425307.html
Place 布局管理
Place 布局管理可以显式的指定控件的绝对位置或相对于其他控件的位置。要使用 Place 布局,调用相应控件的 place() 方法就可以了。所有 tkinter 的标准控件都可以调用 place()。
- '''Tkinter教程之Place篇'''
- '''1.使用绝对坐标将组件放到指定的位置'''
- # -*- coding: utf-8 -*-
- # 不设置root的大小,使用默认
- from tkinter import *
-
- root = Tk()
- lb = Label(root, text='hello Place')
- # lb.place(relx = 1,rely = 0.5,anchor = CENTER)
- # 使用绝对坐标将Label放置到(0,0)位置上
- lb.place(x=0, y=0, anchor=NW)
- root.mainloop()
- # x,y指定组件放置的绝对位置
- '''2.使用相对坐标放置组件位置'''
- # -*- coding: utf-8 -*-
- # 不设置root的大小,使用默认
- from tkinter import *
-
- root = Tk()
- lb = Label(root, text='hello Place')
- # lb.place(relx = 1,rely = 0.5,anchor = CENTER)
- # 使用相对坐标(0.5,0.5)将Label放置到(0.5*sx,0.5.sy)位置上
- lb.place(relx=0.5, rely=0.5, anchor=CENTER)
- root.mainloop()
- # relx,rely指定组件放置的绝对位置,范围为(0-1.0)
- '''3.使用place同时指定多个组件'''
- # -*- coding: utf-8 -*-
- # 不设置root的大小,使用默认
- from tkinter import *
-
- root = Tk()
- root.geometry('800x600')
- lb = Label(root, text='hello Place')
- # lb.place(relx = 1,rely = 0.5,anchor = CENTER)
- # 使用相对坐标(0.5,0.5)将Label放置到(0.5*sx,0.5.sy)位置上
- v = IntVar()
- for i in range(5):
- Radiobutton(
- root,
- text='Radio' + str(i),
- variable=v,
- value=i
- ).place(x=80 * i, anchor=NW)
- root.mainloop()
- # 使用place来指定各个Radiobutton的位置

- '''4.同时使用相对和绝对坐标'''
- # 同时设置relx,rely和x,y的值
- # -*- coding: utf-8 -*-
- # 不设置root的大小,使用默认
- from tkinter import *
-
- root = Tk()
- root.geometry('800x600')
- lb1 = Label(root, text='hello Place', fg='green')
- lb2 = Label(root, text='hello Place', fg='red')
- # 先设置相对坐标为(0.5,0.5),再使用(-200,-200)将坐标作偏移(-200,-200)
- lb1.place(relx=0.5, rely=0.5, anchor=CENTER, x=-200, y=-200)
- # 先设置相对坐标为(0.5,0.5),再使用(-300,-300)将坐标作偏移(-300,-300)
- lb2.place(relx=0.5, rely=0.5, anchor=CENTER, x=-300, y=-300)
- root.mainloop()
- # 同时使用相对和绝对坐标时,相对坐标优先操作,然后是在这个相对坐标的基础上进行偏移

- '''5.使用in来指定放置的容器'''
- # -*- coding: utf-8 -*-
- # 使用in属性来指定放置到的容器是那一个
- from tkinter import *
-
- root = Tk()
- root.geometry('800x600')
- lb1 = Label(root, text='hello Place Label', fg='green')
- bt1 = Button(root, text='hello Place Button', fg='red')
- # 创建一个Label
- lb1.place(relx=0.5, rely=0.5, anchor=CENTER)
-
- # 在root同创建一个Button,目的是与bt1相比较
- bt2 = Button(root, text='button in root', fg='yellow')
- bt2.place(anchor=W)
- # 在Label中创建一个Button
- bt1.place(in_=lb1, anchor=W)
- root.mainloop()
- # 注意bt2放置的位置是在root的(0,0)处,而button1放置的位置是在lb1的(0,0)处,原因是由于bt1使用了in来指定放置的窗口为lb1

- '''6.深入in用法'''
- # -*- coding: utf-8 -*-
- # 使用in属性来指定放置到的容器是那一个,仅能是其master
- from tkinter import *
-
- root = Tk()
- # root.geometry('800x600')
- # 创建两个Frame用作容器
- fm1 = Frame(root, bg='red', width=40, height=40)
- fm2 = Frame(root, bg='blue', width=40, height=40)
- # 再在fm1中创建一个fm3
- fm3 = Frame(fm1, bg='yellow', width=20, height=20)
-
- # 创建一个Label,它的master为fm1
- lb1 = Label(fm1, text='hello Place', fg='green')
- lb1.place(in_=fm1, relx=0.5, rely=0.5, anchor=CENTER)
- # 创建一个Button,它的master为fm1
- bt1 = Button(fm1, text='hello Place', fg='red')
-
- # 将bt1放置到fm2中,程序报错
- # 去掉下面这条语句就可以使用了,可以看到lb1已经正确的放置到fm1的中心位置了
- # bt1.place(in_ = fm2,anchor = W)
-
- # 将上面的语句改为下面,即将bt1放置到其fm1的子组件fm3中,这样也是可以的
- bt1.place(in_=fm3, anchor=W)
-
- fm1.pack()
- fm2.pack()
- fm3.pack()
- root.mainloop()
- # in不是可以随意指定放置的组件的,如果使用in这个参数这个组件必需满足:是其父容器或父容器的子组件

- '''7.事件与Place结合使用'''
- # -*- coding: utf-8 -*-
- # 最后使用两个place方法来动态改变两个Frame的大小。
- from tkinter import *
- root = Tk()
- split = 0.5
- fm1 = Frame(root,bg = 'red')
- fm2 = Frame(root,bg = 'blue')
- # 单击fm1时增大它的占有区域0.1
- def incFm1(event):
- global split
- if split < 1:
- split += 0.1
- fm1.place(rely = 0,relheight = split,relwidth = 1)
- fm2.place(rely = split,relheight = 1 - split,relwidth = 1)
- # 单击fm2时增大它的占有区域0.1
- def incFm2(event):
- global split
- if split > 0:
- split -= 0.1
- fm1.place(rely = 0,relheight = split,relwidth = 1)
- fm2.place(rely = split,relheight = 1 - split,relwidth = 1)
-
- # 这两语句要使用,不然开始看不到两个frame,也就没法点击它们了
- fm1.place(rely = 0,relheight = split,relwidth = 1)
- fm2.place(rely = split,relheight = 1 - split,relwidth = 1)
- # 绑定单击事件
- fm1.bind('<Button-1>',incFm1)
- fm2.bind('<Button-1>',incFm2)
-
- root.mainloop()
- # 为SplitWindow的原型了,再改动一下就可以实现一个SplitWindow了。

参考博文:https://blog.csdn.net/aa1049372051/article/details/51887144


