
- 1GPU计算能力远超CPU!NVIDIA Tesla技术深入解析
- 2论文笔记-FedGraphNN: A Federated Learning Benchmark System for Graph Neural Networks
- 3WebSocket入门篇(一)_websocket学习
- 4USB驱动开发——认识USB驱动_usb_port_feat_power
- 5python 调用大漠_py调用大漠
- 6C++面试常见问题总结(五)(本人面试遇到的问题记录,作为学习和交流用)_c++面试难点
- 7使用Jetpack Compose跨平台开发Web程序,快来试试?
- 8华为C语言编程部分规范_华为c语言编程规范
- 9EGit(Git Eclipse Plugin)使用
- 10虚拟机下面的window7和kali互通并且上网_kali能联网吗
AIGC专栏2——Stable Diffusion结构解析-以文本生成图像(文生图,txt2img)为例
赞
踩
AIGC专栏2——Stable Diffusion结构解析-以文本生成图像(文生图,txt2img)为例
学习前言
用了很久的Stable Diffusion,但从来没有好好解析过它内部的结构,写个博客记录一下,嘿嘿。

源码下载地址
https://github.com/bubbliiiing/stable-diffusion
喜欢的可以点个star噢。
网络构建
一、什么是Stable Diffusion(SD)
Stable Diffusion是比较新的一个扩散模型,翻译过来是稳定扩散,虽然名字叫稳定扩散,但实际上换个seed生成的结果就完全不一样,非常不稳定哈。
Stable Diffusion最开始的应用应该是文本生成图像,即文生图,随着技术的发展Stable Diffusion不仅支持image2image图生图的生成,还支持ControlNet等各种控制方法来定制生成的图像。
Stable Diffusion基于扩散模型,所以不免包含不断去噪的过程,如果是图生图的话,还有不断加噪的过程,此时离不开DDPM那张老图,如下:

Stable Diffusion相比于DDPM,使用了DDIM采样器,使用了隐空间的扩散,另外使用了非常大的LAION-5B数据集进行预训练。
直接Finetune Stable Diffusion大多数同学应该是无法cover住成本的,不过Stable Diffusion有很多轻量Finetune的方案,比如Lora、Textual Inversion等,但这是后话。
本文主要是解析一下整个SD模型的结构组成,一次扩散,多次扩散的流程。
大模型、AIGC是当前行业的趋势,不会的话容易被淘汰,hh。
二、Stable Diffusion的组成
Stable Diffusion由四大部分组成。
1、Sampler采样器。
2、Variational Autoencoder (VAE) 变分自编码器。
3、UNet 主网络,噪声预测器。
4、CLIPEmbedder文本编码器。
每一部分都很重要,我们首先以文本生成图像为例进行解析。既然是文本生成图像,那么我们的输入也只剩下文本了,这时候没有输入图片。
三、生成流程
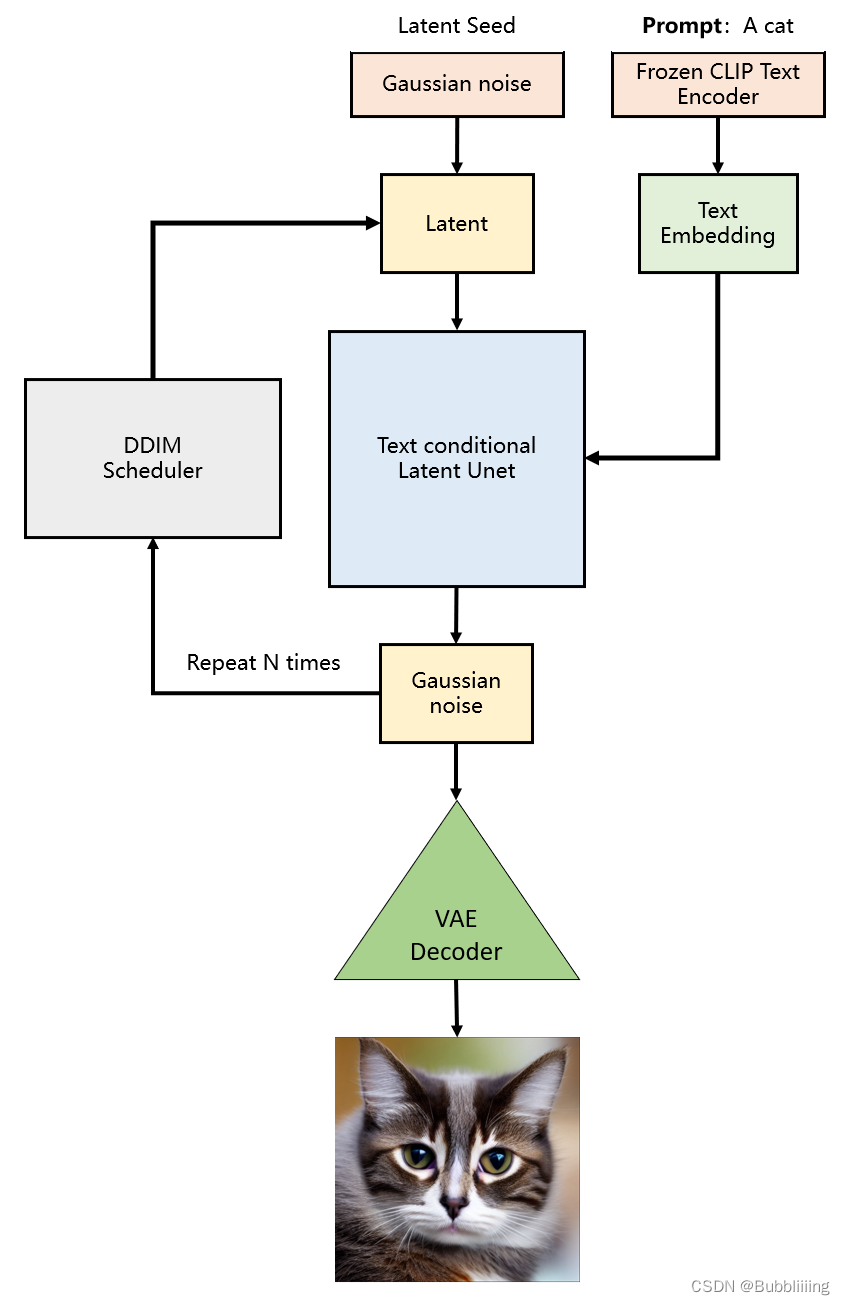
生成流程分为三个部分:
1、prompt文本编码。
2、进行若干次采样。
3、进行解码。
with torch.no_grad():
    if seed == -1:
        seed = random.randint(0, 65535)
    seed_everything(seed)

    # ----------------------- #
    #   获得编码后的prompt
    # ----------------------- #
    cond    = {"c_crossattn": [model.get_learned_conditioning([prompt + ', ' + a_prompt] * num_samples)]}
    un_cond = {"c_crossattn": [model.get_learned_conditioning([n_prompt] * num_samples)]}
    H, W    = input_shape
    shape   = (4, H // 8, W // 8)

    # ----------------------- #
    #   进行采样
    # ----------------------- #
    samples, intermediates = ddim_sampler.sample(ddim_steps, num_samples,
                                                    shape, cond, verbose=False, eta=eta,
                                                    unconditional_guidance_scale=scale,
                                                    unconditional_conditioning=un_cond)

    # ----------------------- #
    #   进行解码
    # ----------------------- #
    x_samples = model.decode_first_stage(samples)
    x_samples = (einops.rearrange(x_samples, 'b c h w -> b h w c') * 127.5 + 127.5).cpu().numpy().clip(0, 255).astype(np.uint8)

- 1
- 2
- 3
- 4
- 5
- 6
- 7
- 8
- 9
- 10
- 11
- 12
- 13
- 14
- 15
- 16
- 17
- 18
- 19
- 20
- 21
- 22
- 23
- 24
- 25
- 26
1、文本编码
文本编码的思路比较简单,直接使用CLIP的文本编码器进行编码就可以了,在代码中定义了一个FrozenCLIPEmbedder类别,使用了transformers库的CLIPTokenizer和CLIPTextModel。
在前传过程中,我们对输入进来的文本首先利用CLIPTokenizer进行编码,然后使用CLIPTextModel进行特征提取,通过FrozenCLIPEmbedder,我们可以获得一个[batch_size, 77, 768]的特征向量。
class FrozenCLIPEmbedder(AbstractEncoder):
    """Uses the CLIP transformer encoder for text (from huggingface)"""
    LAYERS = [
        "last",
        "pooled",
        "hidden"
    ]
    def __init__(self, version="openai/clip-vit-large-patch14", device="cuda", max_length=77,
                 freeze=True, layer="last", layer_idx=None):  # clip-vit-base-patch32
        super().__init__()
        assert layer in self.LAYERS
        # 定义文本的tokenizer和transformer
        self.tokenizer      = CLIPTokenizer.from_pretrained(version)
        self.transformer    = CLIPTextModel.from_pretrained(version)
        self.device         = device
        self.max_length     = max_length
        # 冻结模型参数
        if freeze:
            self.freeze()
        self.layer = layer
        self.layer_idx = layer_idx
        if layer == "hidden":
            assert layer_idx is not None
            assert 0 <= abs(layer_idx) <= 12

    def freeze(self):
        self.transformer = self.transformer.eval()
        # self.train = disabled_train
        for param in self.parameters():
            param.requires_grad = False

    def forward(self, text):
        # 对输入的图片进行分词并编码,padding直接padding到77的长度。
        batch_encoding  = self.tokenizer(text, truncation=True, max_length=self.max_length, return_length=True,
                                        return_overflowing_tokens=False, padding="max_length", return_tensors="pt")
        # 拿出input_ids然后传入transformer进行特征提取。
        tokens          = batch_encoding["input_ids"].to(self.device)
        outputs         = self.transformer(input_ids=tokens, output_hidden_states=self.layer=="hidden")
        # 取出所有的token
        if self.layer == "last":
            z = outputs.last_hidden_state
        elif self.layer == "pooled":
            z = outputs.pooler_output[:, None, :]
        else:
            z = outputs.hidden_states[self.layer_idx]
        return z

    def encode(self, text):
        return self(text)
- 1
- 2
- 3
- 4
- 5
- 6
- 7
- 8
- 9
- 10
- 11
- 12
- 13
- 14
- 15
- 16
- 17
- 18
- 19
- 20
- 21
- 22
- 23
- 24
- 25
- 26
- 27
- 28
- 29
- 30
- 31
- 32
- 33
- 34
- 35
- 36
- 37
- 38
- 39
- 40
- 41
- 42
- 43
- 44
- 45
- 46
- 47
- 48
- 49
2、采样流程
a、生成初始噪声
既然输入里面只有文本,没有输入图片,那么最初始的噪声哪里来?
在这里直接搞个正态分布的噪声就可以了,简单理解就是:既然在训练的时候就是不断的给 原图 加 正态分布噪声 得到最终的噪声矩阵,那么我直接初始化一个 正态分布的噪声 作为 初始噪声 生成图片很合理吧。
在代码里面其实也是这么做的,不过因为我们是在隐空间去进行扩散的,所以我们生成的噪声也是相对于隐空间的。
在这里简单介绍一下VAE,VAE是变分自编码器,可以将输入图片进行编码,一个高宽原本为512x512x3的图片在使用VAE编码后会变成64x64x4,这个4是人为设定的,不必纠结为什么不是3。这个时候我们就使用一个简单的矩阵代替原有的512x512x3的图片了,传输与存储成本就很低。在实际要去看的时候,可以对64x64x4的矩阵进行解码,获得512x512x3的图片。
因此,如果 我们生成的噪声是相对于隐空间的,同时我们要生成一个512x512x3的图片,那么我们就要初始化一个64x64x4的隐向量,我们在隐空间扩散好后,再使用解码器就可以生成512x512x3的图像。
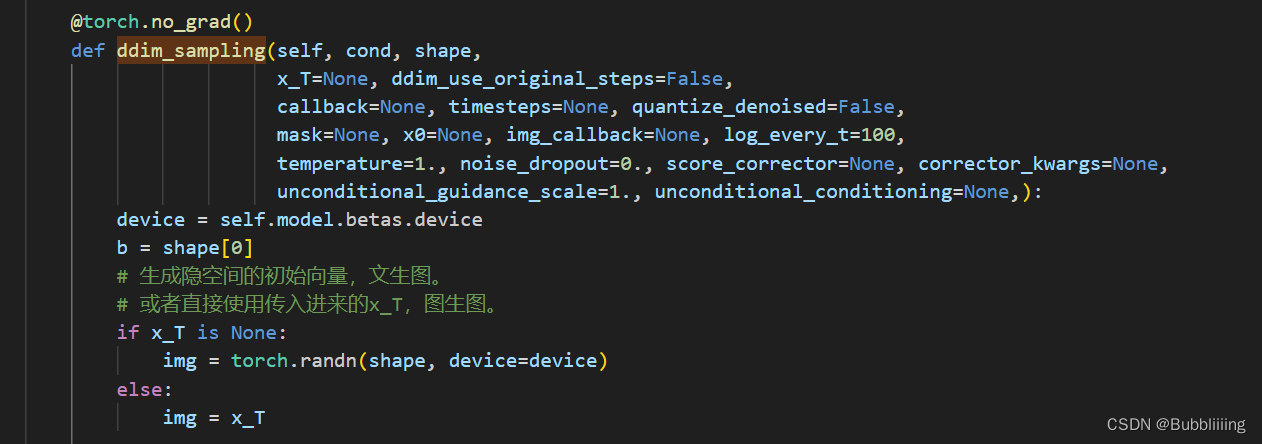
在代码中,我们确实是这么做的,初始噪声的生成代码为:
img = torch.randn(shape, device=device)
- 1
代码位于ldm.models.diffusion.ddim.py中的ddim_sampling方法中。shape是外面传进来的,大小为[4, 64, 64]。
b、对噪声进行N次采样
既然Stable Diffusion是一个不断扩散的过程,那么少不了不断的去噪声,那么怎么去噪声便是一个问题。
在上一步中,我们已经获得了一个img,它是一个符合正态分布的向量,我们便从它开始去噪声。
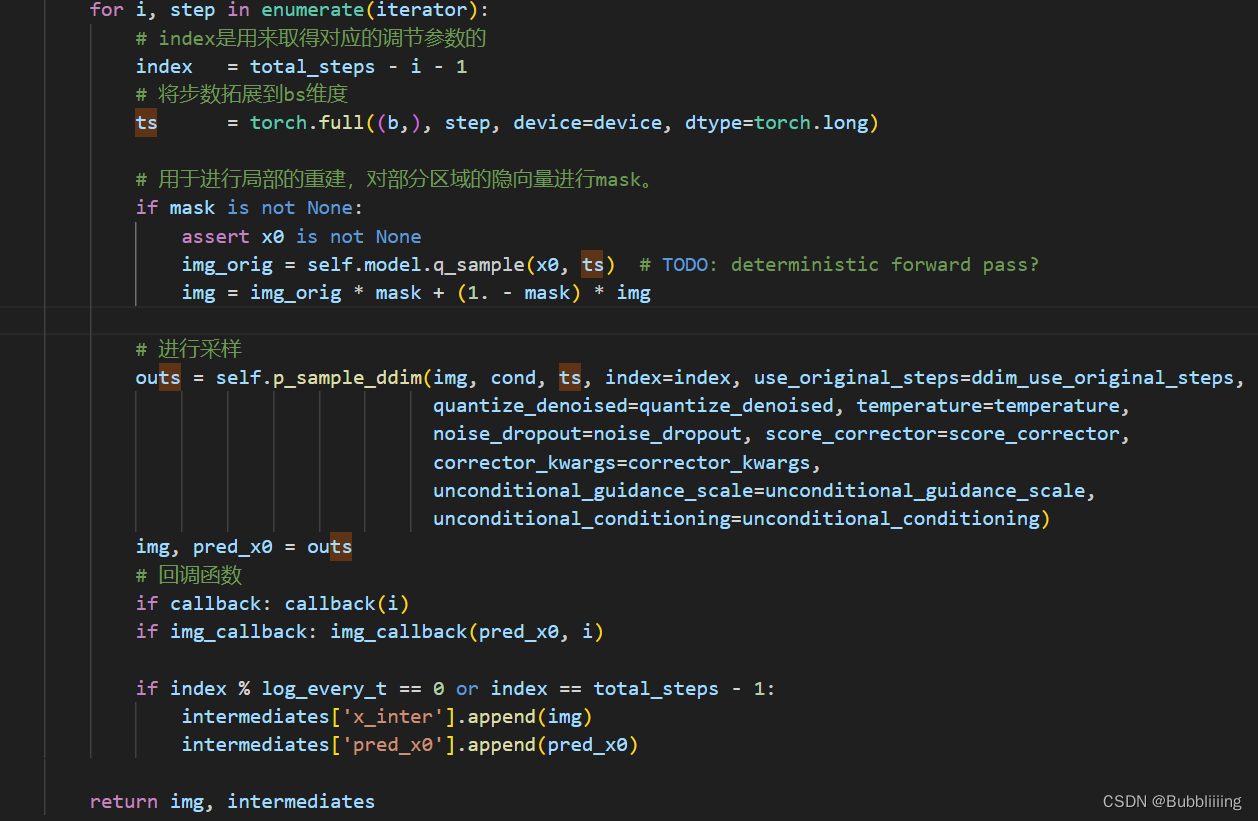
我们会对ddim_timesteps的时间步取反,因为我们现在是去噪声而非加噪声,然后对其进行一个循环,循环的代码如下:
循环中有一个mask,它的作用是用于进行局部的重建,对部分区域的隐向量进行mask,此处没用到。其它东西都是个方法或者函数,也看不出东西来。在这里面看起来最像采样过程的就是p_sample_ddim方法,我们需要进入p_sample_ddim这个方法看看。
for i, step in enumerate(iterator):
    # index是用来取得对应的调节参数的
    index   = total_steps - i - 1
    # 将步数拓展到bs维度
    ts      = torch.full((b,), step, device=device, dtype=torch.long)

    # 用于进行局部的重建,对部分区域的隐向量进行mask。
    if mask is not None:
        assert x0 is not None
        img_orig = self.model.q_sample(x0, ts)  # TODO: deterministic forward pass?
        img = img_orig * mask + (1. - mask) * img

    # 进行采样
    outs = self.p_sample_ddim(img, cond, ts, index=index, use_original_steps=ddim_use_original_steps,
                                quantize_denoised=quantize_denoised, temperature=temperature,
                                noise_dropout=noise_dropout, score_corrector=score_corrector,
                                corrector_kwargs=corrector_kwargs,
                                unconditional_guidance_scale=unconditional_guidance_scale,
                                unconditional_conditioning=unconditional_conditioning)
    img, pred_x0 = outs
    # 回调函数
    if callback: callback(i)
    if img_callback: img_callback(pred_x0, i)

    if index % log_every_t == 0 or index == total_steps - 1:
        intermediates['x_inter'].append(img)
        intermediates['pred_x0'].append(pred_x0)
- 1
- 2
- 3
- 4
- 5
- 6
- 7
- 8
- 9
- 10
- 11
- 12
- 13
- 14
- 15
- 16
- 17
- 18
- 19
- 20
- 21
- 22
- 23
- 24
- 25
- 26
- 27
c、单次采样解析
I、预测噪声
在进行单词采样前,需要首先判断是否有neg prompt,如果有,我们需要同时处理neg prompt,否则仅仅需要处理pos prompt。实际使用的时候一般都有neg prompt(效果会好一些),所以默认进入对应的处理过程。
在处理neg prompt时,我们对输入进来的隐向量和步数进行复制,一个属于pos prompt,一个属于neg prompt。torch.cat默认堆叠维度为0,所以是在batch_size维度进行堆叠,二者不会互相影响。然后我们将pos prompt和neg prompt堆叠到一个batch中,也是在batch_size维度堆叠。
# 首先判断是否由neg prompt,unconditional_conditioning是由neg prompt获得的
if unconditional_conditioning is None or unconditional_guidance_scale == 1.:
    e_t = self.model.apply_model(x, t, c)
else:
    # 一般都是有neg prompt的,所以进入到这里
    # 在这里我们对隐向量和步数进行复制,一个属于pos prompt,一个属于neg prompt
    # torch.cat默认堆叠维度为0,所以是在bs维度进行堆叠,二者不会互相影响
    x_in = torch.cat([x] * 2)
    t_in = torch.cat([t] * 2)
    # 然后我们将pos prompt和neg prompt堆叠到一个batch中
    if isinstance(c, dict):
        assert isinstance(unconditional_conditioning, dict)
        c_in = dict()
        for k in c:
            if isinstance(c[k], list):
                c_in[k] = [
                    torch.cat([unconditional_conditioning[k][i], c[k][i]])
                    for i in range(len(c[k]))
                ]
            else:
                c_in[k] = torch.cat([unconditional_conditioning[k], c[k]])
    else:
        c_in = torch.cat([unconditional_conditioning, c])
- 1
- 2
- 3
- 4
- 5
- 6
- 7
- 8
- 9
- 10
- 11
- 12
- 13
- 14
- 15
- 16
- 17
- 18
- 19
- 20
- 21
- 22
- 23

堆叠完后,我们将隐向量、步数和prompt条件一起传入网络中,将结果在bs维度进行使用chunk进行分割。
因为我们在堆叠时,neg prompt放在了前面。因此分割好后,前半部分e_t_uncond属于利用neg prompt得到的,后半部分e_t属于利用pos prompt得到的,我们本质上应该扩大pos prompt的影响,远离neg prompt的影响。因此,我们使用e_t-e_t_uncond计算二者的距离,使用scale扩大二者的距离。在e_t_uncond基础上,得到最后的隐向量。
# 堆叠完后,隐向量、步数和prompt条件一起传入网络中,将结果在bs维度进行使用chunk进行分割
e_t_uncond, e_t = self.model.apply_model(x_in, t_in, c_in).chunk(2)
e_t = e_t_uncond + unconditional_guidance_scale * (e_t - e_t_uncond)
- 1
- 2
- 3

此时获得的e_t就是通过隐向量和prompt共同获得的预测噪声啦。
II、施加噪声
获得噪声就OK了吗?显然不是的,我们还要将获得的新噪声,按照一定的比例添加到原来的原始噪声上。
这个地方我们最好结合ddim中的公式来看,我们需要获得
α
ˉ
t
\bar{\alpha}_t
αˉt、
α
ˉ
t
−
1
\bar{\alpha}_{t-1}
αˉt−1、
σ
t
\sigma_t
σt、
1
−
α
ˉ
t
\sqrt{1-\bar{\alpha}_t}
1−αˉt
。


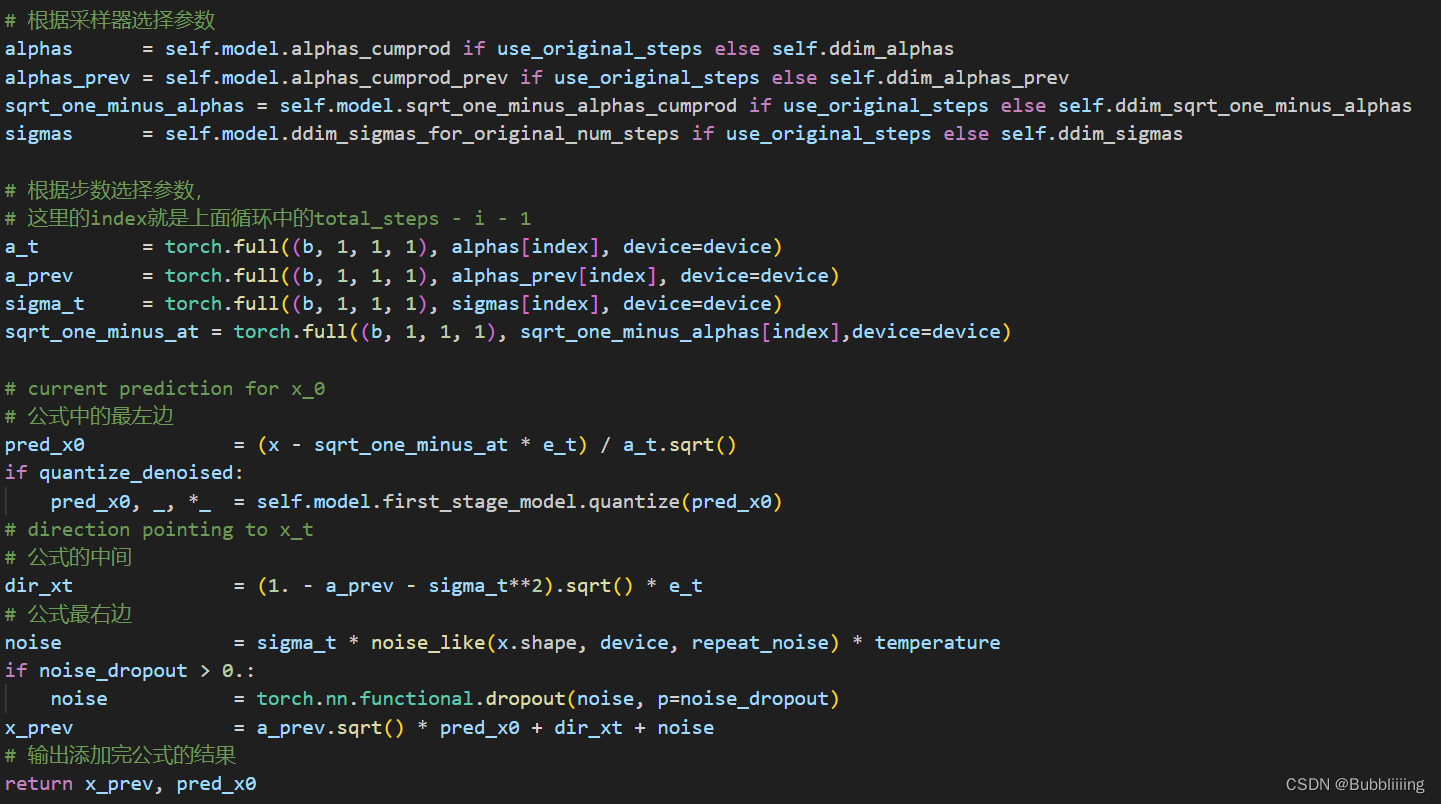
代码中,我们其实已经预先计算好了这些参数。我们只需要直接取出即可,下方的a_t也就是公式中括号外的
α
ˉ
t
\bar{\alpha}_t
αˉt,a_prev 就是公式中的
α
ˉ
t
−
1
\bar{\alpha}_{t-1}
αˉt−1,sigma_t就是公式中的
σ
t
\sigma_t
σt,sqrt_one_minus_at就是公式中的
1
−
α
ˉ
t
\sqrt{1-\bar{\alpha}_t}
1−αˉt
。
# 根据采样器选择参数
alphas      = self.model.alphas_cumprod if use_original_steps else self.ddim_alphas
alphas_prev = self.model.alphas_cumprod_prev if use_original_steps else self.ddim_alphas_prev
sqrt_one_minus_alphas = self.model.sqrt_one_minus_alphas_cumprod if use_original_steps else self.ddim_sqrt_one_minus_alphas
sigmas      = self.model.ddim_sigmas_for_original_num_steps if use_original_steps else self.ddim_sigmas

# 根据步数选择参数,
# 这里的index就是上面循环中的total_steps - i - 1
a_t         = torch.full((b, 1, 1, 1), alphas[index], device=device)
a_prev      = torch.full((b, 1, 1, 1), alphas_prev[index], device=device)
sigma_t     = torch.full((b, 1, 1, 1), sigmas[index], device=device)
sqrt_one_minus_at = torch.full((b, 1, 1, 1), sqrt_one_minus_alphas[index],device=device)
- 1
- 2
- 3
- 4
- 5
- 6
- 7
- 8
- 9
- 10
- 11
- 12
其实这一步我们只是把公式需要用到的系数全都拿了出来,方便后面的加减乘除。然后我们便在代码中实现上述的公式。
# current prediction for x_0
# 公式中的最左边
pred_x0             = (x - sqrt_one_minus_at * e_t) / a_t.sqrt()
if quantize_denoised:
    pred_x0, _, *_  = self.model.first_stage_model.quantize(pred_x0)
# direction pointing to x_t
# 公式的中间
dir_xt              = (1. - a_prev - sigma_t**2).sqrt() * e_t
# 公式最右边
noise               = sigma_t * noise_like(x.shape, device, repeat_noise) * temperature
if noise_dropout > 0.:
    noise           = torch.nn.functional.dropout(noise, p=noise_dropout)
x_prev              = a_prev.sqrt() * pred_x0 + dir_xt + noise
# 输出添加完公式的结果
return x_prev, pred_x0
- 1
- 2
- 3
- 4
- 5
- 6
- 7
- 8
- 9
- 10
- 11
- 12
- 13
- 14
- 15
d、预测噪声过程中的网络结构解析
I、apply_model方法解析
在3.a的预测噪声过程中,我们使用了model.apply_model方法进行噪声的预测,这个方法具体做了什么被隐掉了,我们看看具体做的工作。
apply_model方法在ldm.models.diffusion.ddpm.py文件中。在apply_model中,我们将x_noisy传入self.model中预测噪声。
x_recon = self.model(x_noisy, t, **cond)
- 1
self.model是一个预先构建好的类,定义在ldm.models.diffusion.ddpm.py文件的1416行,内部包含Stable Diffusion的Unet网络,self.model的功能有点类似于包装器,根据模型选择的特征融合方式,进行文本与上文生成的噪声的融合。
c_concat代表使用堆叠的方式进行融合,c_crossattn代表使用attention的方式融合。
class DiffusionWrapper(pl.LightningModule):
    def __init__(self, diff_model_config, conditioning_key):
        super().__init__()
        self.sequential_cross_attn = diff_model_config.pop("sequential_crossattn", False)
        # stable diffusion的unet网络
        self.diffusion_model = instantiate_from_config(diff_model_config)
        self.conditioning_key = conditioning_key
        assert self.conditioning_key in [None, 'concat', 'crossattn', 'hybrid', 'adm', 'hybrid-adm', 'crossattn-adm']

    def forward(self, x, t, c_concat: list = None, c_crossattn: list = None, c_adm=None):
        if self.conditioning_key is None:
            out = self.diffusion_model(x, t)
        elif self.conditioning_key == 'concat':
            xc = torch.cat([x] + c_concat, dim=1)
            out = self.diffusion_model(xc, t)
        elif self.conditioning_key == 'crossattn':
            if not self.sequential_cross_attn:
                cc = torch.cat(c_crossattn, 1)
            else:
                cc = c_crossattn
            out = self.diffusion_model(x, t, context=cc)
        elif self.conditioning_key == 'hybrid':
            xc = torch.cat([x] + c_concat, dim=1)
            cc = torch.cat(c_crossattn, 1)
            out = self.diffusion_model(xc, t, context=cc)
        elif self.conditioning_key == 'hybrid-adm':
            assert c_adm is not None
            xc = torch.cat([x] + c_concat, dim=1)
            cc = torch.cat(c_crossattn, 1)
            out = self.diffusion_model(xc, t, context=cc, y=c_adm)
        elif self.conditioning_key == 'crossattn-adm':
            assert c_adm is not None
            cc = torch.cat(c_crossattn, 1)
            out = self.diffusion_model(x, t, context=cc, y=c_adm)
        elif self.conditioning_key == 'adm':
            cc = c_crossattn[0]
            out = self.diffusion_model(x, t, y=cc)
        else:
            raise NotImplementedError()

        return out
- 1
- 2
- 3
- 4
- 5
- 6
- 7
- 8
- 9
- 10
- 11
- 12
- 13
- 14
- 15
- 16
- 17
- 18
- 19
- 20
- 21
- 22
- 23
- 24
- 25
- 26
- 27
- 28
- 29
- 30
- 31
- 32
- 33
- 34
- 35
- 36
- 37
- 38
- 39
- 40
- 41
代码中的self.diffusion_model便是Stable Diffusion的Unet网络,网络结构位于ldm.modules.diffusionmodules.openaimodel.py文件中的UNetModel类。
II、UNetModel模型解析
UNetModel主要做的工作是结合时间步t和文本Embedding计算这一时刻的噪声。尽管UNet的思路非常简单,但是在StableDiffusion中,UNetModel由ResBlock和Transformer模块组成,整体来讲相比于普通的UNet复杂一些。
Prompt通过Frozen CLIP Text Encoder获得Text Embedding,Timesteps通过全连接(MLP)获得Timesteps Embedding;
ResBlock用于结合时间步Timesteps Embedding,Transformer模块用于结合文本Text Embedding。
我在这里放一张大图,同学们可以看到内部shape的变化。
Unet代码如下所示:
class UNetModel(nn.Module):
    """
    The full UNet model with attention and timestep embedding.
    :param in_channels: channels in the input Tensor.
    :param model_channels: base channel count for the model.
    :param out_channels: channels in the output Tensor.
    :param num_res_blocks: number of residual blocks per downsample.
    :param attention_resolutions: a collection of downsample rates at which
        attention will take place. May be a set, list, or tuple.
        For example, if this contains 4, then at 4x downsampling, attention
        will be used.
    :param dropout: the dropout probability.
    :param channel_mult: channel multiplier for each level of the UNet.
    :param conv_resample: if True, use learned convolutions for upsampling and
        downsampling.
    :param dims: determines if the signal is 1D, 2D, or 3D.
    :param num_classes: if specified (as an int), then this model will be
        class-conditional with `num_classes` classes.
    :param use_checkpoint: use gradient checkpointing to reduce memory usage.
    :param num_heads: the number of attention heads in each attention layer.
    :param num_heads_channels: if specified, ignore num_heads and instead use
                               a fixed channel width per attention head.
    :param num_heads_upsample: works with num_heads to set a different number
                               of heads for upsampling. Deprecated.
    :param use_scale_shift_norm: use a FiLM-like conditioning mechanism.
    :param resblock_updown: use residual blocks for up/downsampling.
    :param use_new_attention_order: use a different attention pattern for potentially
                                    increased efficiency.
    """

    def __init__(
        self,
        image_size,
        in_channels,
        model_channels,
        out_channels,
        num_res_blocks,
        attention_resolutions,
        dropout=0,
        channel_mult=(1, 2, 4, 8),
        conv_resample=True,
        dims=2,
        num_classes=None,
        use_checkpoint=False,
        use_fp16=False,
        num_heads=-1,
        num_head_channels=-1,
        num_heads_upsample=-1,
        use_scale_shift_norm=False,
        resblock_updown=False,
        use_new_attention_order=False,
        use_spatial_transformer=False,    # custom transformer support
        transformer_depth=1,              # custom transformer support
        context_dim=None,                 # custom transformer support
        n_embed=None,                     # custom support for prediction of discrete ids into codebook of first stage vq model
        legacy=True,
    ):
        super().__init__()
        if use_spatial_transformer:
            assert context_dim is not None, 'Fool!! You forgot to include the dimension of your cross-attention conditioning...'

        if context_dim is not None:
            assert use_spatial_transformer, 'Fool!! You forgot to use the spatial transformer for your cross-attention conditioning...'
            from omegaconf.listconfig import ListConfig
            if type(context_dim) == ListConfig:
                context_dim = list(context_dim)

        if num_heads_upsample == -1:
            num_heads_upsample = num_heads

        if num_heads == -1:
            assert num_head_channels != -1, 'Either num_heads or num_head_channels has to be set'

        if num_head_channels == -1:
            assert num_heads != -1, 'Either num_heads or num_head_channels has to be set'

        self.image_size = image_size
        self.in_channels = in_channels
        self.model_channels = model_channels
        self.out_channels = out_channels
        self.num_res_blocks = num_res_blocks
        self.attention_resolutions = attention_resolutions
        self.dropout = dropout
        self.channel_mult = channel_mult
        self.conv_resample = conv_resample
        self.num_classes = num_classes
        self.use_checkpoint = use_checkpoint
        self.dtype = th.float16 if use_fp16 else th.float32
        self.num_heads = num_heads
        self.num_head_channels = num_head_channels
        self.num_heads_upsample = num_heads_upsample
        self.predict_codebook_ids = n_embed is not None

        # 用于计算当前采样时间t的embedding
        time_embed_dim  = model_channels * 4
        self.time_embed = nn.Sequential(
            linear(model_channels, time_embed_dim),
            nn.SiLU(),
            linear(time_embed_dim, time_embed_dim),
        )

        if self.num_classes is not None:
            self.label_emb = nn.Embedding(num_classes, time_embed_dim)

        # 定义输入模块的第一个卷积
        # TimestepEmbedSequential也可以看作一个包装器,根据层的种类进行时间或者文本的融合。
        self.input_blocks = nn.ModuleList(
            [
                TimestepEmbedSequential(
                    conv_nd(dims, in_channels, model_channels, 3, padding=1)
                )
            ]
        )
        self._feature_size  = model_channels
        input_block_chans   = [model_channels]
        ch                  = model_channels
        ds                  = 1
        # 对channel_mult进行循环,channel_mult一共有四个值,代表unet四个部分通道的扩张比例
        # [1, 2, 4, 4]
        for level, mult in enumerate(channel_mult):
            # 每个部分循环两次
            # 添加一个ResBlock和一个AttentionBlock
            for _ in range(num_res_blocks):
                # 先添加一个ResBlock
                # 用于对输入的噪声进行通道数的调整,并且融合t的特征
                layers = [
                    ResBlock(
                        ch,
                        time_embed_dim,
                        dropout,
                        out_channels=mult * model_channels,
                        dims=dims,
                        use_checkpoint=use_checkpoint,
                        use_scale_shift_norm=use_scale_shift_norm,
                    )
                ]
                # ch便是上述ResBlock的输出通道数
                ch = mult * model_channels
                if ds in attention_resolutions:
                    # num_heads=8
                    if num_head_channels == -1:
                        dim_head = ch // num_heads
                    else:
                        num_heads = ch // num_head_channels
                        dim_head = num_head_channels
                    if legacy:
                        #num_heads = 1
                        dim_head = ch // num_heads if use_spatial_transformer else num_head_channels
                    # 使用了SpatialTransformer自注意力,加强全局特征,融合文本的特征
                    layers.append(
                        AttentionBlock(
                            ch,
                            use_checkpoint=use_checkpoint,
                            num_heads=num_heads,
                            num_head_channels=dim_head,
                            use_new_attention_order=use_new_attention_order,
                        ) if not use_spatial_transformer else SpatialTransformer(
                            ch, num_heads, dim_head, depth=transformer_depth, context_dim=context_dim
                        )
                    )
                self.input_blocks.append(TimestepEmbedSequential(*layers))
                self._feature_size += ch
                input_block_chans.append(ch)
            # 如果不是四个部分中的最后一个部分,那么都要进行下采样。
            if level != len(channel_mult) - 1:
                out_ch = ch
                # 在此处进行下采样
                # 一般直接使用Downsample模块
                self.input_blocks.append(
                    TimestepEmbedSequential(
                        ResBlock(
                            ch,
                            time_embed_dim,
                            dropout,
                            out_channels=out_ch,
                            dims=dims,
                            use_checkpoint=use_checkpoint,
                            use_scale_shift_norm=use_scale_shift_norm,
                            down=True,
                        )
                        if resblock_updown
                        else Downsample(
                            ch, conv_resample, dims=dims, out_channels=out_ch
                        )
                    )
                )
                # 为下一阶段定义参数。
                ch = out_ch
                input_block_chans.append(ch)
                ds *= 2
                self._feature_size += ch

        if num_head_channels == -1:
            dim_head = ch // num_heads
        else:
            num_heads = ch // num_head_channels
            dim_head = num_head_channels
        if legacy:
            #num_heads = 1
            dim_head = ch // num_heads if use_spatial_transformer else num_head_channels
        # 定义中间层
        # ResBlock + SpatialTransformer + ResBlock
        self.middle_block = TimestepEmbedSequential(
            ResBlock(
                ch,
                time_embed_dim,
                dropout,
                dims=dims,
                use_checkpoint=use_checkpoint,
                use_scale_shift_norm=use_scale_shift_norm,
            ),
            AttentionBlock(
                ch,
                use_checkpoint=use_checkpoint,
                num_heads=num_heads,
                num_head_channels=dim_head,
                use_new_attention_order=use_new_attention_order,
            ) if not use_spatial_transformer else SpatialTransformer(
                            ch, num_heads, dim_head, depth=transformer_depth, context_dim=context_dim
                        ),
            ResBlock(
                ch,
                time_embed_dim,
                dropout,
                dims=dims,
                use_checkpoint=use_checkpoint,
                use_scale_shift_norm=use_scale_shift_norm,
            ),
        )
        self._feature_size += ch

        # 定义Unet上采样过程
        self.output_blocks = nn.ModuleList([])
        # 循环把channel_mult反了过来
        for level, mult in list(enumerate(channel_mult))[::-1]:
            # 上采样时每个部分循环三次
            for i in range(num_res_blocks + 1):
                ich = input_block_chans.pop()
                # 首先添加ResBlock层
                layers = [
                    ResBlock(
                        ch + ich,
                        time_embed_dim,
                        dropout,
                        out_channels=model_channels * mult,
                        dims=dims,
                        use_checkpoint=use_checkpoint,
                        use_scale_shift_norm=use_scale_shift_norm,
                    )
                ]
                ch = model_channels * mult
                # 然后进行SpatialTransformer自注意力
                if ds in attention_resolutions:
                    if num_head_channels == -1:
                        dim_head = ch // num_heads
                    else:
                        num_heads = ch // num_head_channels
                        dim_head = num_head_channels
                    if legacy:
                        #num_heads = 1
                        dim_head = ch // num_heads if use_spatial_transformer else num_head_channels
                    layers.append(
                        AttentionBlock(
                            ch,
                            use_checkpoint=use_checkpoint,
                            num_heads=num_heads_upsample,
                            num_head_channels=dim_head,
                            use_new_attention_order=use_new_attention_order,
                        ) if not use_spatial_transformer else SpatialTransformer(
                            ch, num_heads, dim_head, depth=transformer_depth, context_dim=context_dim
                        )
                    )
                # 如果不是channel_mult循环的第一个
                # 且
                # 是num_res_blocks循环的最后一次,则进行上采样
                if level and i == num_res_blocks:
                    out_ch = ch
                    layers.append(
                        ResBlock(
                            ch,
                            time_embed_dim,
                            dropout,
                            out_channels=out_ch,
                            dims=dims,
                            use_checkpoint=use_checkpoint,
                            use_scale_shift_norm=use_scale_shift_norm,
                            up=True,
                        )
                        if resblock_updown
                        else Upsample(ch, conv_resample, dims=dims, out_channels=out_ch)
                    )
                    ds //= 2
                self.output_blocks.append(TimestepEmbedSequential(*layers))
                self._feature_size += ch

        # 最后在输出部分进行一次卷积
        self.out = nn.Sequential(
            normalization(ch),
            nn.SiLU(),
            zero_module(conv_nd(dims, model_channels, out_channels, 3, padding=1)),
        )
        if self.predict_codebook_ids:
            self.id_predictor = nn.Sequential(
            normalization(ch),
            conv_nd(dims, model_channels, n_embed, 1),
            #nn.LogSoftmax(dim=1)  # change to cross_entropy and produce non-normalized logits
        )

    def convert_to_fp16(self):
        """
        Convert the torso of the model to float16.
        """
        self.input_blocks.apply(convert_module_to_f16)
        self.middle_block.apply(convert_module_to_f16)
        self.output_blocks.apply(convert_module_to_f16)

    def convert_to_fp32(self):
        """
        Convert the torso of the model to float32.
        """
        self.input_blocks.apply(convert_module_to_f32)
        self.middle_block.apply(convert_module_to_f32)
        self.output_blocks.apply(convert_module_to_f32)

    def forward(self, x, timesteps=None, context=None, y=None,**kwargs):
        """
        Apply the model to an input batch.
        :param x: an [N x C x ...] Tensor of inputs.
        :param timesteps: a 1-D batch of timesteps.
        :param context: conditioning plugged in via crossattn
        :param y: an [N] Tensor of labels, if class-conditional.
        :return: an [N x C x ...] Tensor of outputs.
        """
        assert (y is not None) == (
            self.num_classes is not None
        ), "must specify y if and only if the model is class-conditional"
        hs      = []
        # 用于计算当前采样时间t的embedding
        t_emb   = timestep_embedding(timesteps, self.model_channels, repeat_only=False)
        emb     = self.time_embed(t_emb)

        if self.num_classes is not None:
            assert y.shape == (x.shape[0],)
            emb = emb + self.label_emb(y)

        # 对输入模块进行循环,进行下采样并且融合时间特征与文本特征。
        h = x.type(self.dtype)
        for module in self.input_blocks:
            h = module(h, emb, context)
            hs.append(h)

        # 中间模块的特征提取
        h = self.middle_block(h, emb, context)

        # 上采样模块的特征提取
        for module in self.output_blocks:
            h = th.cat([h, hs.pop()], dim=1)
            h = module(h, emb, context)
        h = h.type(x.dtype)
        # 输出模块
        if self.predict_codebook_ids:
            return self.id_predictor(h)
        else:
            return self.out(h)
- 1
- 2
- 3
- 4
- 5
- 6
- 7
- 8
- 9
- 10
- 11
- 12
- 13
- 14
- 15
- 16
- 17
- 18
- 19
- 20
- 21
- 22
- 23
- 24
- 25
- 26
- 27
- 28
- 29
- 30
- 31
- 32
- 33
- 34
- 35
- 36
- 37
- 38
- 39
- 40
- 41
- 42
- 43
- 44
- 45
- 46
- 47
- 48
- 49
- 50
- 51
- 52
- 53
- 54
- 55
- 56
- 57
- 58
- 59
- 60
- 61
- 62
- 63
- 64
- 65
- 66
- 67
- 68
- 69
- 70
- 71
- 72
- 73
- 74
- 75
- 76
- 77
- 78
- 79
- 80
- 81
- 82
- 83
- 84
- 85
- 86
- 87
- 88
- 89
- 90
- 91
- 92
- 93
- 94
- 95
- 96
- 97
- 98
- 99
- 100
- 101
- 102
- 103
- 104
- 105
- 106
- 107
- 108
- 109
- 110
- 111
- 112
- 113
- 114
- 115
- 116
- 117
- 118
- 119
- 120
- 121
- 122
- 123
- 124
- 125
- 126
- 127
- 128
- 129
- 130
- 131
- 132
- 133
- 134
- 135
- 136
- 137
- 138
- 139
- 140
- 141
- 142
- 143
- 144
- 145
- 146
- 147
- 148
- 149
- 150
- 151
- 152
- 153
- 154
- 155
- 156
- 157
- 158
- 159
- 160
- 161
- 162
- 163
- 164
- 165
- 166
- 167
- 168
- 169
- 170
- 171
- 172
- 173
- 174
- 175
- 176
- 177
- 178
- 179
- 180
- 181
- 182
- 183
- 184
- 185
- 186
- 187
- 188
- 189
- 190
- 191
- 192
- 193
- 194
- 195
- 196
- 197
- 198
- 199
- 200
- 201
- 202
- 203
- 204
- 205
- 206
- 207
- 208
- 209
- 210
- 211
- 212
- 213
- 214
- 215
- 216
- 217
- 218
- 219
- 220
- 221
- 222
- 223
- 224
- 225
- 226
- 227
- 228
- 229
- 230
- 231
- 232
- 233
- 234
- 235
- 236
- 237
- 238
- 239
- 240
- 241
- 242
- 243
- 244
- 245
- 246
- 247
- 248
- 249
- 250
- 251
- 252
- 253
- 254
- 255
- 256
- 257
- 258
- 259
- 260
- 261
- 262
- 263
- 264
- 265
- 266
- 267
- 268
- 269
- 270
- 271
- 272
- 273
- 274
- 275
- 276
- 277
- 278
- 279
- 280
- 281
- 282
- 283
- 284
- 285
- 286
- 287
- 288
- 289
- 290
- 291
- 292
- 293
- 294
- 295
- 296
- 297
- 298
- 299
- 300
- 301
- 302
- 303
- 304
- 305
- 306
- 307
- 308
- 309
- 310
- 311
- 312
- 313
- 314
- 315
- 316
- 317
- 318
- 319
- 320
- 321
- 322
- 323
- 324
- 325
- 326
- 327
- 328
- 329
- 330
- 331
- 332
- 333
- 334
- 335
- 336
- 337
- 338
- 339
- 340
- 341
- 342
- 343
- 344
- 345
- 346
- 347
- 348
- 349
- 350
- 351
- 352
- 353
- 354
- 355
- 356
- 357
- 358
- 359
- 360
- 361
- 362
- 363
- 364
3、隐空间解码生成图片
通过上述步骤,已经可以多次采样获得结果,然后我们便可以通过隐空间解码生成图片。
隐空间解码生成图片的过程非常简单,将上文多次采样后的结果,使用decode_first_stage方法即可生成图片。
在decode_first_stage方法中,网络调用VAE对获取到的64x64x3的隐向量进行解码,获得512x512x3的图片。
@torch.no_grad()
def decode_first_stage(self, z, predict_cids=False, force_not_quantize=False):
    if predict_cids:
        if z.dim() == 4:
            z = torch.argmax(z.exp(), dim=1).long()
        z = self.first_stage_model.quantize.get_codebook_entry(z, shape=None)
        z = rearrange(z, 'b h w c -> b c h w').contiguous()

    z = 1. / self.scale_factor * z
	# 一般无需分割输入,所以直接将x_noisy传入self.model中,在下面else进行
    if hasattr(self, "split_input_params"):
    	......
    else:
        if isinstance(self.first_stage_model, VQModelInterface):
            return self.first_stage_model.decode(z, force_not_quantize=predict_cids or force_not_quantize)
        else:
            return self.first_stage_model.decode(z)
- 1
- 2
- 3
- 4
- 5
- 6
- 7
- 8
- 9
- 10
- 11
- 12
- 13
- 14
- 15
- 16
- 17
文本到图像预测过程代码
整体预测代码如下:
import random

import einops
import numpy as np
import torch
import cv2
import os
from ldm_hacked import DDIMSampler
from ldm_hacked import create_model, load_state_dict, DDIMSampler
from pytorch_lightning import seed_everything

# ----------------------- #
#   使用的参数
# ----------------------- #
# config的地址
config_path = "model_data/sd_v15.yaml"
# 模型的地址
model_path  = "model_data/v1-5-pruned-emaonly.safetensors"

# 生成的图像大小为input_shape
input_shape = [512, 512]
# 一次生成几张图像
num_samples = 2
# 采样的步数
ddim_steps  = 20
# 采样的种子,为-1的话则随机。
seed        = 12345
# eta
eta         = 0

# 提示词
prompt      = "a cat"
# 正面提示词
a_prompt    = "best quality, extremely detailed"
# 负面提示词
n_prompt    = "longbody, lowres, bad anatomy, bad hands, missing fingers, extra digit, fewer digits, cropped, worst quality, low quality"
# 正负扩大倍数
scale       = 9

# save_path
save_path   = "imgs/outputs_imgs"

# ----------------------- #
#   创建模型
# ----------------------- #
model   = create_model(config_path).cpu()
model.load_state_dict(load_state_dict(model_path, location='cuda'), strict=False)
model   = model.cuda()
ddim_sampler = DDIMSampler(model)

with torch.no_grad():
    if seed == -1:
        seed = random.randint(0, 65535)
    seed_everything(seed)

    # ----------------------- #
    #   获得编码后的prompt
    # ----------------------- #
    cond    = {"c_crossattn": [model.get_learned_conditioning([prompt + ', ' + a_prompt] * num_samples)]}
    un_cond = {"c_crossattn": [model.get_learned_conditioning([n_prompt] * num_samples)]}
    H, W    = input_shape
    shape   = (4, H // 8, W // 8)

    # ----------------------- #
    #   进行采样
    # ----------------------- #
    samples, intermediates = ddim_sampler.sample(ddim_steps, num_samples,
                                                    shape, cond, verbose=False, eta=eta,
                                                    unconditional_guidance_scale=scale,
                                                    unconditional_conditioning=un_cond)

    # ----------------------- #
    #   进行解码
    # ----------------------- #
    x_samples = model.decode_first_stage(samples)
    x_samples = (einops.rearrange(x_samples, 'b c h w -> b h w c') * 127.5 + 127.5).cpu().numpy().clip(0, 255).astype(np.uint8)

# ----------------------- #
#   保存图片
# ----------------------- #
if not os.path.exists(save_path):
    os.makedirs(save_path)
for index, image in enumerate(x_samples):
    cv2.imwrite(os.path.join(save_path, str(index) + ".jpg"), cv2.cvtColor(image, cv2.COLOR_BGR2RGB))
- 1
- 2
- 3
- 4
- 5
- 6
- 7
- 8
- 9
- 10
- 11
- 12
- 13
- 14
- 15
- 16
- 17
- 18
- 19
- 20
- 21
- 22
- 23
- 24
- 25
- 26
- 27
- 28
- 29
- 30
- 31
- 32
- 33
- 34
- 35
- 36
- 37
- 38
- 39
- 40
- 41
- 42
- 43
- 44
- 45
- 46
- 47
- 48
- 49
- 50
- 51
- 52
- 53
- 54
- 55
- 56
- 57
- 58
- 59
- 60
- 61
- 62
- 63
- 64
- 65
- 66
- 67
- 68
- 69
- 70
- 71
- 72
- 73
- 74
- 75
- 76
- 77
- 78
- 79
- 80
- 81
- 82
- 83
- 84
- 85

