
- 1signature=9d230a533b0bb2e0d774cd9af4e91613,react-native-dialogs/yarn.lock at 8653282ee0fb6f8d3516f4a...
- 2dwa算法matlab_Lattice规划与Matlab实现(1)
- 3获取Linux操作系统版本名称和版本的方法_获取当前linux系统名称
- 4达摩院|视觉智能AI场景解决方案——AI智慧运动_达摩院体育考试ai算法
- 5chatgpt赋能python:Python创建App:从零开始的SEO指南
- 6树莓派安装Nginx搭建web服务器结合内网穿透实现无公网IP远程访问本地站点
- 7linux 堆利用基础知识_mallopt
- 8多头自注意力机制的代码实现_多头自注意力机制代码实现
- 9文本预处理挖掘之TF-IDF附使用互信息进行特征挑选的过程(任务二)_文本分类如何用tfidf特征选择
- 10Lora 微调wiki_lora add_mixin
Android Preference 卡片圆角风格定制_自定义preferencecategory
赞
踩
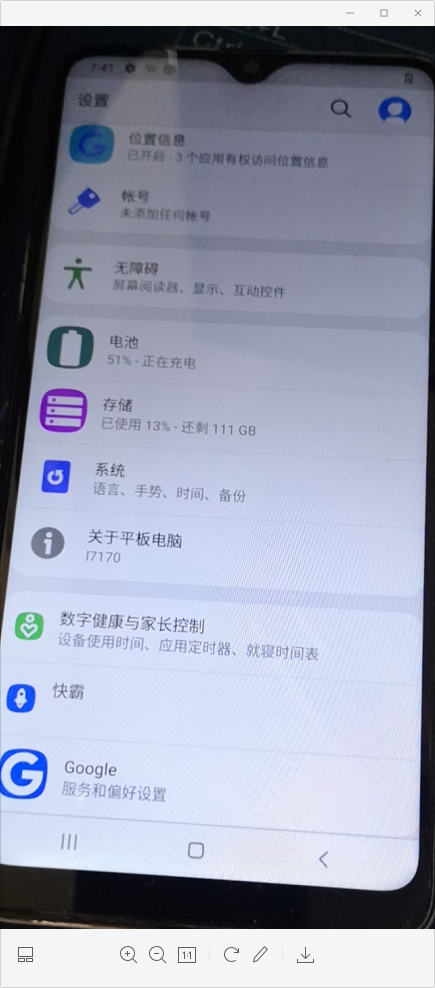
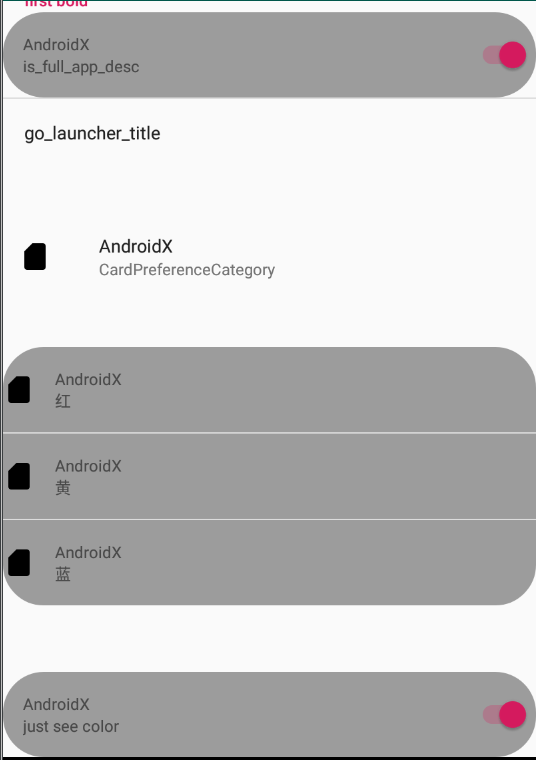
效果图
实现步骤
在网上查找这块的资料,发现并未找到相关的,大多都是通过修改 Preference style 来设置背景色什么的,和我们预想的
效果不太一样,那就去看看 Preference 源码吧,说不定能有什么收获。
先看下 Preference 类继承关系结构图,在AS中通过快捷键 ctrl + h 即可调出视图
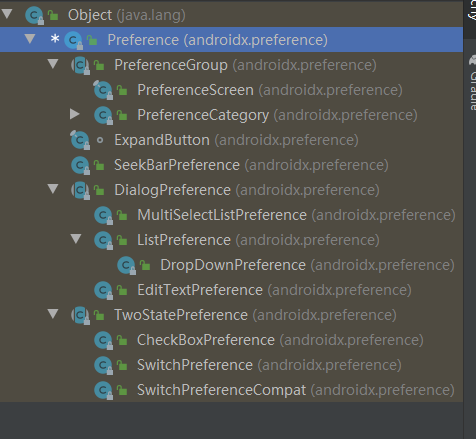
基本上我们常用的简单显示控件都继承自 Preference,系统设置界面也不例外,全都是用的 Preference
通过分析 Preference 源码发现了默认布局文件为 preference.xml,文件路径位于
frameworks/base/core/res/res/layout/preference.xml
<?xml version="1.0" encoding="utf-8"?>
<!-- Layout for a Preference in a PreferenceActivity. The
     Preference is able to place a specific widget for its particular
     type in the "widget_frame" layout. -->
<LinearLayout xmlns:android="http://schemas.android.com/apk/res/android"
    android:layout_width="match_parent"
    android:layout_height="wrap_content"
    android:minHeight="?android:attr/listPreferredItemHeight"
    android:gravity="center_vertical"
    android:paddingEnd="?android:attr/scrollbarSize"
    android:background="?android:attr/selectableItemBackground" >

    <ImageView
        android:id="@+android:id/icon"
        android:layout_width="wrap_content"
        android:layout_height="wrap_content"
        android:layout_gravity="center"
        />

    <RelativeLayout
        android:layout_width="wrap_content"
        android:layout_height="wrap_content"
        android:layout_marginStart="15dip"
        android:layout_marginEnd="6dip"
        android:layout_marginTop="6dip"
        android:layout_marginBottom="6dip"
        android:layout_weight="1">

        <TextView android:id="@+android:id/title"
            android:layout_width="wrap_content"
            android:layout_height="wrap_content"
            android:singleLine="true"
            android:textAppearance="?android:attr/textAppearanceLarge"
            android:ellipsize="marquee"
            android:fadingEdge="horizontal" />

        <TextView android:id="@+android:id/summary"
            android:layout_width="wrap_content"
            android:layout_height="wrap_content"
            android:layout_below="@android:id/title"
            android:layout_alignStart="@android:id/title"
            android:textAppearance="?android:attr/textAppearanceSmall"
            android:textColor="?android:attr/textColorSecondary"
            android:maxLines="4" />

    </RelativeLayout>

    <!-- Preference should place its actual preference widget here. -->
    <LinearLayout android:id="@+android:id/widget_frame"
        android:layout_width="wrap_content"
        android:layout_height="match_parent"
        android:gravity="center_vertical"
        android:orientation="vertical" />

</LinearLayout>

- 1
- 2
- 3
- 4
- 5
- 6
- 7
- 8
- 9
- 10
- 11
- 12
- 13
- 14
- 15
- 16
- 17
- 18
- 19
- 20
- 21
- 22
- 23
- 24
- 25
- 26
- 27
- 28
- 29
- 30
- 31
- 32
- 33
- 34
- 35
- 36
- 37
- 38
- 39
- 40
- 41
- 42
- 43
- 44
- 45
- 46
- 47
- 48
- 49
- 50
- 51
- 52
- 53
- 54
- 55
可以看到对应 Preference 基本属性 icon、title、summary,最外层布局为 LinearLayout,我们是不是可以通过修改
LinearLayout 的 background 属性来实现我们想要的效果呢?答案是可以的,巧的是 Preference 中提供了修改 layoutid 方法
public void setLayoutResource(int layoutResId) {
        mLayoutResId = layoutResId;
    }
- 1
- 2
- 3
google 已经贴心的给我们预留了定制接口,
在 xml 中使用 android:layout="@layout/card_preference"
在 java 中使用 mPreference.setLayoutResource(R.layout.card_preference)
这样我们就不用去修改 preference.xml 源码,copy preference.xml 保证里面的 id 对应即可,其它的随你定义。
接下来就让我们来实现上图的效果吧
1、新建圆角矩形 drawable 资源文件
card_style.xml
<?xml version="1.0" encoding="utf-8"?>
<shape xmlns:android="http://schemas.android.com/apk/res/android"
    android:shape="rectangle">
    <solid android:color="@color/cardBgColor" />
    <stroke
        android:width="1dp"
        android:color="@color/cardBgColor" />
    <corners android:radius="@dimen/card_corner_radius"/>
</shape>
- 1
- 2
- 3
- 4
- 5
- 6
- 7
- 8
- 9
- 10
card_style_top.xml
<?xml version="1.0" encoding="utf-8"?>
<shape xmlns:android="http://schemas.android.com/apk/res/android"
    android:shape="rectangle">
    <solid android:color="@color/cardBgColor" />
    <stroke
        android:width="1dp"
        android:color="@color/cardBgColor" />
    <corners
        android:topLeftRadius="@dimen/card_corner_radius"
        android:topRightRadius="@dimen/card_corner_radius"
        android:bottomRightRadius="0dp"
        android:bottomLeftRadius="0dp"/>
</shape>
- 1
- 2
- 3
- 4
- 5
- 6
- 7
- 8
- 9
- 10
- 11
- 12
- 13
card_style_middle.xml
<?xml version="1.0" encoding="utf-8"?>
<shape xmlns:android="http://schemas.android.com/apk/res/android"
    android:shape="rectangle">
    <solid android:color="@color/cardBgColor" />
    <stroke
        android:width="1dp"
        android:color="@color/cardBgColor" />
    <corners android:radius="0dp"/>
</shape>
- 1
- 2
- 3
- 4
- 5
- 6
- 7
- 8
- 9
card_style_bottom.xml
<?xml version="1.0" encoding="utf-8"?>
<shape xmlns:android="http://schemas.android.com/apk/res/android"
    android:shape="rectangle">
    <solid android:color="@color/cardBgColor" />
    <stroke
        android:width="1dp"
        android:color="@color/cardBgColor" />
    <corners
        android:topLeftRadius="0dp"
        android:topRightRadius="0dp"
        android:bottomRightRadius="@dimen/card_corner_radius"
        android:bottomLeftRadius="@dimen/card_corner_radius"/>
</shape>
- 1
- 2
- 3
- 4
- 5
- 6
- 7
- 8
- 9
- 10
- 11
- 12
- 13
对应 color 和 dimen
<color name="cardBgColor">#9C9C9C</color>

<dimen name="card_corner_radius">30dp</dimen>
- 1
- 2
- 3
2、新建圆角矩形 layout 布局文件
card_preference.xml card_preference_top.xml card_preference_middle.xml card_preference_bottom.xml
card_preference.xml
<?xml version="1.0" encoding="utf-8"?>
<LinearLayout xmlns:android="http://schemas.android.com/apk/res/android"
    android:layout_width="match_parent"
    android:layout_height="wrap_content"
    android:layout_marginLeft="20dp"
    android:layout_marginRight="20dp"
    android:background="@drawable/card_style"
    android:gravity="center_vertical"
    android:minHeight="?android:attr/listPreferredItemHeight"
    android:paddingEnd="?android:attr/scrollbarSize">

    <ImageView
        android:id="@android:id/icon"
        android:layout_width="wrap_content"
        android:layout_height="wrap_content"
        android:layout_gravity="center" />

    <RelativeLayout
        android:layout_width="wrap_content"
        android:layout_height="wrap_content"
        android:layout_marginStart="15dip"
        android:layout_marginTop="6dip"
        android:layout_marginEnd="6dip"
        android:layout_marginBottom="6dip"
        android:layout_weight="1">

        <TextView
            android:id="@android:id/title"
            android:layout_width="wrap_content"
            android:layout_height="wrap_content"
            android:ellipsize="marquee"
            android:fadingEdge="horizontal"
            android:singleLine="true" />

        <TextView
            android:id="@android:id/summary"
            android:layout_width="wrap_content"
            android:layout_height="wrap_content"
            android:layout_below="@android:id/title"
            android:layout_alignStart="@android:id/title"
            android:maxLines="4"
            android:textColor="?android:attr/textColorSecondary" />

    </RelativeLayout>

    <!-- Preference should place its actual preference widget here. -->
    <LinearLayout
        android:id="@android:id/widget_frame"
        android:layout_width="wrap_content"
        android:layout_height="match_parent"
        android:gravity="center_vertical"
        android:orientation="vertical" />

</LinearLayout>
- 1
- 2
- 3
- 4
- 5
- 6
- 7
- 8
- 9
- 10
- 11
- 12
- 13
- 14
- 15
- 16
- 17
- 18
- 19
- 20
- 21
- 22
- 23
- 24
- 25
- 26
- 27
- 28
- 29
- 30
- 31
- 32
- 33
- 34
- 35
- 36
- 37
- 38
- 39
- 40
- 41
- 42
- 43
- 44
- 45
- 46
- 47
- 48
- 49
- 50
- 51
- 52
- 53
- 54
其余布局文件copy card_preference.xml 修改 android:background="@drawable/card_style" 为对应 drawable 即可
3、主角登场 xml 目录下新建 grouppe.xml 文件
<?xml version="1.0" encoding="utf-8"?>
<PreferenceScreen xmlns:android="http://schemas.android.com/apk/res/android"
    xmlns:targetpre="http://schemas.android.com/apk/res-auto"
    android:key="root">

    <PreferenceCategory
        android:key="fpc"
        android:title="first bold">
        <SwitchPreference
            android:defaultValue="true"
            android:key="pref_is_full_app"
            android:layout="@layout/card_preference"
            android:persistent="true"
            android:summary="is_full_app_desc"
            android:title="@string/app_name" />
        <Preference
            android:key="go_launcher"
            android:persistent="false"
            android:title="go_launcher_title">
            <intent
                android:targetClass="com.android.launcher3.Launcher"
                android:targetPackage="com.android.launcher3" />
        </Preference>
    </PreferenceCategory>

    <PreferenceCategory
        android:title=""
        targetpre:card_style="top">
        <Preference
            android:icon="@drawable/ic_sim"
            android:key="red"
            android:persistent="false"
            android:summary="CardPreferenceCategory"
            android:title="@string/app_name" />
    </PreferenceCategory>

    <PreferenceCategory>
        <Preference
            android:icon="@drawable/ic_sim"
            android:key="blue"
            android:layout="@layout/card_preference_top"
            android:persistent="false"
            android:summary="红"
            android:title="@string/app_name">
            <intent android:action="android.settings.DEVICE_INFO_SETTINGS" />
        </Preference>
        <Preference
            android:icon="@drawable/ic_sim"
                android:layout="@layout/card_preference_middle"
            android:persistent="false"
            android:summary="黄"
            android:title="@string/app_name">
            <intent android:action="android.settings.DEVICE_INFO_SETTINGS" />
        </Preference>
        <Preference
            android:icon="@drawable/ic_sim"
            android:layout="@layout/card_preference_bottom"
            android:persistent="false"
            android:summary="蓝"
            android:title="@string/app_name">
            <intent android:action="android.settings.DEVICE_INFO_SETTINGS" />
        </Preference>
    </PreferenceCategory>

    <!--for divide-->
    <Preference
        android:selectable="false"/>

    <SwitchPreference
        android:defaultValue="true"
        android:layout="@layout/card_preference"
        android:persistent="true"
        android:summary="just see color"
        android:title="@string/app_name" />

</PreferenceScreen>
- 1
- 2
- 3
- 4
- 5
- 6
- 7
- 8
- 9
- 10
- 11
- 12
- 13
- 14
- 15
- 16
- 17
- 18
- 19
- 20
- 21
- 22
- 23
- 24
- 25
- 26
- 27
- 28
- 29
- 30
- 31
- 32
- 33
- 34
- 35
- 36
- 37
- 38
- 39
- 40
- 41
- 42
- 43
- 44
- 45
- 46
- 47
- 48
- 49
- 50
- 51
- 52
- 53
- 54
- 55
- 56
- 57
- 58
- 59
- 60
- 61
- 62
- 63
- 64
- 65
- 66
- 67
- 68
- 69
- 70
- 71
- 72
- 73
- 74
- 75
- 76
4、新建 CardActivity.java 继承 PreferenceActivity, 加载 grouppe 布局
public class CardActivity extends PreferenceActivity {
    @Override
    protected void onCreate(Bundle savedInstanceState) {
        super.onCreate(savedInstanceState);
        addPreferencesFromResource(R.xml.grouppe);
    }
}
- 1
- 2
- 3
- 4
- 5
- 6
- 7
- 8
小技巧
为了让多个 Preference 子项紧邻形成一组,需要用 PreferenceCategory 包裹
为了让卡片和单个 Preference 之前增加空行间隔,可以使用空白的 Preference 并设置不可点击 android:selectable=“false”
[详细] -->赞
踩

