
热门标签
热门文章
- 1C++的errorC2039_c2039错误
- 2手把手Verilog HDL同步Vaild-Ready握手FIFO机制_fifo读写握手控制
- 3GDB之解决ptrace反调试手段(八)_gdb trace
- 4绝了绝了!员工因Bug事故被强制要求归还年终奖,否则就收滞纳金且免费开除
- 5fork()函数 图解
- 6放弃吧,这 5 种即将消亡的编程语言_2002年停止更新编程语言
- 7word 段落格式小技巧_word文档前面段落格式
- 8校园网环境下物理机配置OpenStack_openstack 物理网卡配置em
- 9【Unity】XPS模型导入Unity(支持VRChat)
- 10彻底理解位运算——与(&)、非(~)、或(|)、异或(^)_与或非异或
当前位置: article > 正文
Java微信公众号消息推送_公众号发送新闻 java
作者:小蓝xlanll | 2024-03-14 08:59:26
赞
踩
公众号发送新闻 java
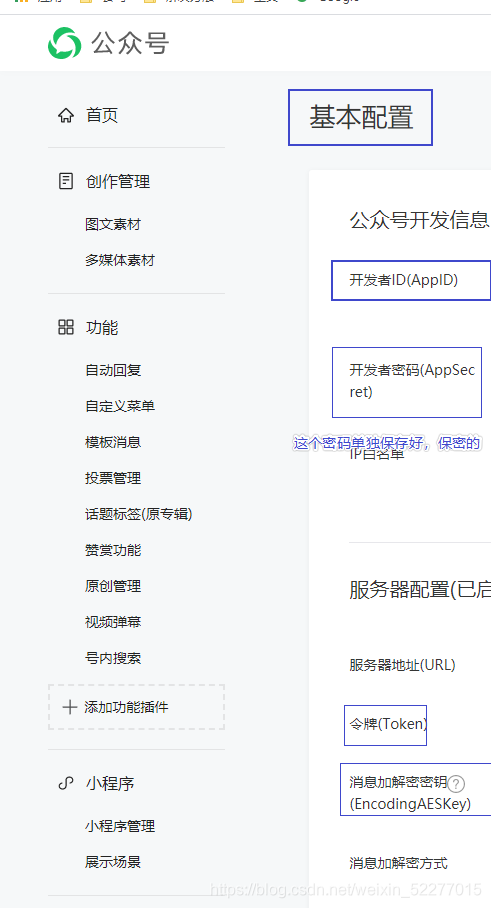
一、在项目的配置文件中配置公众号信息
# 微信公众号配置
wx:
  appid: **********
  secret: **************
  token: *********************
  aeskey: ****************************
- 1
- 2
- 3
- 4
- 5
- 6
二、创建公众号类、达到将数据注入的目的
@Component
@ConfigurationProperties(prefix = "wx")
public class WxMpProperties {

    /**
     * 公众号appId
     */
    private String appId;

    /**
     * 公众号appSecret
     */
    private String secret;

    /**
     * 公众号token
     */
    private String token;

    /**
     * 公众号aesKey
     */
    private String aesKey;

    public String getAppId() {
        return appId;
    }

    public void setAppId(String appId) {
        this.appId = appId;
    }

    public String getSecret() {
        return secret;
    }

    public void setSecret(String secret) {
        this.secret = secret;
    }

    public String getToken() {
        return token;
    }

    public void setToken(String token) {
        this.token = token;
    }

    public String getAesKey() {
        return aesKey;
    }

    public void setAesKey(String aesKey) {
        this.aesKey = aesKey;
    }
}

- 1
- 2
- 3
- 4
- 5
- 6
- 7
- 8
- 9
- 10
- 11
- 12
- 13
- 14
- 15
- 16
- 17
- 18
- 19
- 20
- 21
- 22
- 23
- 24
- 25
- 26
- 27
- 28
- 29
- 30
- 31
- 32
- 33
- 34
- 35
- 36
- 37
- 38
- 39
- 40
- 41
- 42
- 43
- 44
- 45
- 46
- 47
- 48
- 49
- 50
- 51
- 52
- 53
- 54
- 55
- 56
- 57
三、创建配置类将公众号所需对象自动注入
@Configuration
public class WxConfig {
    private final WxMpProperties wxMpProperties;

    /**
     * 构造注入
     *
     * @param wxMpProperties
     */
    WxConfig(WxMpProperties wxMpProperties) {
        this.wxMpProperties = wxMpProperties;
    }

    /**
     * 微信客户端配置存储
     *
     * @return
     */
    @Bean
    public WxMpConfigStorage wxMpConfigStorage() {
        WxMpDefaultConfigImpl configStorage = new WxMpDefaultConfigImpl();
        // 公众号appId
        configStorage.setAppId(wxMpProperties.getAppId());
        // 公众号appSecret
        configStorage.setSecret(wxMpProperties.getSecret());
        // 公众号Token
        configStorage.setToken(wxMpProperties.getToken());
        // 公众号EncodingAESKey
        configStorage.setAesKey(wxMpProperties.getAesKey());
        return configStorage;
    }

    /**
     * 声明实例
     *
     * @return
     */
    @Bean
    public WxMpService wxMpService() {
        WxMpService wxMpService = new WxMpServiceImpl();
        wxMpService.setWxMpConfigStorage(wxMpConfigStorage());
        return wxMpService;
    }
}
- 1
- 2
- 3
- 4
- 5
- 6
- 7
- 8
- 9
- 10
- 11
- 12
- 13
- 14
- 15
- 16
- 17
- 18
- 19
- 20
- 21
- 22
- 23
- 24
- 25
- 26
- 27
- 28
- 29
- 30
- 31
- 32
- 33
- 34
- 35
- 36
- 37
- 38
- 39
- 40
- 41
- 42
- 43
- 44
三、实现发送信息的功能
@Component
public class WxMsgPush {
    /**
     * 微信公众号API的Service
     */
    private final WxMpService wxMpService;

    Logger logger = LoggerFactory.getLogger(getClass());

    /**
     * 构造注入
     */
    WxMsgPush(WxMpService wxMpService) {
        this.wxMpService = wxMpService;
    }


    /**
     * 发送微信模板信息
     *
     * @param openId 接受者openId
     * @return 是否推送成功
     */
    public Boolean SendWxMsg(String openId) {
        // 发送模板消息接口
        WxMpTemplateMessage templateMessage = WxMpTemplateMessage.builder()
                // 接收者openid
                .toUser(openId)
                // 模板id
                .templateId("********************************")
                // 模板跳转链接(自定义)
                .url("http://www.baidu.com")
                .build();
        // 添加模板数据
        templateMessage.addData(new WxMpTemplateData("first", "*****", "#FF00FF"))
                .addData(new WxMpTemplateData("keyword1", "2021-01-28至2021-02-07", "#A9A9A9"))
                .addData(new WxMpTemplateData("keyword2", "***", "#FF00FF"))
                .addData(new WxMpTemplateData("keyword3","*****"))
                .addData(new WxMpTemplateData("remark", "这还是个测试", "#000000"));
        String msgId = null;
        try {
            // 发送模板消息
            msgId = wxMpService.getTemplateMsgService().sendTemplateMsg(templateMessage);
        } catch (WxErrorException e) {
            e.printStackTrace();
        }
        logger.warn("·==++--·推送微信模板信息:{}·--++==·", msgId != null ? "成功" : "失败");
        return msgId != null;
    }
}
- 1
- 2
- 3
- 4
- 5
- 6
- 7
- 8
- 9
- 10
- 11
- 12
- 13
- 14
- 15
- 16
- 17
- 18
- 19
- 20
- 21
- 22
- 23
- 24
- 25
- 26
- 27
- 28
- 29
- 30
- 31
- 32
- 33
- 34
- 35
- 36
- 37
- 38
- 39
- 40
- 41
- 42
- 43
- 44
- 45
- 46
- 47
- 48
- 49
- 50
模板id:
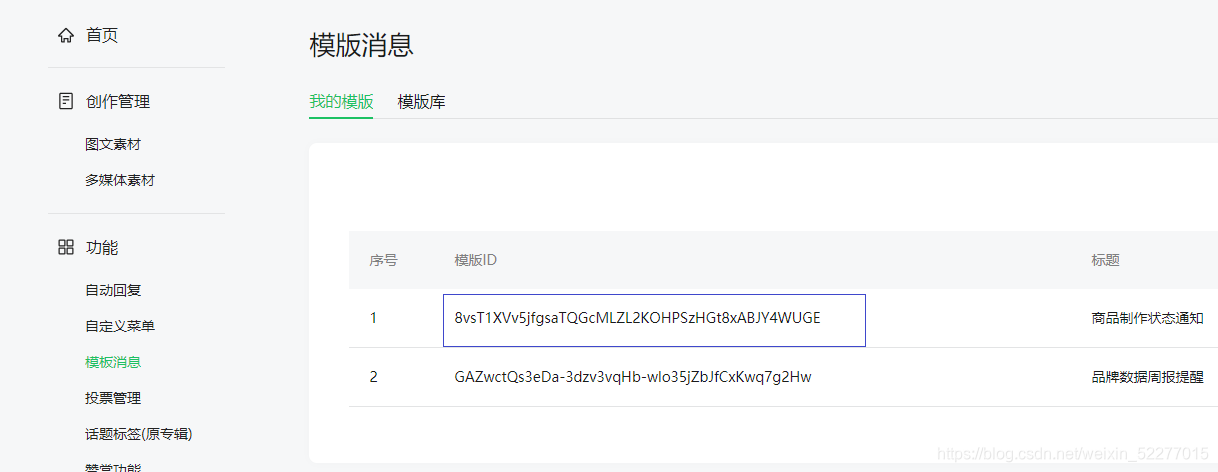
没有可以先添加:

四、创建Controller层
@RestController
@RequestMapping(value = "/api/wxaccount",method = RequestMethod.POST)
public class SendWxAccountApi {
    /**
     * 微信消息推送
     */
    private WxMsgPush wxMsgPush;

    /**
     * 构造注入
     */
    protected SendWxAccountApi(WxMsgPush wxMsgPush) {
        this.wxMsgPush = wxMsgPush;
    }

    /**
     * 发送微信模板消息
     */
    @ApiOperation("发送微信模板消息")
    @ApiImplicitParams({
            @ApiImplicitParam(name = "openId", value = "接受者openId", dataType = "String", paramType = "query")
    })
    @PostMapping("sendWxInfo")
    public void sendWxInfo(String openId) {
        // 执行发送
        Boolean aBoolean = wxMsgPush.SendWxMsg(openId);
        System.out.println(aBoolean);
    }

}
- 1
- 2
- 3
- 4
- 5
- 6
- 7
- 8
- 9
- 10
- 11
- 12
- 13
- 14
- 15
- 16
- 17
- 18
- 19
- 20
- 21
- 22
- 23
- 24
- 25
- 26
- 27
- 28
- 29
- 30
- 31
声明:本文内容由网友自发贡献,不代表【wpsshop博客】立场,版权归原作者所有,本站不承担相应法律责任。如您发现有侵权的内容,请联系我们。转载请注明出处:https://www.wpsshop.cn/w/小蓝xlanll/article/detail/232833
推荐阅读
相关标签

