
- 1Kubernetes — Flannel CNI_flannel v0.11.0队员cni plugin版本
- 2数字人解决方案——LivePortrait实现表情姿态极速迁移
- 3马赛克与目标清除工具分享(lama-cleaner)
- 4Git常用命令show和status和config_git show
- 5国产AI之光!KIMI大模型详细使用入门指南(非常详细)零基础入门到精通,收藏这一篇就够了_kimi从零基础到精通
- 6Zookeeper+Dubbo集成基本准备环境搭建
- 7python ERA5 画水汽通量散度图地图:风速风向矢量图、叠加等高线、色彩分级、添加shp文件、添加位置点及备注_python绘制水汽通量图
- 8Spring Security6.x的登录验证_spring-security 6 配置userdetailsservice
- 945、SpringBoot文件上传到指定磁盘路径 及 上传成功后的文件回显_springboot上传文件到指定文件夹
- 10Redis 作为缓存服务器的配置
Spring Boot使用Netty实现客户端与服务器通信_springboot netty回复客户端
赞
踩
一、服务端
1、添加Maven依赖
- <parent>
- <groupId>org.springframework.boot</groupId>
- <artifactId>spring-boot-starter-parent</artifactId>
- <version>2.1.3.RELEASE</version>
- </parent>
-
- <dependencies>
- <dependency>
- <groupId>org.springframework.boot</groupId>
- <artifactId>spring-boot-starter-web</artifactId>
- </dependency>
-
- <dependency>
- <groupId>io.netty</groupId>
- <artifactId>netty-all</artifactId>
- <version>5.0.0.Alpha2</version>
- </dependency>
-
- <dependency>
- <groupId>com.alibaba</groupId>
- <artifactId>fastjson</artifactId>
- <version>1.2.59</version>
- </dependency>
-
- <dependency>
- <groupId>org.projectlombok</groupId>
- <artifactId>lombok</artifactId>
- <optional>true</optional>
- </dependency>
- </dependencies>

2、application.yml
- server:
- port: 8001
3、启动类
- @SpringBootApplication
- public class NettyServerApplication implements CommandLineRunner {
-
- @Autowired
- private NettyServerBootStrap serverBootStrap;
-
- public static void main(String[] args) {
- SpringApplication.run(NettyServerApplication.class, args);
- }
-
- @Override
- public void run(String... args) throws Exception {
- serverBootStrap.start();
- }
- }
4、NettyServerBootStrap
- @Component
- @Slf4j
- public class NettyServerBootStrap {
-
- @Autowired
- private NettyServerHandler nettyServerHandler;
-
- public void start() throws InterruptedException {
- EventLoopGroup boss = new NioEventLoopGroup();
- EventLoopGroup worker = new NioEventLoopGroup();
- ServerBootstrap bootstrap = new ServerBootstrap();
- try {
- bootstrap.group(boss, worker)
- .channel(NioServerSocketChannel.class)
- .option(ChannelOption.SO_BACKLOG, 128)
- // 使消息立即发出去,不用等待到一定的数据量才发出去
- .option(ChannelOption.TCP_NODELAY, true)
- // 保持长连接状态
- .childOption(ChannelOption.SO_KEEPALIVE, true)
- .childHandler(new ChannelInitializer<SocketChannel>() {
- @Override
- protected void initChannel(SocketChannel socketChannel) throws Exception {
- ChannelPipeline p = socketChannel.pipeline();
- p.addLast(new StringDecoder(CharsetUtil.UTF_8));
- p.addLast(new StringEncoder(CharsetUtil.UTF_8));
- p.addLast(nettyServerHandler);
- }
- });
- // 绑定端口,同步等待成功
- ChannelFuture f = bootstrap.bind(5678).sync();
- if (f.isSuccess()) {
- log.info("Netty Start successful");
- } else {
- log.error("Netty Start failed");
- }
- // 等待服务监听端口关闭
- f.channel().closeFuture().sync();
- } finally {
- // 退出,释放线程资源
- worker.shutdownGracefully();
- boss.shutdownGracefully();
- }
- }
-
- }
5、NettyServerHandler
- @Component
- @ChannelHandler.Sharable
- @Slf4j
- public class NettyServerHandler extends SimpleChannelInboundHandler<String> {
-
- /**
- * @Description 客户端断开连接时执行,将客户端信息从Map中移除
- * @param ctx
- * @Date 2019/8/28 14:22
- * @Author wuyong
- * @return
- **/
- @Override
- public void channelInactive(ChannelHandlerContext ctx) throws Exception {
- log.info("客户端断开连接:{}", getClientIp(ctx.channel()));
- NettyChannelMap.remove((SocketChannel) ctx.channel());
- }
-
- /**
- * @Description 客户端连接时执行,将客户端信息保存到Map中
- * @param ctx
- * @Date 2019/8/28 14:22
- * @Author wuyong
- * @return
- **/
- @Override
- public void channelActive(ChannelHandlerContext ctx) throws Exception {
- log.info("有新的客户端连接:{}", getClientIp(ctx.channel()));
- String clientIp = getClientIp(ctx.channel());
- NettyClient client = new NettyClient((SocketChannel) ctx.channel(), getClientIp(ctx.channel()));
- NettyChannelMap.add(clientIp, client);
- }
-
- /**
- * @Description 收到消息时执行,根据消息类型做不同的处理
- * @param ctx
- * @param msg
- * @Date 2019/8/28 14:33
- * @Author wuyong
- * @return
- **/
- @Override
- public void messageReceived(ChannelHandlerContext ctx, String msg) throws Exception {
- log.info("收到客户端消息:" + msg);
- // 这个消息一般是结构化的数据,比如JSON字符串,解析这个JSON字符串,做相应的逻辑处理
- JSONObject msgObj = JSON.parseObject(msg);
- String msgType = msgObj.getString("msgType");
- switch (msgType) {
- // 回复客户端请求
- case "req":
- doReply(ctx);
- break;
-
- default:
- break;
- }
- }
-
- /**
- * @description: TODO
- * @param ctx
- * @param cause
- * @Author: wuyong
- * @Date: 2019/08/30 13:41:51
- * @return: void
- */
- @Override
- public void exceptionCaught(ChannelHandlerContext ctx, Throwable cause) throws Exception {
- log.info("抛出异常执行,包括客户端断开连接时,会抛出IO异常");
- }
-
- /**
- * @description: 当收到客户端的消息后,进行处理
- * @param ctx
- * @Author: wuyong
- * @Date: 2019/08/30 14:10:59
- * @return: void
- */
- private void doReply(ChannelHandlerContext ctx) {
- String reply = "{\"msgType\":\"reply\",\"data\":\"回复的数据\"}";
- ctx.channel().writeAndFlush(reply);
- }
-
- /**
- * @Description 获取客户端IP
- * @param channel
- * @Date 2019/8/28 14:32
- * @Author wuyong
- * @return
- **/
- private String getClientIp(Channel channel) {
- InetSocketAddress inetSocketAddress = (InetSocketAddress) channel.remoteAddress();
- String clientIP = inetSocketAddress.getAddress().getHostAddress();
- return clientIP;
- }
-
- /**
- * @Description 当有新的客户端连接的时候,用于保存客户端信息
- * @Date 2019/8/28 14:20
- * @Author wuyong
- * @return
- **/
- public static class NettyChannelMap {
-
- public static Map<String, NettyClient> map = new ConcurrentHashMap<>();
-
- public static void add(String clientId, NettyClient client) {
- map.put(clientId, client);
- }
-
- public static NettyClient get(String clientId) {
- return map.get(clientId);
- }
-
- public static void remove(SocketChannel socketChannel) {
- for (Map.Entry entry : map.entrySet()) {
- if (((NettyClient) entry.getValue()).getChannel() == socketChannel) {
- map.remove(entry.getKey());
- }
- }
- }
- }
-
- /**
- * @Description 封装客户端的信息
- * @Date 2019/8/28 14:21
- * @Author wuyong
- * @return
- **/
- @Data
- public static class NettyClient {
-
- /**客户端与服务器的连接*/
- private SocketChannel channel;
-
- /**ip地址*/
- private String clientIp;
-
- // ......
-
- public NettyClient(SocketChannel channel, String clientIp) {
- this.channel = channel;
- this.clientIp = clientIp;
- }
-
- }
-
- }
至此,一个简单的Netty服务端就完成了。接下来写一个Controller,用于获取当前在线的客户端列表:
6、NettyServerController
- @RestController
- @RequestMapping("/server")
- public class NettyServerController {
-
- @GetMapping("/clientList")
- public Map<String, NettyServerHandler.NettyClient> clientList() {
- return NettyServerHandler.NettyChannelMap.map;
- }
-
- }
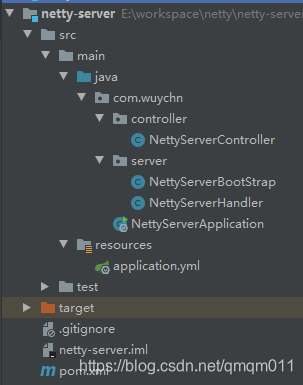
项目结构如下:
二、客户端
客户端添加的依赖、配置文件以及启动类和服务端类似。
1、NettyClientBootStrap
- @Component
- @Slf4j
- public class NettyClientBootStrap {
-
- private static final String HOST = "localhost";
- private static final int PORT = 5678;
- private static SocketChannel socketChannel = null;
-
- public void start() throws InterruptedException {
- EventLoopGroup eventLoopGroup = new NioEventLoopGroup();
- Bootstrap bootstrap = new Bootstrap();
- bootstrap.channel(NioSocketChannel.class);
- bootstrap.option(ChannelOption.SO_KEEPALIVE, true);
- bootstrap.group(eventLoopGroup);
- bootstrap.remoteAddress(HOST, PORT);
- bootstrap.handler(new ChannelInitializer<SocketChannel>() {
- @Override
- protected void initChannel(SocketChannel socketChannel) throws Exception {
- socketChannel.pipeline().addLast(new IdleStateHandler(20, 10, 0));
- socketChannel.pipeline().addLast(new StringEncoder(CharsetUtil.UTF_8));
- socketChannel.pipeline().addLast(new StringDecoder(CharsetUtil.UTF_8));
- socketChannel.pipeline().addLast(new NettyClientHandler());
- }
- });
- ChannelFuture future = bootstrap.connect(HOST, PORT).sync();
- if (future.isSuccess()) {
- socketChannel = (SocketChannel) future.channel();
- log.info("connect server success");
- }
- }
-
- public static SocketChannel getSocketChannel() {
- return socketChannel;
- }
-
- }
2、NettyClientHandler
- @Component
- @Slf4j
- @ChannelHandler.Sharable
- public class NettyClientHandler extends SimpleChannelInboundHandler<String> {
-
- @Override
- public void channelInactive(ChannelHandlerContext ctx) throws Exception {
- log.info("断开连接执行");
- }
-
- @Override
- public void channelActive(ChannelHandlerContext ctx) throws Exception {
- log.info("连接成功执行");
- }
-
- @Override
- protected void messageReceived(ChannelHandlerContext ctx, String msg) throws Exception {
- log.info("收到消息执行:" + msg);
- }
-
- @Override
- public void exceptionCaught(ChannelHandlerContext ctx, Throwable cause) throws Exception {
- log.info("抛出异常执行");
- }
- }
3、编写一个Controller,用于向服务器发送消息:
- @RestController
- @RequestMapping("/client")
- public class NettyClientController {
-
- /**
- * @description: 模拟向服务器发送消息
- * @param
- * @Author: wuyong
- * @Date: 2019/08/30 14:10:09
- * @return: java.lang.String
- */
- @RequestMapping("/req")
- public String req() {
- String msg = "{\"msgType\":\"req\",\"clientId\":\"请求数据\"}";
- NettyClientBootStrap.getSocketChannel().writeAndFlush(msg);
- return "success";
- }
-
- }
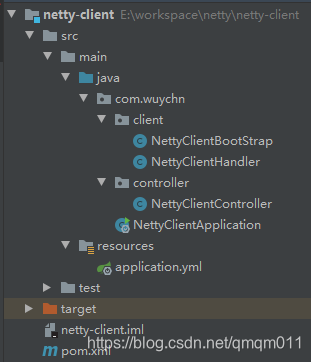
客户端的结构如下:
三、测试
首先启动服务端:
![]()
然后启动客户端,启动成功后可以看到如下输出:

然后查看服务端的控制台:
![]()
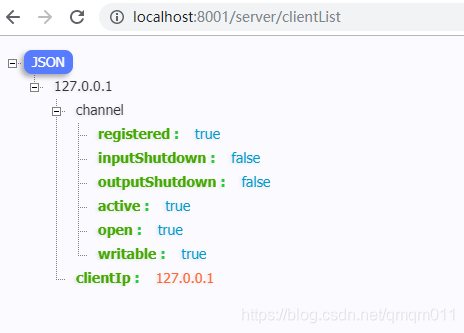
在浏览器中访问http://localhost:8001/server/clientList,可以看到确实注册成功了:
接下来使用客户端向服务器发消息,在浏览器中执行http://localhost:8002/client/req,在服务端的控制台输出如下信息:
![]()
客户端的控制台输出了如下信息:
![]()
接下来断开客户端的连接,在服务端的控制台输出了如下信息:

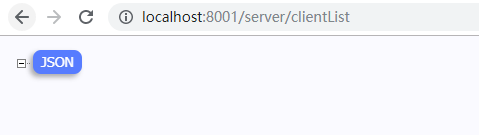
查看客户端列表,也为空了:
四、使用Socket连接服务器
也可以直接使用Socket连接Netty服务器,编写一个简单的Demo如下:
- public class Client {
-
- public static void main(String[] args) throws IOException, InterruptedException {
- Socket socket = new Socket("localhost", 5678);
-
- // 向服务器发消息
- OutputStream outputStream = socket.getOutputStream();
- String msg = "{\"msgType\":\"req\",\"clientId\":\"请求数据\"}";
- outputStream.write(msg.getBytes(CharsetUtil.UTF_8));
- outputStream.flush();
-
- Thread.sleep(1000);
- BufferedReader br = new BufferedReader(new InputStreamReader(socket.getInputStream()));
- char[] ch = new char[65536];
- int len = -1;
- while ((len = br.read(ch)) != -1) {
- String result = new String(ch, 0, len);
- System.out.println("服务器返回数据:" + result);
- }
- }
-
- }
运行main方法,可以看到控制台输出:
服务器返回数据:{"msgType":"reply","data":"回复的数据"}五、粘包/拆包
正常情况下,一条消息是一个整体,一次接收到的消息只会是一条。但是实际情况下,收到的消息可能是多条消息粘在一起,或者一条消息被拆分成了多条。这就是所谓的粘包/拆包。产生粘包和拆包问题的主要原因是,操作系统在发送TCP数据的时候,底层会有一个缓冲区,例如1024个字节大小,如果一次请求发送的数据量比较小,没达到缓冲区大小,TCP则会将多个请求合并为同一个请求进行发送,这就形成了粘包问题;如果一次请求发送的数据量比较大,超过了缓冲区大小,TCP就会将其拆分为多次发送,这就是拆包,也就是将一个大的包拆分为多个小包进行发送。
对于粘包和拆包问题,常见的解决方案有四种(https://my.oschina.net/zhangxufeng/blog/3023794):
1、客户端在发送数据包的时候,每个包都固定长度,比如1024个字节大小,如果客户端发送的数据长度不足1024个字节,则通过补充空格的方式补全到指定长度(FixedLengthFrameDecoder解码器)。
2、客户端在每个包的末尾使用固定的分隔符,例如\r\n,如果一个包被拆分了,则等待下一个包发送过来之后找到其中的\r\n,然后对其拆分后的头部部分与前一个包的剩余部分进行合并,这样就得到了一个完整的包(LineBasedFrameDecoder或DelimiterBasedFrameDecoder解码器)。
3、将消息分为消息头和消息体,在头部中保存有当前整个消息的长度,只有在读取到足够长度的消息之后才算是读到了一个完整的消息(LengthFieldBasedFrameDecoder和LengthFieldPrepender)。
4、通过自定义协议进行粘包和拆包的处理(通过继承LengthFieldBasedFrameDecoder和LengthFieldPrepender来实现粘包和拆包的处理)。
首先,模拟一下粘包和拆包的问题。
修改NettyClientController,连续向服务器发送20条消息:
- private void doReply(ChannelHandlerContext ctx) {
- String reply = "{\"msgType\":\"reply\",\"data\":\"回复的数据\"}";
- for (int i = 0; i < 20; i++) {
- ctx.channel().writeAndFlush(reply);
- }
- }
查看服务端的控制台,输出如下:
- 2019-08-30 15:35:52.330 INFO 5772 --- [ntLoopGroup-1-0] com.wuychn.server.NettyServerHandler : 收到客户端消息:{"msgType":"req","clientId":"请求数据"}
- 2019-08-30 15:35:52.331 INFO 5772 --- [ntLoopGroup-1-0] com.wuychn.server.NettyServerHandler : 收到客户端消息:{"msgType":"req","clientId":"请求数据"}
- 2019-08-30 15:35:52.331 INFO 5772 --- [ntLoopGroup-1-0] com.wuychn.server.NettyServerHandler : 收到客户端消息:{"msgType":"req","clientId":"请求数据"}{"msgType":"req","clientId":"请求数据"}{"msgType":"req","clientId":"请求数据"}{"msgType":"req","clientId":"请求数据"}{"msgType":"req","clientId":"请求数据"}
- 2019-08-30 15:35:52.331 INFO 5772 --- [ntLoopGroup-1-0] com.wuychn.server.NettyServerHandler : 抛出异常执行,包括客户端断开连接时,会抛出IO异常
- 2019-08-30 15:35:52.331 INFO 5772 --- [ntLoopGroup-1-0] com.wuychn.server.NettyServerHandler : 收到客户端消息:{"msgType":"req","clientId":"请求数据"}{"msgType":"req","clientId":"请求数据"}{"msgType":"req","clientId":"请求数据"}
- 2019-08-30 15:35:52.331 INFO 5772 --- [ntLoopGroup-1-0] com.wuychn.server.NettyServerHandler : 抛出异常执行,包括客户端断开连接时,会抛出IO异常
- 2019-08-30 15:35:52.331 INFO 5772 --- [ntLoopGroup-1-0] com.wuychn.server.NettyServerHandler : 收到客户端消息:{"msgType":"req","clientId":"请求数据"}{"msgType":"req","clientId":"请求数据"}
- 2019-08-30 15:35:52.332 INFO 5772 --- [ntLoopGroup-1-0] com.wuychn.server.NettyServerHandler : 抛出异常执行,包括客户端断开连接时,会抛出IO异常
- 2019-08-30 15:35:52.332 INFO 5772 --- [ntLoopGroup-1-0] com.wuychn.server.NettyServerHandler : 收到客户端消息:{"msgType":"req","clientId":"请求数据"}{"msgType":"req","clientId":"请求数据"}
- 2019-08-30 15:35:52.332 INFO 5772 --- [ntLoopGroup-1-0] com.wuychn.server.NettyServerHandler : 抛出异常执行,包括客户端断开连接时,会抛出IO异常
- 2019-08-30 15:35:52.332 INFO 5772 --- [ntLoopGroup-1-0] com.wuychn.server.NettyServerHandler : 收到客户端消息:{"msgType":"req","clientId":"请求数据"}{"msgType":"req","clientId":"请求数据"}
- 2019-08-30 15:35:52.332 INFO 5772 --- [ntLoopGroup-1-0] com.wuychn.server.NettyServerHandler : 抛出异常执行,包括客户端断开连接时,会抛出IO异常
- 2019-08-30 15:35:52.332 INFO 5772 --- [ntLoopGroup-1-0] com.wuychn.server.NettyServerHandler : 收到客户端消息:{"msgType":"req","clientId":"请求数据"}{"msgType":"req","clientId":"请求数据"}
- 2019-08-30 15:35:52.332 INFO 5772 --- [ntLoopGroup-1-0] com.wuychn.server.NettyServerHandler : 抛出异常执行,包括客户端断开连接时,会抛出IO异常
- 2019-08-30 15:35:52.332 INFO 5772 --- [ntLoopGroup-1-0] com.wuychn.server.NettyServerHandler : 收到客户端消息:{"msgType":"req","clientId":"请求数据"}{"msgType":"req","clientId":"请求数据"}
- 2019-08-30 15:35:52.332 INFO 5772 --- [ntLoopGroup-1-0] com.wuychn.server.NettyServerHandler : 抛出异常执行,包括客户端断开连接时,会抛出IO异常
可知第三条消息就发生了粘包的问题。我这里采用在末尾加特定的分隔符(\r\n)的方式来解决。
修改NettyServerBootstrap,添加一个LineBasedFrameDecoder解码器:
- @Component
- @Slf4j
- public class NettyServerBootStrap {
-
- @Autowired
- private NettyServerHandler nettyServerHandler;
-
- public void start() throws InterruptedException {
- EventLoopGroup boss = new NioEventLoopGroup();
- EventLoopGroup worker = new NioEventLoopGroup();
- ServerBootstrap bootstrap = new ServerBootstrap();
- try {
- bootstrap.group(boss, worker)
- .channel(NioServerSocketChannel.class)
- .option(ChannelOption.SO_BACKLOG, 128)
- // 使消息立即发出去,不用等待到一定的数据量才发出去
- .option(ChannelOption.TCP_NODELAY, true)
- // 保持长连接状态
- .childOption(ChannelOption.SO_KEEPALIVE, true)
- .childHandler(new ChannelInitializer<SocketChannel>() {
- @Override
- protected void initChannel(SocketChannel socketChannel) throws Exception {
- ChannelPipeline p = socketChannel.pipeline();
- p.addLast(new LineBasedFrameDecoder(Integer.MAX_VALUE));
- p.addLast(new StringDecoder(CharsetUtil.UTF_8));
- p.addLast(new StringEncoder(CharsetUtil.UTF_8));
- p.addLast(nettyServerHandler);
- }
- });
- // 绑定端口,同步等待成功
- ChannelFuture f = bootstrap.bind(5678).sync();
- if (f.isSuccess()) {
- log.info("Netty Start successful");
- } else {
- log.error("Netty Start failed");
- }
- // 等待服务监听端口关闭
- f.channel().closeFuture().sync();
- } finally {
- // 退出,释放线程资源
- worker.shutdownGracefully();
- boss.shutdownGracefully();
- }
- }
-
- }
修改NettyClientController,在消息末尾增加\r\n:
- @RestController
- @RequestMapping("/client")
- public class NettyClientController {
-
- /**
- * @description: 模拟向服务器发送消息
- * @param
- * @Author: wuyong
- * @Date: 2019/08/30 14:10:09
- * @return: java.lang.String
- */
- @RequestMapping("/req")
- public String req() {
- String msg = "{\"msgType\":\"req\",\"clientId\":\"请求数据\"}\r\n";
- for (int i = 0; i < 20; i++) {
- NettyClientBootStrap.getSocketChannel().writeAndFlush(msg);
- }
- return "success";
- }
-
- }
再次测试,服务器的控制台输出如下:
- 2019-08-30 15:47:05.959 INFO 216 --- [ntLoopGroup-1-1] com.wuychn.server.NettyServerHandler : 收到客户端消息:{"msgType":"req","clientId":"请求数据"}
- 2019-08-30 15:47:06.050 INFO 216 --- [ntLoopGroup-1-1] com.wuychn.server.NettyServerHandler : 收到客户端消息:{"msgType":"req","clientId":"请求数据"}
- 2019-08-30 15:47:06.051 INFO 216 --- [ntLoopGroup-1-1] com.wuychn.server.NettyServerHandler : 收到客户端消息:{"msgType":"req","clientId":"请求数据"}
- 2019-08-30 15:47:06.051 INFO 216 --- [ntLoopGroup-1-1] com.wuychn.server.NettyServerHandler : 收到客户端消息:{"msgType":"req","clientId":"请求数据"}
- 2019-08-30 15:47:06.051 INFO 216 --- [ntLoopGroup-1-1] com.wuychn.server.NettyServerHandler : 收到客户端消息:{"msgType":"req","clientId":"请求数据"}
- 2019-08-30 15:47:06.051 INFO 216 --- [ntLoopGroup-1-1] com.wuychn.server.NettyServerHandler : 收到客户端消息:{"msgType":"req","clientId":"请求数据"}
- 2019-08-30 15:47:06.051 INFO 216 --- [ntLoopGroup-1-1] com.wuychn.server.NettyServerHandler : 收到客户端消息:{"msgType":"req","clientId":"请求数据"}
- 2019-08-30 15:47:06.051 INFO 216 --- [ntLoopGroup-1-1] com.wuychn.server.NettyServerHandler : 收到客户端消息:{"msgType":"req","clientId":"请求数据"}
- 2019-08-30 15:47:06.052 INFO 216 --- [ntLoopGroup-1-1] com.wuychn.server.NettyServerHandler : 收到客户端消息:{"msgType":"req","clientId":"请求数据"}
- 2019-08-30 15:47:06.052 INFO 216 --- [ntLoopGroup-1-1] com.wuychn.server.NettyServerHandler : 收到客户端消息:{"msgType":"req","clientId":"请求数据"}
- 2019-08-30 15:47:06.052 INFO 216 --- [ntLoopGroup-1-1] com.wuychn.server.NettyServerHandler : 收到客户端消息:{"msgType":"req","clientId":"请求数据"}
- 2019-08-30 15:47:06.052 INFO 216 --- [ntLoopGroup-1-1] com.wuychn.server.NettyServerHandler : 收到客户端消息:{"msgType":"req","clientId":"请求数据"}
- 2019-08-30 15:47:06.052 INFO 216 --- [ntLoopGroup-1-1] com.wuychn.server.NettyServerHandler : 收到客户端消息:{"msgType":"req","clientId":"请求数据"}
- 2019-08-30 15:47:06.052 INFO 216 --- [ntLoopGroup-1-1] com.wuychn.server.NettyServerHandler : 收到客户端消息:{"msgType":"req","clientId":"请求数据"}
- 2019-08-30 15:47:06.053 INFO 216 --- [ntLoopGroup-1-1] com.wuychn.server.NettyServerHandler : 收到客户端消息:{"msgType":"req","clientId":"请求数据"}
- 2019-08-30 15:47:06.053 INFO 216 --- [ntLoopGroup-1-1] com.wuychn.server.NettyServerHandler : 收到客户端消息:{"msgType":"req","clientId":"请求数据"}
- 2019-08-30 15:47:06.053 INFO 216 --- [ntLoopGroup-1-1] com.wuychn.server.NettyServerHandler : 收到客户端消息:{"msgType":"req","clientId":"请求数据"}
- 2019-08-30 15:47:06.053 INFO 216 --- [ntLoopGroup-1-1] com.wuychn.server.NettyServerHandler : 收到客户端消息:{"msgType":"req","clientId":"请求数据"}
- 2019-08-30 15:47:06.053 INFO 216 --- [ntLoopGroup-1-1] com.wuychn.server.NettyServerHandler : 收到客户端消息:{"msgType":"req","clientId":"请求数据"}
- 2019-08-30 15:47:06.053 INFO 216 --- [ntLoopGroup-1-1] com.wuychn.server.NettyServerHandler : 收到客户端消息:{"msgType":"req","clientId":"请求数据"}
可见一切正常。
同样的道理,服务器发送给客户端的消息也会出现粘包/拆包的问题,客户端也可以加上LineBasedFrameDecoder解码器,然后服务器发送的消息使用\r\n结尾即可解决。
如果客户端使用的Socket,可以做如下处理:
- public class Client {
-
- public static void main(String[] args) throws IOException, InterruptedException {
- Socket socket = new Socket("localhost", 5678);
-
- // 向服务器发消息
- OutputStream outputStream = socket.getOutputStream();
- String msg = "{\"msgType\":\"req\",\"clientId\":\"请求数据\"}\r\n";
- outputStream.write(msg.getBytes(CharsetUtil.UTF_8));
- outputStream.flush();
-
- // 模拟收到服务端粘包消息:服务器收到客户端消息后,循环回复20条消息
- // 为了让小郭更明显,这里让客户端暂停1秒
- Thread.sleep(1000);
- BufferedReader br = new BufferedReader(new InputStreamReader(socket.getInputStream()));
- char[] ch = new char[65536];
- int len = -1;
- while ((len = br.read(ch)) != -1) {
- String result = new String(ch, 0, len);
- System.out.println("原始消息:" + result); // 获取到的原始消息,是有粘包或者拆包的
- String[] results = result.split("\r\n"); // 按照\r\n拆分,这里没有处理拆包的问题
- for (String str : results) {
- System.out.println("接收到消息:" + str);
- }
- }
- }
-
- }
[详细] -->赞
踩

