
热门标签
热门文章
- 1Ubuntu 24.04 LTS安装elasticsearch-8.14.3+Kibana_elasticsearch8.14.3
- 2数据仓库——聚集(1)_数据处理:聚集表是在哪一阶段
- 3轻松上手Spring AI:开启全民大模型运行新篇章_spring ai demo
- 4OnionSearch: 深度网络的安全搜索引擎
- 5阿里云深度学习平台试玩
- 6linux系统命令(网络相关的调试命令)(ip a、ss、ps、uptime、top、lsof、grep)
- 7百度语音合成 java 教程_java 在线合成语音与识别 示例源码(百度)
- 8redis学习(五)——redis的持久化rdb和aof_rdb文件存储过程
- 9(二)Redis数据类型和数据结构详解
- 10clonezilla(再生龙)克隆linux系统 操作指南
当前位置: article > 正文
duilib最简单的自定义列表_duilib例子
作者:小舞很执着 | 2024-08-07 14:07:00
赞
踩
duilib例子
网上写的关于自定义列表的例子都过于复杂,对初学者不太友好。这里举了一个最简单的例子。
主界面的listdemo.xml内容如下:
- <?xml version="1.0" encoding="UTF-8" ?>
- <Window size="500,500" caption="0,0,0,30">
- <Default name="VScrollBar" value="button1normalimage="file='scrollbar.png' source='0,0,16,16'" button1hotimage="file='scrollbar.png' source='16,0,32,16,16'" button1pushedimage="file='scrollbar.png' source='32,0,48,16'" button2normalimage="file='scrollbar.png' source='0,32,16,48'" button2hotimage="file='scrollbar.png' source='16,32,32,48'" button2pushedimage="file='scrollbar.png' source='32,32,48,48'" thumbnormalimage="file='scrollbar.png' source='0,48,16,64' corner='0,2,0,2'" thumbhotimage="file='scrollbar.png' source='16,48,32,64' corner='0,2,0,2'" thumbpushedimage="file='scrollbar.png' source='32,48,48,64' corner='0,2,0,2'" bknormalimage="file='scrollbar.png' source='0,16,16,32'"" />
- <VerticalLayout bkcolor="#FFFFFFE0">
- <VerticalLayout height="50">
- <HorizontalLayout>
- <HorizontalLayout>
- </HorizontalLayout>
- <Label align="center" text="列表测试Demo"/>
- <HorizontalLayout></HorizontalLayout>
- <Button name="btnstart" text="开始" bkcolor="#FFF5DEB3" padding="8,8,8,8" borderround="5,5"/>
- <HorizontalLayout>
- </HorizontalLayout>
- </HorizontalLayout>
- </VerticalLayout>
- <VerticalLayout >
- <!--list开始-->
- <MyList2 name="list1" header="hidden" itemshowhtml="true" vscrollbar="true">
-
- </MyList2>
- </VerticalLayout>
- </VerticalLayout>
- </Window>

其中MyList2是自定义的列表标签。
列表项的friend_list_item.xml文件内容如下:
- <?xml version="1.0" encoding="UTF-8"?>
- <Window>
- <ListContainerElement height="32">
- <VerticalLayout height="32">
- <HorizontalLayout>
- <VerticalLayout name="logo_container" width="50">
- <Button name="logo" width="32" height="32" />
- </VerticalLayout>
- <VerticalLayout >
- <HorizontalLayout>
- <Label name="nickname" text="default" bordersize="0" width="120" textcolor="#FF000000" disabledtextcolor="#FF808080" />
- <Label name="description" bordersize="0" textcolor="#FF808080" />
- </HorizontalLayout>
- </VerticalLayout>
- </HorizontalLayout>
- </VerticalLayout>
- </ListContainerElement>
- </Window>
MyList2类的代码如下:
UIMyList2.h
- #ifndef UIMYLIST2_H
- #define UIMYLIST2_H
- #include "../../../duilib/DuiLib/UIlib.h"
-
- namespace DuiLib
- {
- struct MyItem2
- {
- //头像
- CDuiString strPic;
- //名称
- CDuiString strNiceName;
- //描述
- CDuiString strDes;
- };
- class CMyListUI2 :public CListUI
- {
- public:
- enum { SCROLL_TIMERID = 10 };
-
- CMyListUI2(CPaintManagerUI& paint_manager);
-
- ~CMyListUI2();
-
- bool Add(CControlUI* pControl);
-
- bool AddAt(CControlUI* pControl, int iIndex);
-
- bool Remove(CControlUI* pControl, bool bDoNotDestroy = false);
-
- bool RemoveAt(int iIndex, bool bDoNotDestroy);
-
- void RemoveAll();
-
- //定制方法
- void AddItem(MyItem2& itemdata);
-
- private:
- CPaintManagerUI& paint_manager_;
-
- CDialogBuilder m_dlgBuilder;
- };
- }
-
- #endif // UIMYLIST2_H
UIMyList2.cpp
-
- #include "UIMyList2.h"
-
- namespace DuiLib{
-
- CMyListUI2::CMyListUI2(CPaintManagerUI& paint_manager)
- :paint_manager_(paint_manager)
- {
- SetItemShowHtml(true);
- }
-
- CMyListUI2::~CMyListUI2()
- {
-
- }
-
- bool CMyListUI2::Add(CControlUI* pControl)
- {
- if (!pControl)
- return false;
-
- if (_tcsicmp(pControl->GetClass(), DUI_CTR_LISTCONTAINERELEMENT) != 0)
- return false;
-
- return CListUI::Add(pControl);
- }
-
- bool CMyListUI2::AddAt(CControlUI* pControl, int iIndex)
- {
- if (!pControl)
- return false;
-
- if (_tcsicmp(pControl->GetClass(), DUI_CTR_LISTCONTAINERELEMENT) != 0)
- return false;
-
- return CListUI::AddAt(pControl, iIndex);
- }
-
- bool CMyListUI2::Remove(CControlUI* pControl, bool bDoNotDestroy)
- {
- if (!pControl)
- return false;
-
- if (_tcsicmp(pControl->GetClass(), DUI_CTR_LISTCONTAINERELEMENT) != 0)
- return false;
-
- return CListUI::Remove(pControl, bDoNotDestroy);
- }
-
- bool CMyListUI2::RemoveAt(int iIndex, bool bDoNotDestroy)
- {
- CControlUI* pControl = GetItemAt(iIndex);
- if (!pControl)
- return false;
-
- if (_tcsicmp(pControl->GetClass(), DUI_CTR_LISTCONTAINERELEMENT) != 0)
- return false;
-
- return CListUI::RemoveAt(iIndex, bDoNotDestroy);
- }
-
- void CMyListUI2::RemoveAll()
- {
- CListUI::RemoveAll();
- }
-
- void CMyListUI2::AddItem(MyItem2& itemdata)
- {
- CListContainerElementUI* pItem = NULL;
- if (!m_dlgBuilder.GetMarkup()->IsValid())
- {
- pItem = static_cast<CListContainerElementUI*>(m_dlgBuilder.Create(_T("friend_list_item.xml"), (UINT)0, NULL, &paint_manager_));
- }
- else {
- pItem = static_cast<CListContainerElementUI*>(m_dlgBuilder.Create((UINT)0, &paint_manager_));
- }
- if (!pItem) return;
- this->Add(pItem);
- //设置头像
- CButtonUI *pBtn = static_cast<CButtonUI*>(pItem->FindSubControl(_T("logo")));
- if (pBtn)
- {
- pBtn->SetNormalImage(itemdata.strPic);
- }
- //设置昵称
- CLabelUI * pNickName = static_cast<CLabelUI*>(pItem->FindSubControl(_T("nickname")));
- if (pNickName)
- {
- pNickName->SetText(itemdata.strNiceName);
- }
- //设置描述
- CLabelUI * pDes = static_cast<CLabelUI*>(pItem->FindSubControl(_T("description")));
- if (pDes)
- {
- pDes->SetText(itemdata.strDes);
- }
- }
- }
main函数主框架的的代码如下:
- #pragma once
-
- #include "../../../duilib/DuiLib/UIlib.h"
- //#include <Windows.h>
-
- #pragma comment(lib,"./bin/duilib_d.lib")
-
-
- #include "UIMyList2.h"
-
- using namespace DuiLib;
-
- class CDuiFrameWnd : public WindowImplBase
- {
- public:
- virtual LPCTSTR GetWindowClassName() const { return _T("listDemo1"); }
- virtual CDuiString GetSkinFile() { return _T("listdemo.xml"); }
- virtual CDuiString GetSkinFolder() { return _T(""); }
-
- //virtual LRESULT HandleMessage(UINT uMsg, WPARAM wParam, LPARAM lParam)
- //{
- // return WindowImplBase::HandleMessage(uMsg, wParam, lParam);
- //}
- virtual void Notify(TNotifyUI& msg)
- {
-
- if (msg.sType == DUI_MSGTYPE_CLICK && msg.pSender->GetName() == _T("btnstart"))
- {
- //点按钮往列表插入数据
- CMyListUI2* pMyList2 = static_cast<CMyListUI2*>(m_PaintManager.FindControl(_T("list1")));
- if (pMyList2)
- {
- MyItem2 itemdata1;
- itemdata1.strPic = _T("default.png");
- itemdata1.strNiceName = _T("小明");
- itemdata1.strDes = _T("我就是我,是颜色不一样的焰火1");
- pMyList2->AddItem(itemdata1);
-
- MyItem2 itemdata2;
- itemdata2.strPic = _T("default.png");
- itemdata2.strNiceName = _T("小王");
- itemdata2.strDes = _T("我就是我,是颜色不一样的焰火2");
- pMyList2->AddItem(itemdata2);
-
- MyItem2 itemdata3;
- itemdata3.strPic = _T("default.png");
- itemdata3.strNiceName = _T("小张");
- itemdata3.strDes = _T("我就是我,是颜色不一样的焰火3");
- pMyList2->AddItem(itemdata3);
- }
- return;
- }
-
- }
- virtual CControlUI* CreateControl(LPCTSTR pstrClass)
- {
- if (_tcsicmp(pstrClass, _T("MyList2")) == 0)
- {
- return new CMyListUI2(m_PaintManager);
- }
- else
- return NULL;
- }
- };
-
- int APIENTRY _tWinMain(HINSTANCE hInstance, HINSTANCE hPrevInstance, LPTSTR lpCmdLine, int nCmdShow)
- {
- CPaintManagerUI::SetInstance(hInstance);
-
- CDuiFrameWnd duiFrame;
- duiFrame.Create(NULL, _T("DUIWnd"), UI_WNDSTYLE_FRAME, WS_EX_WINDOWEDGE);
- duiFrame.CenterWindow();
- duiFrame.ShowModal();
- return 0;
- }
CMyList2的代码已经非常简单了,重写基类的方法实现也很简单。基本上一看就懂。其实本质就是往list中添加子项为CListContainerElementUI控件,该控件包含所有其他控件组成了列表的一项。
个人认为最重要的几个方法是,
CDuiFrameWnd 的CreateControl方法(duilib识别到未知标签后会调用该方法,让程序员返回自定义标签类的实例)以及
CListContainerElementUI的FindSubControl(通过name属性查找子控件)、
CDialogBuilder 的Create方法使用(通过xml文件创建控件)
不懂请留言
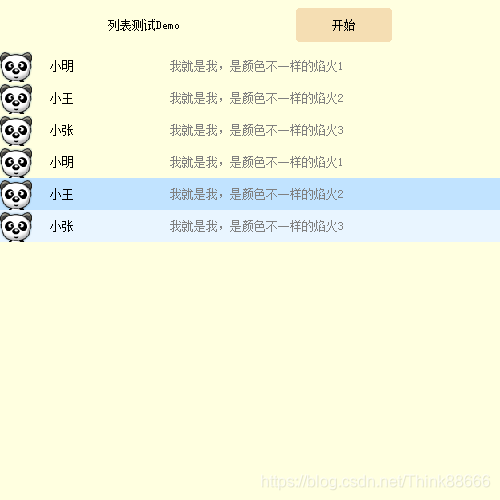
程序运行结果如下:
点击开始按钮向列表添加数据
声明:本文内容由网友自发贡献,不代表【wpsshop博客】立场,版权归原作者所有,本站不承担相应法律责任。如您发现有侵权的内容,请联系我们。转载请注明出处:https://www.wpsshop.cn/w/小舞很执着/article/detail/942898
推荐阅读
相关标签

