
热门标签
热门文章
- 1护网行动HW中的蓝队和红队的区别和关系?_护网蓝队
- 2Microsoft Visual C++ 2017 Redistributable_microsoft visual c++ 2017 redistributable(x86)-141
- 3通信协议缓冲区管理全景:TCP、UDP、ZMQ、DBus、SSL、SOME/IP通讯协议的缓冲区解析..._以太网缓存机制
- 4Llama 3 安装使用方法_llama3安装
- 5目标检测中预测框回归优化IOU、GIOU、DIOU、CIOU、EIOU(二)
- 6git push -f
- 7Mac安装teXstudio笔记_textstudio mac
- 8odps 年月日_odps时间格式转化
- 9隐私计算头条周刊(3.6-3.12)
- 10静态时序分析_静态时序分析是什么
当前位置: article > 正文
MediaPipe基础(1)人脸检测_facemeshv2
作者:小舞很执着 | 2024-06-26 20:09:53
赞
踩
facemeshv2
1.摘要
MediaPipe 人脸检测是一种超快的人脸检测解决方案,具有 6 个landmarks和多人脸支持。它基于 BlazeFace,这是一种轻量级且性能良好的人脸检测器,专为移动 GPU 推理量身定制。
检测器的超实时性能使其能够应用于任何需要准确的面部感兴趣区域作为其他特定任务模型输入的实时取景器体验,例如 3D 面部关键点或几何估计(例如 MediaPipe Face Mesh)、面部特征或表情分类以及面部区域分割等。BlazeFace使用了一个轻量级的特征提取网络,其灵感来自于MobileNetV1/V2,但与MobileNetV1/V2不同,它是一个gpu友好的锚定方案,由Single Shot MultiBox Detector (SSD)改进而来,使用某种策略(an improved tie resolution strategy)替代非极大值抑制的。
2.解决方案的API
2.1参数配置
MODEL_SELECTION:索引为0或1的整数。使用0选择一个短距离模型,最适合距离相机2米以内的人脸,1选择一个全距离模型,最适合距离相机5米以内的人脸。对于全距离选项,采用稀疏模型来提高推理速度。如果未指定,默认为0。貌似此参数已经被淘汰。MIN_DETECTION_CONFIDENCE:来自人脸检测模型的最小置信值 ([0.0, 1.0]),以便将检测视为成功。默认为 0.5。
2.2输出
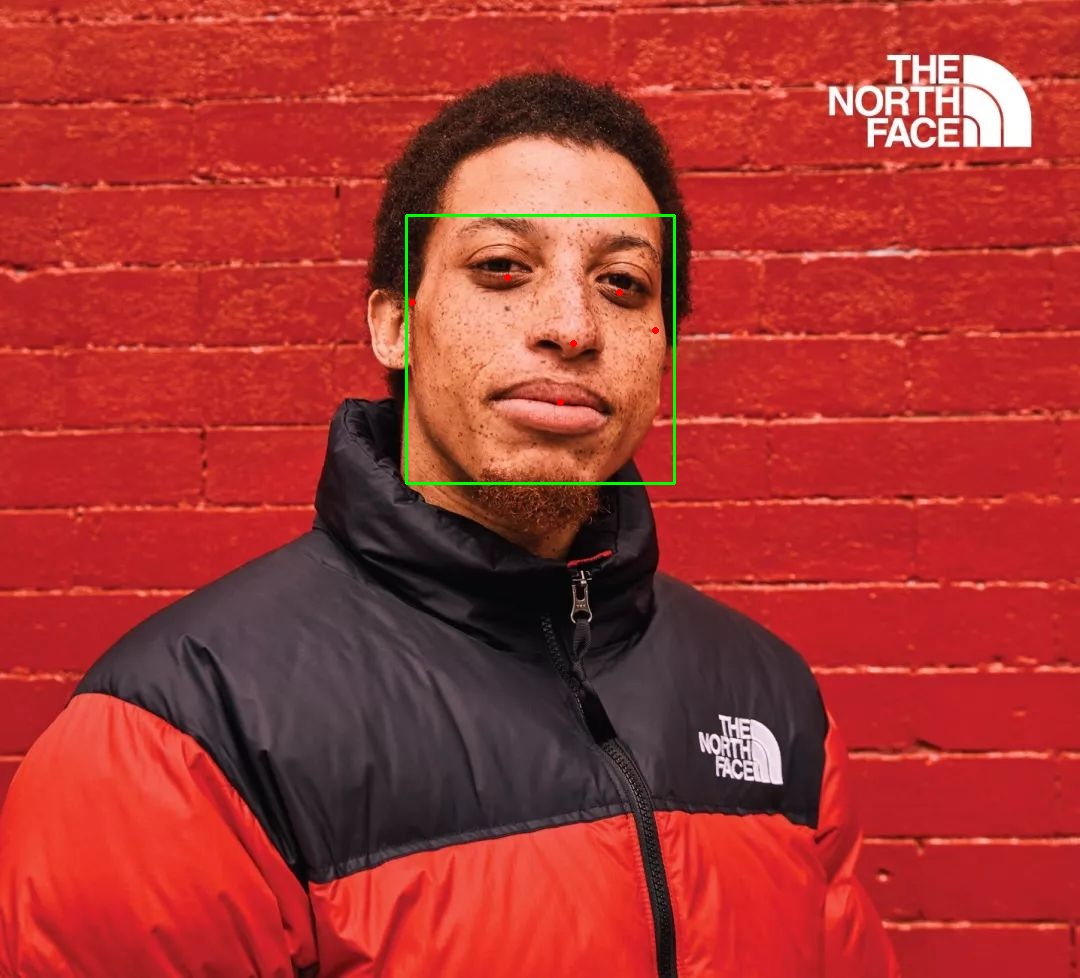
DETECTIONS:检测到的人脸的集合,其中每个人脸都表示为一个检测原始消息,其中包含一个边界框和 6 个关键点(右眼、左眼、鼻尖、嘴巴中心、右耳和左耳)。边界框由xmin和width(由图像宽度归一化为[0.0,1.0])以及ymin和height(由图像高度归一化为[0.0,1.0])组成。每个关键点由 x 和 y 组成,分别通过图像宽度和高度归一化为 [0.0, 1.0]。
3.Python API解决方案
支持配置选项:
- model_selection
- min_detection_confidence
(1)对于图片序列
# python3.6.5 mediapipe=0.8.3
import cv2
import mediapipe as mp
mp_face_detection = mp.solutions.face_detection
mp_drawing = mp.solutions.drawing_utils

# 对于静态图像
IMAGE_FILES = ["trump.jpg"]
with mp_face_detection.FaceDetection(min_detection_confidence=0.5) as face_detection:
  for idx, file in enumerate(IMAGE_FILES):
    image = cv2.imread(file)
    # 转换BGR图像到RGB和使用MediaPipe人脸检测处理它
    results = face_detection.process(cv2.cvtColor(image, cv2.COLOR_BGR2RGB))

    # 绘制人脸检测到每个人脸
    if not results.detections:
      continue
    annotated_image = image.copy()
    for detection in results.detections:
  	  """The enum type of the six face detection key points.
  	  RIGHT_EYE = 0
 	  LEFT_EYE = 1
 	  NOSE_TIP = 2
  	  MOUTH_CENTER = 3
  	  RIGHT_EAR_TRAGION = 4
  	  LEFT_EAR_TRAGION = 5
  	  """
      print('Nose tip:')
      print(mp_face_detection.get_key_point(detection, mp_face_detection.FaceKeyPoint.NOSE_TIP))
      # Nose tip:
	  # x: 0.3519737124443054
	  # y: 0.4148605167865753
      mp_drawing.draw_detection(annotated_image, detection)
    cv2.imwrite('annotated_image' + str(idx) + '.png', annotated_image)

- 1
- 2
- 3
- 4
- 5
- 6
- 7
- 8
- 9
- 10
- 11
- 12
- 13
- 14
- 15
- 16
- 17
- 18
- 19
- 20
- 21
- 22
- 23
- 24
- 25
- 26
- 27
- 28
- 29
- 30
- 31
- 32
- 33
- 34
(2)对于视频
import cv2
import mediapipe as mp
mp_face_detection = mp.solutions.face_detection
mp_drawing = mp.solutions.drawing_utils
# 视频作为输入
cap = cv2.VideoCapture("1.mp4")
with mp_face_detection.FaceDetection(min_detection_confidence=0.5) as face_detection:
  while cap.isOpened():
    success, image = cap.read()
    if not success:
      print("Ignoring empty camera frame.")
      # 如果正在加载摄像头,使用continue而不是break。
      break

    # 水平翻转图像为以后的自拍视图显示,并将BGR图像转换为RGB。
    image = cv2.cvtColor(cv2.flip(image, 1), cv2.COLOR_BGR2RGB)
    # 为了提高性能,可选择将图像标记为不可写以通过引用传递。
    image.flags.writeable = False
    results = face_detection.process(image)

    # 在图像上绘制人脸检测注释。
    image.flags.writeable = True
    image = cv2.cvtColor(image, cv2.COLOR_RGB2BGR)
    if results.detections:
      for detection in results.detections:
        mp_drawing.draw_detection(image, detection)
    cv2.imshow('MediaPipe Face Detection', image)
    if cv2.waitKey(5) & 0xFF == 27:
      break
cap.release()
- 1
- 2
- 3
- 4
- 5
- 6
- 7
- 8
- 9
- 10
- 11
- 12
- 13
- 14
- 15
- 16
- 17
- 18
- 19
- 20
- 21
- 22
- 23
- 24
- 25
- 26
- 27
- 28
- 29
- 30
(3)模块化
import cv2
import mediapipe as mp
import time


class FaceDetector():
    def __init__(self, minDetectionCon=0.5):
        self.minDetectionCon = minDetectionCon
        self.mpFaceDetection = mp.solutions.face_detection
        self.mpDraw = mp.solutions.drawing_utils
        self.faceDetection = self.mpFaceDetection.FaceDetection(self.minDetectionCon)

    def findFaces(self, img, draw=True):
        imgRGB = cv2.cvtColor(img, cv2.COLOR_BGR2RGB)
        self.results = self.faceDetection.process(imgRGB)
        # print(self.results)
        bboxs = []
        if self.results.detections:
            for id, detection in enumerate(self.results.detections):
                bboxC = detection.location_data.relative_bounding_box
                ih, iw, ic = img.shape
                bbox = int(bboxC.xmin * iw), int(bboxC.ymin * ih), int(bboxC.width * iw), int(bboxC.height * ih)
                bboxs.append([id, bbox, detection.score])
                if draw:
                    img = self.fancyDraw(img, bbox)
                    cv2.putText(img, f'{int(detection.score[0] * 100)}%', (bbox[0], bbox[1] - 20),
                                cv2.FONT_HERSHEY_PLAIN, 2, (255, 0, 255), 2)
                return img, bboxs

    def fancyDraw(self, img, bbox, l=30, t=5, rt=1):
        x, y, w, h = bbox
        x1, y1 = x + w, y + h
        cv2.rectangle(img, bbox, (255, 0, 255), rt)
        # Top Left  x,y
        cv2.line(img, (x, y), (x + l, y), (255, 0, 255), t)
        cv2.line(img, (x, y), (x, y + l), (255, 0, 255), t)
        # Top Right  x1,y
        cv2.line(img, (x1, y), (x1 - l, y), (255, 0, 255), t)
        cv2.line(img, (x1, y), (x1, y + l), (255, 0, 255), t)
        # Bottom Left  x,y1
        cv2.line(img, (x, y1), (x + l, y1), (255, 0, 255), t)
        cv2.line(img, (x, y1), (x, y1 - l), (255, 0, 255), t)
        # Bottom Right  x1,y1
        cv2.line(img, (x1, y1), (x1 - l, y1), (255, 0, 255), t)
        cv2.line(img, (x1, y1), (x1, y1 - l), (255, 0, 255), t)
        return img


def main():
    cap = cv2.VideoCapture("1.mp4")
    pTime = 0
    detector = FaceDetector()
    while True:
        success, img = cap.read()
        if not success:
            break
        img, bboxs = detector.findFaces(img)
        print(bboxs)
        cTime = time.time()
        fps = 1 / (cTime - pTime)
        pTime = cTime
        cv2.putText(img, f'FPS: {int(fps)}', (20, 70), cv2.FONT_HERSHEY_PLAIN, 3, (0, 255, 0), 2)
        cv2.imshow("Image", img)
        cv2.waitKey(1)


if __name__ == "__main__":
    main()
- 1
- 2
- 3
- 4
- 5
- 6
- 7
- 8
- 9
- 10
- 11
- 12
- 13
- 14
- 15
- 16
- 17
- 18
- 19
- 20
- 21
- 22
- 23
- 24
- 25
- 26
- 27
- 28
- 29
- 30
- 31
- 32
- 33
- 34
- 35
- 36
- 37
- 38
- 39
- 40
- 41
- 42
- 43
- 44
- 45
- 46
- 47
- 48
- 49
- 50
- 51
- 52
- 53
- 54
- 55
- 56
- 57
- 58
- 59
- 60
- 61
- 62
- 63
- 64
- 65
- 66
- 67
- 68
参考目录
https://google.github.io/mediapipe/solutions/face_detection.html
声明:本文内容由网友自发贡献,转载请注明出处:【wpsshop】
推荐阅读
相关标签

