
热门标签
热门文章
- 1Neo4j 3.2版正式发布:企业级扩展性增强、原生性能提高,还有更多特性
- 2【vivado】ILA调试报错 The debug hub core was not detected 以及 Data read from hw_ila [hw_ila_1] is corrupted_warning: [labtools 27-3361] the debug hub core was
- 3生成式模型和判别式模型的区别_生成式模型与判别式模型的区别
- 4windows server2012 安全配置方案—限制用户数量方法_windows server 2012怎么限制创建账户
- 5HarmonyOS Next应用开发案例大全-(持续更新中……)(1),2024年最新HarmonyOS鸿蒙界面布局实验报告_鸿蒙swiper页面设计实验报告
- 6【Jenkins】Pipeline流水线语法解析全集 -- 脚本式流水线、groovy语法_jenkins groovy语法
- 7【VMware】VMware 安装 macOS虚拟机_虚拟机安装macos
- 8tomcat源码分析 StandardServer初始化过程
- 9在学习python的过程中,遇到的最大的困难是什么?_python面向对象太难了
- 10VMWare14 安装Mac OS系统(操作图解)_vmware mac
当前位置: article > 正文
10分钟学会axios框架核心知识,详细axios教程_axios 框架‘
作者:小桥流水78 | 2024-07-03 17:33:48
赞
踩
axios 框架‘
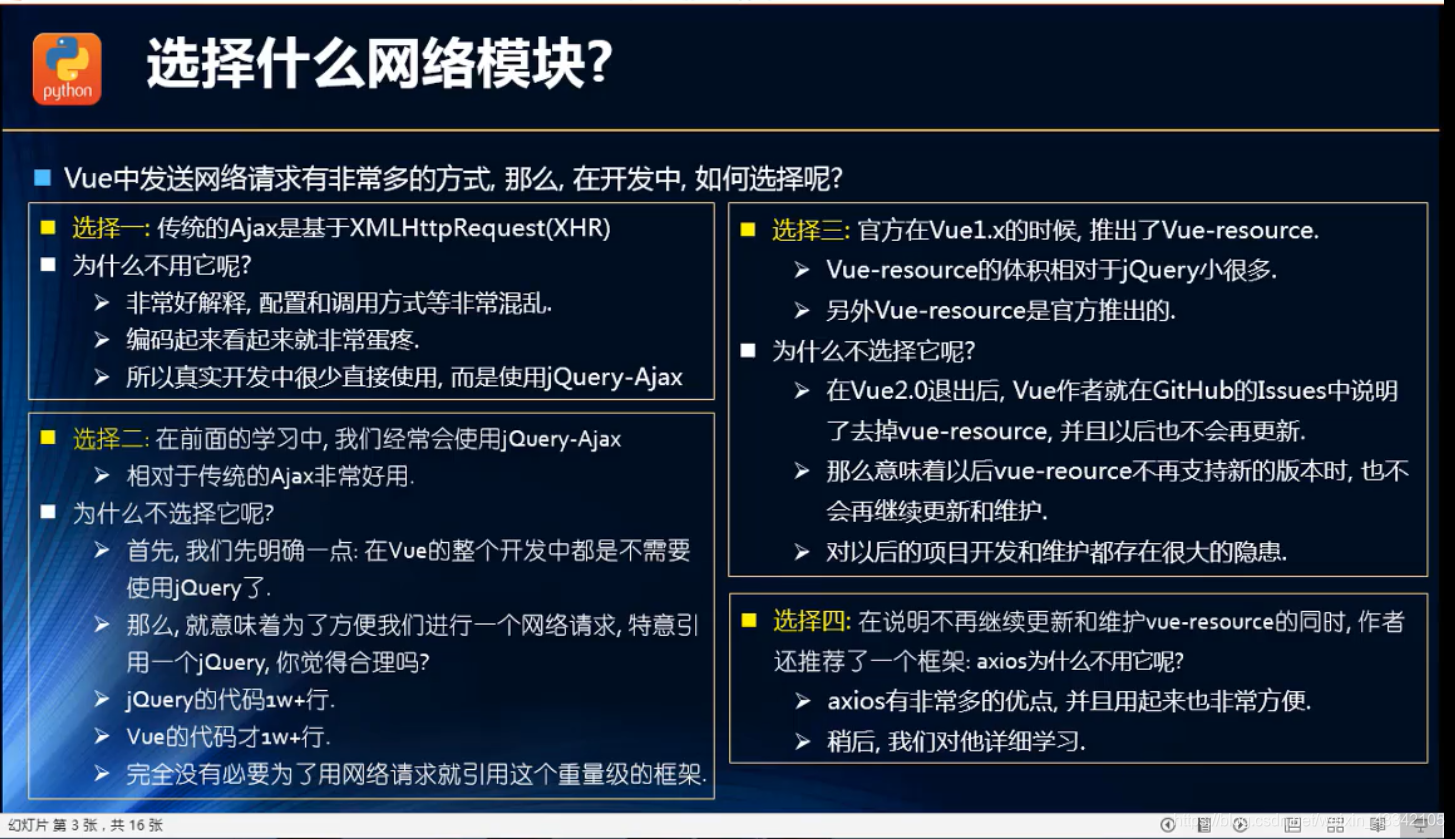
vue选择网络模块的比较
jsonp介绍
了解jsonp

jsonp的封装

为什么选择axios

axios的全部请求方式

怎样发送并发请求
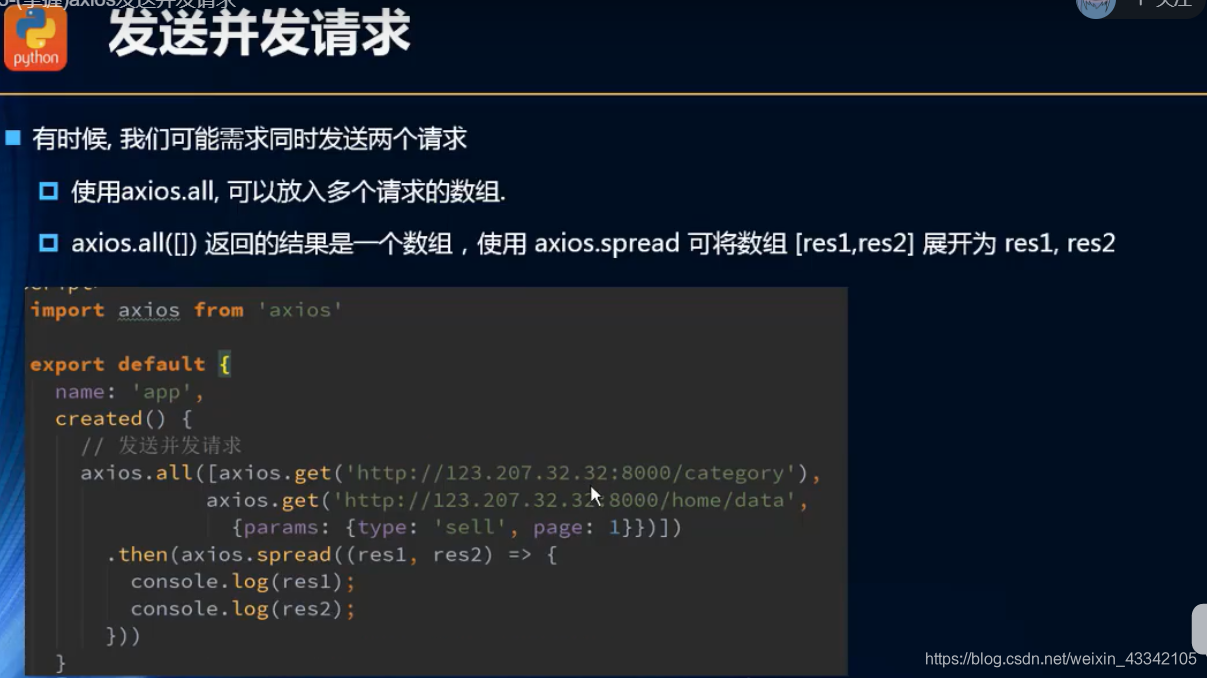
axios.all([
  axios({
    url:'/home/multidata'
  }),
  axios({
    url:'/home/data',
    params:{
      type:'sell',
      page:2
    }
  })
]).then(axios.spread((res1,res2)=>{
  console.log(res1);
  console.log(res2);
}))
- 1
- 2
- 3
- 4
- 5
- 6
- 7
- 8
- 9
- 10
- 11
- 12
- 13
- 14
- 15
怎么进行全局配置

使用全局的配置请求
axios.defaults.baseURL = 'http://123.207.32.32:8000'
axios.defaults.timeout= 5000


axios.all([
  axios({
    url:'/home/multidata'
  }),
  axios({
    url:'/home/data',
    params:{
      type:'sell',
      page:2
    }
  })
]).then(axios.spread((res1,res2)=>{
  console.log(res1);
  console.log(res2);
}))

- 1
- 2
- 3
- 4
- 5
- 6
- 7
- 8
- 9
- 10
- 11
- 12
- 13
- 14
- 15
- 16
- 17
- 18
- 19
- 20
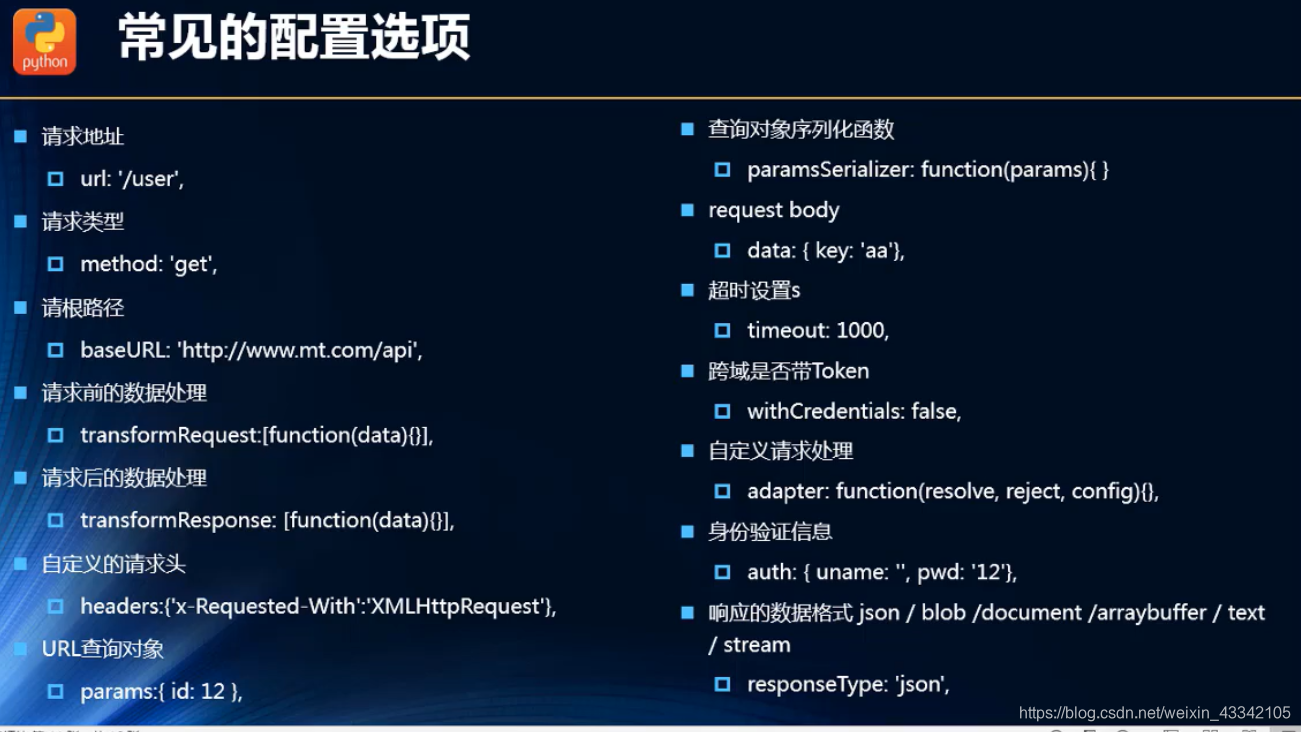
有哪些常用的配置选项
学会创建axios实例
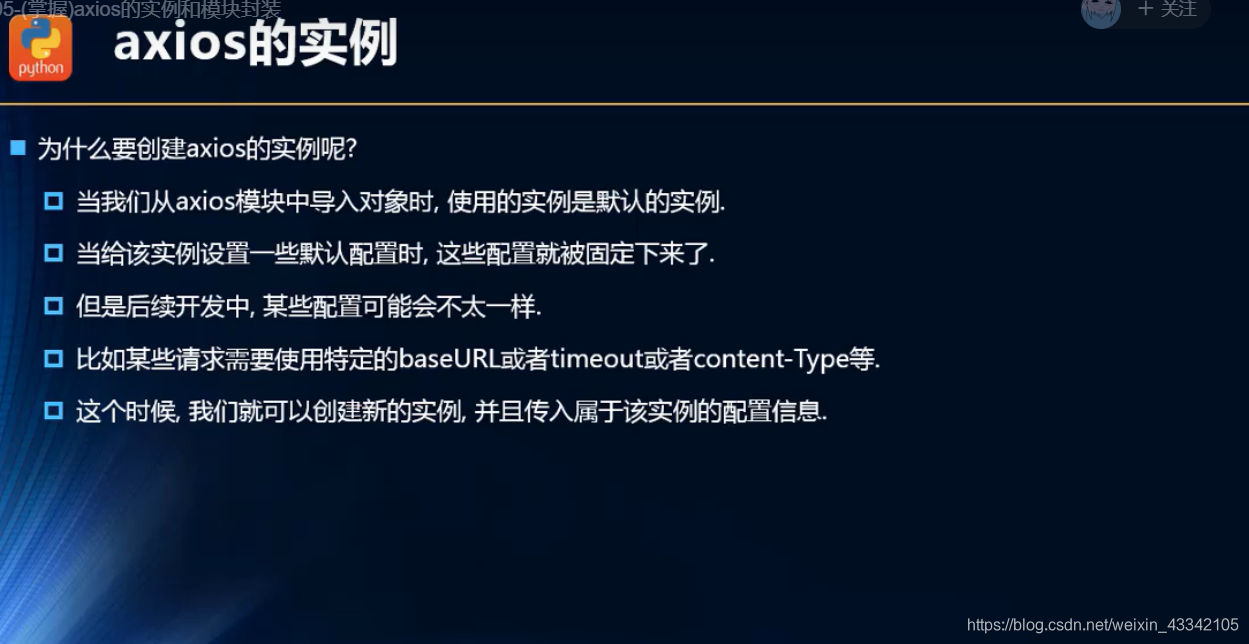
创建axios的实例

const instance1 = axios.create({
  baseURL:'http://123.207.32.32:8000',
  timeout:5000
})

instance1({
  url:'/home/multidata'
}).then(res=>{
  console.log(res)
})

instance1({
  url:'/home/data',
}).then(res=>{
  console.log(res);

})
- 1
- 2
- 3
- 4
- 5
- 6
- 7
- 8
- 9
- 10
- 11
- 12
- 13
- 14
- 15
- 16
- 17
- 18
- 19
- 20
封装axios
由于不可能在每个文件都导入axios,分别进行信息的处理,这样不便于修改和维护项目,需要对axios代码进行封装

import axios from 'axios'

export function request(config){
    const instanse1 = axios.create({
        baseURL:'http://123.207.32.32:8000',
        timeout:5000
    })

    // 发送网络请求
    instanse1(baseConfig)
    .then(res=>{
        // console.log(res);
        config.success(res)
    })
    .catch(err=>{
        // console.log(err);
        config.falure(err)
    })
}
- 1
- 2
- 3
- 4
- 5
- 6
- 7
- 8
- 9
- 10
- 11
- 12
- 13
- 14
- 15
- 16
- 17
- 18
- 19
这样之后在任意一个文件就可以导入并调用封装函数
import {request} from './network/request'

request({
  url:'/home/multidata'
},res=>{
  console.log(res);
},err=>{
  console.log(err);
})

request({
  baseConfig:{

  },
  success(res){

  },
  falure(err){

  }
})
- 1
- 2
- 3
- 4
- 5
- 6
- 7
- 8
- 9
- 10
- 11
- 12
- 13
- 14
- 15
- 16
- 17
- 18
- 19
- 20
- 21
学会使用axios拦截器

export function request(config) {
    return new Promise((resolve, reject) => {
        const instanse1 = axios.create({
            baseURL: 'http://123.207.32.32:8000',
            timeout: 5000
        })

        // axios的拦截器
        // 请求拦截
        instanse1.interceptors.request.use(backMsg =>{
            console.log(backMsg);
            // 1,如果config中的一些信息不符合要求 就可以使用拦截改变config

            // 2,比如发送网络请求是,都希望在界面中显示一个图标

            // 3,某些网络请求(比如登录(token)),必须携带一些信息


            // 已经拦截config需要从新返回
            return config
        },err=>{
            console.log(err); //请求没发出去就会显示这个错误
        })


        // 响应拦截
       instanse1.interceptors.response.use(res=>{
        console.log(res);
        return res.data
       },err=>{
           console.log(err);

       })

        // 发送网络请求
        instanse1(config)
            .then(res => {
                // console.log(res);
                resolve(res)
            })
            .catch(err => {
                // console.log(err);
                reject(err)
            })

        // return instanse1(config)
    })
}
- 1
- 2
- 3
- 4
- 5
- 6
- 7
- 8
- 9
- 10
- 11
- 12
- 13
- 14
- 15
- 16
- 17
- 18
- 19
- 20
- 21
- 22
- 23
- 24
- 25
- 26
- 27
- 28
- 29
- 30
- 31
- 32
- 33
- 34
- 35
- 36
- 37
- 38
- 39
- 40
- 41
- 42
- 43
- 44
- 45
- 46
- 47
- 48
- 49
- 50
- 51
- 52
声明:本文内容由网友自发贡献,不代表【wpsshop博客】立场,版权归原作者所有,本站不承担相应法律责任。如您发现有侵权的内容,请联系我们。转载请注明出处:https://www.wpsshop.cn/w/小桥流水78/article/detail/783992
推荐阅读

相关标签

