
- 1传播行为、事务回滚、分布式事务(CAP理论和BASE理论)
- 2微信小程序发送模版消息推送_微信公众号若依
- 3vue router 整合引入_router在线引入
- 4microblaze+yt8511+freertos 1000M网调试记录_microblaze 千兆以太网
- 5时隔两年,盘点ECCV 2018影响力最大的20篇论文_eccv 2018 image inpainting for irregular holes usi
- 6如何在 Elasticsearch 中选择精确 kNN 搜索和近似 kNN 搜索_elasticsearch knn 和fassi hnsw
- 7进阶指南!深入理解Java注解_深入java注解
- 8大数据技术概述与入门_全球信息量总和 数据
- 9基于springboot+vue的在线学习系统的设计与实现_在线学习系统详细类设计
- 10Electron常见问题 10 - video标签如何控制视频音量大小_video 标签 音量键没法操作
微信公众号发送模板消息_微信公众号模板消息
赞
踩
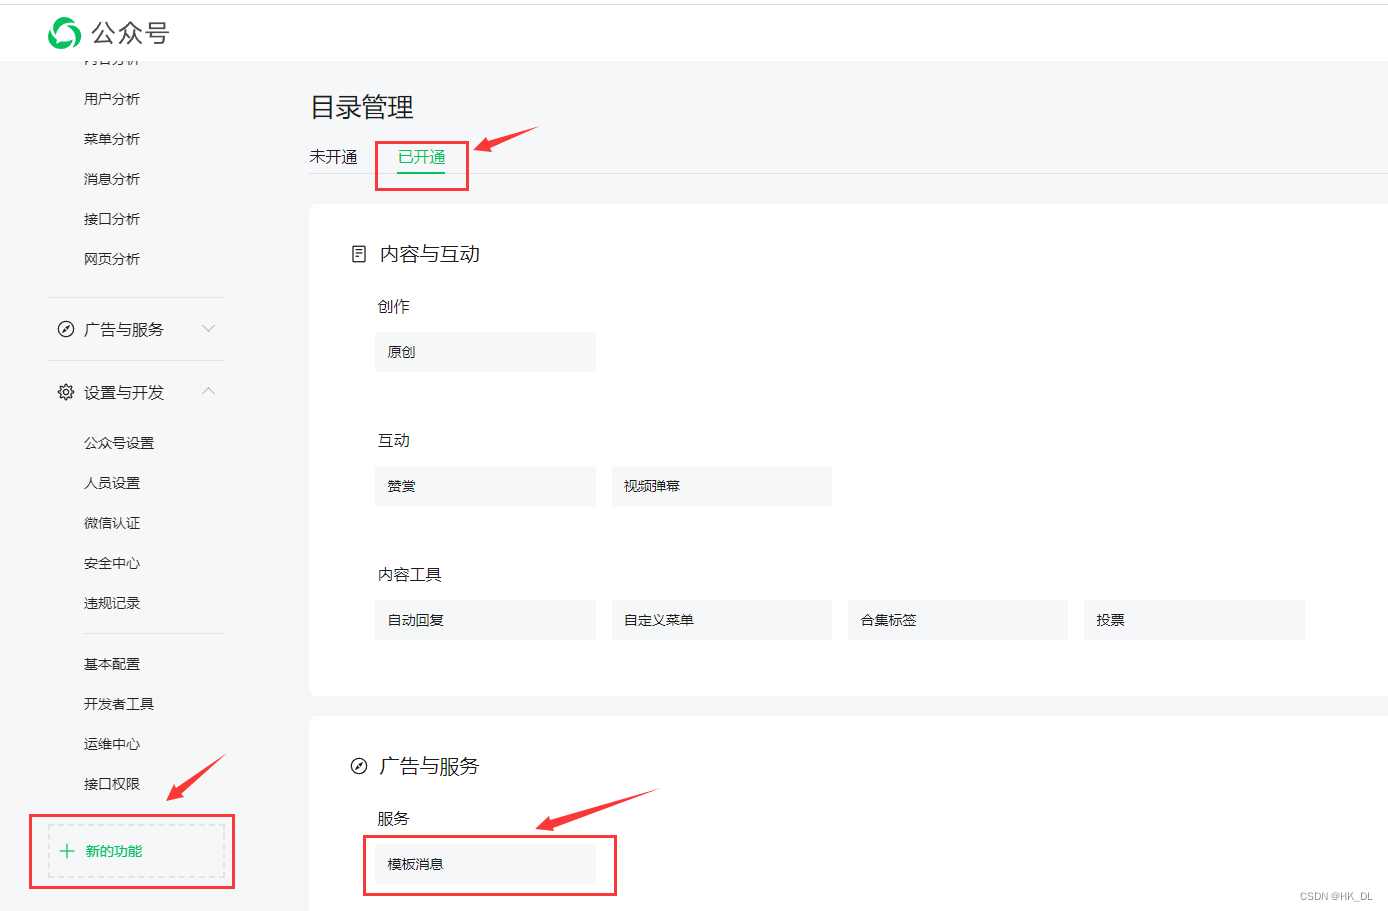
一、登录微信公众号后台,开通模板消息功能,选择使用的模板消息或者申请新的模板消息,只有通过企业认证才能使用模板消息
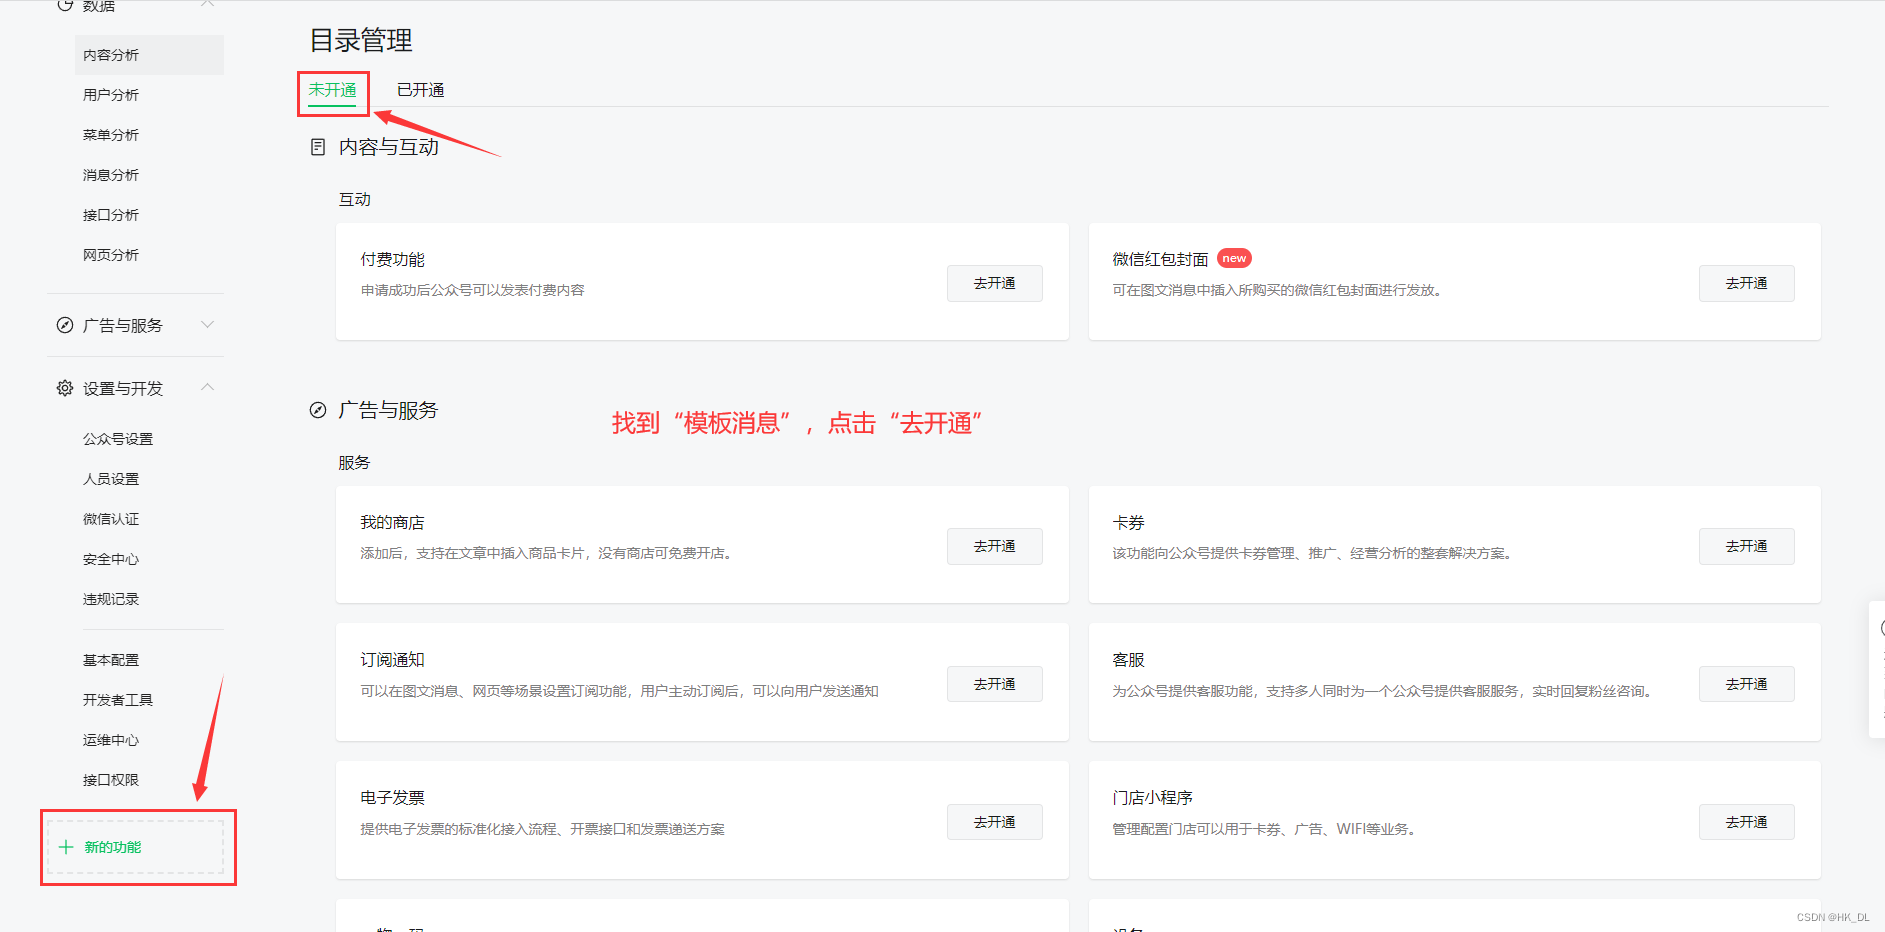
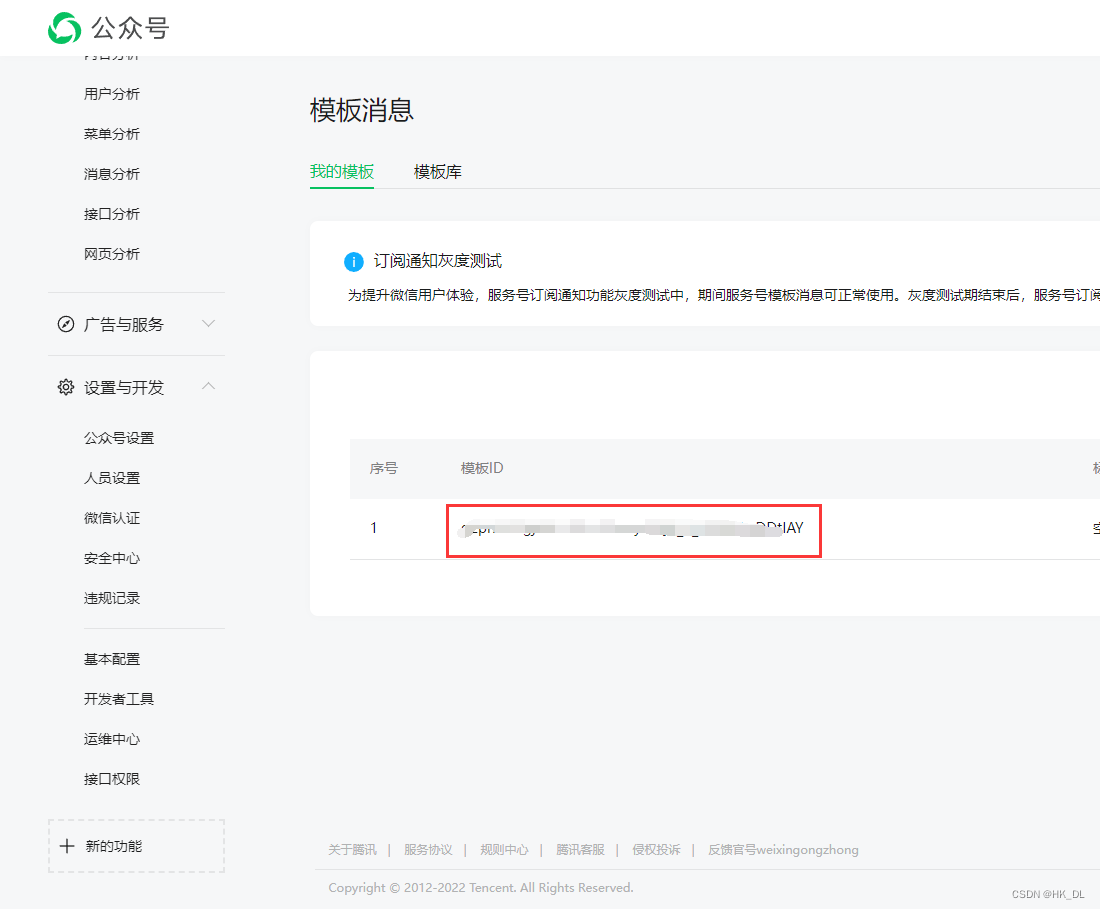
模板消息申请下来后,保存模板消息Id,后续发送模板消息使用
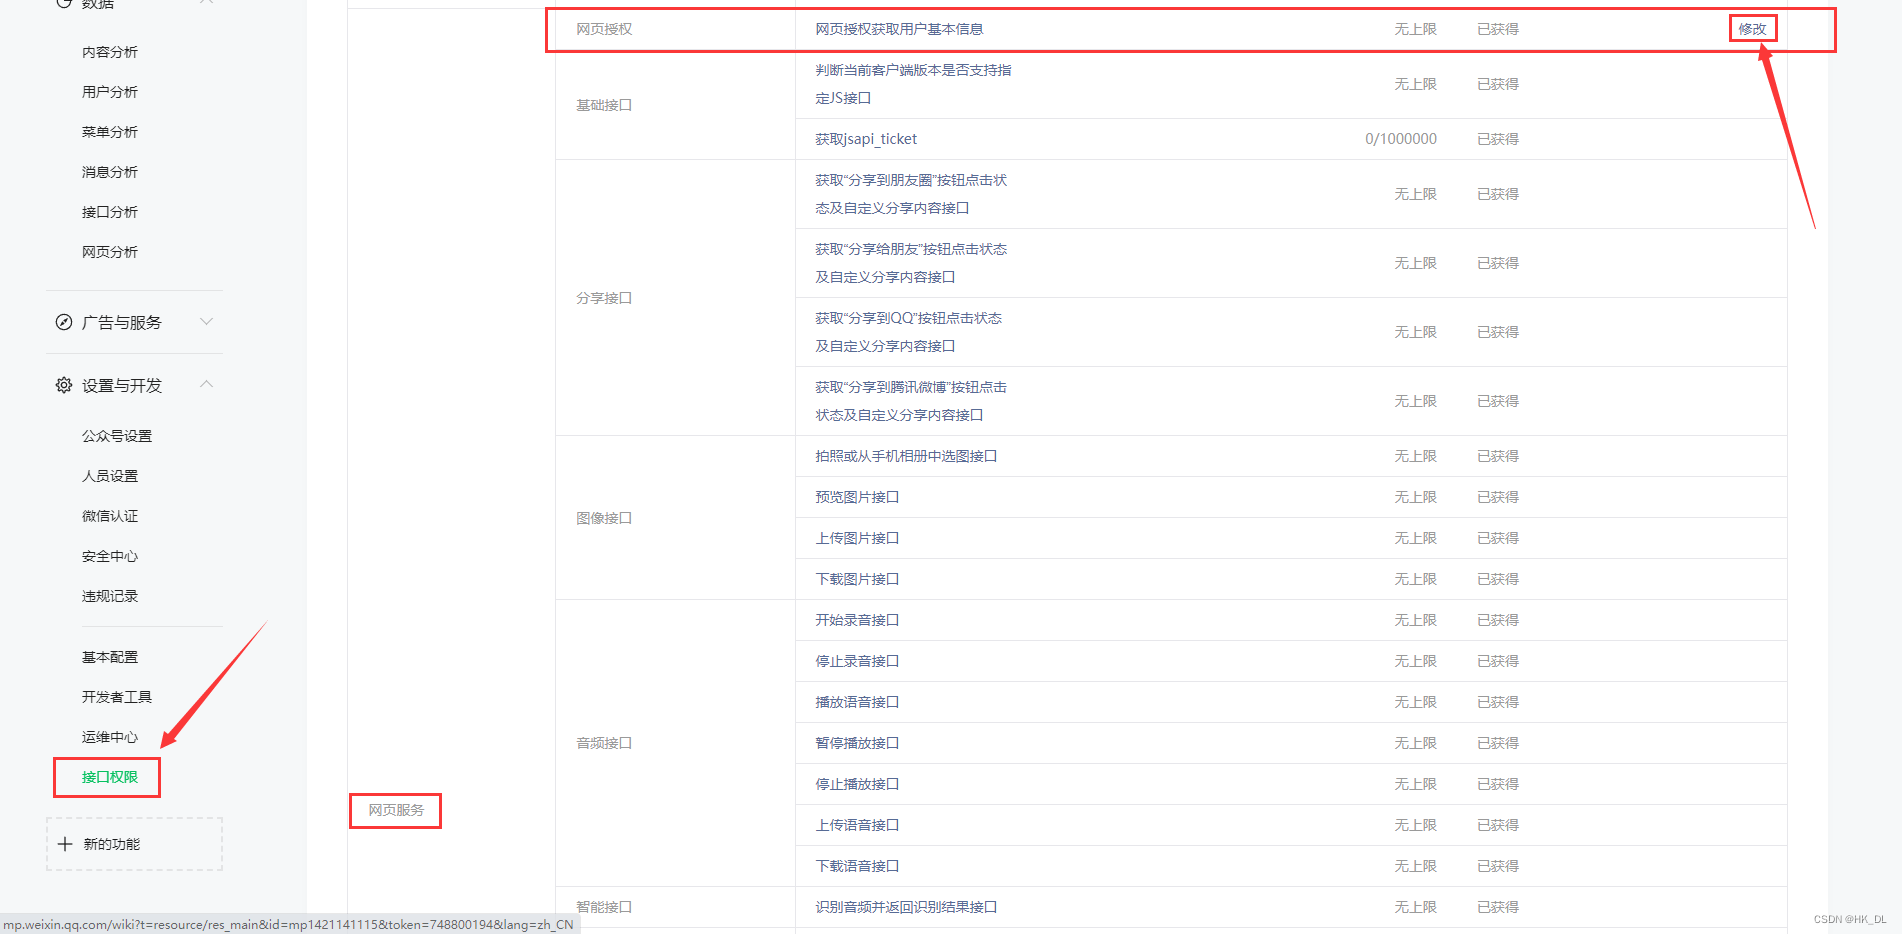
二、接口权限 => 网页服务 => 网页授权 => 申请/修改
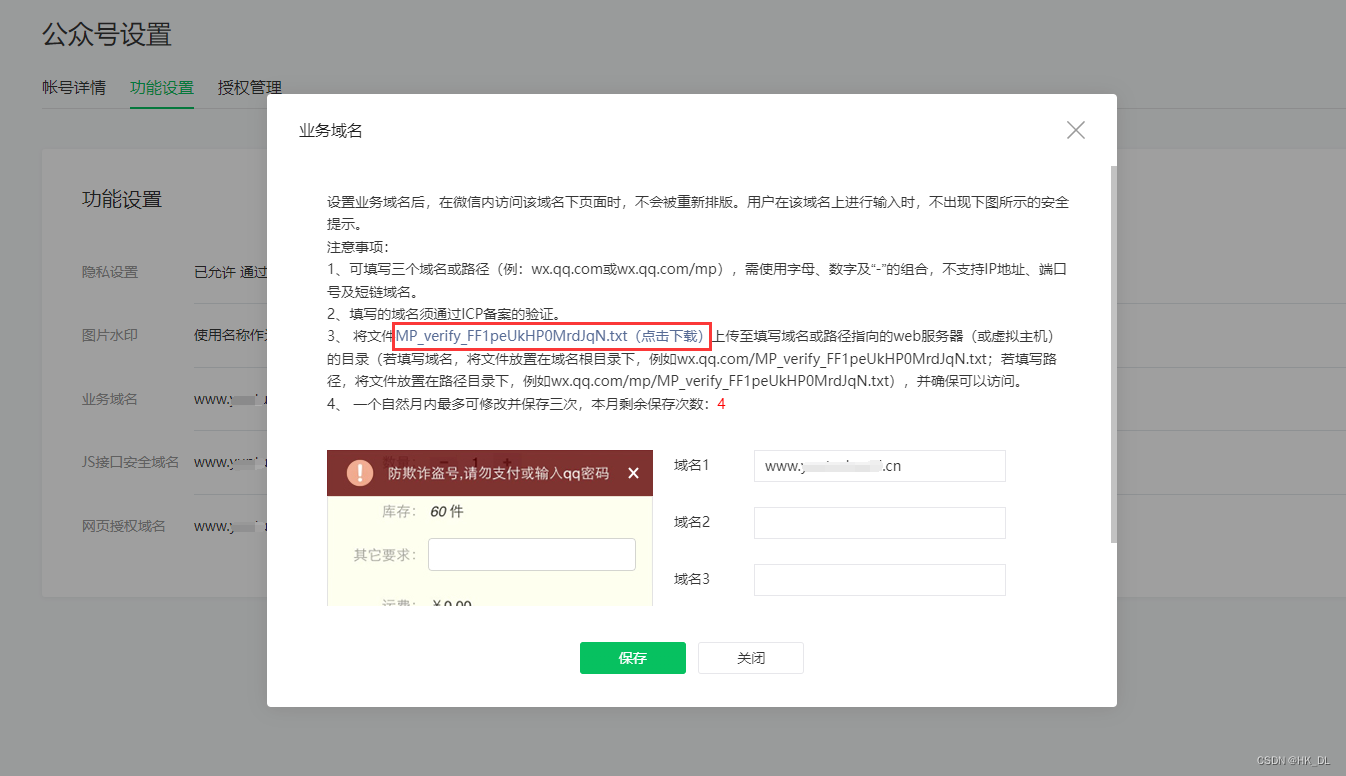
三、配置域名,三项都要配置。注意前面不要加http或https,后面不可带端口号。还需要下载一个校验文件,把下载下来的校验文件放到所配置域名解析的服务器上,需要域名+检验文件名可以访问到这个文件才算校验通过,后面不能有端口(例如:wx.qq.com/MP_verify_FF1peUkHP0MrdJqN.txt;)。
ps:放校验文件的时候需要注意,http默认端口是80,https默认端口是443

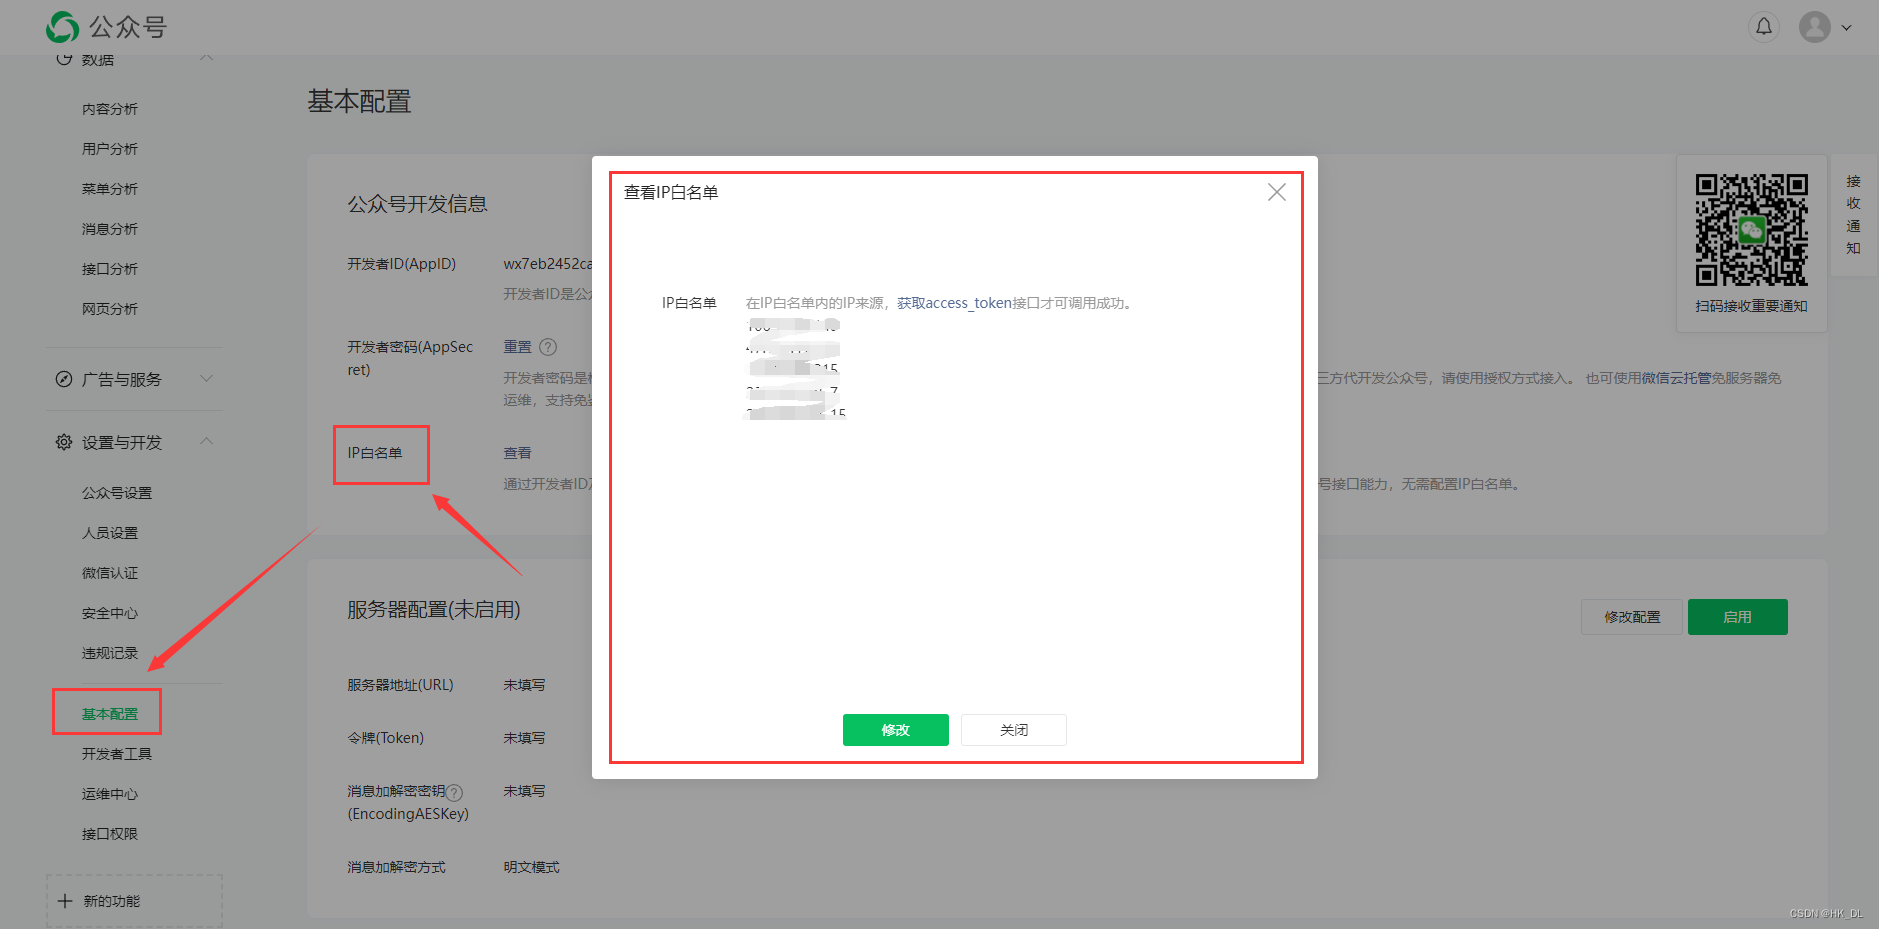
四、配置IP白名单。作用:后续获取access_token访问接口时,需要设置访问来源IP为白名单,如不配置就拿不到token,每台机器上请求返回的ip都会不一样,把开发机器和服务器拿到的ip都配置一样就好,配置多个ip时每个ip用回车隔开就行。怎么获取来源ip:如果没有配置ip白名单,请求获取access_token时会返回一个ip,把这个ip配上去就行了。另外顺便保存一下appId和AppSecret,方便后续使用。
五、以上为发送模板消息的准备工作,下面是重点
一、获取code:需要更换的参数是appid、redirect_uri,其他参数不变,其中scope有两个参数,以snsapi_base为 scope 发起的网页授权,是用来获取进入页面的用户的 openid 的,并且是静默授权并自动跳转到回调页的。用户感知的就是直接进入了回调页(往往是业务页面);
以snsapi_userinfo为 scope 发起的网页授权,是用来获取用户的基本信息的。但这种授权需要用户手动同意,并且由于用户同意过,所以无须关注,就可在授权后获取该用户的基本信息。我这里用的是静默授权然后跳转到相关页面。另外还要注意的是这个地址只能在微信客户端请求才有用,可以用微信开发者工具切换成公众号调试模式测试,请求后会自动重定向,在跳转的地址后面拼上一个code,这个就是我们需要的参数。
https://open.weixin.qq.com/connect/oauth2/authorize?appid=你的appid&redirect_uri=要跳转的地址/页面&response_type=code&scope=snsapi_base&state=STATE#wechat_redirect
二、通过code换取网页授权access_token,拿到openId
注意上面拿到的code只能使用一次,并且有效时长为5分钟,失效必须重新获取
https://api.weixin.qq.com/sns/oauth2/access_token?appid=你的appid&secret=你的secret&code=上面地址栏拿到的code&grant_type=authorization_code
三、获取token(此token与上面的access_token不一样),此token用于发送模板消息用以及其他api接口的调用
https://api.weixin.qq.com/cgi-bin/token?grant_type=client_credential&appid=你的appid&secret=你的secret
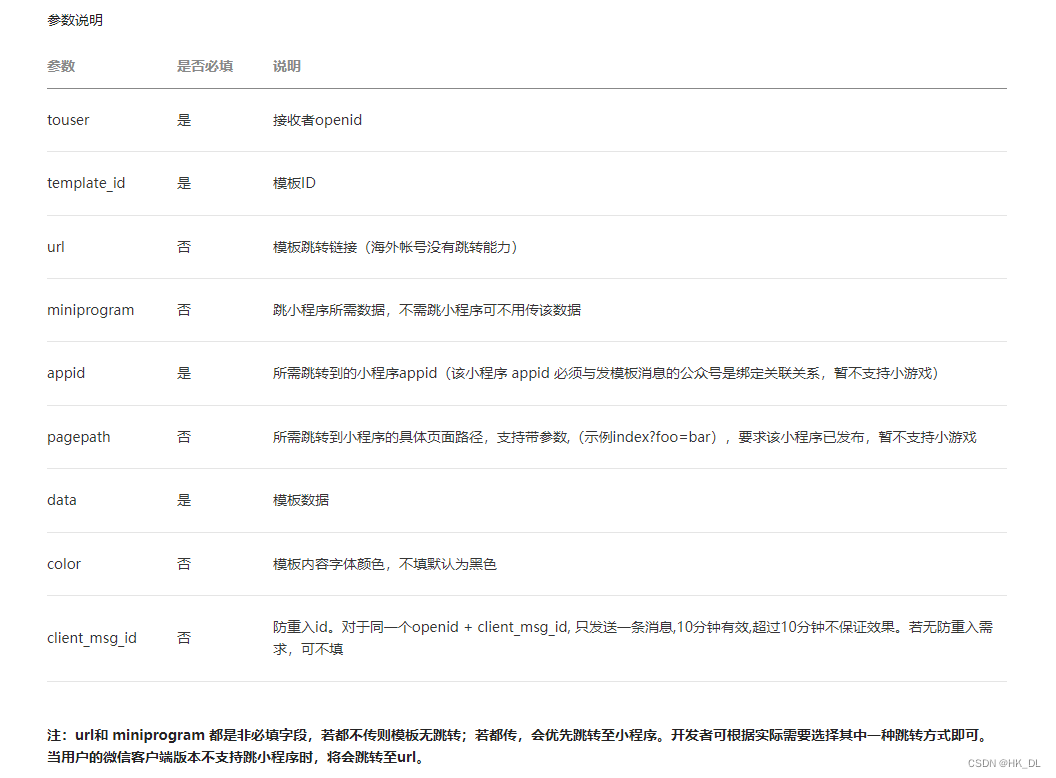
四、发送模板消息
https://api.weixin.qq.com/cgi-bin/message/template/send?access_token=上面获取到的token
POST数据示例如下:
- {
- "touser":"OPENID",
- "template_id":"ngqIpbwh8bUfcSsECmogfXcV14J0tQlEpBO27izEYtY",
- "url":"http://weixin.qq.com/download",
- "miniprogram":{
- "appid":"xiaochengxuappid12345",
- "pagepath":"index?foo=bar"
- },
- "client_msg_id":"MSG_000001",
- "data":{
- "first": {
- "value":"恭喜你购买成功!",
- "color":"#173177"
- },
- "keyword1":{
- "value":"巧克力",
- "color":"#173177"
- },
- "keyword2": {
- "value":"39.8元",
- "color":"#173177"
- },
- "keyword3": {
- "value":"2014年9月22日",
- "color":"#173177"
- },
- "remark":{
- "value":"欢迎再次购买!",
- "color":"#173177"
- }
- }
- }

下面附上java代码:
1.获取用户openid,参数为code
- /**
- * 微信公众号获取获取用户openid
- * @param code
- * @return
- */
- @GetMapping("/getOpenId")
- @ApiOperation(value = "微信公众号获取用户openid")
- public String getOpenId(@RequestParam String code){
- String url= "https://api.weixin.qq.com/sns/oauth2/access_token" + "?appid=" + appId + "&secret=" + appSecret + "&code="+ code+"&grant_type=authorization_code";
- RestTemplate restTemplate=new RestTemplate();
- String response=restTemplate.getForObject(url,String.class);
- JSONObject jsonObj = new JSONObject(response);
- String openid = jsonObj.get("openid").toString();
- return openid;
- }
2.获取token
- /**
- * 微信公众号获取获取token
- * @return
- */
- public String getWeiXinToken(){
- String url="https://api.weixin.qq.com/cgi-bin/token?grant_type=client_credential&appid="+ appId + "&secret=" + appSecret;
- RestTemplate restTemplate = new RestTemplate();
- String forObject = restTemplate.getForObject(url, String.class);
- JSONObject jsonObj = new JSONObject(forObject);
- return jsonObj.get("access_token").toString();
- }
3.准备一个模板消息实体类
- @Data
- public class WxTemplateMsg {
- /**
- * 接收者openId
- */
- private String touser;
- /**
- * 模板ID
- */
- private String template_id;
- /**
- * 模板跳转链接
- */
- private String url;
-
- // "miniprogram":{ 未加入
- // "appid":"xiaochengxuappid12345",
- // "pagepath":"index?foo=bar"
- // },
-
- /**
- * data数据
- */
- private TreeMap<String, TreeMap<String, String>> data;
-
- /**
- * 参数
- *
- * @param value 值
- * @param color 颜色 可不填
- * @return params
- */
- public static TreeMap<String, String> item(String value, String color) {
- TreeMap<String, String> params = new TreeMap<String, String>();
- params.put("value", value);
- params.put("color", color);
- return params;
- }
- }
4.模板消息封装,消息参数根据自己选择的模板消息来
- /**
- * 模板消息封装
- * @param
- * @return
- */
- public String noticeTemplate(String openIdd,String siteName,String airIndex,String value1,String value2,String airIndexTime) {
- // 模版ID
- String templateId="你的模板消息id";
- TreeMap<String, TreeMap<String, String>> params = new TreeMap<>();
- //根据具体模板参数组装
- params.put("first", WxTemplateMsg.item(siteName, "#000000"));
- params.put("keyword1", WxTemplateMsg.item(airIndex, "#000000"));
- params.put("keyword2", WxTemplateMsg.item(value1, "#000000"));
- params.put("keyword3", WxTemplateMsg.item(value2, "#000000"));
- params.put("remark", WxTemplateMsg.item(airIndexTime, "#000000"));
- WxTemplateMsg wxTemplateMsg = new WxTemplateMsg();
- // 模版ID
- wxTemplateMsg.setTemplate_id(templateId);
- // 消息接收者openId
- wxTemplateMsg.setTouser(openIdd);
- // 关键字赋值
- wxTemplateMsg.setData(params);
- String data = JSONUtil.toJsonStr(wxTemplateMsg);
- return data;
- }
5.发送模板消息
- /**
- * 发送模板消息
- */
- public void sendTemplateMsg(String openId,String siteName,String airIndex,String value1,String value2,String airIndexTime){
- //获取token
- String weiXinToken = getWeiXinToken();
- String data = noticeTemplate(openId,siteName,airIndex,value1,value2,airIndexTime);
- //发送消息
- okhttp3.RequestBody requestBody = okhttp3.RequestBody.create(MediaType.parse("application/json"), data);
- Request request = new Request.Builder().url("https://api.weixin.qq.com/cgi-bin/message/template/send?access_token=" + weiXinToken).post(requestBody).build();
- OkHttpClient okHttpClient = new OkHttpClient();
- Response execute = null;
- try {
- execute = okHttpClient.newCall(request).execute();
- String body = execute.body().string();
- if(execute.code() == 200){
- System.out.println("模板消息发送成功==========" + body);
- }else{
- System.out.println("模板消息发送失败==========" + body);
- }
- } catch (IOException e) {
- e.printStackTrace();
- }
- }
OK,至此模板消息发送流程就完啦!


