
- 1小程序展开收起
- 2如何在前端实现WebSocket发送和接收TCP消息(多线程模式)
- 3Elasticsearch的使用RestHighLevelClient_elasticsearch-rest-high-level-client 使用教程
- 4STM32完美移植RT-Thread实时操作系统_rtconfig.h
- 5注解处理器、ServiceLoader 开发SpringCloud启动参数拓展类_implements launcherservice
- 6带你深入浅出Vue
- 7Windows 服务资料不错_cserctrl.writetolog vc
- 8校验 ChatGPT 4.0 真实性的三个经典问题:快速区分 GPT3.5 与 GPT4,并提供免费测试网站_gpt4.0测试csdn
- 9C语言:通过自定义函数实现查找功能_c语言查找函数怎么写
- 10对于超出一行的文本进行(展开/收起)操作的vue组件,实测好用_vue 判断内容是否超过一行
[Docker]二.Docker 镜像,仓库,容器介绍以及详解_docker 镜像库
赞
踩
一.Docker 镜像,容器,仓库的简单介绍
通俗来讲:镜像相当于VM虚拟机中的ios文件,容器相当于虚拟机系统,仓库相当于系统中的进程或者执行文件,容器是通过镜像创建的

 1.镜像
1.镜像
Docker 镜像就是一个 Linux 的文件系统( Root FileSystem ),这个文件系统里面包含可以运行在 Linux 内核的程序以及相应的数据,这里要强调一下镜像的两个特征:
镜像是分层(Layer)的即一个镜像可以多个中间层组成,多个镜像可以共享同一中间层,也可以通过在镜像添加多一层来生成一个新的镜像镜像是只读的(read-only)镜像在构建完成之后,便不可以再修改,而上面所说的添加一层构建新的镜像,这中间实际是通过创建一个临时的容器,在容器上增加或删除文件,从而形成新的镜像,因为容器是可以动态改变的
 2.容器
2.容器
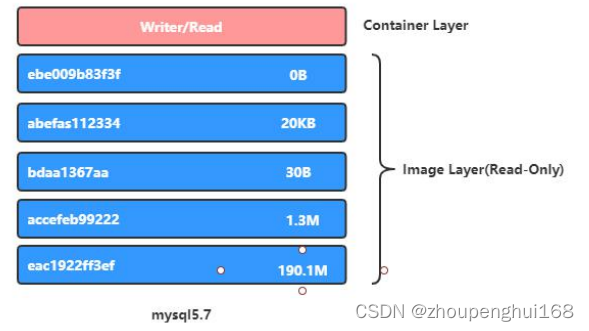
类似 linux 系统环境, 运行和隔离应用 ,容器从镜像启动的时候, docker 会在镜像的最上一层创建一个可写层, 镜像本身是只读的 ,保持不变,容器与镜像的关系,就如同面向编程中对象与类之间的关系。因为 容器是通过镜像来创建的 ,所以必须先有镜像才能创建容器,而生成的容器是一个独立于宿主机的隔离进程,并且有属于容器自己的网络和命名空间。前面介绍过,镜像由多个中间层(layer )组成,生成的镜像是只读的,但容器却是可读可写的,这是因为容器是在镜像上面添一层读写层( writer/read layer )来实现的,如下图所示:
3.仓库(Repository)
仓库(Repository)是集中存储镜像的地方 ,这里有个概念要区分一下,那就是 仓库 与 仓库服务器 (Registry) 是两回事,像上面说的 Docker Hub ,就是 Docker 官方提供的一个仓库服务器,不过其实有时候不太需要太过区分这两个概念
公共仓库
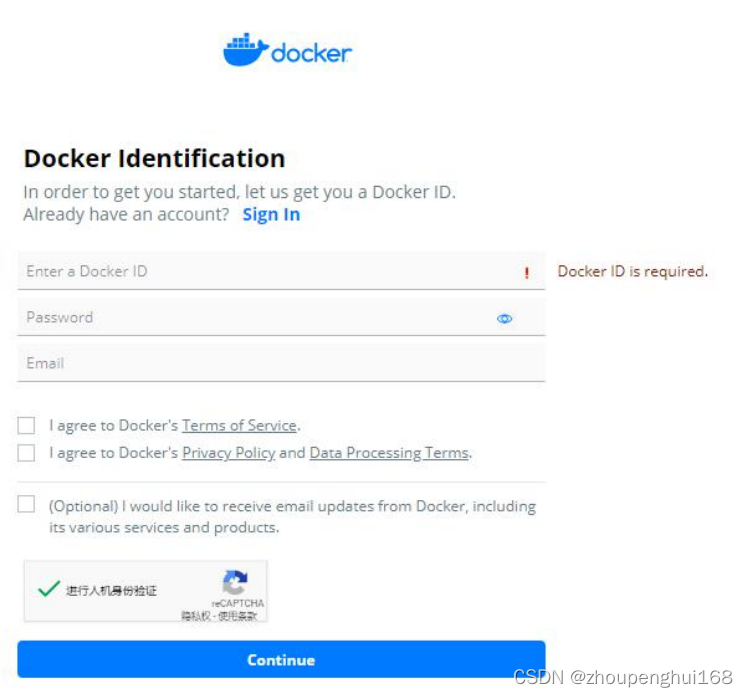
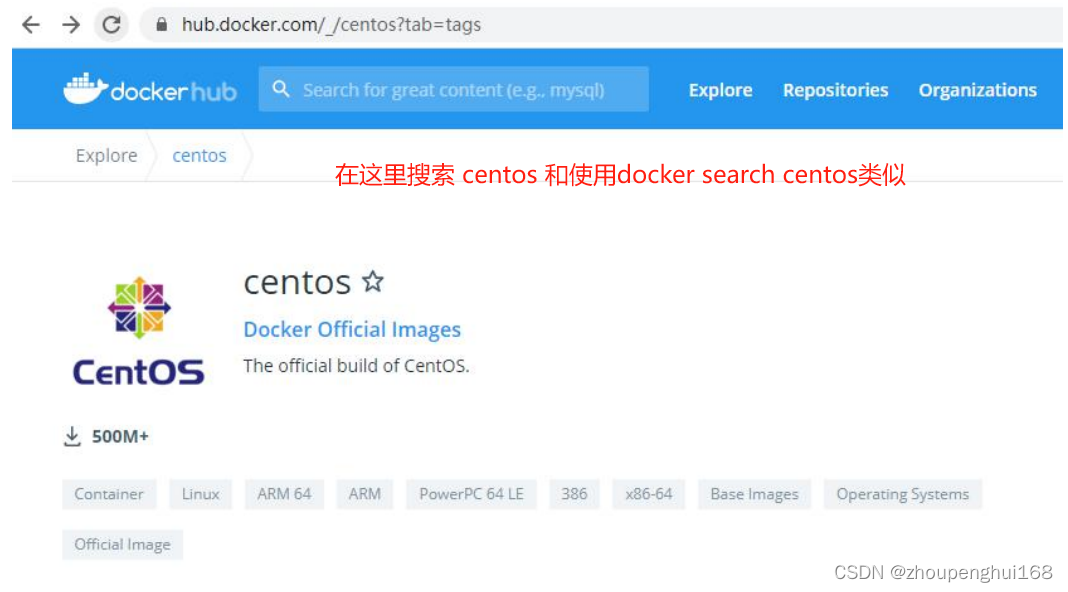
公共仓库一般是指 Docker Hub ,前面已经多次介绍如何从 Docker Hub 获取镜像,除了获取镜像外,也可以将自己构建的镜像存放到 Docker Hub ,这样,别人也可以使用我们构建的镜像,不过要将镜像上传到 Docker Hub ,必须先在 Docker 的官方网站上注册一个账号,注册界面如下,按要求填写必要的信息就可以注册了
 私有仓库
私有仓库
有时候自己部门内部有一些镜像要共享时,如果直接导出镜像拿给别人又比较麻烦,使用像Docker Hub 这样的公共仓库又不是很方便,这时候可以自己搭建属于自己的私有仓库服务,用于存储和分布自己的镜像
二.Docker 镜像以及仓库
Docker 镜像就是一个 Linux 的文件系统( Root FileSystem ),这个文件系统里面包含可以运行在 Linux 内核的程序以及相应的数据
1.docker search 搜索镜像
docker search centos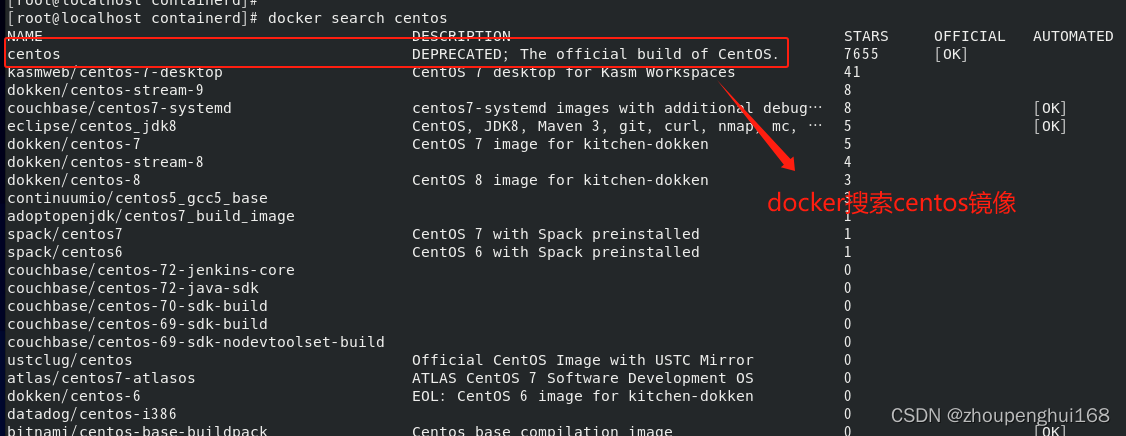
- [root@localhost containerd]# docker search --help
-
- Usage: docker search [OPTIONS] TERM
-
- Search the Docker Hub for images
-
- Options:
- -f, --filter filter Filter output based on conditions provided
- --format string Pretty-print search using a Go template
- --limit int Max number of search results (default 25)
- --no-trunc Don't truncate output
备注: -f STARS=3000 搜索 STARS 大于 3000 的镜像搜索mysql STARS 大于 3000的镜像
- [root@localhost containerd]# docker search mysql -f STARS=3000
- NAME DESCRIPTION STARS OFFICIAL AUTOMATED
- mysql MySQL is a widely used, open-source relation… 14530 [OK]
- mariadb MariaDB Server is a high performing open sou… 5550 [OK]
2.docker pull 下载镜像
下载docker pull centos最新的镜像
docker pull centos- [root@localhost /]# docker pull centos
- Using default tag: latest
- latest: Pulling from library/centos
- 7a0437f04f83: Pull complete
- Digest: sha256:5528e8b1b1719d34604c87e11dcd1c0a20bedf46e83b5632cdeac91b8c04efc1
- Status: Downloaded newer image for centos:latest
- docker.io/library/centos:latest
下载指定的tag的镜像:docker pull centos:8.3.2011
- [root@localhost /]# docker pull centos:8.3.2011
- 8.3.2011: Pulling from library/centos
- Digest: sha256:5528e8b1b1719d34604c87e11dcd1c0a20bedf46e83b5632cdeac91b8c04efc1
- Status: Downloaded newer image for centos:8.3.2011
- docker.io/library/centos:8.3.2011
下载nginx镜像: nginx镜像中集成了一个linux操作系统,在操作系统中又集成了nginx,然后打包成一个nginx镜像,下载好nginx镜像后,然后启动该服务,就可以进行web服务操作了,实际上在下载nignx镜像的时候,其实不是一下子就下载好了的,而是一层一层地下载其他镜像,然后打包成nginx镜像
- root@localhost zph]# docker pull nginx
- Using default tag: latest
- latest: Pulling from library/nginx
- Digest: sha256:b4af4f8b6470febf45dc10f564551af682a802eda1743055a7dfc8332dffa595
- Status: Downloaded newer image for nginx:latest
- docker.io/library/nginx:latest
3.镜像结构
镜像结构:docker.io/library/centos:latest
- [root@localhost containerd]# docker pull centos
- Using default tag: latest
- latest: Pulling from library/centos
- Digest: sha256:a27fd8080b517143cbbbab9dfb7c8571c40d67d534bbdee55bd6c473f432b177
- Status: Downloaded newer image for centos:latest
- docker.io/library/centos:latest
4.docker images 查看本地镜像
- [root@localhost containerd]# docker images
- REPOSITORY TAG IMAGE ID CREATED SIZE
- nginx latest bc649bab30d1 10 days ago 187MB
- hello-world latest 9c7a54a9a43c 5 months ago 13.3kB
- centos latest 5d0da3dc9764 2 years ago 231MB
5.docker tag 给镜像打标签
比如:下载了一个镜像,启动了这个容器,在这个容器中做了一些操作,然后就想把这个容器制作成自己的镜像,那么就需要给这个镜像打标签(相当于发布这个镜像,制作好这个镜像后,就可以把它发布到远程仓库了),给镜像打标签可以创建自己的镜像, 自定义镜像结构命名规则如下 : registry name/repository name/image name:tag name ,例如:docker.io/library/centos:latest
- [root@localhost zph]# docker tag --help
-
- Usage: docker tag SOURCE_IMAGE[:TAG] TARGET_IMAGE[:TAG]
-
- Create a tag TARGET_IMAGE that refers to SOURCE_IMAGE
对上述说明:
SOURCE_IMAGE 镜像名 [:TAG] 镜像标签名
TARGET_IMAGE 打包新的镜像名 [:TAG] 新镜像标签名
比如:把nginx镜像打包成一个新的镜像:
docker tag nginx docker.io/zph/nginx:last 或者把nginx替换成对应的IMAGE ID,如:
docker tag bc649bab30d1 docker.io/zph/nginx:v2
- root@localhost zph]# docker tag nginx docker.io/zph/nginx:last
- [root@localhost zph]# docker images
- REPOSITORY TAG IMAGE ID CREATED SIZE
- nginx latest bc649bab30d1 10 days ago 187MB
- zph/nginx last bc649bab30d1 10 days ago 187MB
6.把本地镜像推送到 dockerHub 仓库
(1).需要在dockerHub上面注册一个账户
把打包好的镜像发布到远程(hub.docker.com官网)自己的账号下,需要有一个docker账号
(2).使用 docker login 本地登录 dockerHub
- [root@localhost ~]# docker login
- Login with your Docker ID to push and pull images from Docker Hub. If you don't have
- a Docker ID, head over to https://hub.docker.com to create one.
- Username: zph
- Password:
- WARNING! Your password will be stored unencrypted in /root/.docker/config.json. Configure a credential helper to remove this warning. See
- https://docs.docker.com/engine/reference/commandline/login/#credentials-store
- Login Succeeded
登录成功后,会把账号信息保存到.docker/config.json中,查看保存的账户信息
- [root@localhost ~]# cat .docker/config.json
- {
- "auths": {
- "https://index.docker.io/v1/":
- {
- "auth": "aXR5aW5nOxxxzEyMzQ="
- }
- }
- }
(3).docker push 镜像名称 把本地镜像推送到远程
下载一个alpine的镜像演示,alpine是一个比较小的的 linux 镜像
- [root@localhost ~]# 下载alpine镜像
- [root@localhost ~]# docker pull alpine
- [root@localhost ~]# 打包alpine镜像
- [root@localhost ~]# docker tag d4ff818577bc docker.io/itying/alpine:v1.0.1
- [root@localhost ~]# docker tag d4ff818577bc docker.io/itying/alpine:latest
- [root@localhost ~]# 查看alpine镜像
- [root@localhost ~]# docker images | grep alpine
- itying/alpine v1.0.1 d4ff818577bc 4 weeks ago 5.6MB
- alpine 3.14.0 d4ff818577bc 4 weeks ago 5.6MB
- alpine latest d4ff818577bc 4 weeks ago 5.6MB
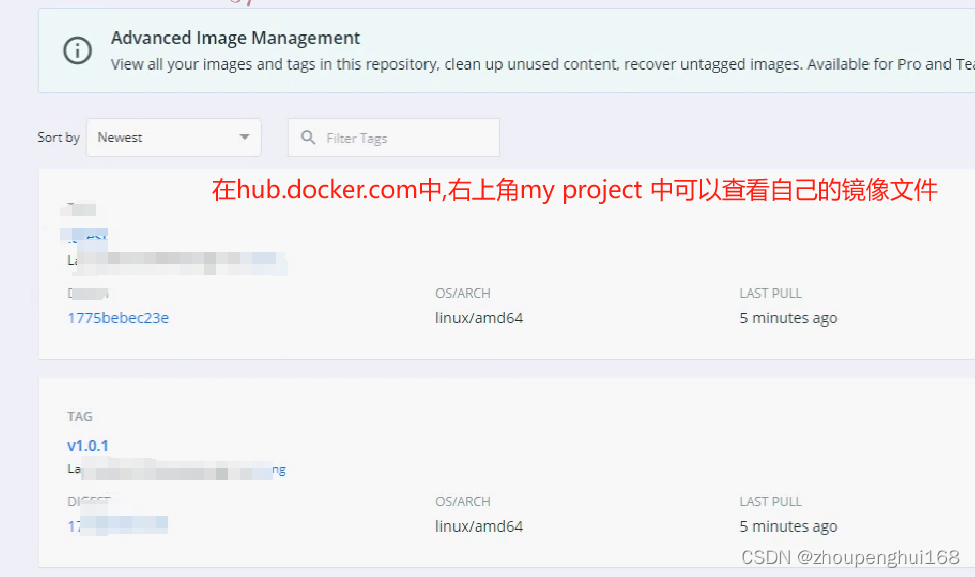
- [root@localhost ~]# 发布apline镜像到dockerHub
- [root@localhost ~]# docker push docker.io/itying/alpine:v1.0.1
- The push refers to repository [docker.io/itying/alpine]
- 72e830a4dff5: Mounted from library/alpine
- v1.0.1: digest: sha256:1775bebec23e1f3ce4869xxx26497d82f2ffca9
- d size: 528
7.docker rmi 删除镜像
查看本地镜像
- [root@localhost zph]# docker images
- REPOSITORY TAG IMAGE ID CREATED SIZE
- nginx latest bc649bab30d1 10 days ago 187MB
- zph/nginx last bc649bab30d1 10 days ago 187MB
- zph/nginx v2 bc649bab30d1 10 days ago 187MB
- hello-world latest 9c7a54a9a43c 5 months ago 13.3kB
- centos latest 5d0da3dc9764 2 years ago 231MB
删除对应的标签镜像:docker rmi 镜像名:版本,如下:
- [root@localhost zph]# docker rmi zph/nginx:v2
- Untagged: zph/nginx:v2
- [root@localhost zph]# docker images
- REPOSITORY TAG IMAGE ID CREATED SIZE
- nginx latest bc649bab30d1 10 days ago 187MB
- zph/nginx last bc649bab30d1 10 days ago 187MB
- hello-world latest 9c7a54a9a43c 5 months ago 13.3kB
- centos latest 5d0da3dc9764 2 years ago 231MB
如果要删除IMAGE ID的镜像,则使用命令:docker rmi -f IMAGE ID, 如:
- [root@localhost zph]# docker rmi -f bc649bab30d1
- Untagged: nginx:latest
- Untagged: nginx@sha256:b4af4f8b6470febf45dc10f564551af682a802eda1743055a7dfc8332dffa595
- Untagged: zph/nginx:last
- Deleted: sha256:bc649bab30d150c10a84031a7f54c99a8c31069c7bc324a7899d7125d59cc973
- Deleted: sha256:c6f480996a203ed077606cce624f944b041449833e2db3f7d19fe22974fb965b
- Deleted: sha256:e4347a01432c5f4350b041632f5703c3dd47de2ec68547b9339d11ea44708389
- Deleted: sha256:9d40098fc19fdfff9c74fd3c2c0ff49bfda7d9d04b5d7806d0843d32055d769a
- Deleted: sha256:165ae0ef2ddd33b6d5a7f206633b9b0c30cd94ff18a4ed5c3aeb59bf28388526
- Deleted: sha256:06dabb44ac4d1f0b5544255e944f15a939178d77aff60a5b296e38bd8743efeb
- Deleted: sha256:ee220599571f649e0fb74b40db1615a4c9c1355ac912f9e70087b695617af352
- Deleted: sha256:cb4596cc145400fb1f2aa56d41516b39a366ecdee7bf3f9191116444aacd8c90
-
- [root@localhost zph]# docker images
- REPOSITORY TAG IMAGE ID CREATED SIZE
- hello-world latest 9c7a54a9a43c 5 months ago 13.3kB
- centos latest 5d0da3dc9764 2 years ago 231MB
这样就会删除IMAGE ID 为 bc649bab30d1的nginx 镜像了
三.Docker 容器
类似 linux 系统环境,运行和隔离应用, 容器从镜像启动的 时候, docker 会在 镜像的最上一层 创建一个 可写层 ,镜像本身是 只读的 ,保持不变,容器与镜像的关系,就如同面向编程中对象与类之间的关系。因为容器是通过镜像来创建的,所以必须先有镜像才能创建容器,而生成的容器是一个独立于宿主机的隔离进程,并且有属于容器自己的网络和命名空间
1.查看所的容器
查看所有运行的容器
- [root@localhost zph]# docker ps
- CONTAINER ID IMAGE COMMAND CREATED STATUS PORTS NAMES
- 757e72f3b32e rabbitmq:3.7.16-management "docker-entrypoint.s…" 22 months ago Up 6 hours 0.0.0.0:4369->4369/tcp, :::4369->4369/tcp, 5671/tcp, 0.0.0.0:5672->5672/tcp, :::5672->5672/tcp, 0.0.0.0:15672->15672/tcp, :::15672->15672/tcp, 0.0.0.0:25672->25672/tcp, :::25672->25672/tcp, 15671/tcp dockerlnmp_rabbitmq_1
- e526c3df36f7 dockerlnmp_mysql "docker-entrypoint.s…" 22 months ago Up 6 hours 0.0.0.0:3306->3306/tcp, :::3306->3306/tcp, 33060/tcp
查看所有容器(既有运行中的容器,也有被销毁的容器)
- [root@localhost zph]# docker ps -a
- CONTAINER ID IMAGE COMMAND CREATED STATUS PORTS NAMES
- 8def313c4f6e hello-world "/hello" 5 hours ago Exited (0) 5 hours ago intelligent_johnson
- 59222227ec81 dockerlnmp_nginx "/usr/bin/supervisor…" 21 months ago Exited (0) 19 months ago dockerlnmp_nginx_1
- ed99ccb1576f dockerlnmp_php "/usr/bin/supervisor…" 21 months ago Exited (0) 19 months ago dockerlnmp_php_1
- 9299363ef447 composer:latest "/docker-entrypoint.…" 21 months ago Exited (1) 19 months ago composer
- b4791a6baf69 c6f915833fb6 "/bin/sh -c 'mkdir -…" 21 months ago Exited (1) 21 months ago
2.docker run 参数
- [root@localhost zph]# docker run --help
-
- Usage: docker run [OPTIONS] IMAGE [COMMAND] [ARG...]
-
- Run a command in a new container
-
- Options:
- --add-host list Add a custom host-to-IP mapping (host:ip)
- -a, --attach list Attach to STDIN, STDOUT or STDERR
- --blkio-weight uint16 Block IO (relative weight), between 10 and 1000, or 0 to disable (default 0)
- --blkio-weight-device list Block IO weight (relative device weight) (default [])
- --cap-add list Add Linux capabilities
- --cap-drop list Drop Linux capabilities
- --cgroup-parent string Optional parent cgroup for the container
- --cgroupns string Cgroup namespace to use (host|private)
- 'host': Run the container in the Docker host's cgroup namespace
- 'private': Run the container in its own private cgroup namespace
- '': Use the cgroup namespace as configured by the
- default-cgroupns-mode option on the daemon (default)
- --cidfile string Write the container ID to the file
- --cpu-period int Limit CPU CFS (Completely Fair Scheduler) period
- --cpu-quota int Limit CPU CFS (Completely Fair Scheduler) quota
- --cpu-rt-period int Limit CPU real-time period in microseconds
- --cpu-rt-runtime int Limit CPU real-time runtime in microseconds
- -c, --cpu-shares int CPU shares (relative weight)
- --cpus decimal Number of CPUs
- --cpuset-cpus string CPUs in which to allow execution (0-3, 0,1)
- --cpuset-mems string MEMs in which to allow execution (0-3, 0,1)
- -d, --detach Run container in background and print container ID
- --detach-keys string Override the key sequence for detaching a container
- --device list Add a host device to the container
- --device-cgroup-rule list Add a rule to the cgroup allowed devices list
- --device-read-bps list Limit read rate (bytes per second) from a device (default [])
- --device-read-iops list Limit read rate (IO per second) from a device (default [])
- --device-write-bps list Limit write rate (bytes per second) to a device (default [])
- --device-write-iops list Limit write rate (IO per second) to a device (default [])
- --disable-content-trust Skip image verification (default true)
- --dns list Set custom DNS servers
- --dns-option list Set DNS options
- --dns-search list Set custom DNS search domains
- --domainname string Container NIS domain name
- --entrypoint string Overwrite the default ENTRYPOINT of the image
- -e, --env list Set environment variables
- --env-file list Read in a file of environment variables
- --expose list Expose a port or a range of ports
- --gpus gpu-request GPU devices to add to the container ('all' to pass all GPUs)
- --group-add list Add additional groups to join
- --health-cmd string Command to run to check health
- --health-interval duration Time between running the check (ms|s|m|h) (default 0s)
- --health-retries int Consecutive failures needed to report unhealthy
- --health-start-period duration Start period for the container to initialize before starting health-retries countdown (ms|s|m|h) (default 0s)
- --health-timeout duration Maximum time to allow one check to run (ms|s|m|h) (default 0s)
- --help Print usage
- -h, --hostname string Container host name
- --init Run an init inside the container that forwards signals and reaps processes
- -i, --interactive Keep STDIN open even if not attached
- --ip string IPv4 address (e.g., 172.30.100.104)
- --ip6 string IPv6 address (e.g., 2001:db8::33)
- --ipc string IPC mode to use
- --isolation string Container isolation technology
- --kernel-memory bytes Kernel memory limit
- -l, --label list Set meta data on a container
- --label-file list Read in a line delimited file of labels
- --link list Add link to another container
- --link-local-ip list Container IPv4/IPv6 link-local addresses
- --log-driver string Logging driver for the container
- --log-opt list Log driver options
- --mac-address string Container MAC address (e.g., 92:d0:c6:0a:29:33)
- -m, --memory bytes Memory limit
- --memory-reservation bytes Memory soft limit
- --memory-swap bytes Swap limit equal to memory plus swap: '-1' to enable unlimited swap
- --memory-swappiness int Tune container memory swappiness (0 to 100) (default -1)
- --mount mount Attach a filesystem mount to the container
- --name string Assign a name to the container
- --network network Connect a container to a network
- --network-alias list Add network-scoped alias for the container
- --no-healthcheck Disable any container-specified HEALTHCHECK
- --oom-kill-disable Disable OOM Killer
- --oom-score-adj int Tune host's OOM preferences (-1000 to 1000)
- --pid string PID namespace to use
- --pids-limit int Tune container pids limit (set -1 for unlimited)
- --platform string Set platform if server is multi-platform capable
- --privileged Give extended privileges to this container
- -p, --publish list Publish a container's port(s) to the host
- -P, --publish-all Publish all exposed ports to random ports
- --pull string Pull image before running ("always"|"missing"|"never") (default "missing")
- --read-only Mount the container's root filesystem as read only
- --restart string Restart policy to apply when a container exits (default "no")
- --rm Automatically remove the container when it exits
- --runtime string Runtime to use for this container
- --security-opt list Security Options
- --shm-size bytes Size of /dev/shm
- --sig-proxy Proxy received signals to the process (default true)
- --stop-signal string Signal to stop a container (default "SIGTERM")
- --stop-timeout int Timeout (in seconds) to stop a container
- --storage-opt list Storage driver options for the container
- --sysctl map Sysctl options (default map[])
- --tmpfs list Mount a tmpfs directory
- -t, --tty Allocate a pseudo-TTY
- --ulimit ulimit Ulimit options (default [])
- -u, --user string Username or UID (format: <name|uid>[:<group|gid>])
- --userns string User namespace to use
- --uts string UTS namespace to use
- -v, --volume list Bind mount a volume
- --volume-driver string Optional volume driver for the container
- --volumes-from list Mount volumes from the specified container(s)
- -w, --workdir string Working directory inside the container
常用命令如下:docker run:创建一个新的容器并运行一个命令docker run 是日常用的最频繁用的命令之一,同样也是较为复杂的命令之一命令格式:docker run [OPTIONS] IMAGE [COMMAND] [ARG...]OPTIONS :选项-i :表示启动一个可交互的容器,并持续打开标准输入-t: 表示使用终端关联到容器的标准输入输出上-d :表示容器放置后台运行--rm:退出后即删除容器--name :表示定义容器唯一名称-p 映射端口-v 指定路径挂载数据卷-e 运行容器传递环境变量IMAGE :表示要运行的镜像COMMAND :表示启动容器时要运行的命令
3.-it 启动一个交互式容器
docker run 启动一个交互式容器在容器内执行/bin/bash 命令:
docker run -it --name centos7 centos /bin/bash 或者 docker run -it --name centos7 5d0da3dc9764 /bin/bash
5d0da3dc9764 为centos镜像的IMAGE ID, --name 给这个容器命名
- [root@localhost zph]# docker images
- REPOSITORY TAG IMAGE ID CREATED SIZE
- hello-world latest 9c7a54a9a43c 5 months ago 13.3kB
- centos latest 5d0da3dc9764 2 years ago 231MB
- [root@localhost zph]# docker run -it --name centos7 9c7a54a9a43c /bin/bash
- [root@8780efa9cf48 /]# ls
- bin dev etc home lib lib64 lost+found media mnt opt proc root run sbin srv sys tmp usr var
可以在容器中执行操作命令,如:ls cat,还可以在容器中安装一些软件,相当于把容器当作一个操作系统,只不过这个操作系统是一个比较精简的操作系统而已
- [root@0f0b83575aa4 /]# 进入容器后查看容器的IP地址
- [root@0f0b83575aa4 /]# ifconfig
- bash: ifconfig: command not found
-
- #s说明没有这个命令,使用yum安装命令操作
- [root@0f0b83575aa4 /]# yum install net-tools
- Loaded plugins: fastestmirror, ovl
- Determining fastest mirrors
- * base: mirrors.aliyun.com
- * extras: mirrors.aliyun.com
- * updates: mirrors.aliyun.com
-
- ...
-
- #安装成功后,使用ifconfig查看就可以了
- [root@0f0b83575aa4 /]# ifconfig
- eth0: flags=4163<UP,BROADCAST,RUNNING,MULTICAST> mtu 1500
- inet 172.17.0.2 netmask 255.255.0.0 broadcast 172.17.255.255
- ether 02:42:ac:11:00:02 txqueuelen 0 (Ethernet)
- RX packets 17779 bytes 32924504 (31.3 MiB)
- RX errors 0 dropped 0 overruns 0 frame 0
- TX packets 8464 bytes 495661 (484.0 KiB)
- TX errors 0 dropped 0 overruns 0 carrier 0 collisions 0
-
- lo: flags=73<UP,LOOPBACK,RUNNING> mtu 65536
- inet 127.0.0.1 netmask 255.0.0.0
- loop txqueuelen 1000 (Local Loopback)
- RX packets 0 bytes 0 (0.0 B)
- RX errors 0 dropped 0 overruns 0 frame 0
- TX packets 0 bytes 0 (0.0 B)
- TX errors 0 dropped 0 overruns 0 carrier 0 collisions 0
退出容器
exit: 容器停止并退出
ctrl+p+q:容器不停止退出
4.--rm 启动一个退出即删除容器
创建一个非交互式的容器用完就删除,也就是退出容器后就销毁
docker run --rm centos7 /bin/bash创建一个交互式的容器用完就删
docker run -it --rm centos7 /bin/bashexit 退出后,执行命令docker ps -a,发现上面的centos7已经被销毁了,没有这个记录
5.-d 启动一个后台容器
开启一个后台交互的容器,注意启动的时候加上-it,如果不加的话 docker 启动容器会自动停
止,也就是说,加上-d后,就是启动这个容器,然后在后台运行,不进入这个容器,eg:
- # 启动一个centos容器,并命名,执行/bin/bash,在后台运行,不进入容器内部
- [root@localhost zph]# docker run -it --name centos7-bak -d eeb6ee3f44bd /bin/bash
- # 该命令执行后,出现下面字符串
- 48830cb9e3177724a977a0ba1d6f0a1d06ceca016a148a7e9358bab9da3fe652
- [root@localhost zph]#
- #查看容器:发现存在cents7-bak这个容器,说明了上面docker run 命令的正确性
- [root@localhost zph]# docker ps
- CONTAINER ID IMAGE COMMAND CREATED STATUS PORTS NAMES
- 48830cb9e317 eeb6ee3f44bd "/bin/bash" 15 seconds ago Up 13 seconds centos7-bak
6.exec 进入置为后台已经启动的容器
进入一个容器可以使用 docker exec 或者 docker attac,用得最多的是docker exec这个命令,文档如下:
- [root@localhost zph]# docker exec --help
-
- Usage: docker exec [OPTIONS] CONTAINER COMMAND [ARG...]
-
- Run a command in a running container
-
- Options:
- -d, --detach Detached mode: run command in the background
- --detach-keys string Override the key sequence for detaching a container
- -e, --env list Set environment variables
- --env-file list Read in a file of environment variables
- -i, --interactive Keep STDIN open even if not attached
- --privileged Give extended privileges to the command
- -t, --tty Allocate a pseudo-TTY
- -u, --user string Username or UID (format: <name|uid>[:<group|gid>])
- -w, --workdir string Working directory inside the container
docker attach文档:
- [root@localhost zph]# docker attach --help
-
- Usage: docker attach [OPTIONS] CONTAINER
-
- Attach local standard input, output, and error streams to a running container
-
- Options:
- --detach-keys string Override the key sequence for detaching a container
- --no-stdin Do not attach STDIN
- --sig-proxy Proxy all received signals to the process (default true)
两个命令的区别:
docker exec: 进入容器开启一个新的终端(常用) 执行 exit 退出的时候不会停止容器,使用docker ps 查看时,容器存在,不会被销毁docker attach: 进入容器正在执行的终端 exit 退出会停止容器,docker ps查看时,容器不存在,已经被销毁了
- #查看正在运行的容器
- []root@localhost zph]# docker ps
- CONTAINER ID IMAGE COMMAND CREATED STATUS PORTS NAMES
- 48830cb9e317 eeb6ee3f44bd "/bin/bash" 12 minutes ago Up 12 minutes centos7-bak
- #进入容器,开启一个终端
- [root@localhost zph]# docker exec -it 48830cb9e317 /bin/bash
7.start 启动 stop 停止 restart 重启容器 exit 退出容器
- #docker ps -a: 查看所有容器(包括正在运行的以及被销毁的)
- #docker start: 容器名/容器id 启动容器
- #docker stop: 容器名/容器id 停止容器
- #docker restart: 容器名/容器id 重启容器
- #退出容器
- # exit: 容器停止并退出
- # ctrl+p+q:容器不停止退出
8.删除容器
- #docker rm 容器名/容器id :删除一个已经停止的容器,如果删除的容器在运行中,会弹出一个警告
- #docker rm -f 容器名/容器id :强制删除一个容器,不管是否在运行
- #docker rm -f $(docker ps -q) :删除所有容器()docker ps -q: 获取容器id)
- #docker rm $(docker ps -qf status=exited) :根据容器的状态,删除 Exited 状态的容器(docker ps -qf status=exited:筛选获取status=exited的容器id)
9.docker ps讲解
- [root@localhost zph]# docker ps --help
-
- Usage: docker ps [OPTIONS]
-
- List containers
-
- Options:
- -a, --all Show all containers (default shows just running):展示所有容器
- -f, --filter filter Filter output based on conditions provided:筛选
- --format string Pretty-print containers using a Go template
- -n, --last int Show n last created containers (includes all states) (default -1)
- -l, --latest Show the latest created container (includes all states)
- --no-trunc Don't truncate output
- -q, --quiet Only display container IDs:展示容器id
- -s, --size Display total file sizes
10查看容器操作日志
- #docker logs 帮助文档
- [root@localhost zph]# docker logs --help
-
- Usage: docker logs [OPTIONS] CONTAINER
-
- Fetch the logs of a container
-
- Options:
- --details Show extra details provided to logs
- -f, --follow Follow log output: 跟踪日志输出
- --since string Show logs since timestamp (e.g. 2013-01-02T13:23:37Z) or relative (e.g. 42m for 42 minutes) :显示某个开始时间的所有日志
- -n, --tail string Number of lines to show from the end of the logs (default "all"):仅列出最新 N 条容器日
- -t, --timestamps Show timestamps:显示时间戳
- --until string Show logs before a timestamp (e.g. 2013-01-02T13:23:37Z) or relative (e.g. 42m for 42 minutes)
-
- #运行容器,给容器取一个别名,并进入容器的bash
- [root@localhost zph]# docker run -it --name centos7 eeb6ee3f44bd /bin/bash
- [root@63b354d40a1a /]#
- [root@63b354d40a1a /]# cd /home/
- [root@63b354d40a1a home]# ll
- total 0
- [root@63b354d40a1a home]# mkdir git
- [root@63b354d40a1a home]# cd git/
- [root@63b354d40a1a git]# touch text.txt
- [root@63b354d40a1a git]# ll
- total 0
- -rw-r--r-- 1 root root 0 Oct 24 15:26 text.txt
- #执行ctrl+q+p:退出不停止容器操作
- [root@63b354d40a1a git]# ^P[root@localhost zph]#
- #查看正在运行的容器
- [root@localhost zph]# docker ps
- CONTAINER ID IMAGE COMMAND CREATED STATUS PORTS NAMES
- 63b354d40a1a eeb6ee3f44bd "/bin/bash" About a minute ago Up About a minute centos7
- #查看进入容器后的操作日志
- [root@localhost zph]# docker logs 63b354d40a1a
- [root@63b354d40a1a /]#
- [root@63b354d40a1a /]# cd /home/
- [root@63b354d40a1a home]# ll
- total 0
- [root@63b354d40a1a home]# mkdir git
- [root@63b354d40a1a home]# cd git/
- [root@63b354d40a1a git]# touch text.txt
- [root@63b354d40a1a git]# ll
- total 0
- -rw-r--r-- 1 root root 0 Oct 24 15:26 text.txt
- [root@localhost zph]#
11.docker commit 容器转换为镜像
镜像是没有写入权限的,但是可以修改容器把容器制作为镜像,通过镜像启动一个容器 给容器写入内容,安装相关的软件,然后把这个容器转换为镜像,然后打包上传到hub,别人就可以使用该镜像了,以alpine为例:
- #拉取alpine镜像
- [root@localhost zph]# docker pull alpine
- Using default tag: latest
- latest: Pulling from library/alpine
- 96526aa774ef: Pull complete
- Digest: sha256:eece025e432126ce23f223450a0326fbebde39cdf496a85d8c016293fc851978
- Status: Downloaded newer image for alpine:latest
- docker.io/library/alpine:latest
-
- #查看是否存在alpine镜像
- [root@localhost zph]# docker images
- REPOSITORY TAG IMAGE ID CREATED SIZE
- alpine latest 8ca4688f4f35 3 weeks ago 7.34MB
-
- #运行alpine镜像,启动容器,并给容器命名,执行/bin/bash命令
- [root@localhost zph]# docker run -it --name myalpine 8ca4688f4f35 /bin/bash
- docker: Error response from daemon: OCI runtime create failed: container_linux.go:380: starting container process caused: exec: "/bin/bash": stat /bin/bash: no such file or directory: unknown.
- #上面报错了: 提示没有/bin/bash这个命令
-
- #重新启动容器,执行/bin/sh命令
- [root@localhost zph]# docker run -it --name myalpine 8ca4688f4f35 /bin/sh
- docker: Error response from daemon: Conflict. The container name "/myalpine" is already in use by container "959ece20098efb44b3c1744bb5df49a4d4caa78c362fd0eacc22fc53494f9f65". You have to remove (or rename) that container to be able to reuse that name.
- #还是报错了:提示容器已经存在,容器名称存在了
-
- #通过docker ps -a 查看,果然刚才启动的容器存在,解决办法:删除这个容器
- root@localhost zph]# docker ps -a
- CONTAINER ID IMAGE COMMAND CREATED STATUS PORTS NAMES
- 959ece20098e 8ca4688f4f35 "/bin/bash" 40 seconds ago Created myalpine
-
- #删除容器
- [root@localhost zph]# docker rm 959ece20098e
- 959ece20098e
-
- #重新执行镜像,启动容器,并执行/bin/sh 命令,然后在容器中写入内容,退出
- [root@localhost zph]# docker run -it --name myalpine 8ca4688f4f35 /bin/sh
- / # cd root/
- ~ # ls
- ~ # echo test docker commit > test.txt
- ~ # ls
- test.txt
- ~ # exit
-
- #查看容器:发现myalpine已经退出,因为执行了exit,没问题
- [root@localhost zph]# docker ps -a
- CONTAINER ID IMAGE COMMAND CREATED STATUS PORTS NAMES
- c37dce69c265 8ca4688f4f35 "/bin/sh" About a minute ago Exited (0) 22 seconds ago myalpine
-
- #把myalpine制作成镜像,使用docker commit 命令
- #查看docker commit命令文档: docker commit [参数:-a,-c,...] 容器名/容器id 镜像名[:版本]
- [root@localhost zph]# docker commit --help
-
- Usage: docker commit [OPTIONS] CONTAINER [REPOSITORY[:TAG]]
-
- Create a new image from a container's changes
- Options:
- -a, --author string Author (e.g., "John Hannibal Smith <hannibal@a-team.com>")
- -c, --change list Apply Dockerfile instruction to the created image
- -m, --message string Commit message
- -p, --pause Pause container during commit (default true)
- #制作镜像
- [root@localhost zph]# docker commit c37dce69c265 docker.io/library/myalpine:v1
- sha256:dd14c18efe091413581205f414dacca80d954e85cfb28208e7e610e1fb3c4f6e
- #查看是否制作镜像成功
- [root@localhost zph]# docker images
- REPOSITORY TAG IMAGE ID CREATED SIZE
- myalpine v1 dd14c18efe09 14 seconds ago 7.34MB
- #上面存在myalpine:v1,说明制作镜像成功了
- #验证镜像: 运行镜像,开启这个容器
- [root@localhost zph]# docker run -it -d --name myalpine.v1 dd14c18efe09 /bin/sh
- cde912eb360c67b8becd8d70562929b08205440f8ba552b6eea80e51ebb20f78
- #查看这个容器是否启动
- [root@localhost zph]# docker ps
- CONTAINER ID IMAGE COMMAND CREATED STATUS PORTS NAMES
- cde912eb360c dd14c18efe09 "/bin/sh" 9 seconds ago Up 5 seconds myalpine.v1
- #进入容器验证
- [root@localhost zph]# docker exec -it cde912eb360c /bin/sh
- / # cd root/
- ~ # ls
- test.txt
- ~ # cat test.txt
- test docker commit
- ~ # exit
- #里面有创建的text.txt,说明镜像创建成功
12.镜像的导入导出
可以把制作好的镜像发布到 dockerHub上,也可以把制作好的镜像导出发给别人
- #查看所有镜像
- [root@localhost zph]# docker images
- REPOSITORY TAG IMAGE ID CREATED SIZE
- myalpine v1 dd14c18efe09 14 hours ago 7.34MB
-
- #导出镜像
- [root@localhost zph]# docker save myalpine > myalpine.tar
- [root@localhost zph]# ll
- 总用量 7464
- drwxr-xr-x. 2 zph zph 6 12月 23 2021 公共
- drwxr-xr-x. 2 zph zph 6 12月 23 2021 模板
- drwxr-xr-x. 2 zph zph 6 12月 23 2021 视频
- drwxr-xr-x. 2 zph zph 6 12月 23 2021 图片
- drwxr-xr-x. 2 zph zph 6 12月 23 2021 文档
- drwxr-xr-x. 2 zph zph 6 12月 23 2021 下载
- drwxr-xr-x. 2 zph zph 6 12月 23 2021 音乐
- drwxr-xr-x. 2 zph zph 6 12月 23 2021 桌面
- -rw-r--r-- 1 root root 7641600 10月 25 07:26 myalpine.tar
-
- #删除镜像
- [root@localhost zph]# docker rmi dd14c18efe09
-
- #查看所有镜像
- [root@localhost zph]# docker images
- REPOSITORY TAG IMAGE ID CREATED SIZE
-
- #导入镜像
- [root@localhost zph]# docker load < myalpine.tar
- Loaded image: myalpine:v1
-
- #查看所有镜像
- [root@localhost zph]# docker images
- REPOSITORY TAG IMAGE ID CREATED SIZE
- myalpine v1 dd14c18efe09 14 hours ago 7.34MB
-
- #校验镜像是否成功
- [root@localhost zph]# docker run -it --name myalpine.v1 dd14c18efe09 /bin/bash
- #不报错就成功了
13.docker cp 实现数据拷贝
docker cp :用于容器与主机之间的数据拷贝
- [root@localhost zph]# docker cp --help
-
- Usage: docker cp [OPTIONS] CONTAINER:SRC_PATH DEST_PATH|-
- docker cp [OPTIONS] SRC_PATH|- CONTAINER:DEST_PATH
-
- Copy files/folders between a container and the local filesystem
-
- Use '-' as the source to read a tar archive from stdin
- and extract it to a directory destination in a container.
- Use '-' as the destination to stream a tar archive of a
- container source to stdout.
-
- Options:
- -a, --archive Archive mode (copy all uid/gid information)
- -L, --follow-link Always follow symbol link in SRC_PATH
- #查看目录
- [root@localhost zph]# pwd
- /home/zph
-
- #创建文件夹
- [root@localhost zph]# mkdir www
- [root@localhost zph]# cd www/
- [root@localhost www]# ll
- 总用量 0
-
- #创建文件并写入数据
- [root@localhost www]# echo test.docker > test.txt
- [root@localhost www]# ll
- 总用量 4
- -rw-r--r-- 1 root root 12 10月 25 07:51 test.txt
- [root@localhost www]# cd ..
-
- #查看images
- [root@localhost zph]# docker images
- REPOSITORY TAG IMAGE ID CREATED SIZE
- centos 7 eeb6ee3f44bd 2 years ago 204MB
-
- #查看运行的容器
- [root@localhost zph]# docker ps
- CONTAINER ID IMAGE COMMAND CREATED STATUS PORTS NAMES
- 63b354d40a1a eeb6ee3f44bd "/bin/bash" 23 hours ago Up 23 hours centos7
-
- #进入容器
- [root@localhost zph]# docker exec -it 63b354d40a1a /bin/bash
-
- #查看/下是否存在www目录:发现不存在该目录
- [root@63b354d40a1a /]# ll
- total 12
- -rw-r--r-- 1 root root 12114 Nov 13 2020 anaconda-post.log
- lrwxrwxrwx 1 root root 7 Nov 13 2020 bin -> usr/bin
- drwxr-xr-x 5 root root 360 Oct 24 15:25 dev
- drwxr-xr-x 1 root root 66 Oct 24 15:24 etc
- drwxr-xr-x 1 root root 17 Oct 24 15:26 home
- lrwxrwxrwx 1 root root 7 Nov 13 2020 lib -> usr/lib
- lrwxrwxrwx 1 root root 9 Nov 13 2020 lib64 -> usr/lib64
- drwxr-xr-x 2 root root 6 Apr 11 2018 media
- drwxr-xr-x 2 root root 6 Apr 11 2018 mnt
- drwxr-xr-x 2 root root 6 Apr 11 2018 opt
- dr-xr-xr-x 255 root root 0 Oct 24 15:24 proc
- dr-xr-x--- 2 root root 114 Nov 13 2020 root
- drwxr-xr-x 11 root root 148 Nov 13 2020 run
- lrwxrwxrwx 1 root root 8 Nov 13 2020 sbin -> usr/sbin
- drwxr-xr-x 2 root root 6 Apr 11 2018 srv
- dr-xr-xr-x 13 root root 0 Oct 24 15:24 sys
- drwxrwxrwt 7 root root 132 Nov 13 2020 tmp
- drwxr-xr-x 13 root root 155 Nov 13 2020 usr
- drwxr-xr-x 18 root root 238 Nov 13 2020 var
-
- #退出
- [root@63b354d40a1a /]# exit
- exit
-
- #cp /home/zph/www/目录下的所有文件到容器的/下
- [root@localhost zph]# docker cp /home/zph/www/ 63b354d40a1a:/
-
- #进入容器查看是否cp成功
- [root@localhost zph]# docker exec -it 63b354d40a1a /bin/bash
-
- #ll查看:发现存在www,说明cp成功了
- [root@63b354d40a1a /]# ll
- total 12
- -rw-r--r-- 1 root root 12114 Nov 13 2020 anaconda-post.log
- lrwxrwxrwx 1 root root 7 Nov 13 2020 bin -> usr/bin
- drwxr-xr-x 5 root root 360 Oct 24 15:25 dev
- drwxr-xr-x 1 root root 66 Oct 24 15:24 etc
- drwxr-xr-x 1 root root 17 Oct 24 15:26 home
- lrwxrwxrwx 1 root root 7 Nov 13 2020 lib -> usr/lib
- lrwxrwxrwx 1 root root 9 Nov 13 2020 lib64 -> usr/lib64
- drwxr-xr-x 2 root root 6 Apr 11 2018 media
- drwxr-xr-x 2 root root 6 Apr 11 2018 mnt
- drwxr-xr-x 2 root root 6 Apr 11 2018 opt
- dr-xr-xr-x 255 root root 0 Oct 24 15:24 proc
- dr-xr-x--- 1 root root 27 Oct 25 14:53 root
- drwxr-xr-x 11 root root 148 Nov 13 2020 run
- lrwxrwxrwx 1 root root 8 Nov 13 2020 sbin -> usr/sbin
- drwxr-xr-x 2 root root 6 Apr 11 2018 srv
- dr-xr-xr-x 13 root root 0 Oct 24 15:24 sys
- drwxrwxrwt 7 root root 132 Nov 13 2020 tmp
- drwxr-xr-x 13 root root 155 Nov 13 2020 usr
- drwxr-xr-x 18 root root 238 Nov 13 2020 var
- drwxr-xr-x 2 root root 22 Oct 25 14:51 www
- [root@63b354d40a1a /]# cd www/
- [root@63b354d40a1a www]# ll
- total 4
- -rw-r--r-- 1 root root 12 Oct 25 14:51 test.txt
-
- #在www下新建文件并写入数据,然后退出
- [root@63b354d40a1a www]# echo test2.com > test2.txt
- [root@63b354d40a1a www]# exit
- exit
-
- #cp容器中的www下的所有文件到系统的/var下
- [root@localhost zph]# docker cp 63b354d40a1a:www/ /var
-
- #查看是否cp成功:发现成功了
- [root@localhost zph]# ll /var/www/
- 总用量 8
- -rw-r--r-- 1 root root 10 10月 25 07:54 test2.txt
- -rw-r--r-- 1 root root 12 10月 25 07:51 test.txt
- [root@localhost zph]#

