
- 1OpenAI 为 GPT-3.5 Turbo 推出微调功能 (fine-tuning)_fine-tuning openai's gpt 3.5 for langchain agents
- 2华为鸿蒙系统支持什么手机_什么样的手机可以刷鸿蒙系统?看看你的手机支持吗?...
- 3安卓连接java_从零学习安卓自动化(java+appium方向):手机连接Appium(二)
- 4基于FPGA的UDP协议栈设计第四章_UDP层设计
- 5yolov5训练高精度非机动车驾驶检测_非机动车数据集
- 6modelsim仿真验证后,修改代码,不用重新关闭打开的调试技巧_modelsim仿真改原文件后
- 7【证明】对极几何:本质矩阵内在性质_本质矩阵的内在性质
- 8Unity开发(六) Prefab加载自动化管理引用计数管理器_unity assetbundle 和 gameobject的 引用计数
- 9怎么样去处理样本不平衡问题 | (文后分享大量检测+分割框架)
- 10【无人机综合题】+题解
RabbitMQ的五种消息模型_rabbitmq五种消息模型
赞
踩
相关RabbitMQ学习链接:
RabbitMQ提供了多种消息模型,官网上第6种是RPC不属于常规的消息队列。 属于消息模型的是前5种:
-
简单的一对一模型
-
工作队列模型 ,一个生产者将消息分发给多个消费者
-
发布/订阅模型 ,生产者发布消息,多个消费者同时收取
-
路由模型 ,生产者通过关键字发送消息给特定消费者
-
主题模型 ,路由模式基础上,在关键字里加入了通配符
一对一模型
 最基本的队列模型: 一个生产者发送消息到一个队列,一个消费者从队列中取消息。
操作步骤
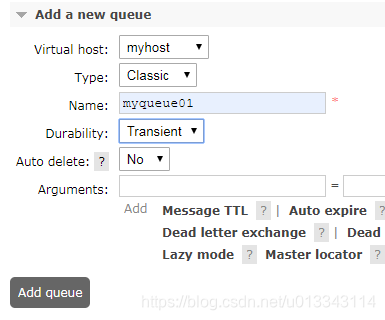
1)启动Rabbitmq,在管理页面中创建用户admin 2)使用admin登录,然后创建虚拟主机myhost 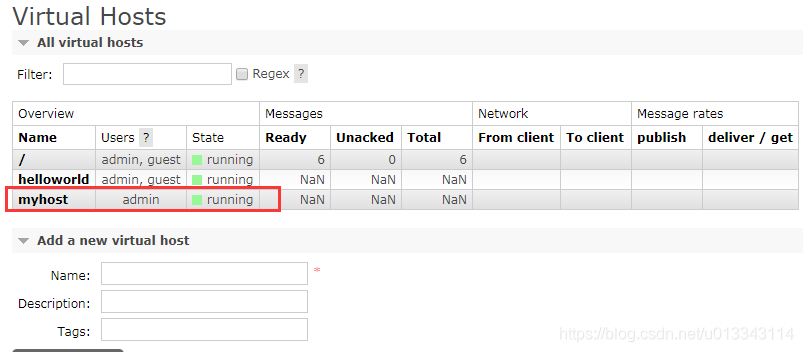 创建队列,配置如下
案例代码
导入依赖
- <dependency>
- <groupId>com.rabbitmq</groupId>
- <artifactId>amqp-client</artifactId>
- <version>3.4.1</version>
- </dependency>
开发工具类
- public class MQUtils {
-
- public static final String QUEUE_NAME = "myqueue01";
- public static final String QUEUE_NAME2 = "myqueue02";
-
- public static final String EXCHANGE_NAME = "myexchange01";
- public static final String EXCHANGE_NAME2 = "myexchange02";
- public static final String EXCHANGE_NAME3 = "myexchange03";
-
- /**
- * 获得MQ的连接
- * @return
- * @throws IOException
- */
- public static Connection getConnection() throws IOException {
- ConnectionFactory connectionFactory = new ConnectionFactory();
- //配置服务器名、端口、虚拟主机名、登录账号和密码
- connectionFactory.setHost("localhost");
- connectionFactory.setPort(5672);
- connectionFactory.setVirtualHost("myhost");
- connectionFactory.setUsername("admin");
- connectionFactory.setPassword("123456");
- return connectionFactory.newConnection();
- }
- }

开发生产者
- /**
- * 生产者,发送简单的消息到队列中
- */
- public class SimpleProducer {
-
- public static void main(String[] args) throws IOException {
- Connection connection = MQUtils.getConnection();
- //创建通道
- Channel channel = connection.createChannel();
- //定义队列
- channel.queueDeclare(MQUtils.QUEUE_NAME,false,false,false,null);
- String msg = "Hello World!";
- //发布消息到队列
- channel.basicPublish("",MQUtils.QUEUE_NAME,null,msg.getBytes());
- channel.close();
- connection.close();
- }
- }
运行生产者代码,管理页面点进myqueue01,在GetMessages中可以看到消息 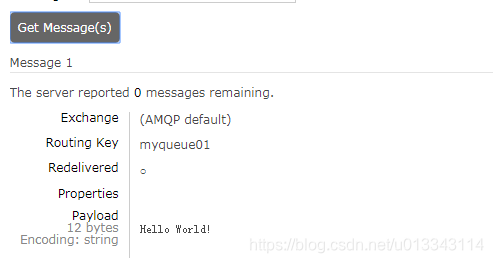
开发消费者
- /**
- * 消费者,从队列中读取简单的消息
- */
- public class SimpleConsumer {
-
- public static void main(String[] args) throws IOException, InterruptedException {
- Connection connection = MQUtils.getConnection();
- Channel channel = connection.createChannel();
- //定义队列
- channel.queueDeclare(MQUtils.QUEUE_NAME,false,false,false,null);
- //创建消费者
- QueueingConsumer queueingConsumer = new QueueingConsumer(channel);
- //消费者消费通道中的消息
- channel.basicConsume(MQUtils.QUEUE_NAME,true,queueingConsumer);
- //读取消息
- while(true){
- QueueingConsumer.Delivery delivery = queueingConsumer.nextDelivery();
- System.out.println(new String(delivery.getBody()));
- }
- }
- }
工作队列模型
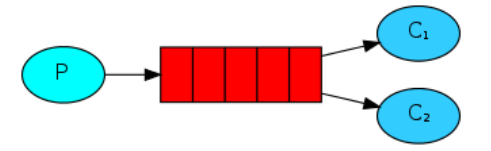
工作队列,生产者将消息分发给多个消费者,如果生产者生产了100条消息,消费者1消费50条,消费者2消费50条。
案例代码
开发生产者
- /**
- 多对多模式的生产者,会发送多条消息到队列中
- */
- public class WorkProductor {
-
- public static void main(String[] args) throws IOException, InterruptedException {
- Connection connection = MQUtils.getConnection();
- Channel channel = connection.createChannel();
- channel.queueDeclare(MQUtils.QUEUE_NAME,false,false,false,null);
- for(int i = 0;i < 100;i++){
- String msg = "Hello-->" + i;
- channel.basicPublish("",MQUtils.QUEUE_NAME,null, msg.getBytes());
- System.out.println("send:" + msg);
- Thread.sleep(10);
- }
- channel.close();
- connection.close();
- }
- }
开发消费者1
- /**
- * 多对多模式的消费者1
- */
- public class WorkConsumer01 {
-
- public static void main(String[] args) throws IOException, InterruptedException {
- Connection connection = MQUtils.getConnection();
- Channel channel = connection.createChannel();
- channel.queueDeclare(MQUtils.QUEUE_NAME,false,false,false,null);
- QueueingConsumer queueingConsumer = new QueueingConsumer(channel);
- //消费者消费通道中的消息
- channel.basicConsume(MQUtils.QUEUE_NAME,true,queueingConsumer);
- while(true){
- QueueingConsumer.Delivery delivery = queueingConsumer.nextDelivery();
- System.out.println("WorkConsumer1 receive :" + new String(delivery.getBody()));
- Thread.sleep(10);
- }
- }
- }
开发消费者2
- /**
- * 多对多模式的消费者2
- */
- public class WorkConsumer02 {
-
- public static void main(String[] args) throws IOException, InterruptedException {
- Connection connection = MQUtils.getConnection();
- Channel channel = connection.createChannel();
- channel.queueDeclare(MQUtils.QUEUE_NAME,false,false,false,null);
- QueueingConsumer queueingConsumer = new QueueingConsumer(channel);
- //消费者消费通道中的消息
- channel.basicConsume(MQUtils.QUEUE_NAME,true,queueingConsumer);
- while(true){
- QueueingConsumer.Delivery delivery = queueingConsumer.nextDelivery();
- System.out.println("WorkConsumer2 receive :" + new String(delivery.getBody()));
- Thread.sleep(1000);
- }
- }
- }
生产者发送100个消息,两个消费者分别读取了50条。 看消息内容,发现队列发送消息采用的是轮询方式,也就是先发给消费者1,再发给消费者2,依次往复。
能者多劳
上面案例中有一个问题:消费者处理消息的速度是不一样的,消费者1处理后睡眠10毫秒(Thread.sleep(10)),消费者2是1000毫秒,速度相差100倍,但是最后处理的消息数还是一样的。这样就存在效率问题:处理能力强的消费者得不到更多的消息。
因为队列默认采用是自动确认机制,消息发过去后就自动确认,队列不清楚每个消息具体什么时间处理完,所以平均分配消息数量。
实现能者多劳:
-
channel.basicQos(1);限制队列一次发一个消息给消费者,等消费者有了反馈,再发下一条
-
channel.basicAck 消费完消息后手动反馈,处理快的消费者就能处理更多消息
-
basicConsume 中的参数改为false
- /**
- 多对多模式的消费者1
- */
- public class WorkConsumer1 {
-
- public static void main(String[] args) throws IOException, InterruptedException {
- Connection connection = MQUtils.getConnection();
- Channel channel = connection.createChannel();
- channel.queueDeclare(MQUtils.QUEUE_NAME,false,false,false,null);
- //同一时刻服务器只发送一条消息给消费者
- channel.basicQos(1);
- QueueingConsumer queueingConsumer = new QueueingConsumer(channel);
- //true是自动返回完成状态,false表示手动
- channel.basicConsume(MQUtils.QUEUE_NAME,false,queueingConsumer);
- while(true){
- QueueingConsumer.Delivery delivery = queueingConsumer.nextDelivery();
- System.out.println("WorkConsumer1 receive :" + new String(delivery.getBody()));
- Thread.sleep(10);
- //手动确定返回状态,不写就是自动确认
- channel.basicAck(delivery.getEnvelope().getDeliveryTag(),false);
- }
- }
- }
-
- /**
- * 多对多模式的消费者2
- */
- public class WorkConsumer2 {
-
- public static void main(String[] args) throws IOException, InterruptedException {
- Connection connection = MQUtils.getConnection();
- Channel channel = connection.createChannel();
- channel.queueDeclare(MQUtils.QUEUE_NAME,false,false,false,null);
- //同一时刻服务器只发送一条消息给消费者
- channel.basicQos(1);
- QueueingConsumer queueingConsumer = new QueueingConsumer(channel);
- //true是自动返回完成状态,false表示手动
- channel.basicConsume(MQUtils.QUEUE_NAME,false,queueingConsumer);
- while(true){
- QueueingConsumer.Delivery delivery = queueingConsumer.nextDelivery();
- System.out.println("WorkConsumer2 receive :" + new String(delivery.getBody()));
- Thread.sleep(1000);
- //手动确定返回状态,不写就是自动确认
- channel.basicAck(delivery.getEnvelope().getDeliveryTag(),false);
- }
- }
- }
发布/订阅模型
 发布/订阅模式和Work模式的区别是:Work模式只存在一个队列,多个消费者共同消费一个队列中的消息;而发布订阅模式存在多个队列,不同的消费者可以从各自的队列中处理完全相同的消息。
操作步骤
实现步骤: 1) 创建交换机(Exchange)类型是fanout(扇出) 2) 交换机需要绑定不同的队列 3) 不同的消费者从不同的队列中获得消息 4) 生产者发送消息到交换机 5) 再由交换机将消息分发到多个队列
新建队列 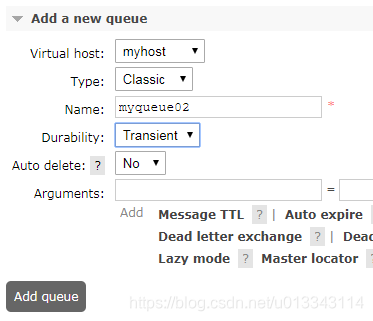 新建交换机
新建交换机 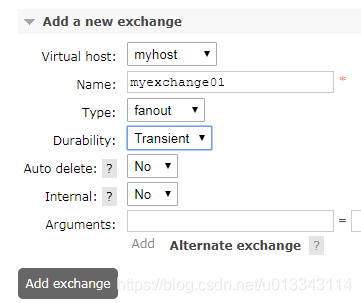 点击交换机,在bindings里面绑定两个队列
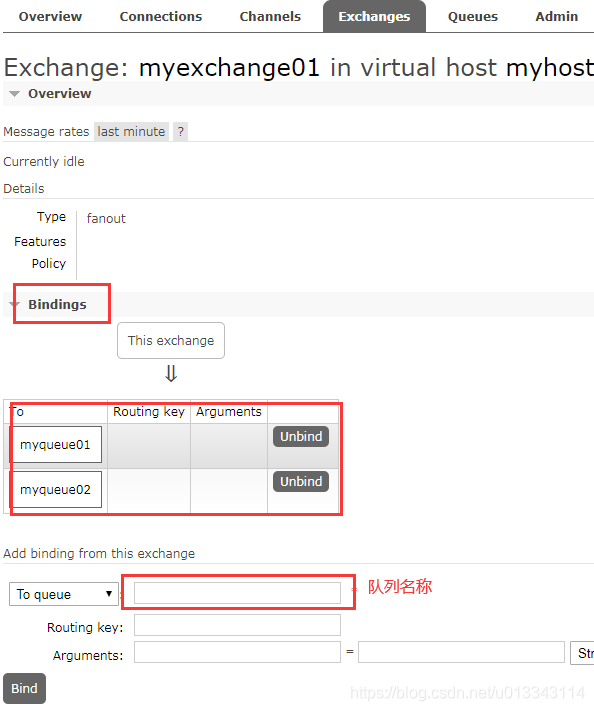
案例代码
生产者
- /**
- * 发布和订阅模式的生产者,消息会通过交换机发到队列
- */
- public class PublishProductor {
-
- public static void main(String[] args) throws IOException {
- Connection connection = MQUtils.getConnection();
- Channel channel = connection.createChannel();
- //声明fanout exchange
- channel.exchangeDeclare(MQUtils.EXCHANGE_NAME,"fanout");
- String msg = "Hello Fanout";
- //发布消息到交换机
- channel.basicPublish(MQUtils.EXCHANGE_NAME,"",null,msg.getBytes());
- System.out.println("send:" + msg);
- channel.close();
- connection.close();
- }
- }
消费者1
- /**
- * 发布订阅模式的消费者1
- * 两个消费者绑定的消息队列不同
- * 通过交换机一个消息能被不同队列的两个消费者同时获取
- * 一个队列可以有多个消费者,队列中的消息只能被一个消费者获取
- */
- public class SubscribeConsumer1 {
-
- public static void main(String[] args) throws IOException, InterruptedException {
- Connection connection = MQUtils.getConnection();
- Channel channel = connection.createChannel();
- channel.queueDeclare(MQUtils.QUEUE_NAME,false,false,false,null);
- //绑定队列1到交换机
- channel.queueBind(MQUtils.QUEUE_NAME,MQUtils.EXCHANGE_NAME,"");
- QueueingConsumer queueingConsumer = new QueueingConsumer(channel);
- channel.basicConsume(MQUtils.QUEUE_NAME,true,queueingConsumer);
- while(true){
- QueueingConsumer.Delivery delivery = queueingConsumer.nextDelivery();
- System.out.println("Consumer1 receive :" + new String(delivery.getBody()));
- }
- }
- }
消费者2
- public class SubscribeConsumer2 {
-
- public static void main(String[] args) throws IOException, InterruptedException {
- Connection connection = MQUtils.getConnection();
- Channel channel = connection.createChannel();
- channel.queueDeclare(MQUtils.QUEUE_NAME2,false,false,false,null);
- //绑定队列2到交换机
- channel.queueBind(MQUtils.QUEUE_NAME2,MQUtils.EXCHANGE_NAME,"");
- QueueingConsumer queueingConsumer = new QueueingConsumer(channel);
- channel.basicConsume(MQUtils.QUEUE_NAME2,true,queueingConsumer);
- while(true){
- QueueingConsumer.Delivery delivery = queueingConsumer.nextDelivery();
- System.out.println("Consumer2 receive :" + new String(delivery.getBody()));
- }
- }
- }
路由模型
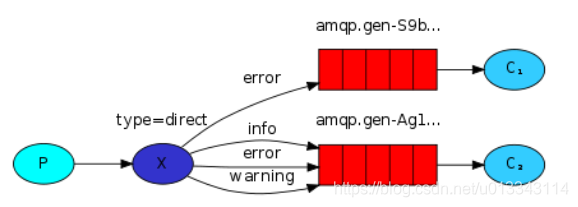 路由模式的消息队列可以给队列绑定不同的key,生产者发送消息时,给消息设置不同的key,这样交换机在分发消息时,可以让消息路由到key匹配的队列中。 可以想象上图是一个日志处理系统,C1可以处理error日志消息,C2可以处理info\error\warining类型的日志消息,使用路由模式就很容易实现了。
操作步骤
新建direct类型的交换机 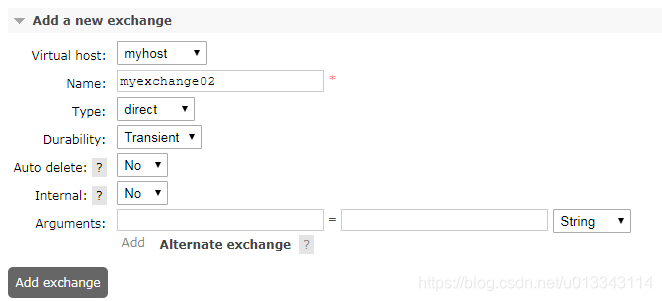
案例代码
生产者,给myqueue01绑定了key:error,myqueue02绑定了key:debug,然后发送了key:error的消息
- /**
- 路由模式的生产者,发布消息会有特定的Key,消息会被绑定特定Key的消费者获取
- */
- public class RouteProductor {
-
- public static void main(String[] args) throws IOException, InterruptedException {
- Connection connection = MQUtils.getConnection();
- Channel channel = connection.createChannel();
- //声明交换机类型为direct
- channel.exchangeDeclare(MQUtils.EXCHANGE_NAME2,"direct");
- String msg = "Hello-->Route";
- //绑定队列1到交换机,指定了Key为error
- channel.queueBind(MQUtils.QUEUE_NAME,MQUtils.EXCHANGE_NAME2,"error");
- //绑定队列2到交换机,指定了Key为debug
- channel.queueBind(MQUtils.QUEUE_NAME2,MQUtils.EXCHANGE_NAME2,"debug");
- //error是一个指定的Key
- channel.basicPublish(MQUtils.EXCHANGE_NAME2,"error",null,msg.getBytes());
- System.out.println("send:" + msg);
- channel.close();
- connection.close();
- }
- }
消费者1
- /**
- * 路由模式的消费者1
- * 可以指定Key,消费特定的消息
- */
- public class RouteConsumer1 {
-
- public static void main(String[] args) throws IOException, InterruptedException {
- Connection connection = MQUtils.getConnection();
- Channel channel = connection.createChannel();
- channel.queueDeclare(MQUtils.QUEUE_NAME,false,false,false,null);
- QueueingConsumer queueingConsumer = new QueueingConsumer(channel);
- channel.basicConsume(MQUtils.QUEUE_NAME,true,queueingConsumer);
- while(true){
- QueueingConsumer.Delivery delivery = queueingConsumer.nextDelivery();
- System.out.println("RouteConsumer1 receive :" + new String(delivery.getBody()));
- }
- }
- }
消费者2
- /**
- * 路由模式的消费者2
- * 可以指定Key,消费特定的消息
- */
- public class RouteConsumer2 {
-
- public static void main(String[] args) throws IOException, InterruptedException {
- Connection connection = MQUtils.getConnection();
- Channel channel = connection.createChannel();
- channel.queueDeclare(MQUtils.QUEUE_NAME2,false,false,false,null);
- QueueingConsumer queueingConsumer = new QueueingConsumer(channel);
- channel.basicConsume(MQUtils.QUEUE_NAME2,true,queueingConsumer);
- while(true){
- QueueingConsumer.Delivery delivery = queueingConsumer.nextDelivery();
- System.out.println("RouteConsumer2 receive :" + new String(delivery.getBody()));
-
- }
- }
- }
主题模型
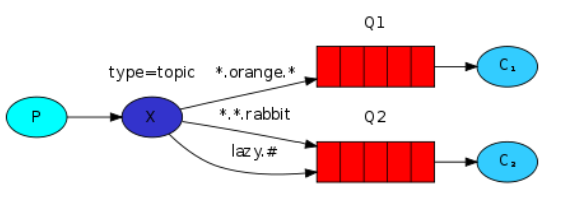 主题模式和路由模式差不多,在key中可以加入通配符:
-
* 匹配任意一个单词 com.* ----> com.hopu com.blb com.baidu
-
# 匹配.号隔开的0个或多个单词 com.# ---> com.hopu.net com.hopu com.163.xxx.xxx.xxx
案例代码
生产者代码
- /**
- 主题模式的生产者
- */
- public class TopicProductor {
-
- public static void main(String[] args) throws IOException, InterruptedException {
- Connection connection = MQUtils.getConnection();
- Channel channel = connection.createChannel();
- //声明交换机类型为topic
- channel.exchangeDeclare(MQUtils.EXCHANGE_NAME3,"topic");
- //绑定队列到交换机,最后指定了Key
- channel.queueBind(MQUtils.QUEUE_NAME,MQUtils.EXCHANGE_NAME3,"xray.#");
- //绑定队列到交换机,最后指定了Key
- channel.queueBind(MQUtils.QUEUE_NAME2,MQUtils.EXCHANGE_NAME3,"*.*.cn");
- String msg = "Hello-->Topic";
- channel.basicPublish(MQUtils.EXCHANGE_NAME3,"rabbit.com.cn",null,msg.getBytes());
- System.out.println("send:" + msg);
- channel.close();
- connection.close();
- }
- }
消费者1
- /**
- * 主题模式的消费者1 ,类似路由模式,可以使用通配符对Key进行筛选
- * #匹配1个或多个单词,*匹配一个单词
- */
- public class TopicConsumer1 {
-
- public static void main(String[] args) throws IOException, InterruptedException {
- Connection connection = MQUtils.getConnection();
- Channel channel = connection.createChannel();
- channel.queueDeclare(MQUtils.QUEUE_NAME,false,false,false,null);
- QueueingConsumer queueingConsumer = new QueueingConsumer(channel);
- channel.basicConsume(MQUtils.QUEUE_NAME,true,queueingConsumer);
- while(true){
- QueueingConsumer.Delivery delivery = queueingConsumer.nextDelivery();
- System.out.println("TopicConsumer1 receive :" + new String(delivery.getBody()));
- }
- }
- }
消费者2
- /**
- * 主题模式的消费者2
- */
- public class TopicConsumer2 {
-
- public static void main(String[] args) throws IOException, InterruptedException {
- Connection connection = MQUtils.getConnection();
- Channel channel = connection.createChannel();
- channel.queueDeclare(MQUtils.QUEUE_NAME2,false,false,false,null);
- QueueingConsumer queueingConsumer = new QueueingConsumer(channel);
- channel.basicConsume(MQUtils.QUEUE_NAME2,true,queueingConsumer);
- while(true){
- QueueingConsumer.Delivery delivery = queueingConsumer.nextDelivery();
- System.out.println("TopicConsumer2 receive :" + new String(delivery.getBody()));
- }
- }
- }


