
- 1java8 lambda python_Java 8的核心新特性:Lambda(匿名函数)、流、默认方法
- 2GRU-深度学习循环神经网络情感分类模型搭建_gru网络进行情感分类
- 3申请ios证书并发布uniapp软件
- 4毕设分享|基于51单片机基于Proteus的温控系统设计与仿真_proteus仿真课程设计
- 5Neo4j 3.2版正式发布:企业级扩展性增强、原生性能提高,还有更多特性
- 6LLaMA Board: 通过一站式网页界面快速上手 LLaMA Factory
- 7微服务SpringCloud ES分布式全文搜索引擎简介 下载安装及简单操作入门
- 82024 年求职不易,有没有什么效率高的求职方法?
- 9微信小程序获取用户openid_刚接触小程序,用微信开发工具获取用户的 openid 每次都会变?
- 10排序算法——梳理总结
【人脸考勤项目】人脸检测的5种方式_cv2人脸验证
赞
踩
文章内容:
1)人脸检测的5种方法
1. Haar cascade + opencv
2. HOG + Dlib
3. CNN + Dlib
4. SSD
5. MTCNN
一。人脸检测的5种方法实现
1. Haar cascade + opencv
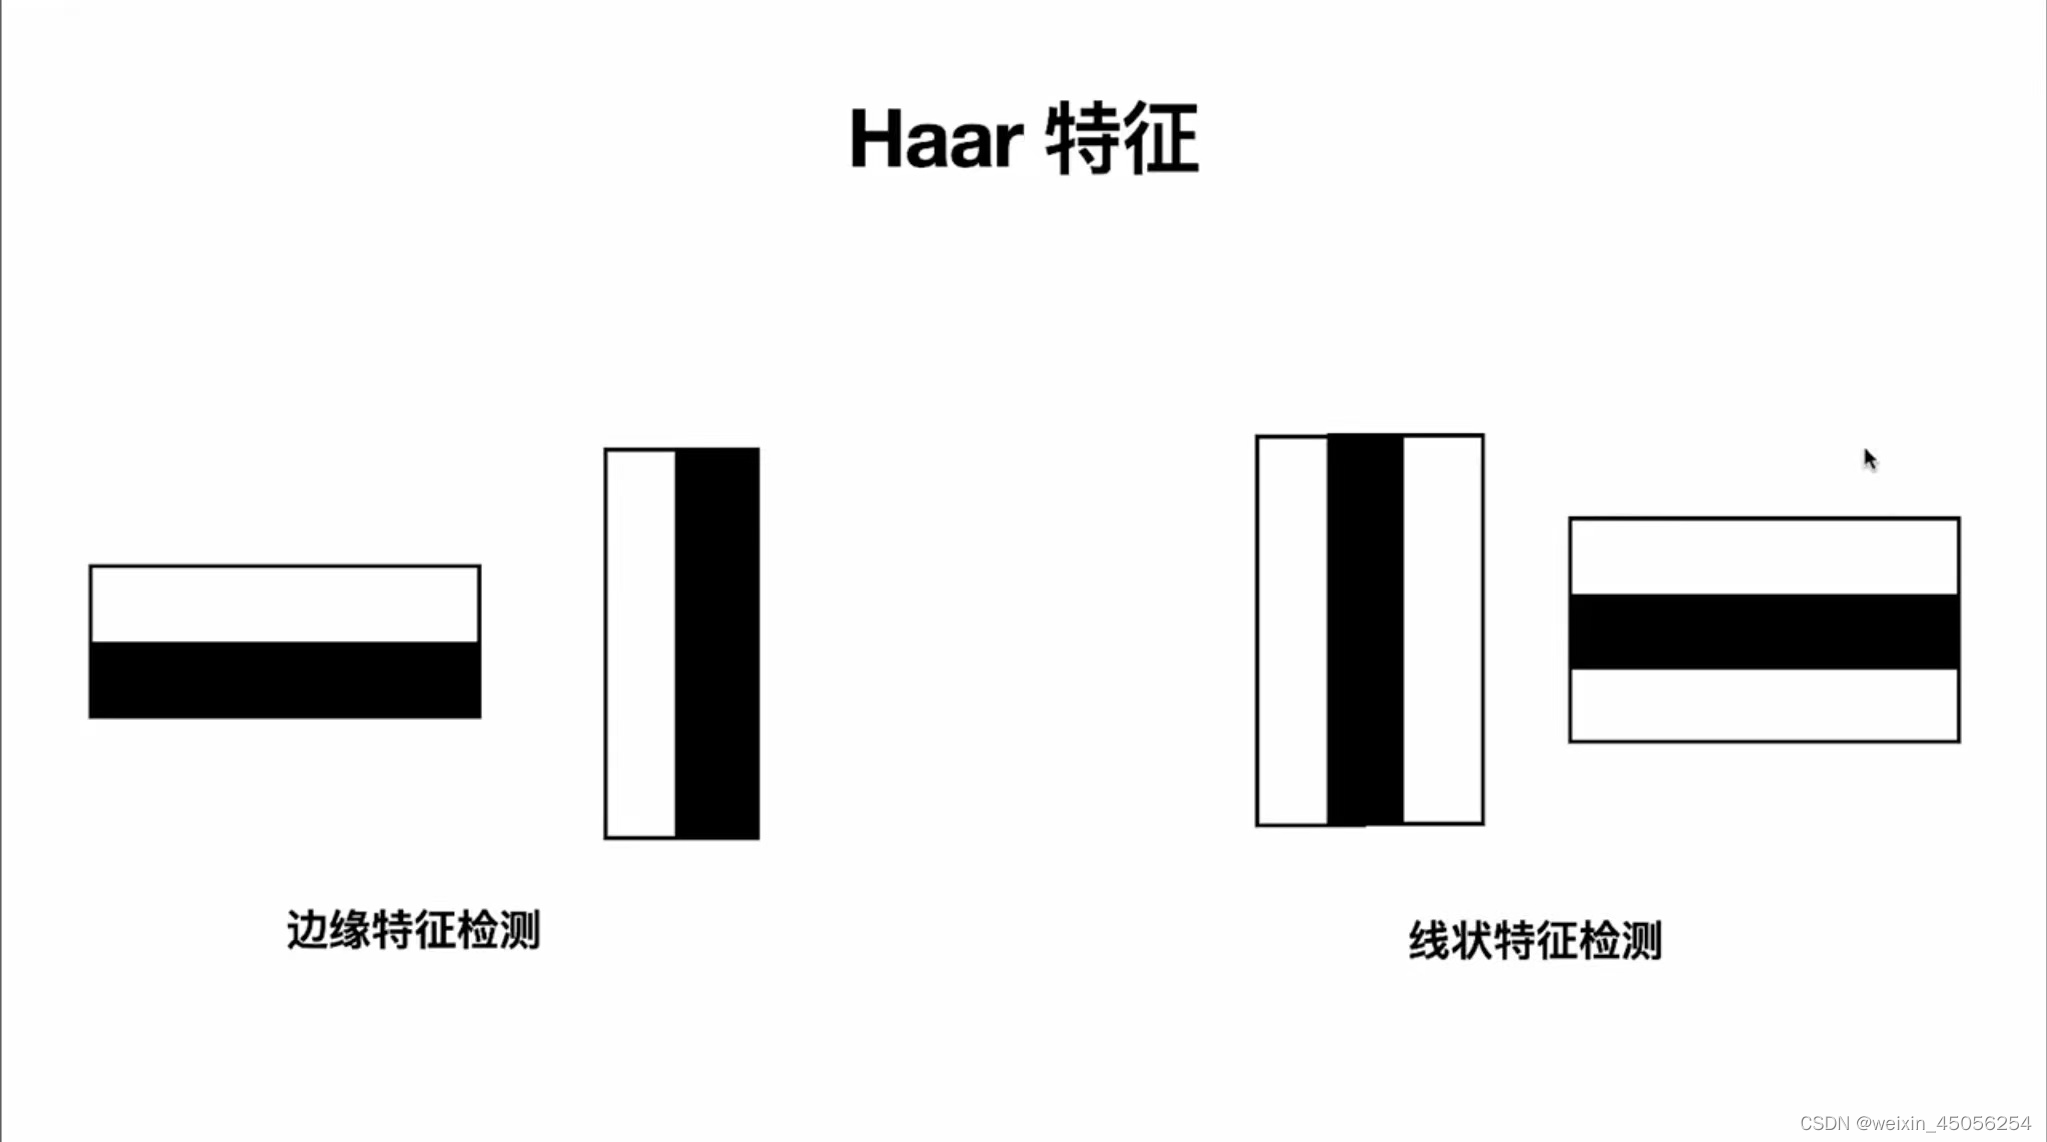
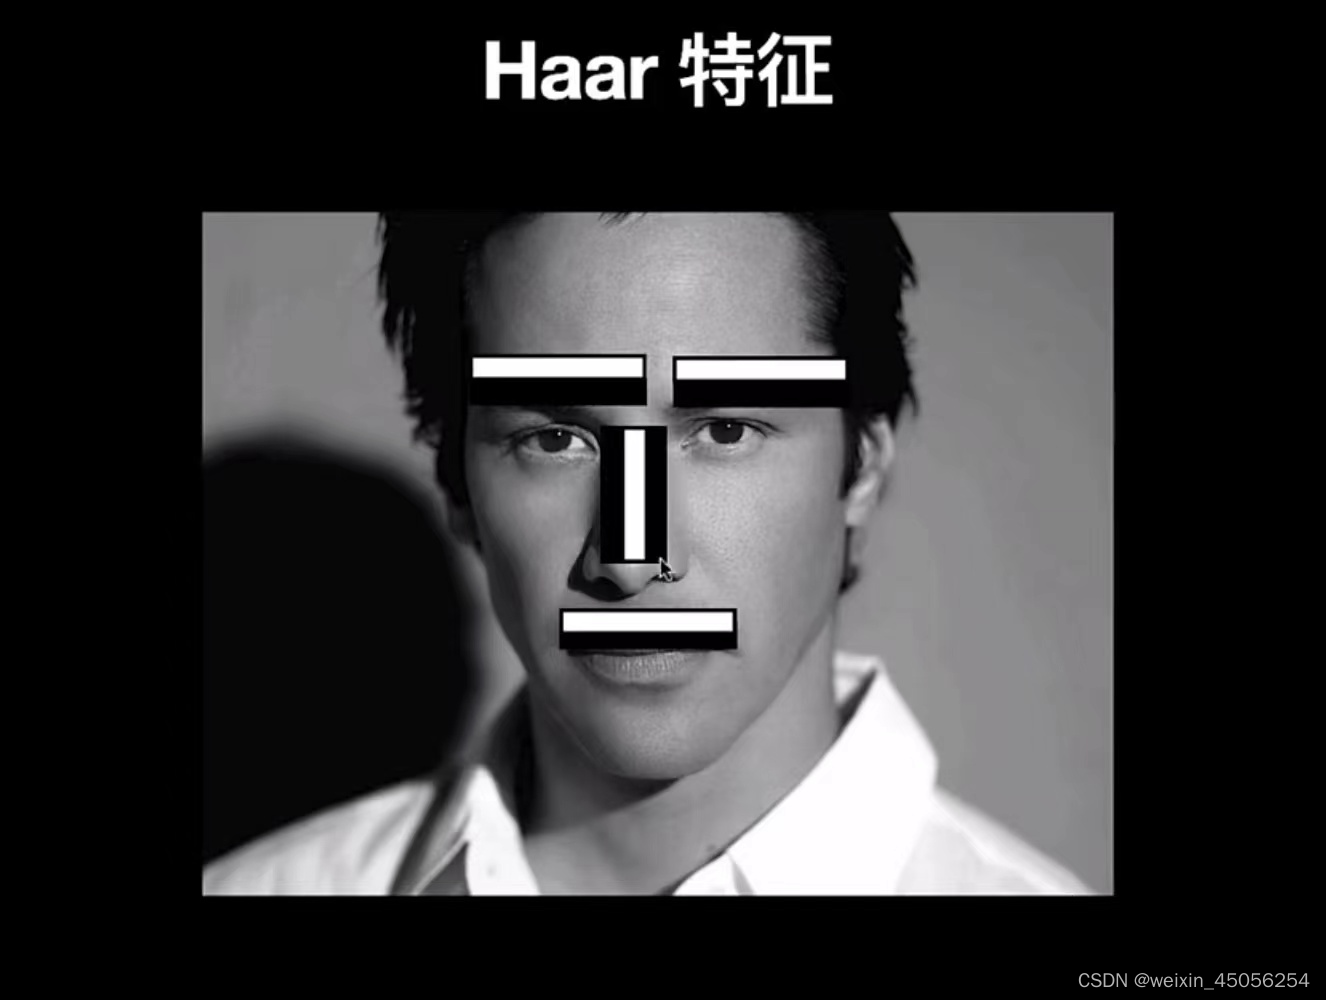
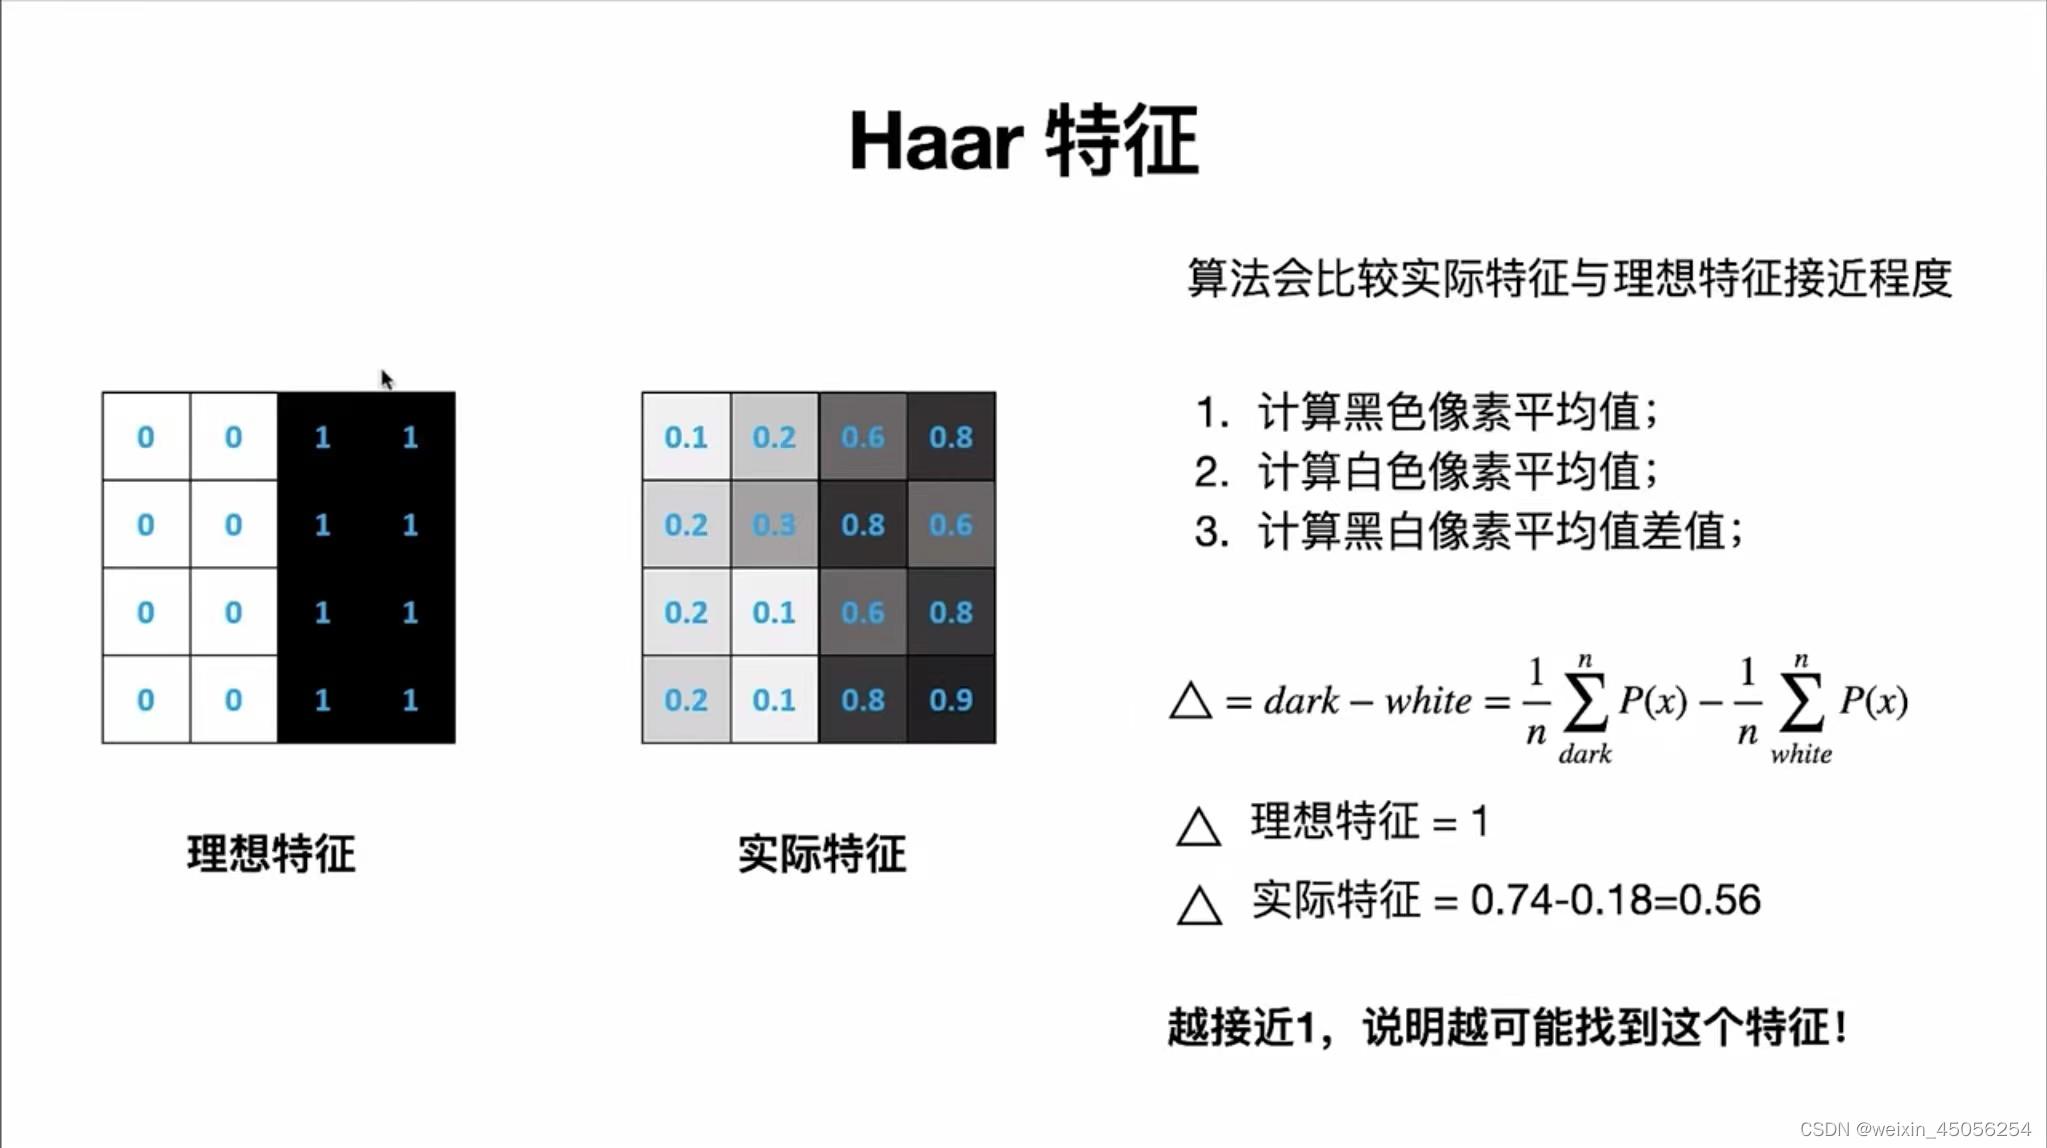
Haar是专门用来检测边缘特征的。基本流程如下:
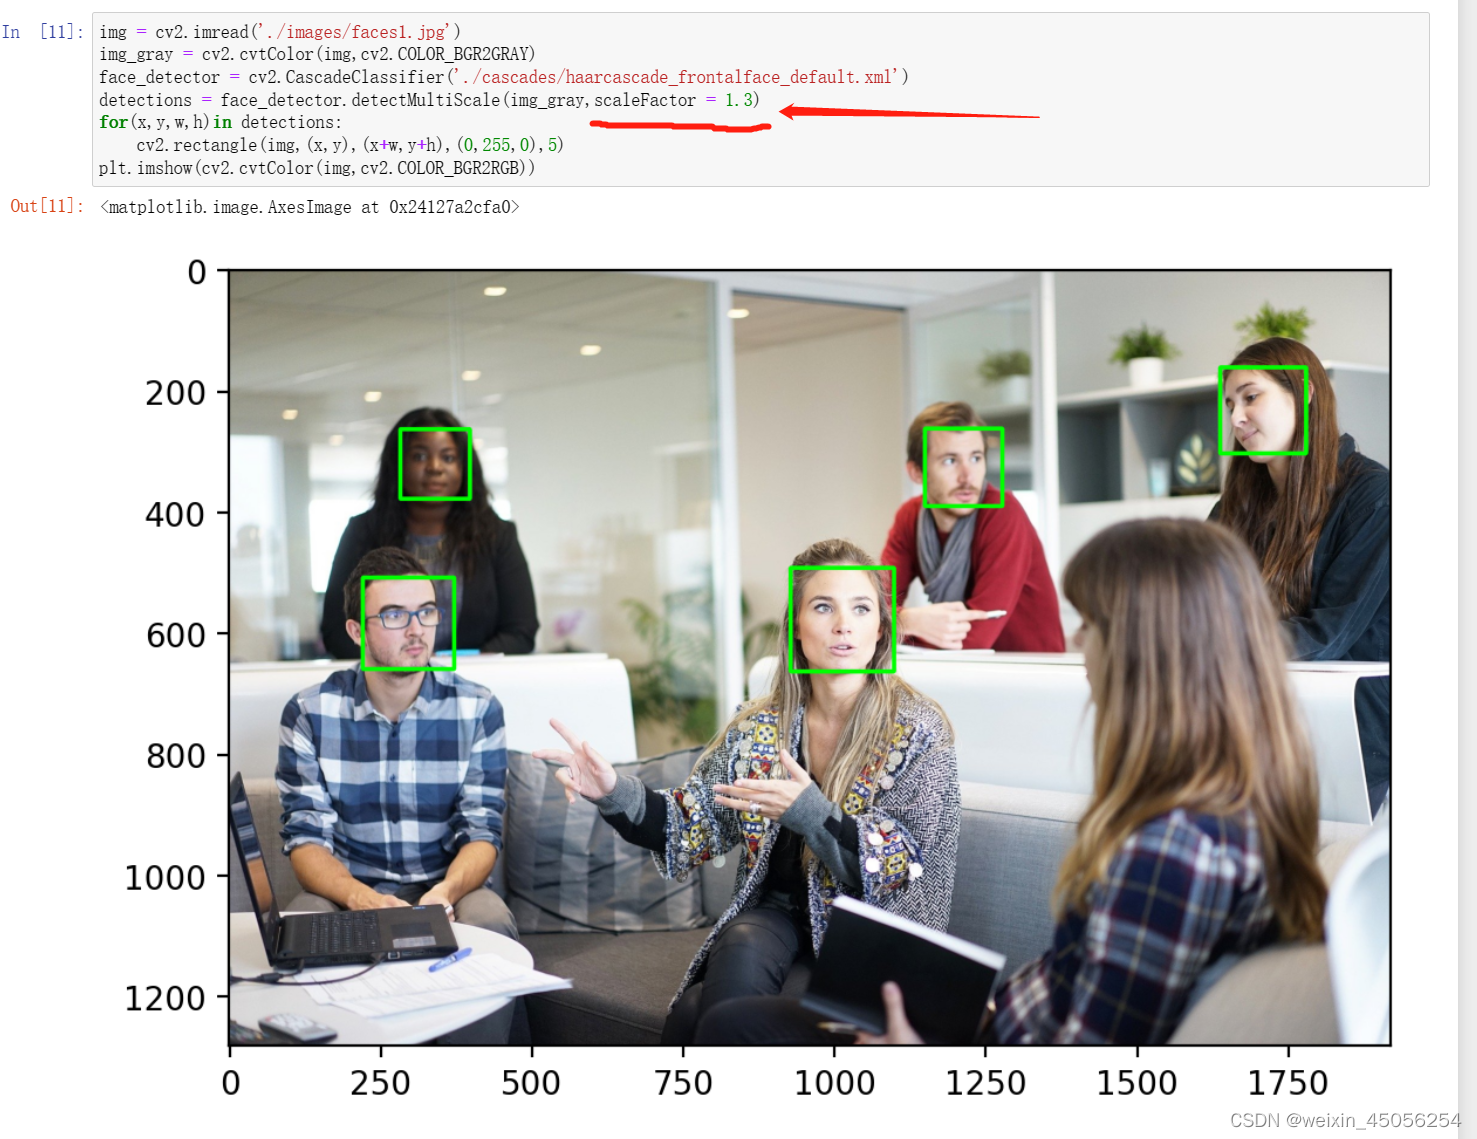
第1步,读取图片
img = cv2.imread('./images/faces1.jpg')第2步,将图片转化为灰度图片,因为Haar检测器识别的是灰度图片
img_gray = cv2.cvtColor(img,cv2.COLOR_BGR2GRAY)第3步,构造Haar检测器
face_detector = cv2.CascadeClassifier('./cascades/haarcascade_frontalface_default.xml')第4步,检测器开始检测人脸
detections = face_detector.detectMultiScale(img_gray)第5步,迭代器解析
- for(x,y,w,h)in detections:
- cv2.rectangle(img,(x,y),(x+w,y+h),(0,255,0),5)
第6步,显示
plt.imshow(cv2.cvtColor(img,cv2.COLOR_BGR2RGB))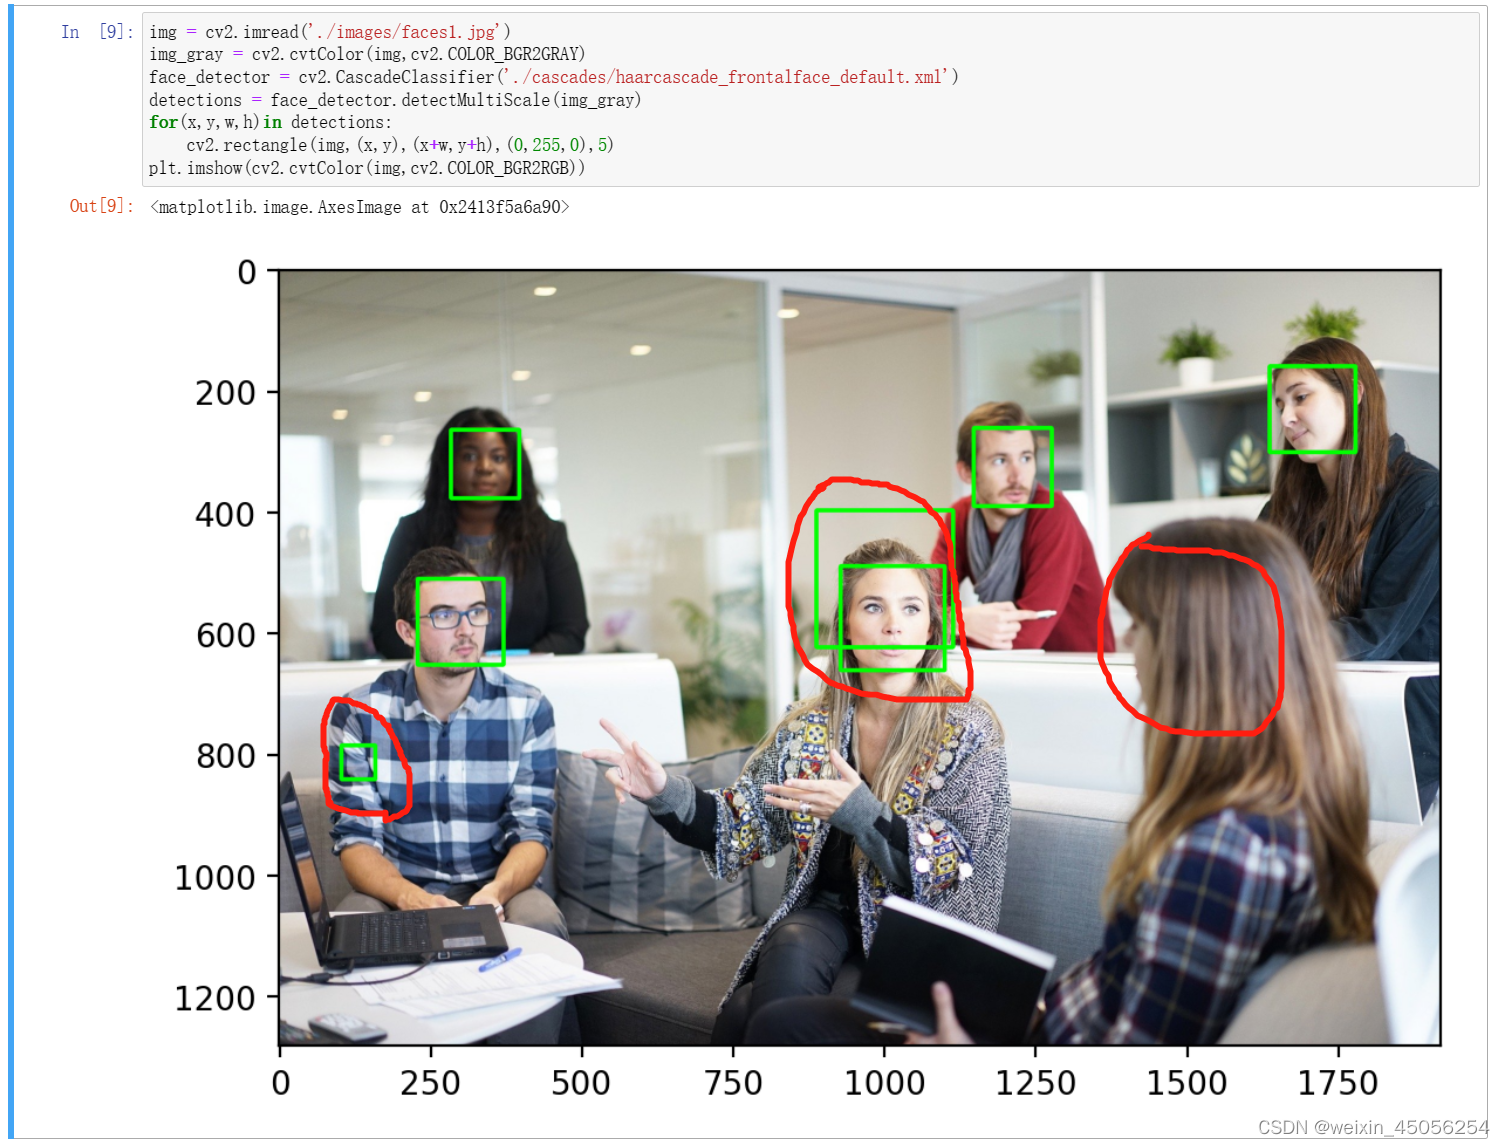
第7步,参数调节
-- scaleFactor
scaleFactor是用来调节检测人脸大小的范围的,举个例子scaleFactor = 1表示人脸检测范围从1开始检测,人脸离相机远,脸小,离相机近脸大,因此scaleFactor的取值能一定程度上影响识别的精度。
但有时候不论怎么调节scaleFactor都会出现下述情况 ,此时需要minNeighbor调节人脸框的候选数量
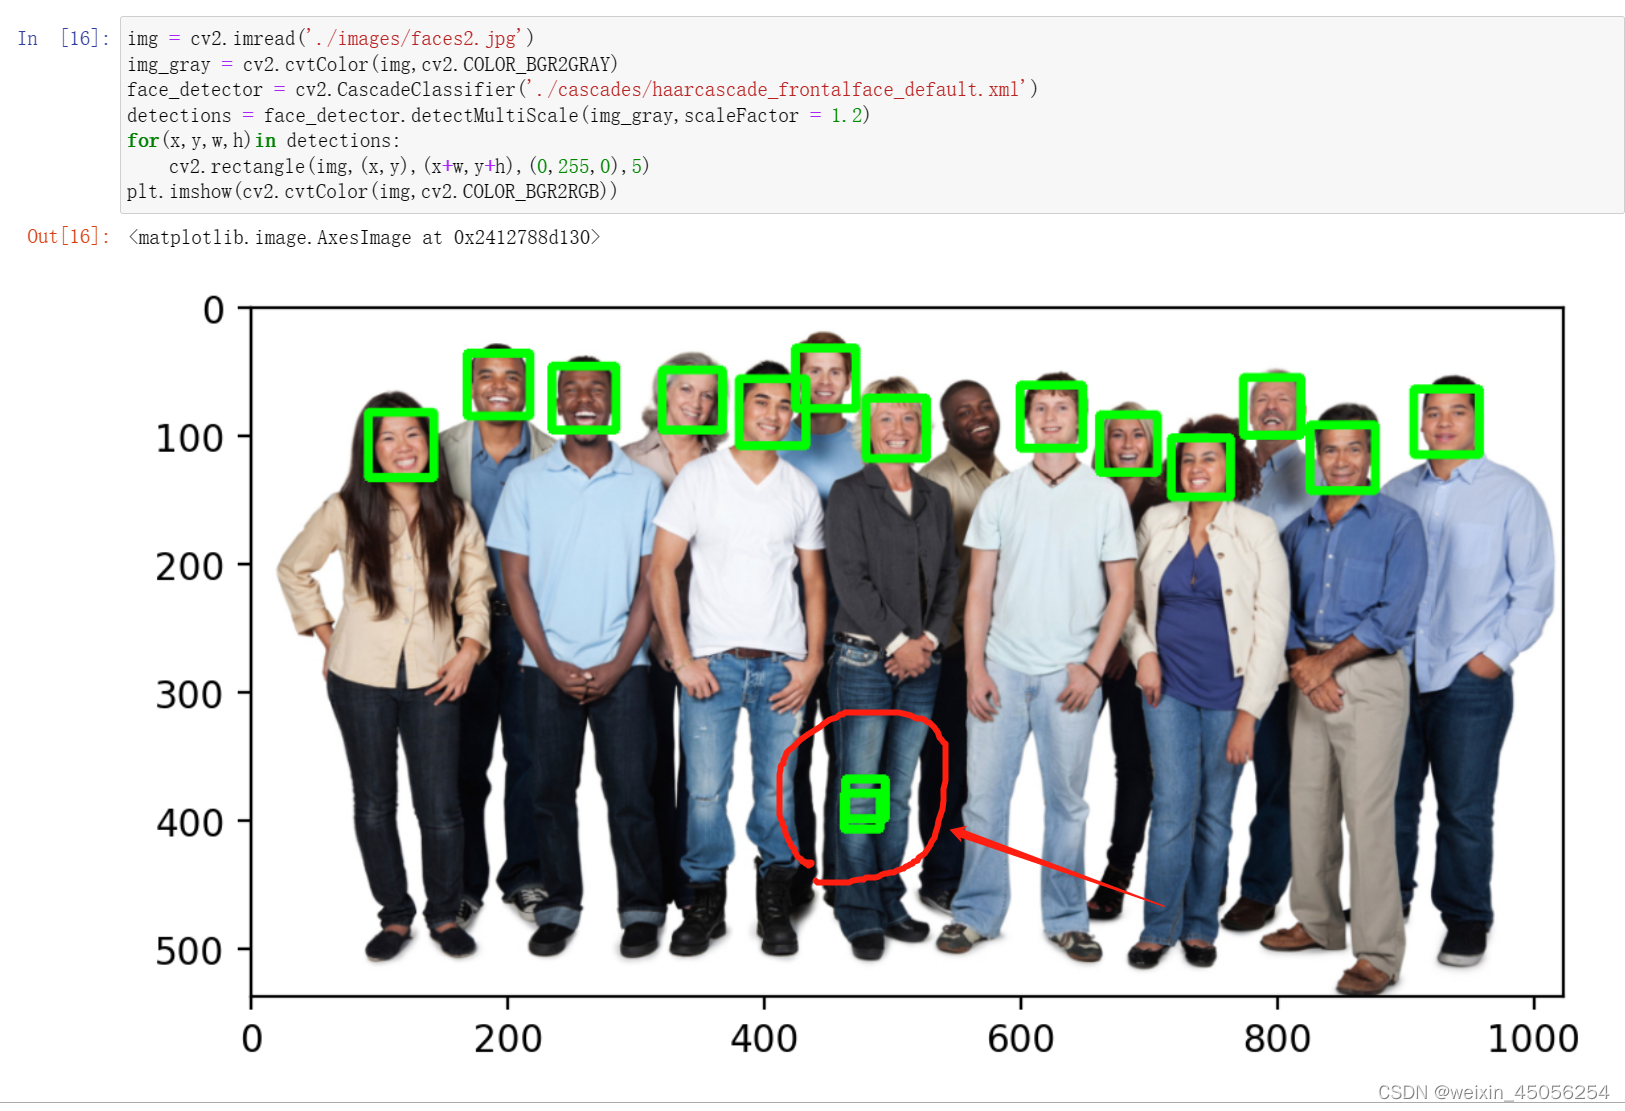
--minNeighbors
minNeighbors指每个人脸框最小的候选数量,算法为了检测人脸,可能会在一个人物照片的多个地方去检测人脸,最后会识别出多个地方可能都是人脸,这时minNeighbors会对这些识别结果进行排序取出最可能是人脸的地方,试想一下,如果所有的方框都集中在某一个区域,那么是不是代表这个区域内是人脸的可能性更高,当然是这样,这个方框集中在某一个区域的数量就叫做人脸框的候选数量用minNeighbors表示,显然minNeighbors较大比较好,太大了会出现漏检。

--minSize
minSize表示最小人脸尺寸,maxSize表示最大人脸尺寸,这两个参数都是用来控制人脸大小的,如
detections = face_detector.detectMultiScale(img_gray,scaleFactor = 1.2,minNeighbors =7,minSize=(1,1))2. HOG + Dlib
第1步,读取图片
- img = cv2.imread('./images/faces2.jpg')
- plt.imshow(cv2.cvtColor(img,cv2.COLOR_BGR2RGB))
第2步,构造HOG检测器,需要安装Dlib包(conda install -c conda-forge dlib)
- import dlib
- hog_face_detector = dlib.get_frontal_face_detector()
第3步,检测人脸
detections= hog_face_detector(img,1)#指的是scaleFactor=1第4步,解析
- for face in detections:
- x = face.left()
- y = face.top()
- r = face.right()
- b = face.bottom()
- cv2.rectangle(img,(x,y),(r,b),(0,255,0),5)
第5步,显示
plt.imshow(cv2.cvtColor(img,cv2.COLOR_BGR2RGB))
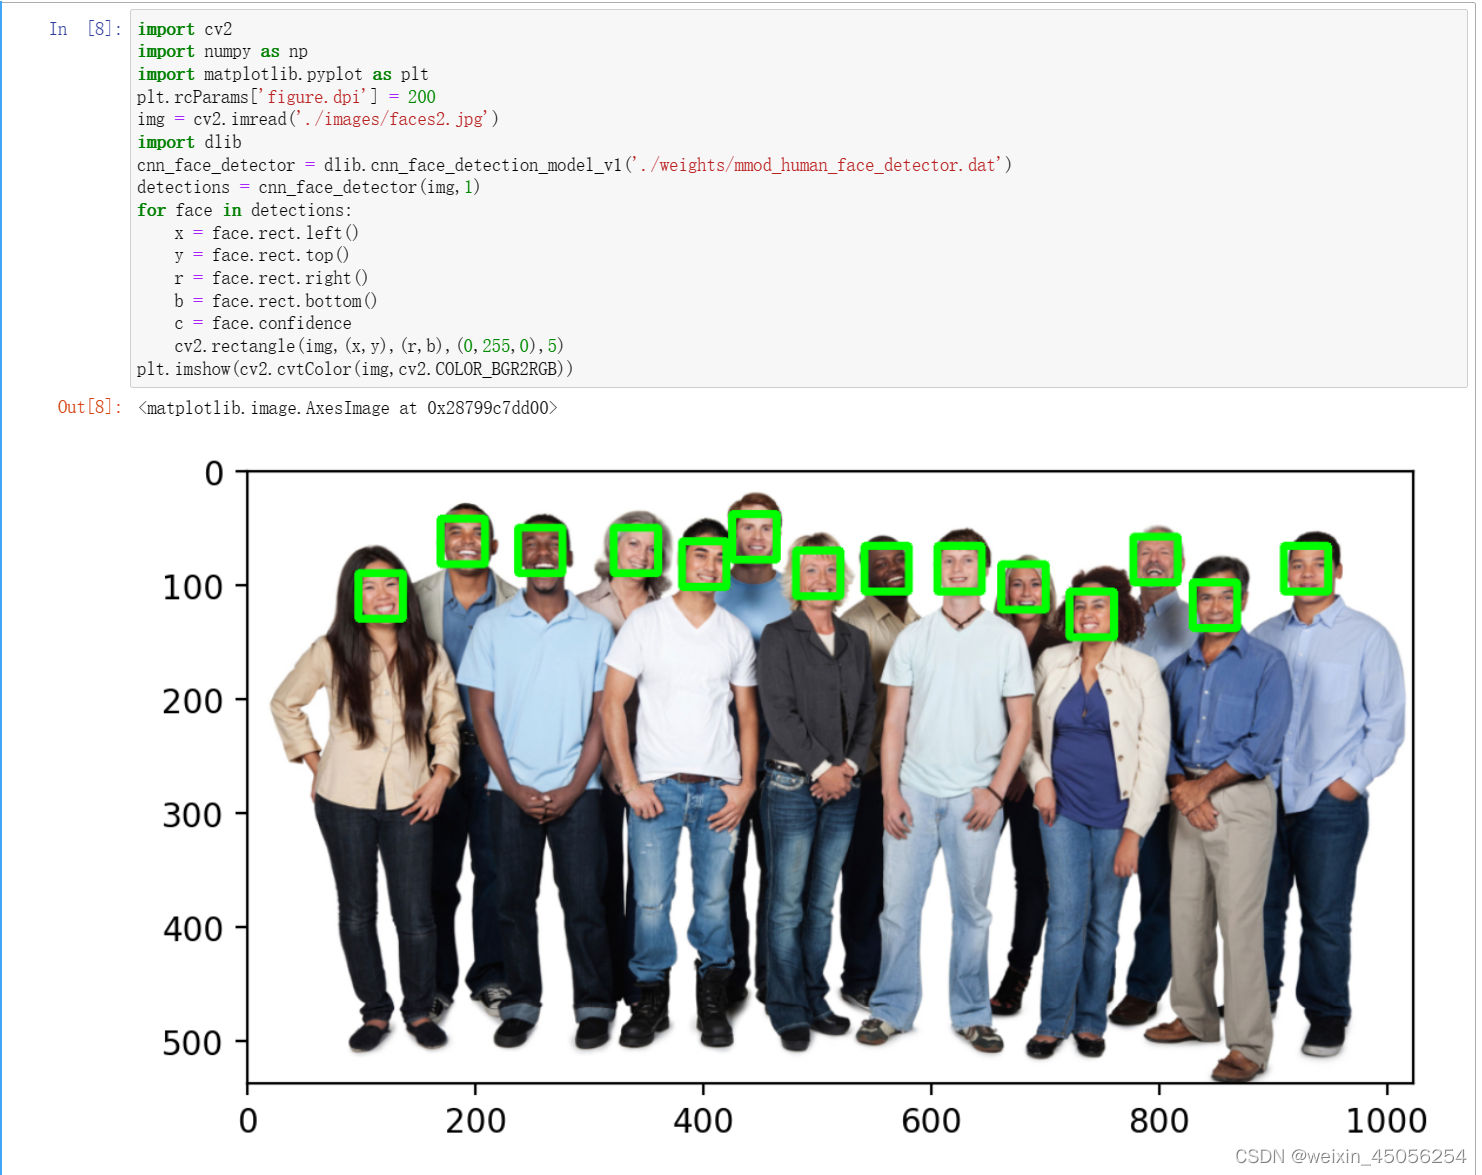
3. CNN + Dlib
- import cv2
- import numpy as np
- import matplotlib.pyplot as plt
- plt.rcParams['figure.dpi'] = 200
- img = cv2.imread('./images/faces2.jpg')
- import dlib
- cnn_face_detector = dlib.cnn_face_detection_model_v1('./weights/mmod_human_face_detector.dat')
- detections = cnn_face_detector(img,1)
- for face in detections:
- x = face.rect.left()
- y = face.rect.top()
- r = face.rect.right()
- b = face.rect.bottom()
- c = face.confidence
- cv2.rectangle(img,(x,y),(r,b),(0,255,0),5)
- plt.imshow(cv2.cvtColor(img,cv2.COLOR_BGR2RGB))

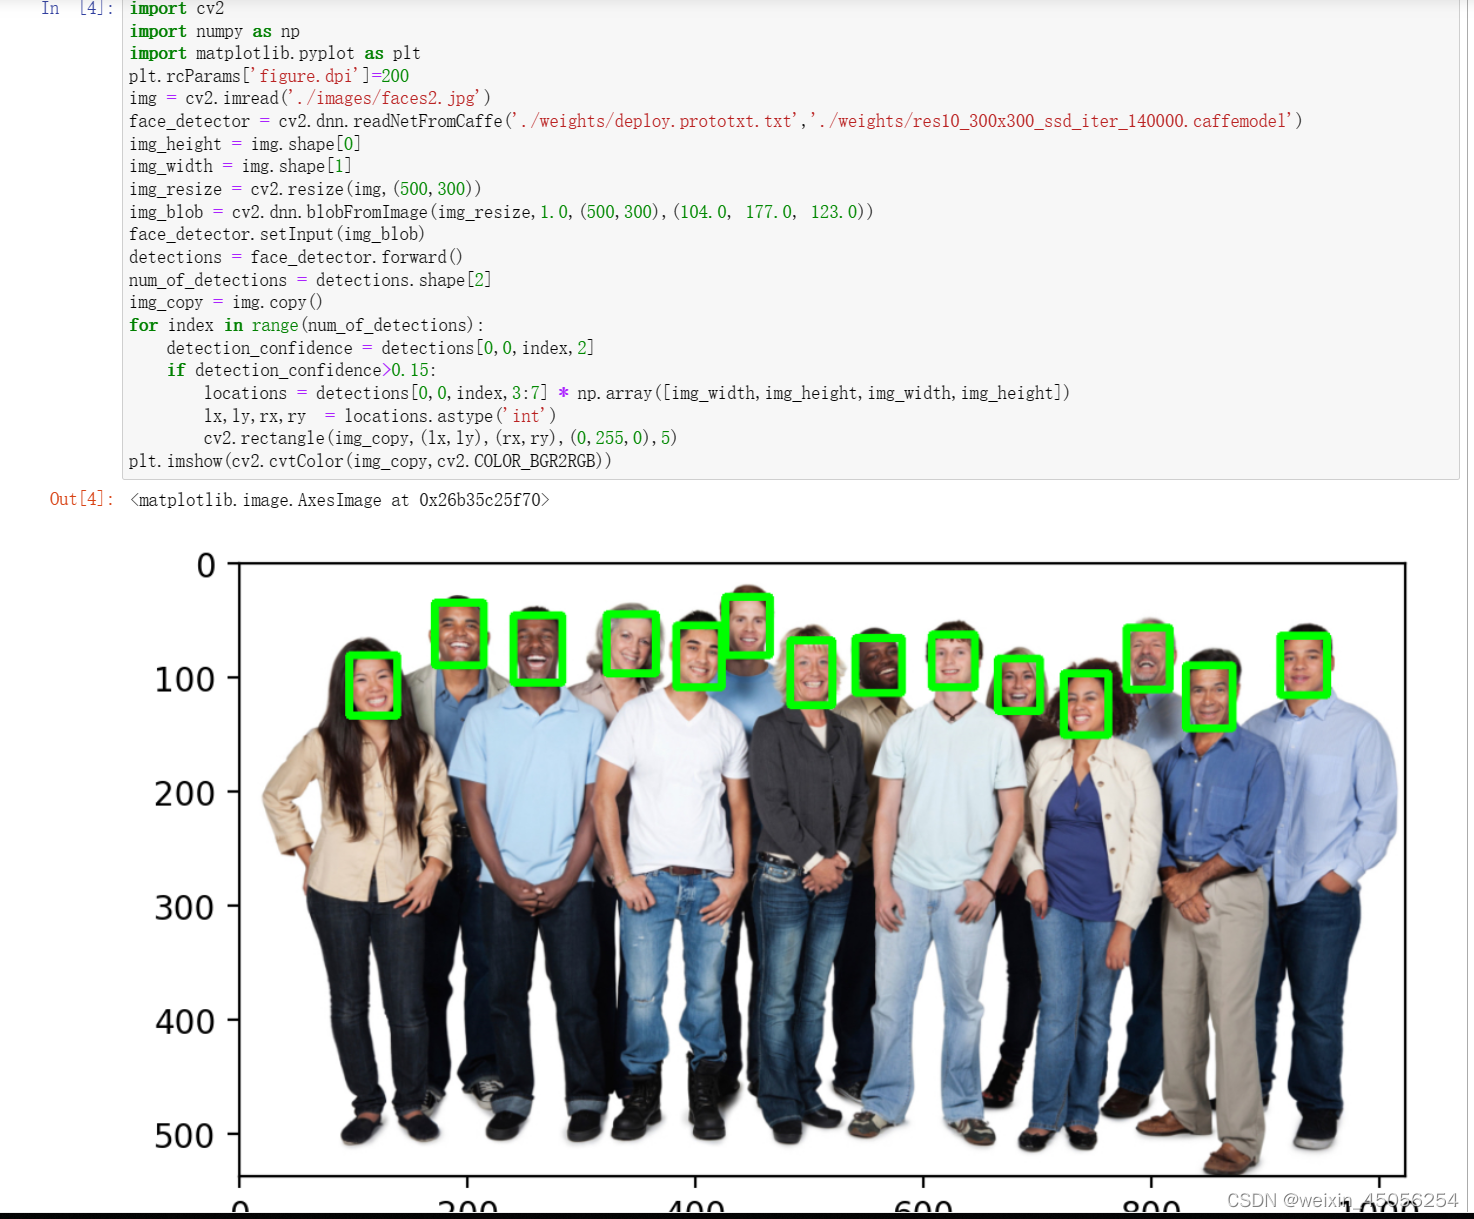
4. SSD
- import cv2
- import numpy as np
- import matplotlib.pyplot as plt
- plt.rcParams['figure.dpi']=200
- img = cv2.imread('./images/faces2.jpg')
- face_detector = cv2.dnn.readNetFromCaffe('./weights/deploy.prototxt.txt','./weights/res10_300x300_ssd_iter_140000.caffemodel')
- img_height = img.shape[0]
- img_width = img.shape[1]
- img_resize = cv2.resize(img,(500,300))
- img_blob = cv2.dnn.blobFromImage(img_resize,1.0,(500,300),(104.0, 177.0, 123.0))
- face_detector.setInput(img_blob)
- detections = face_detector.forward()
- num_of_detections = detections.shape[2]
- img_copy = img.copy()
- for index in range(num_of_detections):
- detection_confidence = detections[0,0,index,2]
- if detection_confidence>0.15:
- locations = detections[0,0,index,3:7] * np.array([img_width,img_height,img_width,img_height])
- lx,ly,rx,ry = locations.astype('int')
- cv2.rectangle(img_copy,(lx,ly),(rx,ry),(0,255,0),5)
- plt.imshow(cv2.cvtColor(img_copy,cv2.COLOR_BGR2RGB))
5. MTCNN
- import cv2
- import numpy as np
- import matplotlib.pyplot as plt
- plt.rcParams['figure.dpi']=200
-
- img = cv2.imread('./images/faces2.jpg')
- img_cvt = cv2.cvtColor(img,cv2.COLOR_BGR2RGB)
- from mtcnn.mtcnn import MTCNN
- face_detetor = MTCNN()
- detections = face_detetor.detect_faces(img_cvt)
- for face in detections:
- (x, y, w, h) = face['box']
- cv2.rectangle(img_cvt, (x, y), (x + w, y + h), (0,255,0), 5)
- plt.imshow(img_cvt)

- import cv2
- import numpy as np
- import matplotlib.pyplot as plt
- plt.rcParams['figure.dpi']=200
- img = cv2.imread('./images/test.jpg')
- img_cvt = cv2.cvtColor(img,cv2.COLOR_BGR2RGB)
- from mtcnn.mtcnn import MTCNN
- face_detetor = MTCNN()
- detections = face_detetor.detect_faces(img_cvt)
- for face in detections:
- (x, y, w, h) = face['box']
- cv2.rectangle(img_cvt, (x, y), (x + w, y + h), (0,255,0), 5)
- plt.imshow(img_cvt)

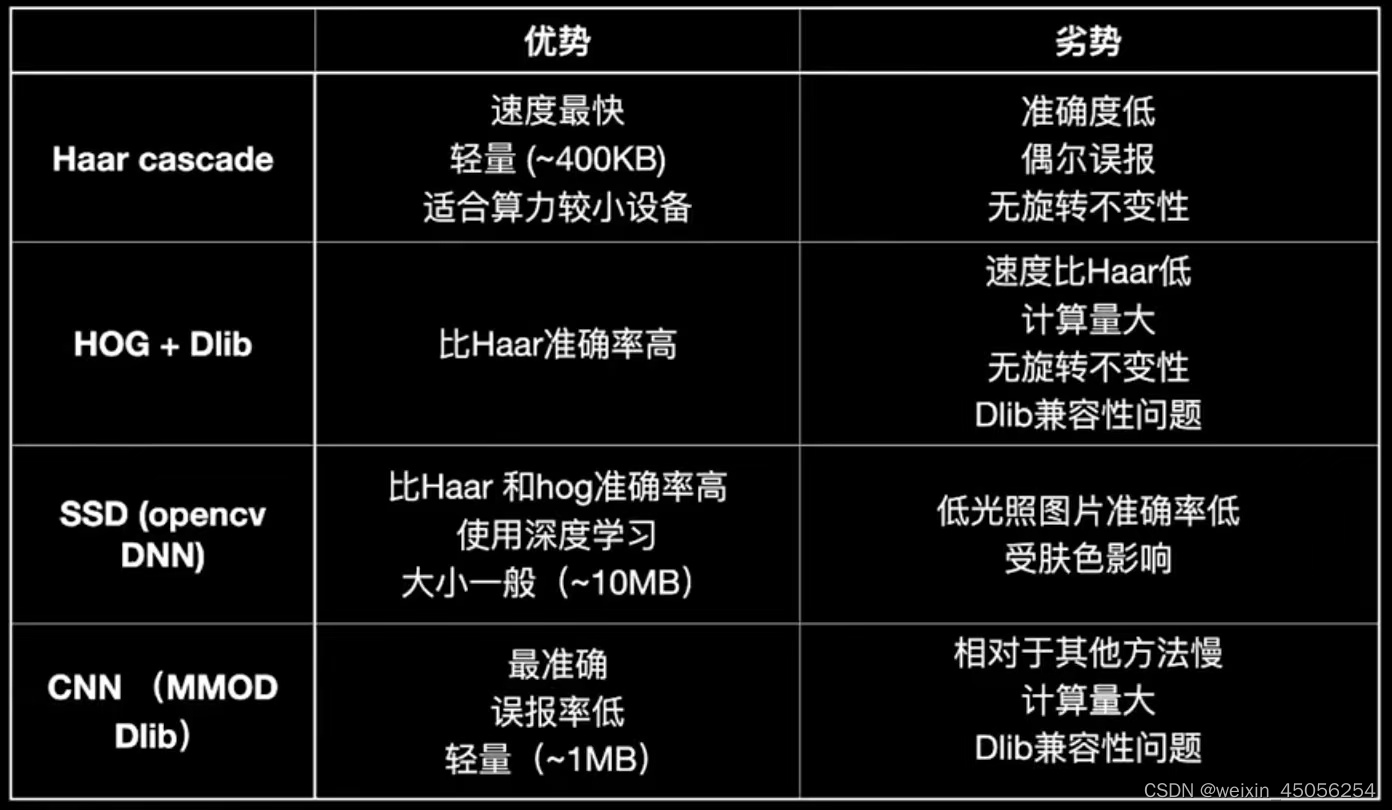
5种人脸检测方式对比
视频流人脸检测 :
1.构造haar人脸检测器
2.获取视频流
3.检测每一帧画面
4.画人脸框并显示
- import cv2
- import numpy as np
- cap = cv2.VideoCapture(0)
- haar_face_detector = cv2.CascadeClassifier('./cascades/haarcascade_frontalface_default.xml')
- while True:
- ret,frame = cap.read()
- fram = cv2.flip(frame,1)
- frame_gray = cv2.cvtColor(frame,cv2.COLOR_BGR2GRAY)
- detection = haar_face_detector.detectMultiScale(frame_gray,minNeighbors=5)
- for(x,y,w,h) in detection:
- cv2.rectangle(fram,(x,y),(x+w,y+h),(0,255,0),5)
- cv2.imshow('Demo',fram)
- if cv2.waitKey(10) & 0xff == ord('q'):
- break
- cap.release()
- cv2.destoryAllWindows()

