
- 1【AI特训营】基于PaddleDection半监督PP-YOLOE完成卡车垃圾倾倒检测_ai垃圾监测,面积测量
- 2每日一看大模型新闻(2023.11.09)GPT-5爆料:多模态Gobi将在2024年初发布;亚马逊训练比GPT-4参数多两倍的大型语言模型Olympus;GPT-4 Turbo中文基准评测出炉
- 3双重差分法(DID):算法策略效果评估的利器
- 4解决无法访问OpenAI API的三种方式_openai怎么访问
- 5利用DocsGPT快速搭建一个问答式的文档检索服务_群晖 文件服务器 利用chatgpt实现文件智能检索
- 6Python爬取旅游网站热门景点信息的技术性文章
- 7半小时拥有自己的ChatGPT4,通俗易懂_开通chatgpt4的方法
- 8三维重建入门第一篇:KinectFusion论文精读,原理、流程详解,帮你看懂这篇文章
- 9ubuntu重装mysql8
- 10树莓派4B debian嵌入式远程连接远程控制xrdp(Ubuntu为例)_debian xrdp
直面原理:5 张图彻底了解 Android TextToSpeech 机制_texttospeech texttospeechservice
赞
踩
ChatGPT如此火爆,但它的强悍在于NLU(自然语言理解)、DM(对话管理)和NLG(自然语言生成)这三块,而Recognition识别和TTS播报这两块是缺失的。假使你的 App 接入了 ChatGPT,但如果需要播报出来的话,TextToSpeech机制就可以派上用场了。
1 前言
关于语音方面的交互,Android SDK 提供了用于语音交互的 VoiceInteraction 机制、语音识别的 Recognition 接口、语音播报的 TTS 接口。
前者已经介绍过,本次主要聊聊第 3 块即 TTS,后续会分析下第 2 块即 Android 标准的 Recognition 机制。
通过 TextToSpeech 机制,任意 App 都可以方便地采用系统内置或第三方提供的 TTS Engine 进行播放铃声提示、语音提示的请求,Engine 可以由系统选择默认的 provider 来执行操作,也可由 App 具体指定偏好的目标 Engine 来完成。
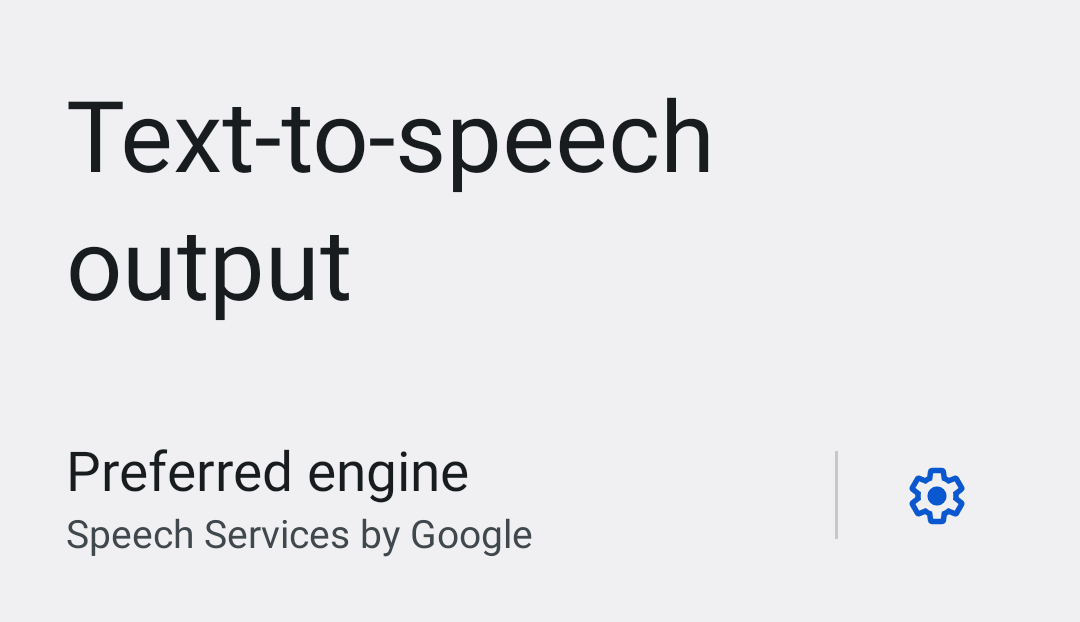
默认 TTS Engine 可以在设备设置的路径中找到,亦可由用户手动更改:Settings -> Accessibility -> Text-to-speech ouput -> preferred engine
TextToSpeech 机制的优点有很多:
- 对于需要使用 TTS 的请求 App 而言:无需关心 TTS 的具体实现,通过
TextToSpeechAPI 即用即有 - 对于需要对外提供 TTS 能力的实现 Engine 而言,无需维护复杂的 TTS 时序和逻辑,按照
TextToSpeechService框架的定义对接即可,无需关心系统如何将实现和请求进行衔接
本文将会阐述 TextToSpeech 机制的调用、Engine 的实现以及系统调度这三块,彻底梳理清楚整个流程。
2 TextToSpeech 调用
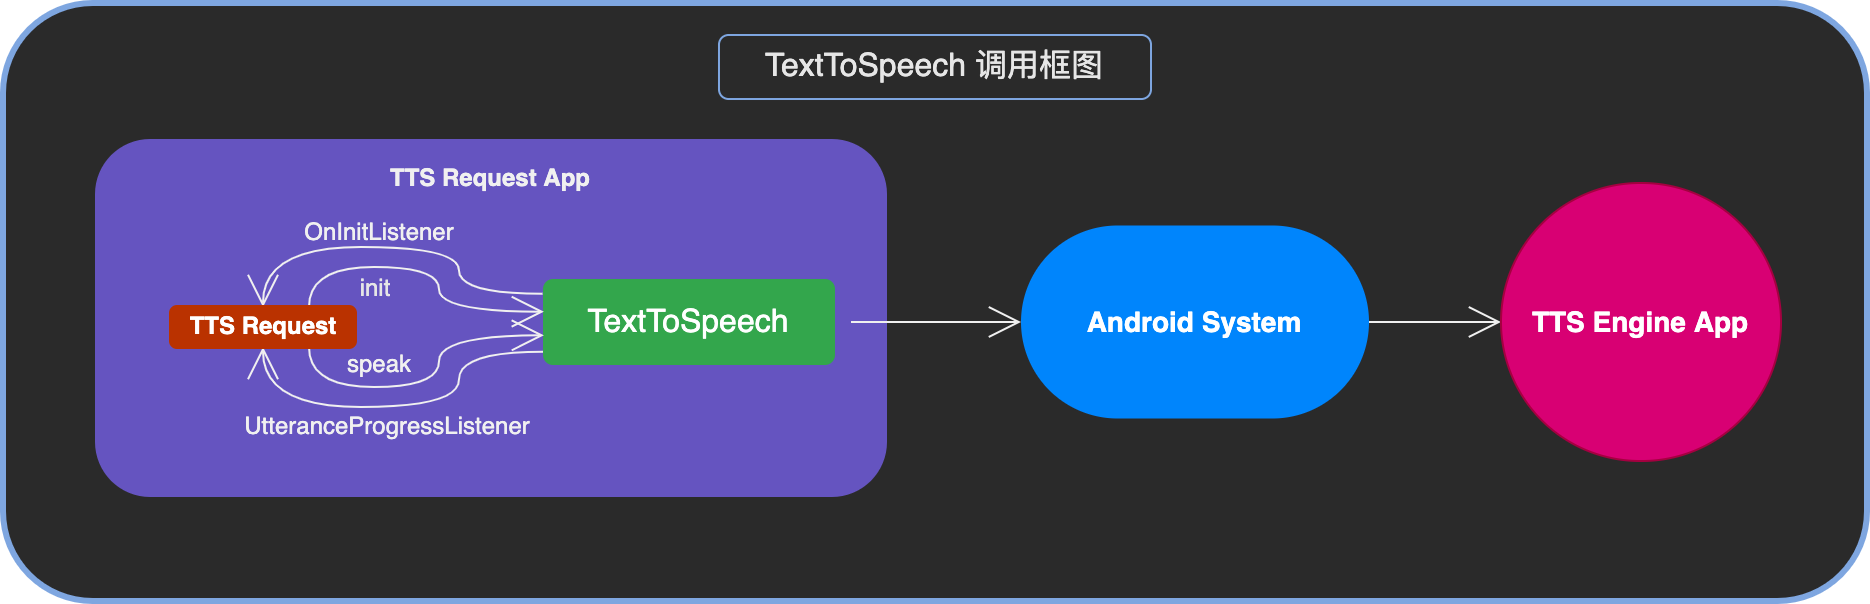
TextToSpeech API 是为 TTS 调用准备,总体比较简单。
最主要的是提供初始化 TTS 接口的 TextToSpeech() 构造函数和初始化后的回调 OnInitListener,后续的播放 TTS 的 speak() 和播放铃声的 playEarcon()。
比较重要的是处理播放请求的 4 种回调结果,需要依据不同结果进行 TTS 播报开始的状态记录、播报完毕后的下一步动作、抑或是在播报出错时对音频焦点的管理等等。
之前的 OnUtteranceCompletedListener 在 API level 18 时被废弃,可以使用回调更为精细的 UtteranceProgressListener。
// TTSTest.kt
class TTSTest(context: Context) {
    private val tts: TextToSpeech = TextToSpeech(context) { initResult -> ... }

    init {
        tts.setOnUtteranceProgressListener(object : UtteranceProgressListener() {
            override fun onStart(utteranceId: String?) { ... }

            override fun onDone(utteranceId: String?) { ... }

            override fun onStop(utteranceId: String?, interrupted: Boolean)  { ... }

            override fun onError(utteranceId: String?)  { ... }
        })
    }

    fun testTextToSpeech(context: Context) {
        tts.speak(
            "你好,汽车",
            TextToSpeech.QUEUE_ADD,
            Bundle(),
            "xxdtgfsf"
        )

        tts.playEarcon(
            EARCON_DONE,
            TextToSpeech.QUEUE_ADD,
            Bundle(),
            "yydtgfsf"
        )
    }

    companion object {
        const val EARCON_DONE = "earCon_done"
    }
}
- 1
- 2
- 3
- 4
- 5
- 6
- 7
- 8
- 9
- 10
- 11
- 12
- 13
- 14
- 15
- 16
- 17
- 18
- 19
- 20
- 21
- 22
- 23
- 24
- 25
- 26
- 27
- 28
- 29
- 30
- 31
- 32
- 33
- 34
- 35
- 36
3 TextToSpeech 系统调度
3.1 init 绑定
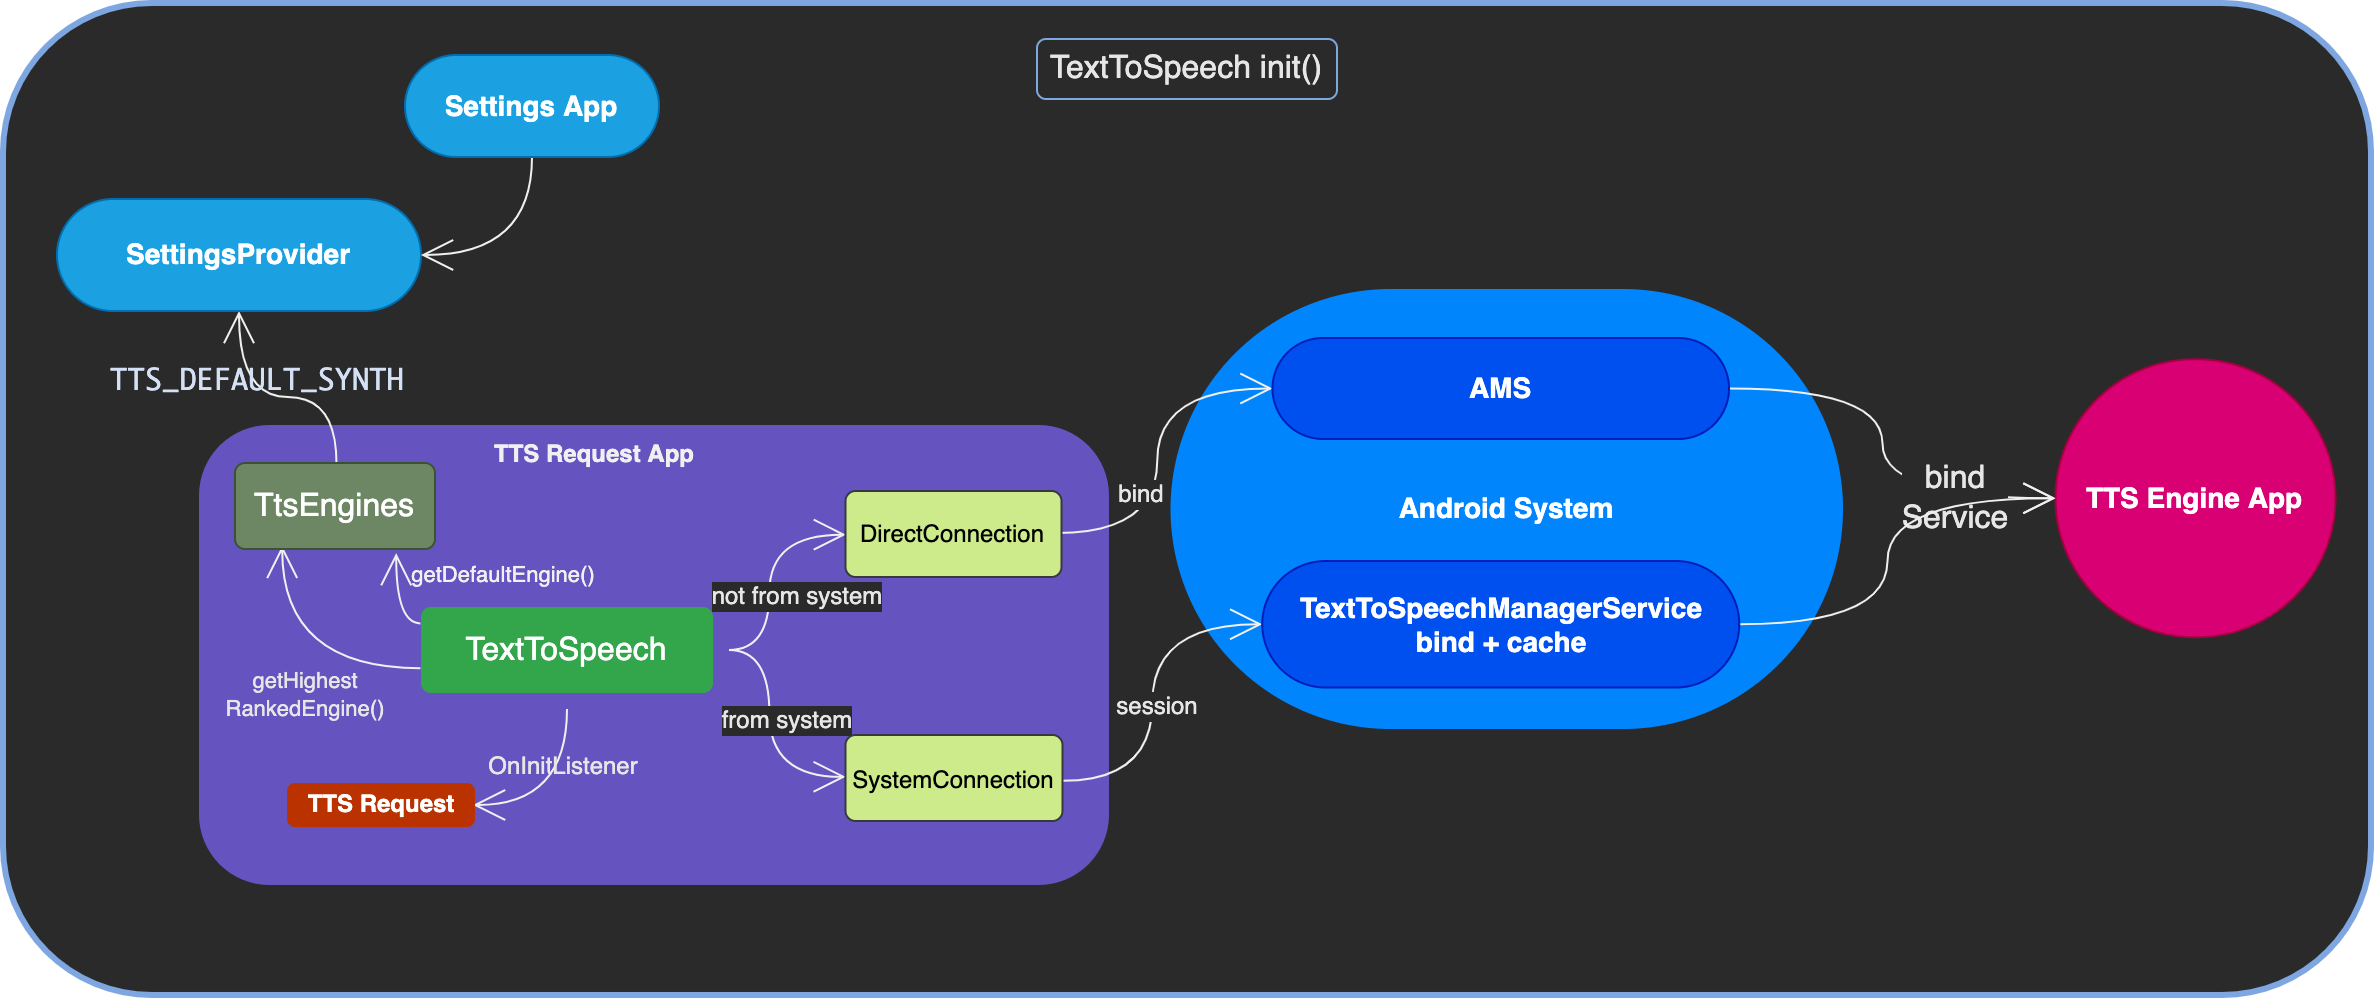
首先从 TextToSpeech() 的实现入手,以了解在 TTS 播报之前,系统和 TTS Engine 之间做了什么准备工作。
-
其触发的
initTTS()将按照如下顺序查找需要连接到哪个 Engine:- 如果构造 TTS 接口的实例时指定了目标 Engine 的 package,那么首选连接到该 Engine
- 反之,获取设备设置的 default Engine 并连接,设置来自于
TtsEngines从系统设置数据SettingsProvider中 读取TTS_DEFAULT_SYNTH而来 - 如果 default 不存在或者没有安装的话,从 TtsEngines 获取第一位的系统 Engine 并连接。第一位指的是从所有 TTS Service 实现 Engine 列表里获得第一个属于 system image 的 Engine
-
连接的话均是调用
connectToEngine(),其将依据调用来源来采用不同的Connection内部实现去connect():-
如果调用不是来自 system,采用
DirectConnection- 其 connect() 实现较为简单,封装 Action 为
INTENT_ACTION_TTS_SERVICE的 Intent 进行bindService(),后续由AMS执行和 Engine 的绑定,这里不再展开
- 其 connect() 实现较为简单,封装 Action 为
-
反之,采用
SystemConnection,原因在于系统的 TTS 请求可能很多,不能像其他 App 一样总是创建一个新的连接,而是需要 cache 并复用这种连接-
具体是直接获取名为
texttospeech、管理 TTS Service 的系统服务TextToSpeechManagerService的接口代理并直接调用它的createSession()创建一个 session,同时暂存其指向的ITextToSpeechSession代理接口。该 session 实际上还是
AIDL机制,TTS 系统服务的内部会创建专用的TextToSpeechSessionConnection去 bind 和 cache Engine,这里不再赘述
-
-
无论是哪种方式,在 connected 之后都需要将具体的 TTS Eninge 的
ITextToSpeechService接口实例暂存,同时将 Connection 实例暂存到 mServiceConnection,给外部类接收到 speak() 的时候使用。而且要留意,此刻还会启动一个异步任务SetupConnectionAsyncTask将自己作为 Binder 接口ITextToSpeechCallback返回给 Engine 以处理完之后回调结果给 Request
-
-
connect 执行完毕并结果 OK 的话,还要暂存到
mConnectingServiceConnection,以在结束 TTS 需求的时候释放连接使用。并通过dispatchOnInit()传递SUCCESS给 Request App- 实现很简单,将结果 Enum 回调给初始化传入的
OnInitListener接口
- 实现很简单,将结果 Enum 回调给初始化传入的
-
如果连接失败的话,则调用
dispatchOnInit()传递ERROR
// TextToSpeech.java
public class TextToSpeech {
    public TextToSpeech(Context context, OnInitListener listener) {
        this(context, listener, null);
    }

    private TextToSpeech( ... ) {
        ...
        initTts();
    }

    private int initTts() {
        // Step 1: Try connecting to the engine that was requested.
        if (mRequestedEngine != null) {
            if (mEnginesHelper.isEngineInstalled(mRequestedEngine)) {
                if (connectToEngine(mRequestedEngine)) {
                    mCurrentEngine = mRequestedEngine;
                    return SUCCESS;
                }
                ...
            } else if (!mUseFallback) {
                ...
                dispatchOnInit(ERROR);
                return ERROR;
            }
        }

        // Step 2: Try connecting to the user's default engine.
        final String defaultEngine = getDefaultEngine();
        ...

        // Step 3: Try connecting to the highest ranked engine in the system.
        final String highestRanked = mEnginesHelper.getHighestRankedEngineName();
        ...

        dispatchOnInit(ERROR);
        return ERROR;
    }

    private boolean connectToEngine(String engine) {
        Connection connection;
        if (mIsSystem) {
            connection = new SystemConnection();
        } else {
            connection = new DirectConnection();
        }

        boolean bound = connection.connect(engine);
        if (!bound) {
            return false;
        } else {
            mConnectingServiceConnection = connection;
            return true;
        }
    }
}
- 1
- 2
- 3
- 4
- 5
- 6
- 7
- 8
- 9
- 10
- 11
- 12
- 13
- 14
- 15
- 16
- 17
- 18
- 19
- 20
- 21
- 22
- 23
- 24
- 25
- 26
- 27
- 28
- 29
- 30
- 31
- 32
- 33
- 34
- 35
- 36
- 37
- 38
- 39
- 40
- 41
- 42
- 43
- 44
- 45
- 46
- 47
- 48
- 49
- 50
- 51
- 52
- 53
- 54
- 55
- 56
Connection 内部类和其两个子类的实现:
// TextToSpeech.java
public class TextToSpeech {
    ...
    private abstract class Connection implements ServiceConnection {
        private ITextToSpeechService mService;
        ...

        private final ITextToSpeechCallback.Stub mCallback =
                new ITextToSpeechCallback.Stub() {
                    public void onStop(String utteranceId, boolean isStarted)
                            throws RemoteException {
                        UtteranceProgressListener listener = mUtteranceProgressListener;
                        if (listener != null) {
                            listener.onStop(utteranceId, isStarted);
                        }
                    };

                    @Override
                    public void onSuccess(String utteranceId) { ... }

                    @Override
                    public void onError(String utteranceId, int errorCode) { ... }

                    @Override
                    public void onStart(String utteranceId) { ... }
                    ...
                };

        @Override
        public void onServiceConnected(ComponentName componentName, IBinder service) {
            synchronized(mStartLock) {
                mConnectingServiceConnection = null;

                mService = ITextToSpeechService.Stub.asInterface(service);
                mServiceConnection = Connection.this;

                mEstablished = false;
                mOnSetupConnectionAsyncTask = new SetupConnectionAsyncTask();
                mOnSetupConnectionAsyncTask.execute();
            }
        }
        ...
    }

    private class DirectConnection extends Connection {
        @Override
        boolean connect(String engine) {
            Intent intent = new Intent(Engine.INTENT_ACTION_TTS_SERVICE);
            intent.setPackage(engine);
            return mContext.bindService(intent, this, Context.BIND_AUTO_CREATE);
        }
        ...
    }

    private class SystemConnection extends Connection {
        ...
        boolean connect(String engine) {
            IBinder binder = ServiceManager.getService(Context.TEXT_TO_SPEECH_MANAGER_SERVICE);
            ...
            try {
                manager.createSession(engine, new ITextToSpeechSessionCallback.Stub() {
                    ...
                });
                return true;
            } ...
        }
        ...
    }
}
- 1
- 2
- 3
- 4
- 5
- 6
- 7
- 8
- 9
- 10
- 11
- 12
- 13
- 14
- 15
- 16
- 17
- 18
- 19
- 20
- 21
- 22
- 23
- 24
- 25
- 26
- 27
- 28
- 29
- 30
- 31
- 32
- 33
- 34
- 35
- 36
- 37
- 38
- 39
- 40
- 41
- 42
- 43
- 44
- 45
- 46
- 47
- 48
- 49
- 50
- 51
- 52
- 53
- 54
- 55
- 56
- 57
- 58
- 59
- 60
- 61
- 62
- 63
- 64
- 65
- 66
- 67
- 68
- 69
3.2 speak 播报
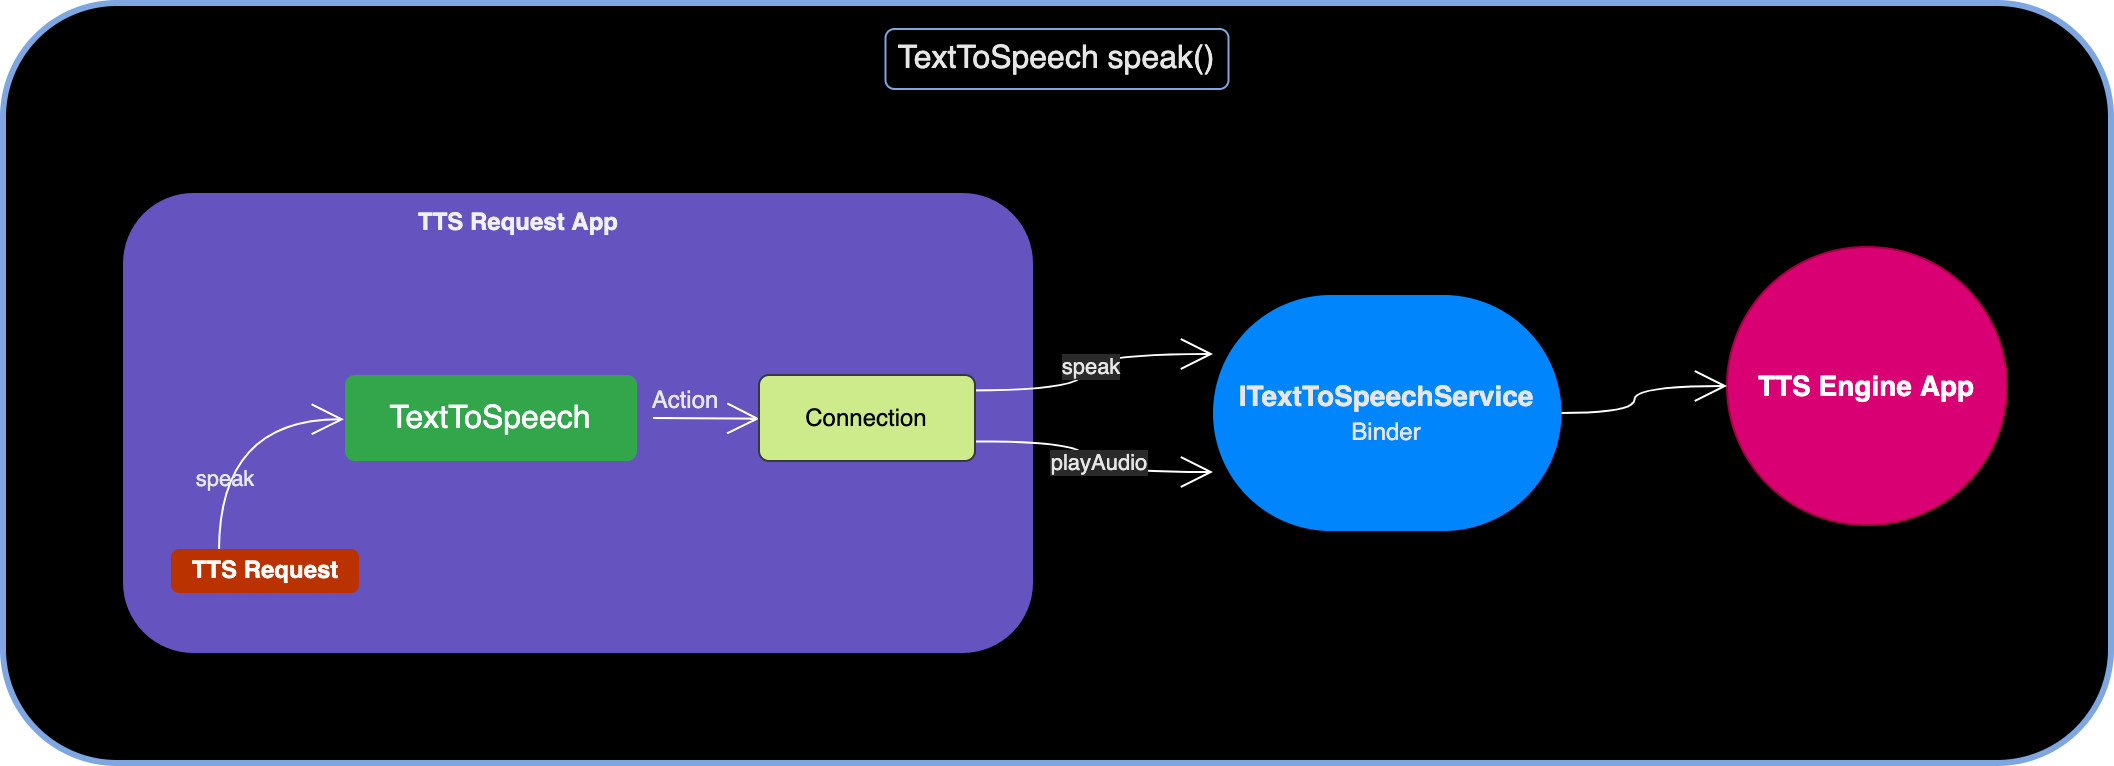
后面看看重要的 speak(),系统做了什么具体实现。
-
首先将 speak() 对应的调用远程接口的操作封装为 Action 接口实例,并交给 init() 时暂存的已连接的 Connection 实例去调度。
// TextToSpeech.java
public class TextToSpeech {
    ...
    private Connection mServiceConnection;

    public int speak(final CharSequence text, ... ) {
        return runAction((ITextToSpeechService service) -> {
            ...
        }, ERROR, "speak");
    }

    private <R> R runAction(Action<R> action, R errorResult, String method) {
        return runAction(action, errorResult, method, true, true);
    }

    private <R> R runAction( ... ) {
        synchronized (mStartLock) {
            ...
            return mServiceConnection.runAction(action, errorResult, method, reconnect,
                    onlyEstablishedConnection);
        }
    }

    private abstract class Connection implements ServiceConnection {
        public <R> R runAction( ... ) {
            synchronized (mStartLock) {
                try {
                    ...
                    return action.run(mService);
                }
                ...
            }
        }
    }
}
- 1
- 2
- 3
- 4
- 5
- 6
- 7
- 8
- 9
- 10
- 11
- 12
- 13
- 14
- 15
- 16
- 17
- 18
- 19
- 20
- 21
- 22
- 23
- 24
- 25
- 26
- 27
- 28
- 29
- 30
- 31
- 32
- 33
- 34
- 35
-
Action的实际内容是先从mUtterancesMap 里查找目标文本是否有设置过本地的 audio 资源:- 如有设置的话,调用用 TTS Engine 的
playAudio()直接播放 - 反之调用 text 转 audio 的接口
speak()
// TextToSpeech.java public class TextToSpeech { ... public int speak(final CharSequence text, ... ) { return runAction((ITextToSpeechService service) -> { Uri utteranceUri = mUtterances.get(text); if (utteranceUri != null) { return service.playAudio(getCallerIdentity(), utteranceUri, queueMode, getParams(params), utteranceId); } else { return service.speak(getCallerIdentity(), text, queueMode, getParams(params), utteranceId); } }, ERROR, "speak"); } ... }- 1
- 2
- 3
- 4
- 5
- 6
- 7
- 8
- 9
- 10
- 11
- 12
- 13
- 14
- 15
- 16
- 17
后面即是 TextToSpeechService 的实现环节。
- 如有设置的话,调用用 TTS Engine 的
4 TextToSpeechService 实现
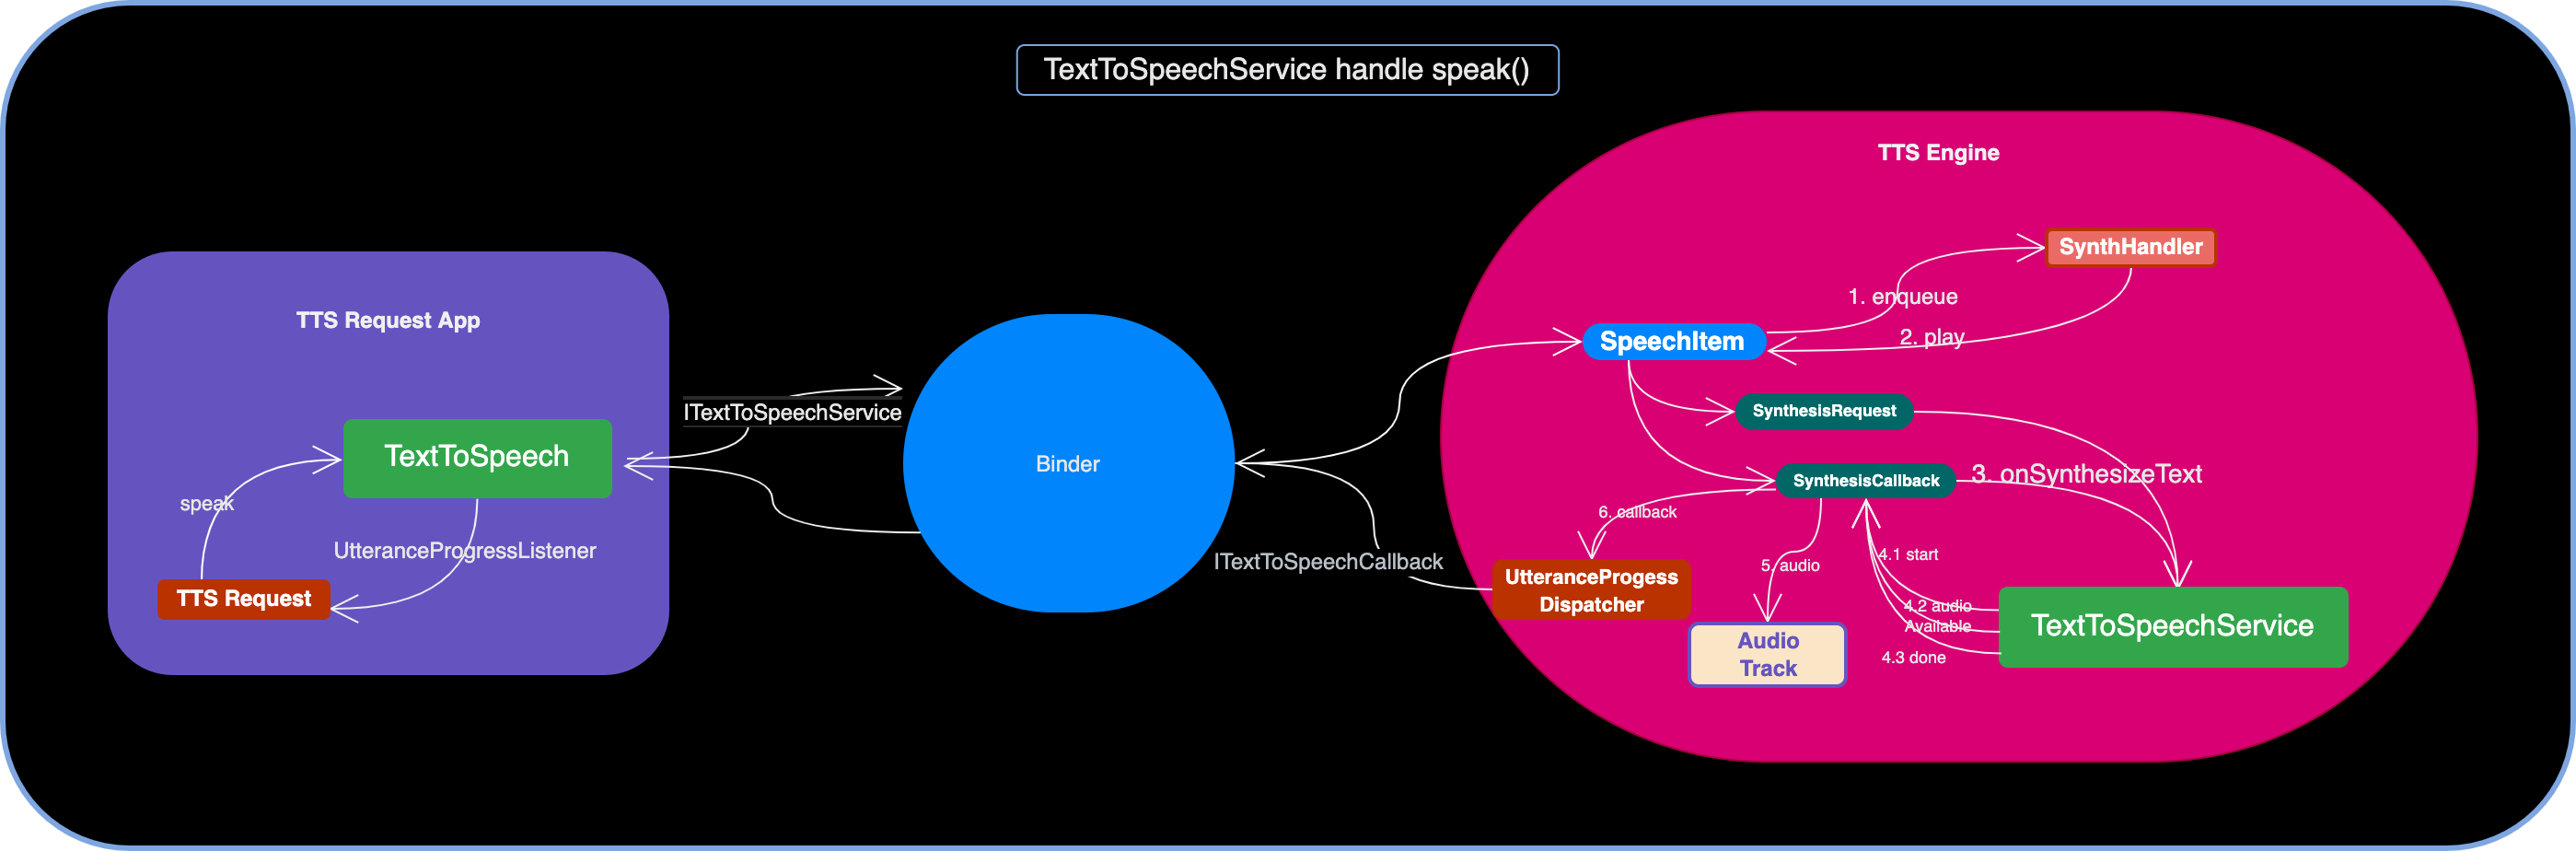
-
TextToSpeechService 内接收的实现是向内部的
SynthHandler发送封装的 speak 或 playAudio 请求的SpeechItem。SynthHandler 绑定到 TextToSpeechService 初始化的时候启动的、名为 “SynthThread” 的 HandlerThread。
- speak 请求封装给 Handler 的是
SynthesisSpeechItem - playAudio 请求封装的是
AudioSpeechItem
// TextToSpeechService.java public abstract class TextToSpeechService extends Service { private final ITextToSpeechService.Stub mBinder = new ITextToSpeechService.Stub() { @Override public int speak( IBinder caller, CharSequence text, int queueMode, Bundle params, String utteranceId) { SpeechItem item = new SynthesisSpeechItem( caller, Binder.getCallingUid(), Binder.getCallingPid(), params, utteranceId, text); return mSynthHandler.enqueueSpeechItem(queueMode, item); } @Override public int playAudio( ... ) { SpeechItem item = new AudioSpeechItem( ... ); ... } ... }; ... }- 1
- 2
- 3
- 4
- 5
- 6
- 7
- 8
- 9
- 10
- 11
- 12
- 13
- 14
- 15
- 16
- 17
- 18
- 19
- 20
- 21
- 22
- 23
- 24
- 25
- 26
- 27
- 28
- 29
- 30
- 31
- 32
- speak 请求封装给 Handler 的是
-
SynthHandler 拿到 SpeechItem 后根据 queueMode 的值决定是 stop() 还是继续播放。播放的话,是封装进一步 play 的操作 Message 给 Handler。
// TextToSpeechService.java private class SynthHandler extends Handler { ... public int enqueueSpeechItem(int queueMode, final SpeechItem speechItem) { UtteranceProgressDispatcher utterenceProgress = null; if (speechItem instanceof UtteranceProgressDispatcher) { utterenceProgress = (UtteranceProgressDispatcher) speechItem; } if (!speechItem.isValid()) { if (utterenceProgress != null) { utterenceProgress.dispatchOnError( TextToSpeech.ERROR_INVALID_REQUEST); } return TextToSpeech.ERROR; } if (queueMode == TextToSpeech.QUEUE_FLUSH) { stopForApp(speechItem.getCallerIdentity()); } else if (queueMode == TextToSpeech.QUEUE_DESTROY) { stopAll(); } Runnable runnable = new Runnable() { @Override public void run() { if (setCurrentSpeechItem(speechItem)) { speechItem.play(); removeCurrentSpeechItem(); } else { speechItem.stop(); } } }; Message msg = Message.obtain(this, runnable); msg.obj = speechItem.getCallerIdentity(); if (sendMessage(msg)) { return TextToSpeech.SUCCESS; } else { if (utterenceProgress != null) { utterenceProgress.dispatchOnError(TextToSpeech.ERROR_SERVICE); } return TextToSpeech.ERROR; } } ... }- 1
- 2
- 3
- 4
- 5
- 6
- 7
- 8
- 9
- 10
- 11
- 12
- 13
- 14
- 15
- 16
- 17
- 18
- 19
- 20
- 21
- 22
- 23
- 24
- 25
- 26
- 27
- 28
- 29
- 30
- 31
- 32
- 33
- 34
- 35
- 36
- 37
- 38
- 39
- 40
- 41
- 42
- 43
- 44
- 45
- 46
- 47
- 48
-
play() 具体是调用 playImpl() 继续。对于 SynthesisSpeechItem 来说,将初始化时创建的
SynthesisRequest实例和SynthesisCallback实例(此处的实现是PlaybackSynthesisCallback)收集和调用onSynthesizeText()进一步处理,用于请求和回调结果。// TextToSpeechService.java private abstract class SpeechItem { ... public void play() { synchronized (this) { if (mStarted) { throw new IllegalStateException("play() called twice"); } mStarted = true; } playImpl(); } } class SynthesisSpeechItem extends UtteranceSpeechItemWithParams { public SynthesisSpeechItem( ... String utteranceId, CharSequence text) { mSynthesisRequest = new SynthesisRequest(mText, mParams); ... } ... @Override protected void playImpl() { AbstractSynthesisCallback synthesisCallback; mEventLogger.onRequestProcessingStart(); synchronized (this) { ... mSynthesisCallback = createSynthesisCallback(); synthesisCallback = mSynthesisCallback; } TextToSpeechService.this.onSynthesizeText(mSynthesisRequest, synthesisCallback); if (synthesisCallback.hasStarted() && !synthesisCallback.hasFinished()) { synthesisCallback.done(); } } ... }- 1
- 2
- 3
- 4
- 5
- 6
- 7
- 8
- 9
- 10
- 11
- 12
- 13
- 14
- 15
- 16
- 17
- 18
- 19
- 20
- 21
- 22
- 23
- 24
- 25
- 26
- 27
- 28
- 29
- 30
- 31
- 32
- 33
- 34
- 35
- 36
- 37
- 38
- 39
- 40
-
onSynthesizeText() 是 abstract 方法,需要 Engine 复写以将 text 合成 audio 数据,也是 TTS 功能里最核心的实现。
- Engine 需要从
SynthesisRequest中提取 speak 的目标文本、参数等信息,针对不同信息进行区别处理。并通过SynthesisCallback的各接口将数据和时机带回: - 在数据合成前,通过
start()告诉系统生成音频的采样频率,多少位pcm格式音频,几通道等等。PlaybackSynthesisCallback的实现将会创建播放的SynthesisPlaybackQueueItem交由AudioPlaybackHandler去排队调度 - 之后,通过
audioAvailable()接口将合成的数据以 byte[] 形式传递回来,会取出 start() 时创建的 QueueItem put 该 audio 数据开始播放 - 最后,通过
done()告知合成完毕
// PlaybackSynthesisCallback.java class PlaybackSynthesisCallback extends AbstractSynthesisCallback { ... @Override public int start(int sampleRateInHz, int audioFormat, int channelCount) { mDispatcher.dispatchOnBeginSynthesis(sampleRateInHz, audioFormat, channelCount); int channelConfig = BlockingAudioTrack.getChannelConfig(channelCount); synchronized (mStateLock) { ... SynthesisPlaybackQueueItem item = new SynthesisPlaybackQueueItem( mAudioParams, sampleRateInHz, audioFormat, channelCount, mDispatcher, mCallerIdentity, mLogger); mAudioTrackHandler.enqueue(item); mItem = item; } return TextToSpeech.SUCCESS; } @Override public int audioAvailable(byte[] buffer, int offset, int length) { SynthesisPlaybackQueueItem item = null; synchronized (mStateLock) { ... item = mItem; } final byte[] bufferCopy = new byte[length]; System.arraycopy(buffer, offset, bufferCopy, 0, length); mDispatcher.dispatchOnAudioAvailable(bufferCopy); try { item.put(bufferCopy); } ... return TextToSpeech.SUCCESS; } @Override public int done() { int statusCode = 0; SynthesisPlaybackQueueItem item = null; synchronized (mStateLock) { ... mDone = true; if (mItem == null) { if (mStatusCode == TextToSpeech.SUCCESS) { mDispatcher.dispatchOnSuccess(); } else { mDispatcher.dispatchOnError(mStatusCode); } return TextToSpeech.ERROR; } item = mItem; statusCode = mStatusCode; } if (statusCode == TextToSpeech.SUCCESS) { item.done(); } else { item.stop(statusCode); } return TextToSpeech.SUCCESS; } ... }- 1
- 2
- 3
- 4
- 5
- 6
- 7
- 8
- 9
- 10
- 11
- 12
- 13
- 14
- 15
- 16
- 17
- 18
- 19
- 20
- 21
- 22
- 23
- 24
- 25
- 26
- 27
- 28
- 29
- 30
- 31
- 32
- 33
- 34
- 35
- 36
- 37
- 38
- 39
- 40
- 41
- 42
- 43
- 44
- 45
- 46
- 47
- 48
- 49
- 50
- 51
- 52
- 53
- 54
- 55
- 56
- 57
- 58
- 59
- 60
- 61
- 62
- 63
- 64
- 65
- 66
- 67
- 68
- 69
- 70
上述的 QueueItem 的放置 audio 数据和消费的逻辑如下,主要是 put 操作触发 Lock 接口的 take Condition 恢复执行,最后调用 AudioTrack 去播放。
// SynthesisPlaybackQueueItem.java final class SynthesisPlaybackQueueItem ... { void put(byte[] buffer) throws InterruptedException { try { mListLock.lock(); long unconsumedAudioMs = 0; ... mDataBufferList.add(new ListEntry(buffer)); mUnconsumedBytes += buffer.length; mReadReady.signal(); } finally { mListLock.unlock(); } } private byte[] take() throws InterruptedException { try { mListLock.lock(); while (mDataBufferList.size() == 0 && !mStopped && !mDone) { mReadReady.await(); } ... ListEntry entry = mDataBufferList.poll(); mUnconsumedBytes -= entry.mBytes.length; mNotFull.signal(); return entry.mBytes; } finally { mListLock.unlock(); } } public void run() { ... final UtteranceProgressDispatcher dispatcher = getDispatcher(); dispatcher.dispatchOnStart(); if (!mAudioTrack.init()) { dispatcher.dispatchOnError(TextToSpeech.ERROR_OUTPUT); return; } try { byte[] buffer = null; while ((buffer = take()) != null) { mAudioTrack.write(buffer); } } ... mAudioTrack.waitAndRelease(); dispatchEndStatus(); } void done() { try { mListLock.lock(); mDone = true; mReadReady.signal(); mNotFull.signal(); } finally { mListLock.unlock(); } } }- 1
- 2
- 3
- 4
- 5
- 6
- 7
- 8
- 9
- 10
- 11
- 12
- 13
- 14
- 15
- 16
- 17
- 18
- 19
- 20
- 21
- 22
- 23
- 24
- 25
- 26
- 27
- 28
- 29
- 30
- 31
- 32
- 33
- 34
- 35
- 36
- 37
- 38
- 39
- 40
- 41
- 42
- 43
- 44
- 45
- 46
- 47
- 48
- 49
- 50
- 51
- 52
- 53
- 54
- 55
- 56
- 57
- 58
- 59
- 60
- 61
- 62
- 63
- 64
- 65
- Engine 需要从
-
上述 PlaybackSynthesisCallback 在通知 QueueItem 的同时,会通过 UtteranceProgressDispatcher 接口将数据、结果一并发送给 Request App。
// TextToSpeechService.java interface UtteranceProgressDispatcher { void dispatchOnStop(); void dispatchOnSuccess(); void dispatchOnStart(); void dispatchOnError(int errorCode); void dispatchOnBeginSynthesis(int sampleRateInHz, int audioFormat, int channelCount); void dispatchOnAudioAvailable(byte[] audio); public void dispatchOnRangeStart(int start, int end, int frame); }- 1
- 2
- 3
- 4
- 5
- 6
- 7
- 8
- 9
- 10
- 11
- 12
- 13
- 14
- 15
- 16
事实上该接口的实现就是 TextToSpeechService 处理 speak 请求的 UtteranceSpeechItem 实例,其通过缓存着各
ITextToSpeechCallback接口实例的 CallbackMap 发送回调给 TTS 请求的 App。(这些 Callback 来自于 TextToSpeech 初始化时候通过 ITextToSpeechService 将 Binder 接口传递来和缓存起来的。)private abstract class UtteranceSpeechItem extends SpeechItem implements UtteranceProgressDispatcher { ... @Override public void dispatchOnStart() { final String utteranceId = getUtteranceId(); if (utteranceId != null) { mCallbacks.dispatchOnStart(getCallerIdentity(), utteranceId); } } @Override public void dispatchOnAudioAvailable(byte[] audio) { final String utteranceId = getUtteranceId(); if (utteranceId != null) { mCallbacks.dispatchOnAudioAvailable(getCallerIdentity(), utteranceId, audio); } } @Override public void dispatchOnSuccess() { final String utteranceId = getUtteranceId(); if (utteranceId != null) { mCallbacks.dispatchOnSuccess(getCallerIdentity(), utteranceId); } } @Override public void dispatchOnStop() { ... } @Override public void dispatchOnError(int errorCode) { ... } @Override public void dispatchOnBeginSynthesis(int sampleRateInHz, int audioFormat, int channelCount) { ... } @Override public void dispatchOnRangeStart(int start, int end, int frame) { ... } } private class CallbackMap extends RemoteCallbackList<ITextToSpeechCallback> { ... public void dispatchOnStart(Object callerIdentity, String utteranceId) { ITextToSpeechCallback cb = getCallbackFor(callerIdentity); if (cb == null) return; try { cb.onStart(utteranceId); } ... } public void dispatchOnAudioAvailable(Object callerIdentity, String utteranceId, byte[] buffer) { ITextToSpeechCallback cb = getCallbackFor(callerIdentity); if (cb == null) return; try { cb.onAudioAvailable(utteranceId, buffer); } ... } public void dispatchOnSuccess(Object callerIdentity, String utteranceId) { ITextToSpeechCallback cb = getCallbackFor(callerIdentity); if (cb == null) return; try { cb.onSuccess(utteranceId); } ... } ... }- 1
- 2
- 3
- 4
- 5
- 6
- 7
- 8
- 9
- 10
- 11
- 12
- 13
- 14
- 15
- 16
- 17
- 18
- 19
- 20
- 21
- 22
- 23
- 24
- 25
- 26
- 27
- 28
- 29
- 30
- 31
- 32
- 33
- 34
- 35
- 36
- 37
- 38
- 39
- 40
- 41
- 42
- 43
- 44
- 45
- 46
- 47
- 48
- 49
- 50
- 51
- 52
- 53
- 54
- 55
- 56
- 57
- 58
- 59
- 60
- 61
- 62
- 63
- 64
- 65
- 66
- 67
-
ITextToSpeechCallback 的执行将通过 TextToSpeech 的中转抵达请求 App 的 Callback,以执行“TextToSpeech 调用”章节提到的进一步操作
// TextToSpeech.java public class TextToSpeech { ... private abstract class Connection implements ServiceConnection { ... private final ITextToSpeechCallback.Stub mCallback = new ITextToSpeechCallback.Stub() { @Override public void onStart(String utteranceId) { UtteranceProgressListener listener = mUtteranceProgressListener; if (listener != null) { listener.onStart(utteranceId); } } ... }; } } // TTSTest.kt class TTSTest(context: Context) { init { tts.setOnUtteranceProgressListener(object : UtteranceProgressListener() { override fun onStart(utteranceId: String?) { ... } override fun onDone(utteranceId: String?) { ... } override fun onStop(utteranceId: String?, interrupted: Boolean) { ... } override fun onError(utteranceId: String?) { ... } }) } .... }- 1
- 2
- 3
- 4
- 5
- 6
- 7
- 8
- 9
- 10
- 11
- 12
- 13
- 14
- 15
- 16
- 17
- 18
- 19
- 20
- 21
- 22
- 23
- 24
- 25
- 26
- 27
- 28
- 29
- 30
- 31
- 32
- 33
- 34
5 使用和实现上的注意
对于 TTS 请求方有几点使用上的建议:
- TTS 播报前记得申请对应 type 的音频焦点
- TTS Request App 的 Activity 或 Service 生命周期销毁的时候,比如 onDestroy() 等时候,需要调用 TextToSpeech 的
shutdown()释放连接、资源 - 可以通过 addSpeech() 指定固定文本的对应 audio 资源(比如说语音里常用的几套唤醒后的欢迎词 audio),在后续的文本请求时直接播放该 audio,免去文本转语音的过程、提高效率
对于 TTS Engine 提供方也有几点实现上的建议:
-
TTS Engine 的各实现要和 TTS 的
SynthesisCallback做好对接,要留意只能在该 callback 已经执行了 start() 并未结束的条件下调用 done()。否则 TTS 会发生如下两种错误:- Duplicate call to done()
- done() was called before start() call
-
TTS Engine 核心作用是将 text 文本合成 speech 音频数据,合成到数据之后 Engine 当然可以选择直接播报,甚至不回传音频数据。但建议将音频数据回传,交由系统 AudioTrack 播报。一来交由系统统一播报;二来 Request App 亦可以拿到音频数据进行 cache 和分析
6 结语
可以看到 Request App 不关心实现、只需通过 TextToSpeech 几个 API 便可完成 TTS 的播报操作。而且 TTS 的实现也只需要按照 TextToSpeechService 约定的框架、回调实现即可,和 App 的对接工作由系统完成。
我们再花点时间梳理下整个过程:
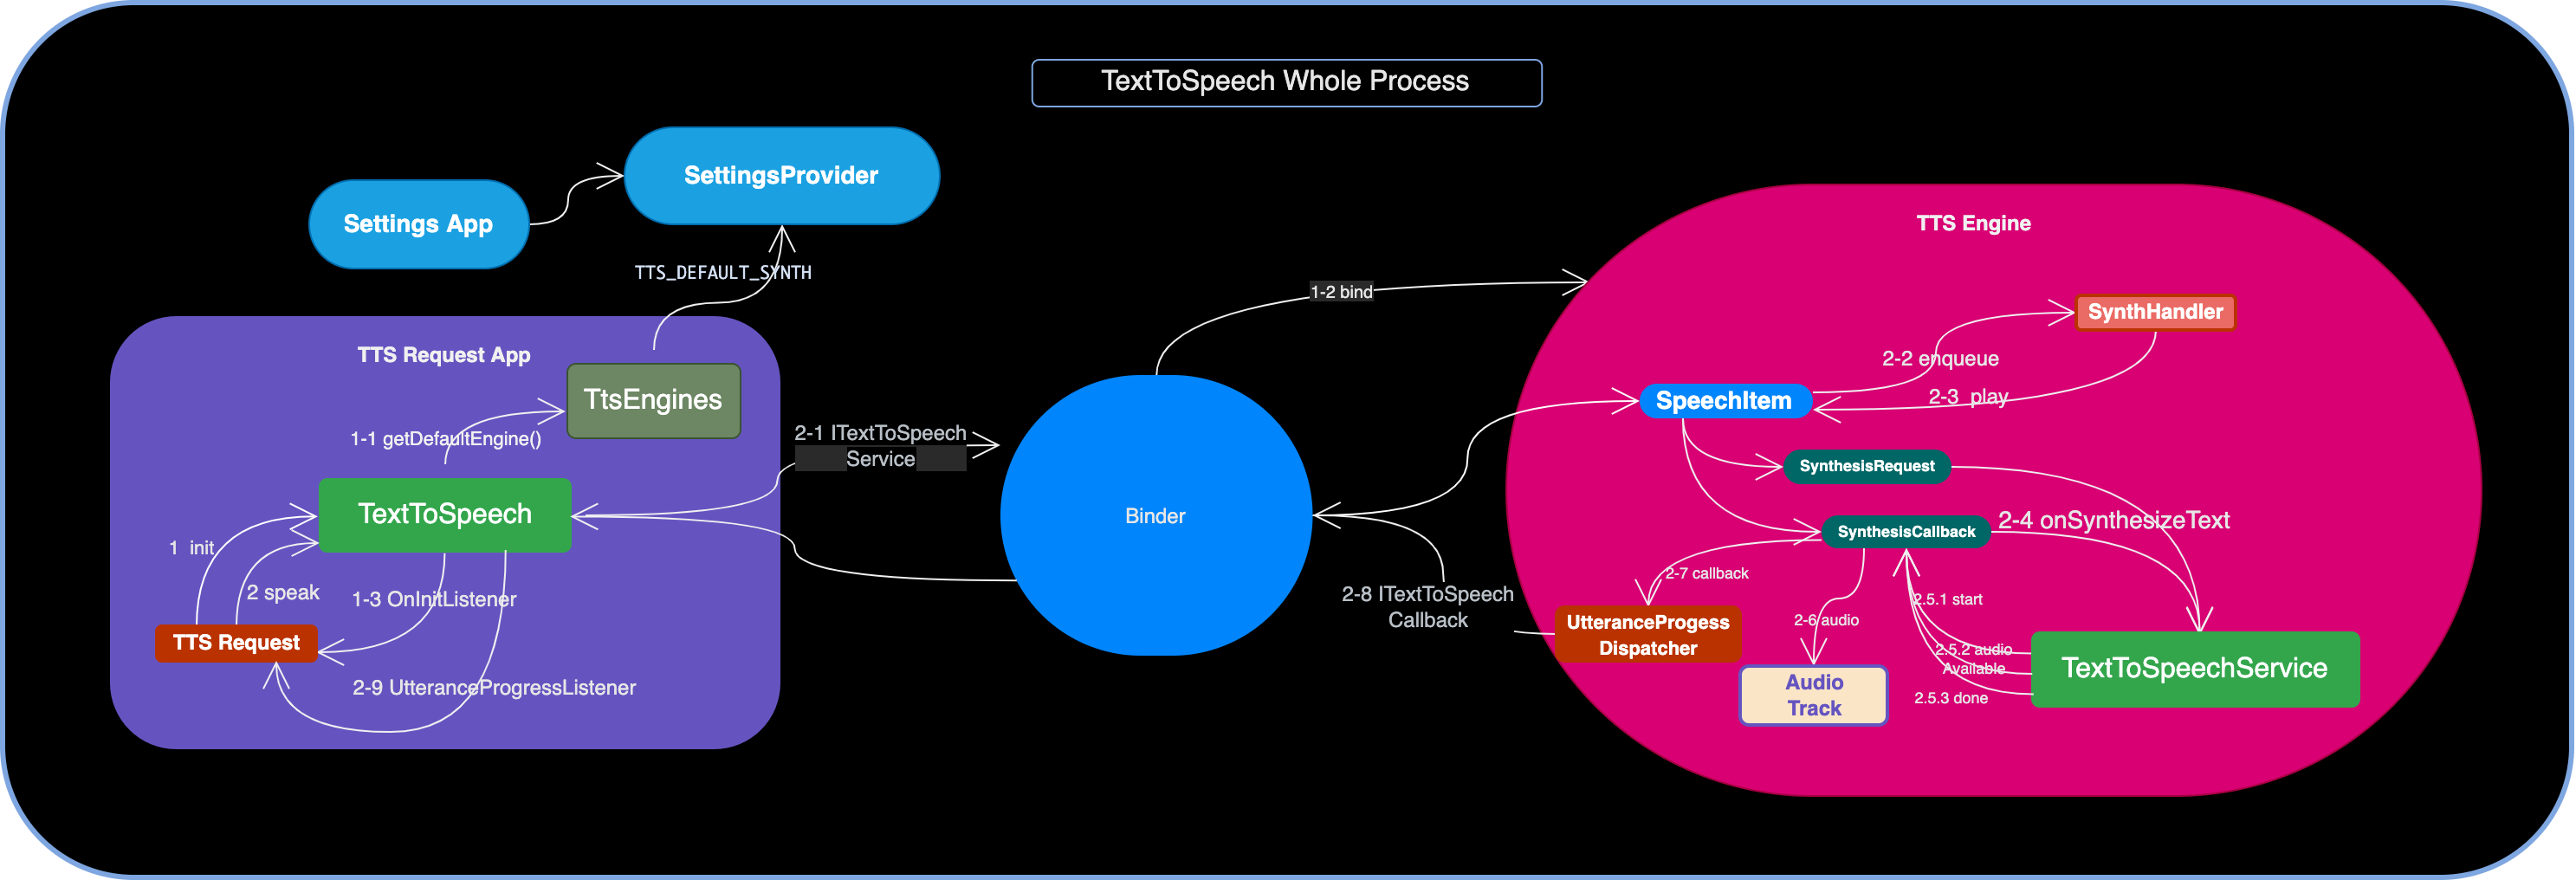
流程:
- TTS Request App 调用
TextToSpeech构造函数,由系统准备播报工作前的准备,比如通过Connection绑定和初始化目标的 TTS Engine - Request App 提供目标 text 并调用
speak()请求 - TextToSpeech 会检查目标 text 是否设置过本地的 audio 资源,没有的话回通过 Connection 调用
ITextToSpeechServiceAIDL 的 speak() 继续 TextToSpeechService收到后封装请求SynthesisRequest和用于回调结果的SynthesisCallback实例- 之后将两者作为参数调用核心实现
onSynthesizeText(),其将解析 Request 并进行 Speech 音频数据合成 - 此后通过 SynthesisCallback 将合成前后的关键回调告知系统,尤其是
AudioTrack播放 - 同时需要将 speak 请求的结果告知 Request App,即通过
UtteranceProgressDispatcher中转,实际上是调用ITextToSpeechCallbackAIDL - 最后通过
UtteranceProgressListener告知 TextToSpeech 初始化时设置的各回调

