
热门标签
热门文章
- 1基于FPGA的CAN总线控制器的设计(上)_基于fpga通过can接口远程在线升级c程序
- 2【python】PyQt5中QButtonGroup的详细用法解析与应用实战
- 3靓图!多点创新!CEEMDAN-Kmeans-VMD-CNN-LSTM-Attention双重分解+卷积长短期+注意力多元时间序列预测
- 4idea远程拉取新项目_idea拉取公司远程项目
- 5opencv_不******2 main3
- 6四 . 队列的顺序存储结构_进队的时间复杂度
- 7Python40行代码实现语音和ChatGPT聊天_python调用chatgpt语音转文字
- 8图解 Kafka 架构与工作原理_kafka工作原理和架构
- 9JUC系列(八)| 读写锁-ReadWriteLock_juc的读写锁怎么用
- 10数据结构 - 并查集 rank 的优化
当前位置: article > 正文
Haproxy快速部署
作者:天景科技苑 | 2024-08-16 11:20:32
赞
踩
Haproxy快速部署
Haproxy
实验环境
| 主机名 | IP地址 |
|---|---|
| haproxy | 192.168.69.32 |
| web1 | 192.168.69.33 |
| web2 | 192.168.69.32 |
Haproxy反向代理
- haproxy介绍
根据静态分布cookie,分配http请求;
分布负载到各个服务器,同时保证服务器通过使用http cookie实现连接保持;
当主服务器宕机切换到备份服务器;允许特殊端口的服务监控
根据应用的cookie做连接保持;
带用户验证的详细的HTML监控报告。
- haproxy负载均衡算法
| Haproxy的负载均衡的算法有8种 | ||
|---|---|---|
| roundrobin | 轮询 | 挨个分配机器 |
| static-rr | 加权轮询 | 根据服务器的不同处理能力,给每个服务器分配不同的权值,使其能够接受相应权值数的服务请求。 |
| leastconn | 最少连接数 | 最少连接数均衡算法对内部中需负载的每一台服务器都有一个数据记录,记录当前该服务器正在处理的连接数量,当有新的服务连接请求时,将把当前请求分配给连接数最少的服务器 |
| source | IP Hash | 同一IP地址,达到的是同一台server |
| ri | 表示请求的URI | |
| rl_param | 请求的URI参数 | |
| har | 根据HTTP请求的头来锁定每一次HTTP请求 | |
| rdp-cookie() | 根据cookie来锁定并哈希每一次TCP请求 |
- haproxy部署
1.关闭防火墙和selinux
[root@haproxy ~]# systemctl stop firewalld.service
[root@haproxy ~]# systemctl disable firewalld.service
[root@haproxy ~]# setenforce 0
- 1
- 2
- 3
2.安装
[root@haproxy ~]# yum install gcc gcc-c++ make openssl-devel kernel-devel
[root@haproxy srv]# ls
haproxy-1.7.8.tar.gz
[root@haproxy haproxy-1.7.8]# make TARGET=linux31 CPU=x86_64 PREFIX=/usr/local/haprpxy USE_OPENSSL=1 ADDLIB=-lz
[root@haproxy haproxy-1.7.8]# make install PREFIX=/usr/local/haproxy
[root@haproxy haproxy-1.7.8]# cp examples/option-http_proxy.cfg /usr/local/haproxy/conf/haproxy.cfg
[root@haproxy haproxy-1.7.8]# ln -s /usr/local/haproxy/conf/haproxy.cfg /etc/haproxy/haproxy.cfg
[root@haproxy haproxy-1.7.8]# cp -r /usr/local/src/haproxy-1.6.12/examples/errorfiles  /usr/local/haproxy/errorfiles
[root@haproxy haproxy-1.7.8]# cp -r ./examples/errorfiles /usr/local/haproxy/errorfiles
[root@haproxy haproxy-1.7.8]# mkdir -p /usr/local/haproxy/log
[root@haproxy haproxy-1.7.8]# touch /usr/local/haproxy/log/haproxy.log
[root@haproxy haproxy-1.7.8]# ln -s /usr/local/haproxy/log/haproxy.log /var/log/haproxy.log
[root@haproxy haproxy-1.7.8]# cp ./examples/haproxy.init /etc/rc.d/init.d/haproxy
[root@haproxy haproxy-1.7.8]# chmod +x /etc/rc.d/init.d/haproxy
[root@haproxy haproxy-1.7.8]# chkconfig haproxy on
[root@haproxy haproxy-1.7.8]# ln -s /usr/local/haproxy/sbin/haproxy /usr/sbin

- 1
- 2
- 3
- 4
- 5
- 6
- 7
- 8
- 9
- 10
- 11
- 12
- 13
- 14
- 15
- 16
3.配置
[root@haproxy haproxy-1.7.8]# cp /etc/haproxy/haproxy.cfg /opt/haproxy.cfg.bak
### 配置文件详解
[root@haproxy haproxy-1.7.8]# cat /etc/haproxy/haproxy.cfg
global       #全局配置文件
maxconn 100000           # 最大连接数
chroot /usr/local/haproxy  # haproxy 安装目录
user haproxy  # 运行haproxy的用户
group haproxy    #运行haproxy的用户组
daemon           # 以后台守护进程运行
nbproc 1          # 设置进程数
#pidfile /usr/local/haproxy/logs/haproxy.pid
pidfile /var/run/haproxy.pid    #haproxy的pid文件
log 127.0.0.1 local3 info         #日志输出配置,所有日志都记录在本机,通过local0输出,日志级别是info。注意:info级的日志会打印 HAProxy 处理的每一条请求,会占用很大的磁盘空间,在生产环境中,建议将日志级别调整为notice

defaults   # 默认配置
option http-keep-alive
maxconn 100000
mode http    # 运行模式 tcp、 http、 health
timeout connect 5000ms   #连接超时
timeout client  50000ms    #客户端超时
timeout server 50000ms  # 服务器端超时

listen stats  # 统计页面配置
mode http
maxconn 10  ##默认的最大连接数
bind 0.0.0.0:8080
stats enable
stats uri     /haproxy-status     #统计页面url
stats auth    haproxy:saltstack   #设置监控页面的用户和密码,可以设置多个用户名,就是多行的形式

frontend public    #自定义描述信息
bind *:80      #监听 80 端口
mode http
option httplog
log global
    default_backend backend_www_example_com

backend backend_www_example_com
option forwardfor header X-REAL-IP
option httpchk HEAD / HTTP/1.0
#balance source / ip_hash
# 轮询
balance roundrobin
server web-node1  192.168.69.33:8080 check inter 2000 rise 30 fall 15
server web-node2  192.168.69.34:8080 check inter 2000 rise 30 fall 15
- 1
- 2
- 3
- 4
- 5
- 6
- 7
- 8
- 9
- 10
- 11
- 12
- 13
- 14
- 15
- 16
- 17
- 18
- 19
- 20
- 21
- 22
- 23
- 24
- 25
- 26
- 27
- 28
- 29
- 30
- 31
- 32
- 33
- 34
- 35
- 36
- 37
- 38
- 39
- 40
- 41
- 42
- 43
- 44
- 45
- 46
4.启动
[root@haproxy haproxy-1.7.8]# service haproxy start
[root@haproxy haproxy-1.7.8]# ss -lnpt
State       Recv-Q Send-Q        Local Address:Port                       Peer Address:Port
LISTEN      0      128                       *:80                                    *:*                   users:(("haproxy",pid=27368,fd=4))
LISTEN      0      128                       *:8080                                  *:*
- 1
- 2
- 3
- 4
- 5
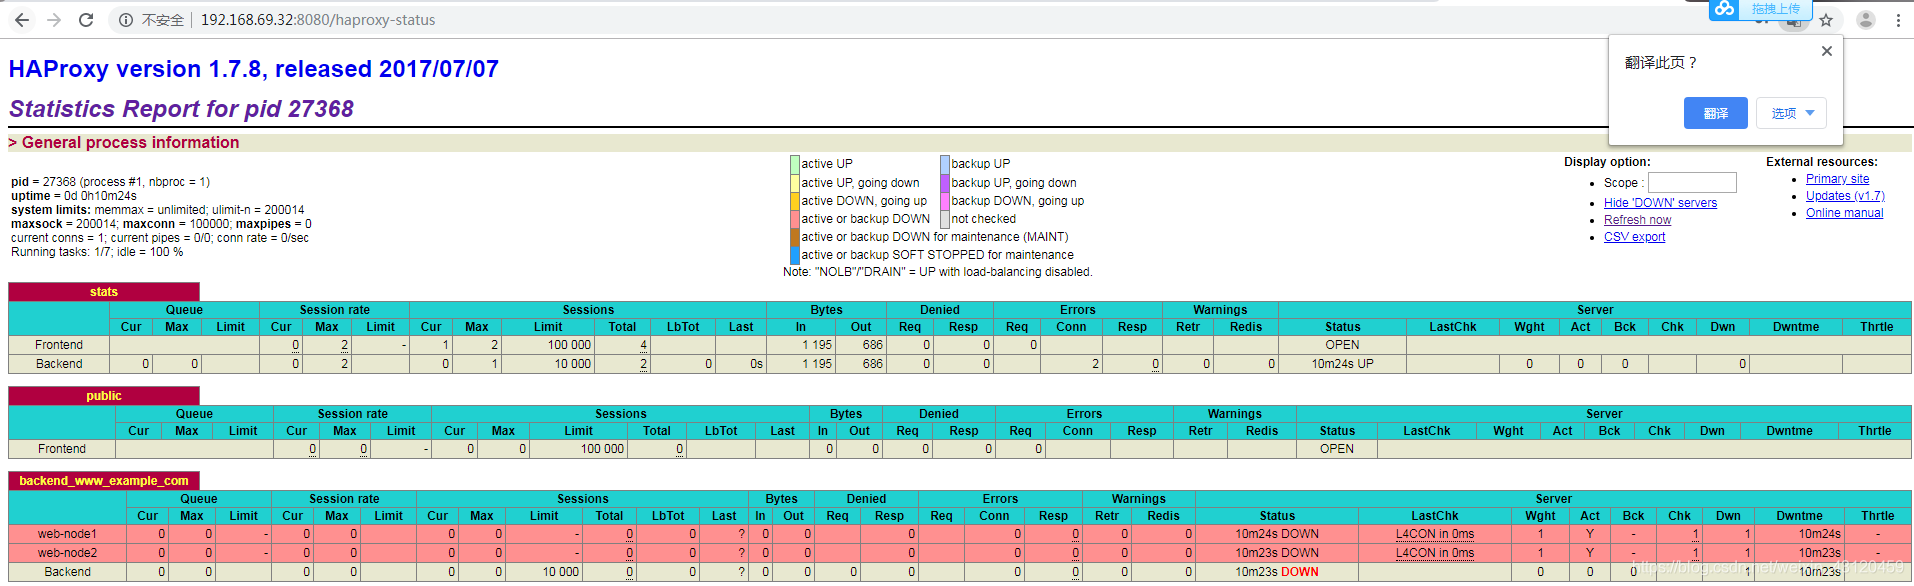
此时访问状态页8080端口,因位两台web服务器并没有配置所有显示DOWN状态
- 配置两台web服务器
就用nginx来作为web
#安装
[root@web1 ~]# yum -y install nginx
#配置
[root@web1 ~]# vi /etc/nginx/nginx.conf   #讲nginx的默认端口改为8080
···
    server {
        listen       8080 default_server;
        listen       [::]:8080 default_server;
        server_name  _;
        root         /usr/share/nginx/html;
···
[root@web1 ~]# echo "This is web1 server" /usr/share/nginx/html/index.html   #配置默认页
#web同上配置
#启动
[root@web1 ~]# systemctl start nginx
- 1
- 2
- 3
- 4
- 5
- 6
- 7
- 8
- 9
- 10
- 11
- 12
- 13
- 14
- 15
- 16
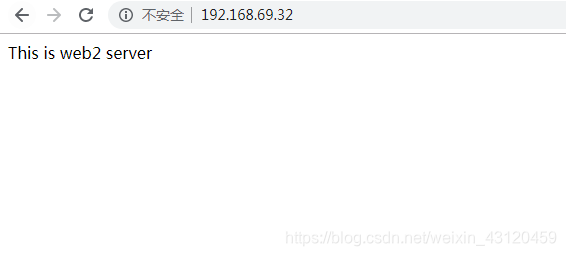
在haproxy上设置以轮训的方式访问,效果如下
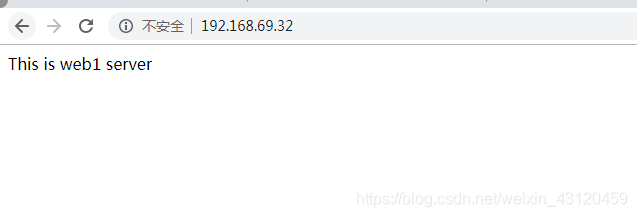
第二次访问
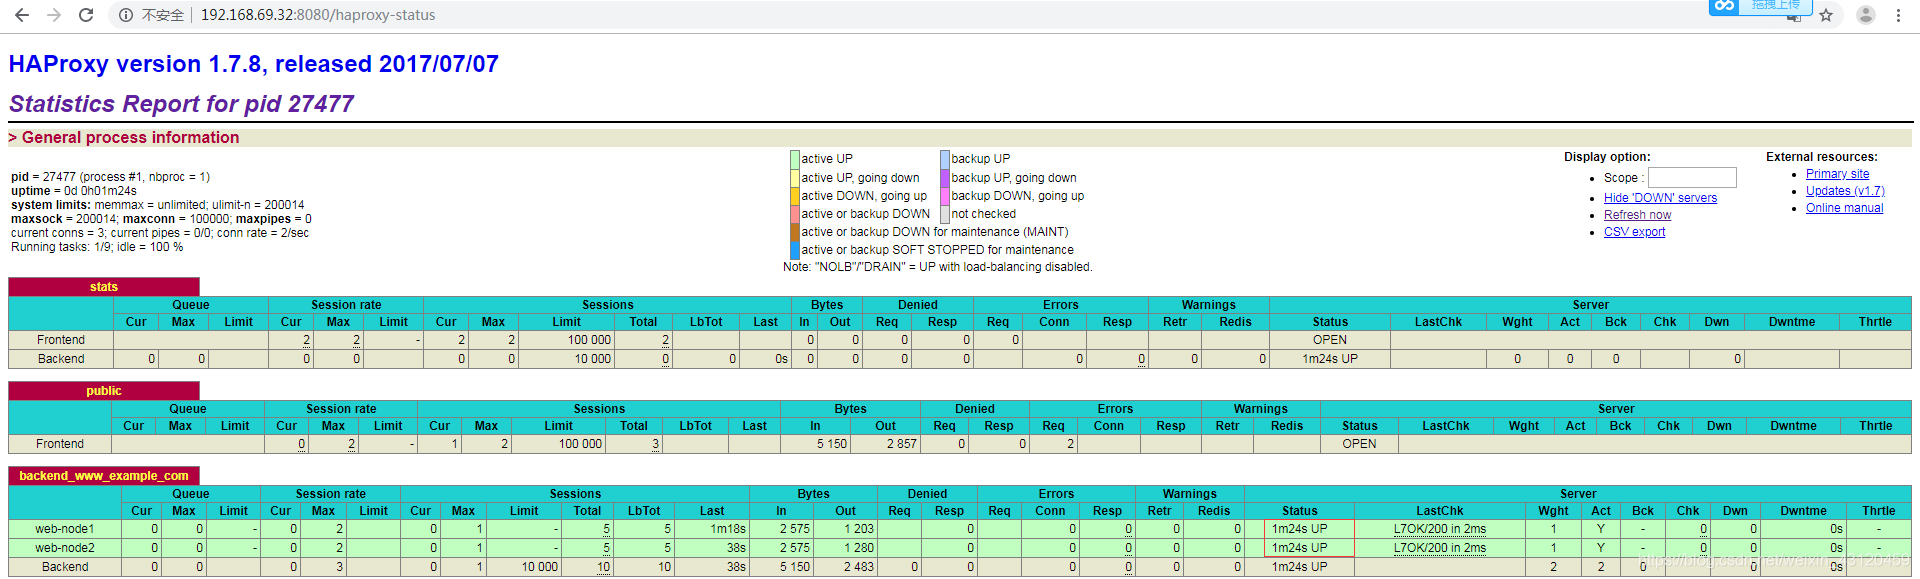
查看状态页,此时的web都处于UP状态
声明:本文内容由网友自发贡献,不代表【wpsshop博客】立场,版权归原作者所有,本站不承担相应法律责任。如您发现有侵权的内容,请联系我们。转载请注明出处:https://www.wpsshop.cn/w/天景科技苑/article/detail/987978
推荐阅读
相关标签

