
热门标签
热门文章
- 1优化MySQL数据库查询的三种方法简介
- 2OLAP与OLTP:数据处理系统的比较分析_联机事务处理和联机分析处理
- 3职场生存法则:一个外企女白领的日记...
- 4【deepin 邀您体验】玲珑 10 分钟快速构建指南!_安装玲珑支持
- 5用Git远程仓库实现多人协同开发_git仓库开放给多人
- 6若依点击菜单进入饼状图和柱状图_若依首页添加数据统计图
- 7【机器学习300问】132、自注意力机制(Self-Attention)和传统注意力机制(Attention)的区别?_attention 和 self-attention 有什么区别
- 8github copilot vs 通义灵码 vs 腾讯云 AI 代码助手_腾讯云代码助手与通义灵码哪个好用
- 9毕设/私活/bigold必备项目,一个挣钱的免费的全开源标准前后端分离后台管理权限系统【springboot+vue+redis+Spring Security】脚手架搭建:若依Ruo框架具体使用教程_基于若依的毕业设计
- 102024最新D卷 华为OD统一考试题库清单(按算法分类),如果你时间紧迫,就按这个刷
当前位置: article > 正文
02_01_SpringMVC初识
作者:天景科技苑 | 2024-06-19 04:40:32
赞
踩
02_01_SpringMVC初识
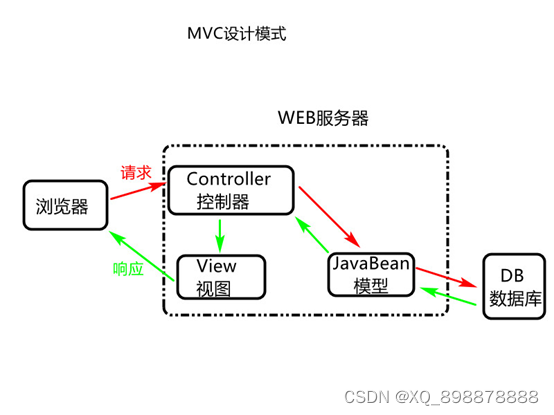
一、回顾MVC三层架构
1、什么是MVC三层
- MVC是 模型(Model)、视图(View)、控制器(Controller)的简写,是一种软件设计规范。主要作用是降低视图与业务逻辑之间的双向耦合,它不是一种设计模式,而是一种架构模式。
- Model(模型):数据处理模型,提供了要展示的数据,包括了数据和业务行为;
- View(视图):负责展示模型,一般就是我们所见到的用户界面,客户想看到的东西;
- Controller(控制器):接收用户请求,委托给模型进行处理,将处理后的模型数据返回给视图,视图负责进行渲染展示;
2、MVC模型
二、介绍SpringMVC
- SpringMVC是Spring框架的一部分,是基于Java实现MVC设计模式的轻量级Web框架。
1、SpringMVC的优点
- 轻量级、可适配、非侵入式、简单易学;
- 高效,是基于请求响应的MVC框架(降低视图层与业务层之间的耦合性、提高可重用性和维护性);
- 与Spring框架有很好的兼容性;
- 功能强大、简洁灵活;
2、SpringMVC的实现原理
2.1 相关组件
- 前端控制器/调度器(
DispatcherServlet):负责将用户发送的请求拦截下来,分发到各个控制器方法中; - 处理器映射器(
HandlerMapping):根据请求的URL 与 @RequestMaping映射进行匹配,匹配成功后会返回具体的Handler(封装了具体的控制器方法); - 处理器适配器(
HandlerAdapator):负责调用Handler中的具体方法、返回视图名地址,将其封装到ModelAndView中(封装视图名和request域的数据); - 视图解析器(
ViewReslover):根据ModelAndView中的视图名地址,去找到具体的jsp,然后封装到View对象中; - 视图(
View):进行视图渲染(将jsp转换成html的内容),最终响应到客户端;
2.2 执行流程
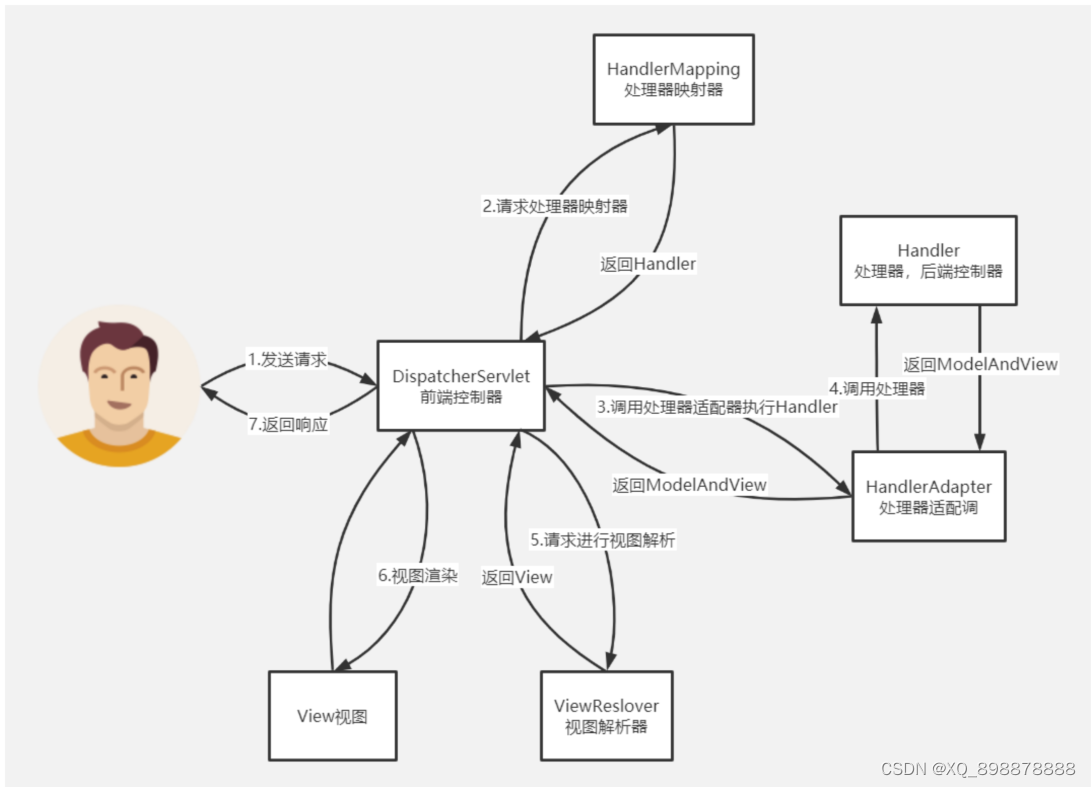
- 后续补充…
3、基于XML实现的SpringMVC
3.1 添加依赖
 <dependency>
    <groupId>org.springframework</groupId>
    <artifactId>spring-webmvc</artifactId>
    <version>5.3.1</version>
 </dependency>
- 1
- 2
- 3
- 4
- 5
3.2 编写web.xml文件
<?xml version="1.0" encoding="UTF-8"?>
<web-app xmlns="http://xmlns.jcp.org/xml/ns/javaee"
         xmlns:xsi="http://www.w3.org/2001/XMLSchema-instance"
         xsi:schemaLocation="http://xmlns.jcp.org/xml/ns/javaee http://xmlns.jcp.org/xml/ns/javaee/web-app_4_0.xsd"
         version="4.0">

    <!--注册配置DispatcherServlet【前端控制器】-->
    <servlet>
        <servlet-name>springmvc</servlet-name>
        <servlet-class>org.springframework.web.servlet.DispatcherServlet</servlet-class>
        <!--关联springmvc的配置文件【初始化DispatcherServlet】-->
        <init-param>
            <!--初始化参数:
            (1)contextConfigLocation 配置springmvc的xml配置文件,需要指定路径
            (2)也可以不配置,它会自动去WEB-INF中去找一个(【servlet-name】-servlet.xml)的文件-->
            <param-name>contextConfigLocation</param-name>
            <param-value>classpath:springmvc.xml</param-value>
        </init-param>
        <!--设置优先级【当启动服务器时,就会加载IOC容器中所有的bean】-->
        <!--当web服务器启动时,就会创建一个servlet(会自动调用servlet的构造函数以及init()方法)-->
        <load-on-startup>1</load-on-startup>
    </servlet>

    <!--配置servlet的映射路径:
        (1)'/'  会匹配除 .jsp 之外的请求
        (2)‘/*’ 会匹配所有的请求-->
    <servlet-mapping>
        <servlet-name>springmvc</servlet-name>
        <url-pattern>/</url-pattern>
    </servlet-mapping>

    <!--配置编码过滤器 CharacterEncodingFilter,解决中文乱码问题-->
    <filter>
        <filter-name>characterEncodingFilter</filter-name>
        <filter-class>org.springframework.web.filter.CharacterEncodingFilter</filter-class>
        <!--配置编码-->
        <init-param>
            <param-name>encoding</param-name>
            <param-value>UTF-8</param-value>
        </init-param>
        <!--同时开启请求和响应的编码设置-->
        <init-param>
            <param-name>forceEncoding</param-name>
            <param-value>true</param-value>
        </init-param>
    </filter>
    <!--配置拦截哪些请求进行过滤-->
    <filter-mapping>
        <filter-name>characterEncodingFilter</filter-name>
        <!--指定需要拦截的url路径-->
        <url-pattern>/*</url-pattern>
        <!--拦截规则:指定过滤哪个servlet-->
        <servlet-name>springmvc</servlet-name>
    </filter-mapping>
</web-app>

- 1
- 2
- 3
- 4
- 5
- 6
- 7
- 8
- 9
- 10
- 11
- 12
- 13
- 14
- 15
- 16
- 17
- 18
- 19
- 20
- 21
- 22
- 23
- 24
- 25
- 26
- 27
- 28
- 29
- 30
- 31
- 32
- 33
- 34
- 35
- 36
- 37
- 38
- 39
- 40
- 41
- 42
- 43
- 44
- 45
- 46
- 47
- 48
- 49
- 50
- 51
- 52
- 53
- 54
- 55
3.3 编写springmvc.xml配置文件
<?xml version="1.0" encoding="UTF-8"?>
<beans xmlns="http://www.springframework.org/schema/beans"
       xmlns:xsi="http://www.w3.org/2001/XMLSchema-instance"
       xmlns:context="http://www.springframework.org/schema/context"
       xmlns:mvc="http://www.springframework.org/schema/mvc"
       xsi:schemaLocation="http://www.springframework.org/schema/beans http://www.springframework.org/schema/beans/spring-beans.xsd http://www.springframework.org/schema/context https://www.springframework.org/schema/context/spring-context.xsd http://www.springframework.org/schema/mvc https://www.springframework.org/schema/mvc/spring-mvc.xsd">

    <!--开启组件扫描-->
    <context:component-scan base-package="org.example"></context:component-scan>

</beans>
- 1
- 2
- 3
- 4
- 5
- 6
- 7
- 8
- 9
- 10
- 11
3.4 编写控制器类
@Controller
public class HelloController {

    //@RequestMapping 将方法映射给对应的url请求处理
    @RequestMapping("/Hello")
    public String helloWorld(String name){

        System.out.println("hello springmvc:"+ name);
        /*
         * 响应:
         * (1)redirect:重定向
         * (2)默认值:转发
         */
        return "index.jsp";
    }
}
- 1
- 2
- 3
- 4
- 5
- 6
- 7
- 8
- 9
- 10
- 11
- 12
- 13
- 14
- 15
- 16
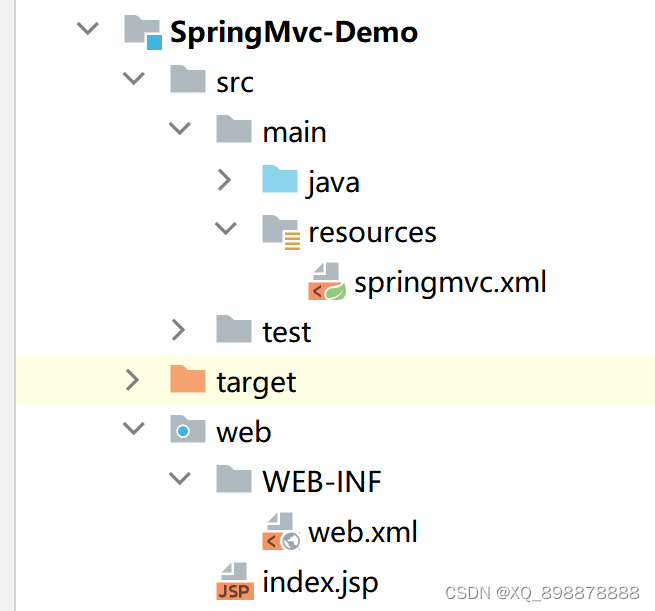
- 项目结构
- 请求地址:
http://localhost:8090/springmvc/Hello?name=李四
声明:本文内容由网友自发贡献,不代表【wpsshop博客】立场,版权归原作者所有,本站不承担相应法律责任。如您发现有侵权的内容,请联系我们。转载请注明出处:https://www.wpsshop.cn/w/天景科技苑/article/detail/735379
推荐阅读
相关标签

