
热门标签
热门文章
- 1python终端与编辑器的差别_python unicode相等比较在终端中失败,但在Spyder编辑器下工作...
- 2【正点原子K210连载】第二十四章 LCD显示实验 摘自【正点原子】DNK210使用指南-CanMV版指南_k210中lcd的用处
- 3MySQL高可用工具—Orchestrator初识
- 4mysql5.6.40部署过程
- 5Mamori.xyz:基于机器学习的区块链价值提取系统
- 6Linux 安装Hadoop集群+脚本分发,最新教程,细到极致_linux安装hadoop集群
- 7sourcetree中常用功能使用方法及gitlab冲突解决_sourcetree如何解决冲突
- 8杂谈: MVC/MVP/MVVM (一)
- 9(Mac)RocketMQ的本地安装测试(详细图示)_mac rocketmq
- 10【SpringBoot系列】Arthas配合docker轻松实现线上热更新_arthas docker
当前位置: article > 正文
SpringBoot:Boot Admin Server_spring-boot-admin-starter-server
作者:在线问答5 | 2024-07-20 11:01:04
赞
踩
spring-boot-admin-starter-server
目录
指标监控可视化文档:用于管理 Spring Boot 应用程序的管理 UI![]() https://github.com/codecentric/spring-boot-adminSpring Boot Admin Reference Guide
https://github.com/codecentric/spring-boot-adminSpring Boot Admin Reference Guide![]() https://codecentric.github.io/spring-boot-admin/2.5.1/#getting-started
https://codecentric.github.io/spring-boot-admin/2.5.1/#getting-started
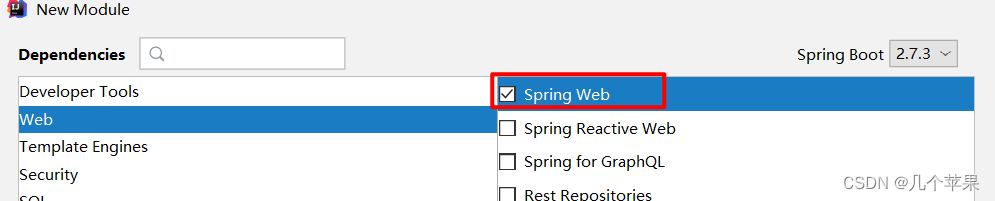
一、创建项目
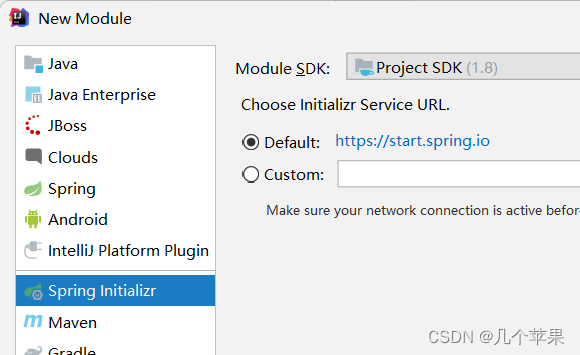

就勾选Spring Web项目即可
二、基础设置
(1) 依赖引入
- <dependency>
- <groupId>de.codecentric</groupId>
- <artifactId>spring-boot-admin-starter-server</artifactId>
- <version>2.5.1</version>
- </dependency>
(2) 开启服务器监控功能
- import de.codecentric.boot.admin.server.config.EnableAdminServer;
- import org.springframework.boot.SpringApplication;
- import org.springframework.boot.autoconfigure.SpringBootApplication;
-
- @EnableAdminServer //开启服务器监控功能
- @SpringBootApplication
- public class BootAdminServerApplication {
-
- public static void main(String[] args) {
- SpringApplication.run(BootAdminServerApplication.class, args);
- }
-
- }
(3) SpringBoot配置文件
server.port=8888
(4) 启动项目
浏览器输入:http://localhost:8888/
打开的管理页面如下:

三、注册客户端
客户端中的数据需要被服务器收集
(1) 添加依赖
- <dependency>
- <groupId>de.codecentric</groupId>
- <artifactId>spring-boot-admin-starter-client</artifactId>
- <version>2.5.1</version>
- </dependency>
(2) 客户端把数据传递给服务器
在需要监控的项目中的application.yaml配置:(注意是另一个项目的application.yaml,因为要监控另一个项目)
- spring:
- boot:
- admin:
- client:
- url: http://localhost:8888
开启所有端点的监控,同样是在需要被监控的项目中进行配置(这里还是application.yaml)
- # management 是所有actuator的配置
- # management.endpoint.端点名.xxxx 对某个端点的具体配置
- management:
- endpoints:
- enabled-by-default: true #默认开启所有监控端点 true
- web:
- exposure:
- include: '*' # 以web方式暴露所有端点
四、监控项目
客户端和服务器连接好后,就可以打开SpringBoot Admin Server的管理界面了,实时监控项目


声明:本文内容由网友自发贡献,不代表【wpsshop博客】立场,版权归原作者所有,本站不承担相应法律责任。如您发现有侵权的内容,请联系我们。转载请注明出处:https://www.wpsshop.cn/w/在线问答5/article/detail/856542
推荐阅读
相关标签

