
- 1【Android】四大组件(Activity、Service、Broadcast Receiver、Content Provider)、结构目录
- 2linux的lsm--TCB组成部分的新视角_lsgntbn
- 3RAG - langchain + llamaindex + qwen_llamaindex与langchain结合
- 4【Python】已解决:WARNING: pip is configured with locations that require TLS/SSL, however the ssl module i_python:使用pip工具时报错warning: pip is configured with l
- 5QT管理系统模板(连接SQLITE数据库)_qt数据库管理系统
- 6从本地创建项目到 Gitee 提交的完整教程_如何把本地的项目提交gitee
- 7算法板子:BFS(广度优先搜索)——迷宫问题,求从迷宫的起点到终点的最短路径; 八数码问题,求从初始布局到最终布局x最少移动多少次
- 8人工智能深度学习系列—深度学习中的边界框回归新贵:GHM(Generalized Histogram Loss)全解析
- 9【已解决】Python解决TypeError: __init__() missing 1 required positional argument: ‘comment‘报错
- 10SpringBoot整合Swagger_springboot搭建swagger
Nginx漏洞之未授权访问和源码泄漏漏洞处理_nginx 检测到目标网站源代码泄露
赞
踩
一、漏洞描述
某次安全扫描,发现某平台存在资源:未授权访问和源码泄漏;攻击者可能获取到网站的配置文件、敏感数据存储位置和访问凭证等信息。这意味着攻击者可以获得对网站的完全或部分控制权,进而进行恶意篡改、删除或添加恶意代码,破坏网站的正常运行、导致数据丢失、影响用户访问或利用网站进行其他不法行为。
处理:该资源接口进行鉴权设置,禁止公网未授权直接访问。
相关资源:htpasswd介绍、htpasswd介绍、 HTTP Basic Authentication、ngx_http_auth_basic_module
二、SSO服务器
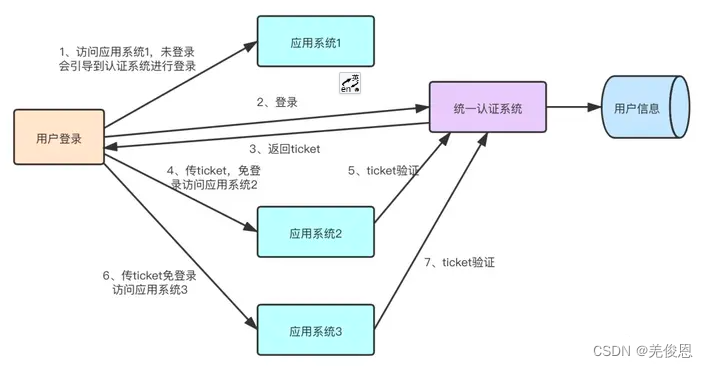
SSO(Single Sign On)是实现在多个应用系统中,用户只需要登录一次就可以访问所有相互信任的应用系统;尤其在大型企业和政府部门等电子化系统办公场景中,一般办公系统会由多个不同的子系统构成,如果这些子系统直接暴漏,缺乏鉴权,就会出现上述的漏洞风险,那如何保证安全又不影响子系统业务交互呢?这个时候有一个SSO 单点登录就显得尤为重要了。但是注意,过多引入第三方SSO框架会让我们的异常错误可能出现:不在自己可控制的范围内的情况,可能不利于提高项目的健壮性及可持续发展。流程示意如下:
1)SSO建设选择
常用的13个开源免费单点登录SSO系统:
- sa-token - 一个轻量级 Java 权限认证框架,让鉴权变得简单、优雅!
- authelia - 是一个免费、开源、可私有化部署的单点登录(SSO)项目
- BootstrapAdmin - 基于 RBAC 的 Net7 后台管理框架,权限管理,前后台分离,支持多站点单点登录,兼容所有主流浏览器
- JustAuth - 如你所见,它仅仅是一个第三方授权登录的工具类库
- MaxKey - 单点登录认证系统
- jap - 一款开源的登录认证中间件,基于模块化设计,为所有需要登录认证的web应用提供一套标准的技术解决方案
- eiam - 数字身份管控平台
- CollectiveOAuth - 史上最全的整合第三方登录的开源库
- Netnr.Login - 第三方 OAuth2 授权登录管理
- keycloak - 是一个免费、开源身份认证和访问管理系统
- SD.IdentitySystem - 统一身份认证/权限管理/角色管理/菜单管理/SSO/License授权
- IdentityServer4 - 基于.NET 5+IdentityServer4+Vue+Sqlserver 的统一授权认证系统
- cas - 是一个开源的企业级单点登录系统
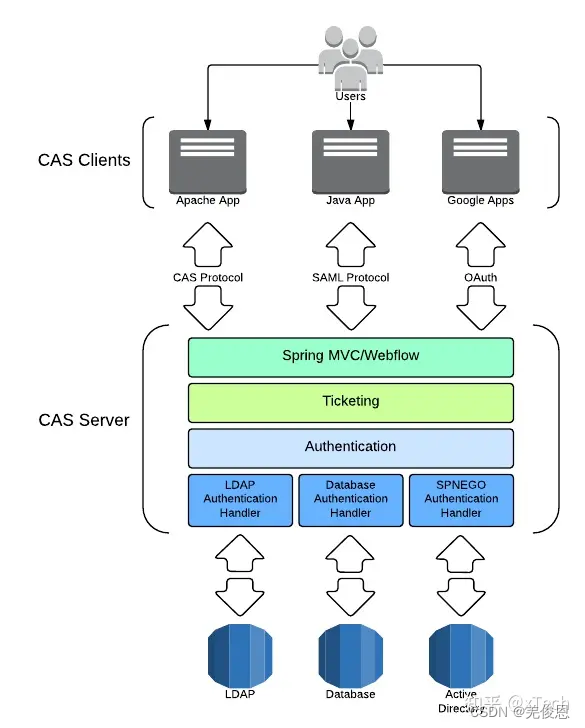
2)Apereo CAS系统:
Apereo CAS是一个开源的企业级单点登录系统,是CAS项目的一部分。Apereo CAS开箱即用,并且提供多种协议支持,如:CAS(v1,v2和v3)、SAML(1.0和2.0)、OAuth(v2)、OpenID、OpenID Connect等,Apereo CAS支持使用多种身份证方法,包括:JAAS、LDAP、RDBMS、Radius、JWT等。Apereo CAS支持通过Due、YubiKey、RSA、Google Authenticator、U2F、WebAuten等进行身份验证。

1> 架构图
3)Keycloak

Keycloak是一个免费、开源身份认证和访问管理系统,支持高度可配置的单点登录(SSO)功能,旨在为现代的应用程序和服务,提供包含身份管理和访问管理功能的单点登录工具。Keycloak内置支持连接到现有的LDAP或Active Directory服务器。也可以自己实现与关系数据库中的用户数据对接。
Keycloak支持许多目前比较流行认证标准协议,如:OpenID Connect,OAuth 2.0、SAML 2.0等。它还支持多平台多种语言:Java、Python、Go、Node.js、Spring、Quarkus ,同时还有 CLI 、SDK 和 RESTful API。
1> 安装
#docker方式部署,完成后,可以访问 http://localhost:8080 进行测试,用户名/密码:admin/admin
docker run -p 8080:8080 -e KEYCLOAK_ADMIN=admin -e KEYCLOAK_ADMIN_PASSWORD=admin -d quay.io/keycloak/keycloak:18.0.0 start-dev
- 1
- 2
- 3
2>配置keycloak
登陆keycloak 管理控制台,创建一个租户:在 keycloak 中,一个 realm 相当于一个租户,它允许创建独立的应用程序和用户组。master 是keycloak 中默认的 realm,master 是专用于管理 keycloak的,不建议用于自己的应用程序。要应用于自己的应用程序时,一般最好建立一个自己指定名称的 realm,在master下面单机 Add realm创建。

在新创建的 realm 中创建一个user:

保存成功后,设置初始密码,点击 Credentials,其中Temporary 处点击为 OFF,完成密码重置。
完成后,配置要单点的应用程序。Keycloak管理控制台Clients新建客户端: 用上面Keycloak 实例注册一个应用程序:
3>修改grafana配置:
编辑 /etc/grafana/grafana.ini,修改以下配置:
[server]
root_url = http://localhost:3000/
[auth.generic_oauth]
allow_sign_up = true
api_url = http://localhost:8080/realms/grafana/protocol/openid-connect/userinfo
auth_url = http://localhost:8080/realms/grafana/protocol/openid-connect/auth
client_id = grafana
client_secret = B1dllYApv88FHkkLQDqCwv2aRH5hHwoU
enabled = true
name = grafana
role_attribute_path = role
root_url = http://localhost:3000/
scopes = openid email
token_url = http://localhost:8080/realms/grafana/protocol/openid-connect/token
- 1
- 2
- 3
- 4
- 5
- 6
- 7
- 8
- 9
- 10
- 11
- 12
- 13
- 14
- 15
在 keycloak 中配置好正确的 用户名、密码 后,重新访问 grafana,就可以看到类似如下界面:

4)nginx密码限制访问
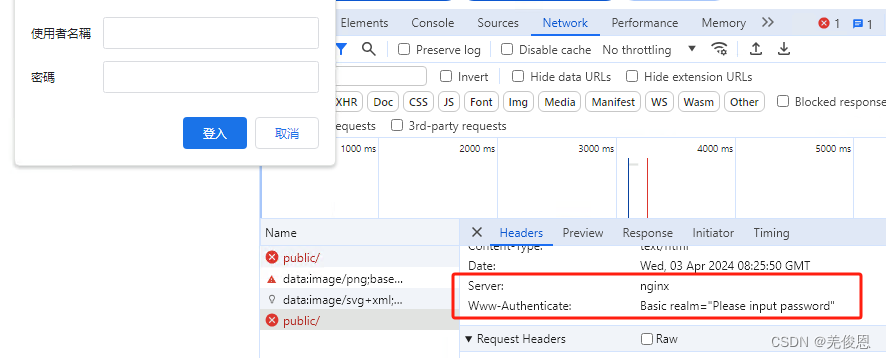
#htpasswd是开源的http服务器Apache Http Server的一个命令行工具.可以用来创建和更新基本认证的用户认证密码文件.其中htpasswd必须对密码文件有读写权限,配置了基本身份验证后,会从浏览器弹出简单的登录窗口,但对于面向终端用户的前台来说,确实不够友好,故只适用于部分内部用户使用的页面
#htpasswd总共有4种加密算法,分别是MD5、bcrypt、CRYPT、SHA,在httpd-tools 2.2的版本中,默认使用的是CRYPT加密算法来进行密码加密的,而httpd-tools 2.4的版本中,默认是使用MD5来进行密码加密的,现场默认就是MD5;其中没有加salt的SHA算法,没有MD5安全
#安装 htpasswd 工具
yum -y install httpd-tools  #或npm install -g htpasswd
#如果报错:“error: unpacking of archive failed on file /usr/bin/xxxx: cpio: open Failed”,请检查/usr/bin目录是否设置特殊权限
chattr -i /usr/bin  #再次安装即可
which htpasswd  #/usr/bin/htpasswd
#htpasswd用法及参数
htpasswd [-cimB25dpsDv] [-C cost] [-r rounds] passwordfile username
htpasswd -b[cmB25dpsDv] [-C cost] [-r rounds] passwordfile username password

	htpasswd -n[imB25dps] [-C cost] [-r rounds] username
	htpasswd -nb[mB25dps] [-C cost] [-r rounds] username password
 -c  Create a new file.
 -n  Don't update file; display results on stdout.
 -b  Use the password from the command line rather than prompting for it.
 -i  Read password from stdin without verification (for script usage).
 -m  Force MD5 encryption of the password (default).
 -2  Force SHA-256 crypt() hash of the password (secure).
 -5  Force SHA-512 crypt() hash of the password (secure).
 -B  Force bcrypt aencryption of the password (very secure).
 -C  Set the computing time used for the bcrypt algorithm
     (higher is more secure but slower, default: 5, valid: 4 to 31).
 -r  Set the number of rounds used for the SHA-256, SHA-512 algorithms
     (higher is more secure but slower, default: 5000).
 -d  Force CRYPT encryption of the password (8 chars max, insecure).
 -s  Force SHA-1 encryption of the password (insecure).
 -p  Do not encrypt the password (plaintext, insecure).
 -D  Delete the specified user.
 -v  Verify password for the specified user.

#创建认证用户 ,会在/etx/nginx/passwd.db文件中生成用户名和加密的密码,格式类似: admin:YlmaHlkJnzhxG
htpasswd -c .lip_htpasswd.db admin //输入密码,生成的数据文件建议放入web运行目录,比如nginx配置文件目录下,注意这种交互式输入密码可能会出现配置无效的情况,报错如下:
htpasswd后{"message": "invalid username or password","traceID":""}
#用一下命令重新生成,注意-d采用,因Nginx采用crypt解密,如果不兼容,即使能看到了 Auth 提示,但当输入了正确的密码,也会收到 403或401,500,400等错误。Nginx 的认证系统不支持加密密码,它只接受密码的散列值。Nginx 通常使用 bcrypt、md5 或 sha1 来散列密码,但是需要注意的是,自 Nginx 1.11.7 版本起,默认情况下,md5 和 sha1 已被弃用。
htpasswd -cbd .lip_htpasswd.db admin password #用 crypt()函数加密,但密码不能超狗8位;或
openssl passwd -crypt "password"  #-crypt:UNIX标准加密算法,也是默认的算法
chmod 600 .lip_htpasswd.db
#nginx的ngx_http_auth_basic_module可以帮助我们在 http 资源没有任何保护的情况下,添加基础的认证;修改配置,增加: auth_basic 和 auth_basic_user_file
vim /usr/local/nginx/conf/nginx.conf
……
server {
listen 80;
server_name local.server.com;
#auth_basic "Please input password"; #这里是验证时的提示信息
#auth_basic_user_file /usr/local/nginx/conf/third_htpasswd.db;
location / {
	root /data/www; #或如下
	auth_basic "Please input password"; #这里是验证时的提示信息
	auth_basic_user_file /usr/local/nginx/conf/third_htpasswd.db;
	index index.html;
	rewrite ^/$  https://new_uri permanent;
 }
location /public {
proxy_buffering on;
          proxy_buffer_size 4k;
          proxy_buffers 8 4M;
          proxy_busy_buffers_size 4M;
        # websocket处理
          proxy_http_version 1.1;
          proxy_set_header Upgrade $http_upgrade;
          proxy_set_header Connection "upgrade";
          proxy_set_header X-Real-IP $remote_addr;
          add_header Access-Control-Allow-Origin *;
          add_header Access-Control-Allow-Methods GET,POST,OPTIONS;
          #add_header Access-Control-Allow-Credentials true;
          proxy_set_header Authorization "Bearer grafana_API_token";
          auth_basic "Please input password"; #这里是验证时的提示信息
          auth_basic_user_file third_htpasswd.db;
          proxy_pass http://grafana_ip:3000;
         }

}
#方式2,整体限制局部取消
server {
    ...
    auth_basic           "Administrator’s Area";
    auth_basic_user_file conf/htpasswd;

    location /public/ {
        auth_basic off;  #对不限制的location配置该处
    }
}
#方式3:混合用多种控制,
location / {
    satisfy any;  #当值为any时,满足allow和auth任一条件即可,当值为all时,需同时满足;

    allow 192.168.1.0/32;
    deny  all;

    auth_basic           "closed site";
    auth_basic_user_file conf/htpasswd;
}
#重启nginx服务 ,如果不满足会报:401 (Authorization Required) error
nginx -s reload

#grafana配置调整
sed -i "s/;allow_embedding = false/allow_embedding = true/g" /etc/grafana/grafana.ini
cat /etc/grafana/grafana.ini  | grep allow_embedding
systemctl restart grafana-server
- 1
- 2
- 3
- 4
- 5
- 6
- 7
- 8
- 9
- 10
- 11
- 12
- 13
- 14
- 15
- 16
- 17
- 18
- 19
- 20
- 21
- 22
- 23
- 24
- 25
- 26
- 27
- 28
- 29
- 30
- 31
- 32
- 33
- 34
- 35
- 36
- 37
- 38
- 39
- 40
- 41
- 42
- 43
- 44
- 45
- 46
- 47
- 48
- 49
- 50
- 51
- 52
- 53
- 54
- 55
- 56
- 57
- 58
- 59
- 60
- 61
- 62
- 63
- 64
- 65
- 66
- 67
- 68
- 69
- 70
- 71
- 72
- 73
- 74
- 75
- 76
- 77
- 78
- 79
- 80
- 81
- 82
- 83
- 84
- 85
- 86
- 87
- 88
- 89
- 90
- 91
- 92
- 93
- 94
- 95
- 96
- 97
- 98
- 99
- 100
Grafana配置新增服务账户API:


#验证
curl -H "Authorization: Bearer eyJrIjoiRnJjVmNURW1vdnlxQkdOTExqM29DcnJJV3g4TnQ0SEwiLCJuIjoid2Vidmlld2VyIiwiaWQiOjF9" http://grafana_ip:3000/api/dashboards/home
#防火墙
firewall-cmd --permanent --zone=public --remove-port=80/tcp
firewall-cmd --permanent --add-rich-rule='rule family="ipv4" source address='你的网站ip' port port="80" protocol="tcp" accept'
firewall-cmd --reload
#配置主页,安装插件yesoreyeram-boomtheme-panel
grafana-cli plugins install yesoreyeram-boomtheme-panel  #或
grafana-cli --pluginUrl https://github.com/yesoreyeram/yesoreyeram-boomtheme-panel/releases/download/v0.2.1/yesoreyeram-boomtheme-panel-0.2.1.zip plugins install yesoreyeram-boomtheme-panel
cd /usr/share/grafana/public  #grafana插件位置
- 1
- 2
- 3
- 4
- 5
- 6
- 7
- 8
- 9
- 10


上面能添加外部CSS地址,地址栏输入:https://github.com/gilbN/theme.park/tree/master/CSS/themes/grafana或https://github.com/GilbN/theme.park/tree/master/css/theme-options就会看到多个CSS:
https://gilbn.github.io/theme.park/CSS/themes/grafana/hotline.css
https://gilbn.github.io/theme.park/CSS/themes/grafana/aquamarine.css
https://gilbn.github.io/theme.park/CSS/themes/grafana/organizr-dark.css
https://gilbn.github.io/theme.park/CSS/themes/grafana/organizr-dashboard.css
https://gilbn.github.io/theme.park/CSS/themes/grafana/plex.css
https://gilbn.github.io/theme.park/CSS/themes/grafana/space-gray.css

#优化css加载速度
wget https://gilbn.github.io/theme.park/CSS/themes/grafana/hotline.css
然后重新配置grafana的CSS,修改成本地的地址,比如:/public/css/hotline.css

5)LDAP账号统一管理限制
1> LDAP (Lightweight Directory Access Protocol)服务创建
#安装ldap服务
yum install -y openldap-servers openldap-clients openldap openldap-devel compat-openldap openldap-servers-sql
#启动LDAP服务
systemctl start slapd
#设置LDAP服务开机启动
systemctl enable slapd
#查看LDAP服务状态
systemctl status slapd
#重新加载配置文件
systemctl reload slapd
#查看ldap版本信息
slapd -VV
#ldap的默认端口是389
lsof -i:389
#创建根密码
slappasswd   #输出类似如下,保存好这个字符串,后面需要使用
{SSHA}XzxogzZEjaWKetR4FpLliMGtXLpxg5j7
#编辑数据文件db.ldif,将‘dc=example,dc=com’替换为你的域名,后面它将用于OpenLDAP服务器;其中LDIF 是 LDAP 数据交换格式的缩写,它是纯文本的

vim /etc/openldap/slapd.d/db.ldif  #新增下面内容,检查空行里不要有空格,不然会报错wrong attributeType at line xx
dn: olcDatabase={2}hdb,cn=config
changetype: modify
replace: olcSuffix
olcSuffix: dc=example,dc=com

dn: olcDatabase={2}hdb,cn=config
changetype: modify
replace: olcRootDN
olcRootDN: cn=admin,dc=example,dc=com

dn: olcDatabase={2}hdb,cn=config
changetype: modify
add: olcRootPW
olcRootPW: {SSHA}XzxogzZEjaWKetR4FpLliMGtXLpxg5j7  #对应上面根密码
#发送配置
ldapmodify -Y EXTERNAL -H ldapi:/// -f db.ldif
#创建monitor数据文件

vim /etc/openldap/slapd.d/monitor.ldif  #新增下面内容
dn: olcDatabase={1}monitor,cn=config
changetype: modify
replace: olcAccess
olcAccess: {0}to * by dn.base="gidNumber=0+uidNumber=0,cn=peercred,cn=external, cn=auth" read by dn.base="cn=admin,dc=example,dc=com" read by * none
#发送配置
ldapmodify -Y EXTERNAL -H ldapi:/// -f monitor.ldi

#创建ldap基础库,复制ldap示例配置,赋予它所有权限
cp /usr/share/openldap-servers/DB_CONFIG.example /var/lib/ldap/DB_CONFIG
chown ldap:ldap /var/lib/ldap/*
#向数据库添加schemas,包括cosine、nis、inetorgperson三个文件
ldapadd -Y EXTERNAL -H ldapi:/// -f /etc/openldap/schema/cosine.ldif
ldapadd -Y EXTERNAL -H ldapi:/// -f /etc/openldap/schema/nis.ldif
ldapadd -Y EXTERNAL -H ldapi:/// -f /etc/openldap/schema/inetorgperson.ldif

#域文件配置
vim /etc/openldap/slapd.d/base.ldif   #新增下面内容
dn: dc=example,dc=com
dc: example
objectClass: top
objectClass: domain

dn: cn=admin,dc=example,dc=com
objectClass: organizationalRole
cn: admin
description: LDAP Manager

dn: ou=People,dc=example,dc=com
objectClass: organizationalUnit
ou: People

dn: ou=Group,dc=example,dc=com
objectClass: organizationalUnit
ou: Group
#保存至数据库
ldapadd -x -W -D "cn=admin,dc=example,dc=com" -f base.ldif
Enter LDAP Password:  //输入前面设置的根密码

#配置SSL
vim /usr/share/openldap-servers/slapd.ldif   #修改下面内容
#olcTLSCACertificatePath: /etc/openldap/certs
#olcTLSCertificateFile: "OpenLDAP Server"
#olcTLSCertificateKeyFile: /etc/openldap/certs/password
olcTLSCACertificateFile: /path/to/server.crt
olcTLSCertificateKeyFile: /path/to/server.key
olcTLSCertificateFile: /path/to/server.crt
#配置监听端口
vim /etc/sysconfig/slapd   #修改下面内容(缺省的值为ldapi=/var/run/ldapi, ldap=389, ldaps=636)
SLAPD_URLS="ldapi:/// ldap:/// ldaps:///"
#重启ldap
systemctl restart slapd
#ldap ssl的默认端口是636
lsof -i:636
#验证ssl证书信息
openssl s_client -connect <hostname>:636
openssl s_client -showcerts -CAfile /path/to/server.crt -connect <hostname>:636

#创建用户,在operation组下面创建用户,uidNumber可以自己指定(每个用户唯一)
vim user.ldif   #如下
dn: uid=monitor,ou=operation,dc=example,dc=com
objectClass: posixAccount
objectClass: top
objectClass: inetOrgPerson
objectClass: shadowAccount
cn: monitor
uid: monitor
sn: mo
gidNumber: 0
uidNumber: 9999
homeDirectory: /home/monitor
loginShell: /sbin/nologin
shadowMin: 0
shadowMax: 99999
#保存至数据库
ldapadd -x -W -D "cn=admin,dc=example,dc=com" -f user.ldif
#设置密码
ldappasswd -s 密码 -W -D "cn=admin,dc=example,dc=com" -x "uid=monitor,ou=People,dc=example,dc=com"
#查询用户,其中:dn:专有名称,“dn”代表唯一标识目录中条目的名称,是一串域组成。
ldapsearch -x -b dc=example,dc=com -H ldap://localhost  #-x表示使用简单身份验证;-b表示搜索DN;-H表示使用LDAP服务器的URL
#搜索指定用户
ldapsearch -x cn=monitor -b dc=example,dc=com -H ldap://localhost
#ldap用命令行管理database比较麻烦,可以用辅助Web工具phpLDAPadmin,LDAP Account Manager等,推荐使用 LDAP Account Manager,安装完成后可以在浏览器中登入LAM的管理界面,http://IP/lam,第一次登录需设置ldap server profile, 点击登入界面左上角的LAM configuration,然后点击Edit server profiles,设置登录密码,第一次登入的话默认密码是 lam。然后需要设置ldap Server address 和 Tree suffix,在Security setting中设置admin,点击Account types页,在Active account types中设置LDAP suffix 和List attributes。
- 1
- 2
- 3
- 4
- 5
- 6
- 7
- 8
- 9
- 10
- 11
- 12
- 13
- 14
- 15
- 16
- 17
- 18
- 19
- 20
- 21
- 22
- 23
- 24
- 25
- 26
- 27
- 28
- 29
- 30
- 31
- 32
- 33
- 34
- 35
- 36
- 37
- 38
- 39
- 40
- 41
- 42
- 43
- 44
- 45
- 46
- 47
- 48
- 49
- 50
- 51
- 52
- 53
- 54
- 55
- 56
- 57
- 58
- 59
- 60
- 61
- 62
- 63
- 64
- 65
- 66
- 67
- 68
- 69
- 70
- 71
- 72
- 73
- 74
- 75
- 76
- 77
- 78
- 79
- 80
- 81
- 82
- 83
- 84
- 85
- 86
- 87
- 88
- 89
- 90
- 91
- 92
- 93
- 94
- 95
- 96
- 97
- 98
- 99
- 100
- 101
- 102
- 103
- 104
- 105
- 106
- 107
- 108
- 109
- 110
- 111
- 112
- 113
- 114
- 115
- 116
- 117
- 118
- 119
- 120
- 121
- 122
2> Nginx 配置
server {
……
ldap_server openldap {
        url ldap://ldap_ip:389/dc=***,dc=com?uid?sub?(&(objectClass=person));
        binddn "cn=**,dc=***,dc=com";
        binddn_passwd "******";
        group_attribute people;
        group_attribute_is_dn on;
        require valid_user;
    }
location / {
        # adding ldap authentication
        auth_ldap "Closed content";
        auth_ldap_servers openldap;

        root   /usr/share/nginx/html;
        index  index.html index.htm;
    }
}
- 1
- 2
- 3
- 4
- 5
- 6
- 7
- 8
- 9
- 10
- 11
- 12
- 13
- 14
- 15
- 16
- 17
- 18
- 19
- 20
6)Nginx的WAF之Naxsi
Naxsi用于防护XSS和SQL注入以及RFI、文件上传、CSRF,这些都是web安全中最常见的攻击方式,它是一个第三方的nginx模块,依赖于libpcre,与任何nginx版本都兼容;过程中可以用sqlmap来注入dvwa来测试验证;项目地址:https://github.com/nbs-system/naxsi
使用:只需要下载Naxsi源码包,然后再nginx编译时使用–add-dynamic-module=Naxsi源码包路径,指定静态模块加入nginx编译配置里即可;然后通过make modules,安装模块为ngx_http_naxsi_module.so,保存在objs目录,复制到nginx的modules目录,Naxsi的规则配置也复制到nginx conf下,在nginx配置文件中,加载naxsi模块和核心规则。
三、SSO服务器配置
1)应用场景一
四、附录
4.1、常见文件属性回顾
| 属性 | 说明 |
|---|---|
| i | 对文件设置i属性,不允许对文件进行删除、重命名,也不能添加和修改数据。 对目录设置i属性,只能修改目录下文件中的数据,但不允许新建和删除文件。文件权限中,大写的 I 表示不可变属性,而小写的 i 表示不可变文件。不可变属性仅保护文件的特定属性,而不可变文件保护整个文件。其中,不可变文件是不可变属性的一种更严格的形式。 |
| a | 对文件设置a属性,只能在文件中新增数据,但是不能删除和修改数据。 对目录设置a属性,只能在目录中新增和修改文件,但是不允许删除文件。 |
| u | 对文件或目录设置u属性,在删除时,其内容会被保存,以保证后期能够恢复,一般用来防止意外删除文件或目录。 |
| s | 对文件或目录设置s属性,在删除文件或目录时,会被彻底删除,不可恢复。 |
| e | Linux中绝大多数的文件都默认拥有e属性,表示该文件是使用ext文件系统进行存储的。 |
| 大写i | 标记文件或目录的某些属性为不可变,防止意外更改。仅当文件或目录的所属用户具有超级用户权限时,才能更改不可变属性。典型的不可变属性包括:a(存档位)c(压缩位)t(尾部锁定位)S(安全不可变位) |
| t | t设置粘着位,一般针对权限是777的文件夹设置权限。如果文件设置了t权限则只有属主和root有删除文件的权限;777的目录设置t权限,索引用户可以在这个目录下面创建文件和删除自己创建的文件,删除其他人创建的文件权限不被允许(比如共享目录) |
| 操作符 | +:为文件或目录添加属性;-:移除文件或目录已有的某些属性;=:为文件或目录设定一些属性。 |
4.2、http basic_auth 认证流程原理
1、用户第一次通过客户端访问页面,服务器端向客户端返回401状态码,并在WWW-Authenticate响应头说明验证的信息,其中:第一个Basic是说明使用的验证方案,第二部分realm主要是用来添加登录说明描述的
2、客户端收到相应后,弹窗让用户输入用户名和密码。其中,请求头Authorization由两部分组成,第一个Basic是说明使用的验证方案,第二个是用户名和密码编码后的字符。当第一次验证通过后,客户端会把正确的凭据缓存到session,保留一段时间,所以在验证通过后的一段时间内再次访问,是不用再输入用户名和密码的。密码文件访问错误,会报403提示;注意:basic的编码是base64,相当于明文传输。特别是非https协议,存在泄露的风险很高。
3、用户输入后,客户端通过编码或加密的方式,把用户名和密码通过Authorization请求头发送给服务端。
4、服务端验证通过,则返回200状态码,不然则返回401状态码。

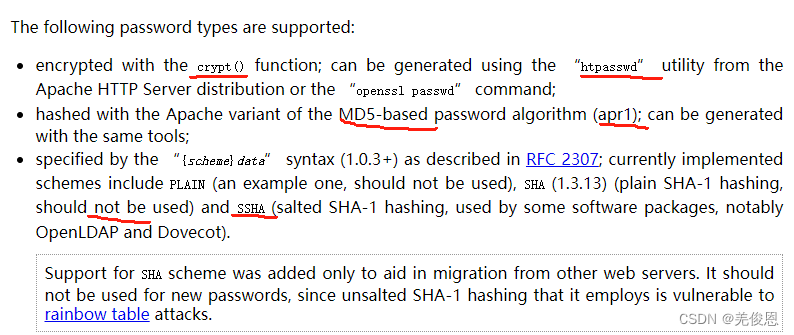
密码文件支持的加密算法:
4.3、Nginx权限自定义权限验证
自定义权限认证可以允许应用程序配置权限验证的服务,来完成特色的权限认证。示例如下:
server {
    listen       80;
    server_name  localhost;

    location / {
        root   /usr/share/nginx/html;
        index  index.html index.htm;
        auth_request /auth;
    }
    location = /auth {
         fastcgi_pass 127.0.0.1:7099;
         fastcgi_param SCRIPT_FILENAME /opt/fcgiauth.sh;  #配置了一个fcgiauth.sh的fcgi程序来进行验证用户权限,Nginx 将会调用这个脚本处理auth_request
         # 如果上面的fcgi程序要使用HTTP_AUTHORIZATION,就需要下面的配置,它将 HTTP 请求中的 Authorization 头信息传递给 FastCGI 应用程序,环境变量 $http_authorization 中包含了原始请求中的 Authorization 头信息。
         fastcgi_param HTTP_AUTHORIZATION $http_authorization;
         include /etc/nginx/fastcgi_params;
    }
}
#验证脚本:用户名admin,密码123456

#!/bin/bash
# 获取认证信息
AUTH_INFO=$(echo "$HTTP_AUTHORIZATION" | cut -d ' ' -f 2)

#如果http请求中没有HTTP_AUTHORIZATION信息,返回状态码-401,并要求客户端用base64方式加密验证信息;
if [ -z "$AUTH_INFO" ]; then
    # 没有认证信息,返回401
    echo "Status: 401 Unauthorized"
    echo "Content-Type: text/html"
    # 通知客户端加密方式,如果没有这个内容,客户端将不发送用户名和密码
    echo "WWW-Authenticate: Basic realm=\"User Visible Realm\""
    echo ""
    echo "<html><body><h1>401 Unauthorized</h1></body></html>"
#http请求中有HTTP_AUTHORIZATION信息,用户名为"admin"且密码为"123456",则通过认证,返回状态码-200。
else

    # 解码认证信息
    AUTH_INFO=$(echo "$AUTH_INFO" | base64 -d)
    # 判断用户名和密码是否正确
    if [ "$AUTH_INFO" = "admin:123456" ]; then
        # 用户名和密码正确,返回200
        echo "Status: 200 OK"
        echo "Content-Type: text/html"
        echo ""
        echo "<html><body><h1>200 OK</h1></body></html>"
    else
        # 用户名或密码错误,则返回403
        echo "Status: 403 Forbidden"
        echo "Content-Type: text/html"
        echo ""
        echo "<html><body><h1>403 Forbidden</h1></body></html>"
    fi
fi
- 1
- 2
- 3
- 4
- 5
- 6
- 7
- 8
- 9
- 10
- 11
- 12
- 13
- 14
- 15
- 16
- 17
- 18
- 19
- 20
- 21
- 22
- 23
- 24
- 25
- 26
- 27
- 28
- 29
- 30
- 31
- 32
- 33
- 34
- 35
- 36
- 37
- 38
- 39
- 40
- 41
- 42
- 43
- 44
- 45
- 46
- 47
- 48
- 49
- 50
- 51
- 52
4.4、Grafana配置嵌入项目iframe使用JWT实现免密授权登录
1)场景背景
因现场项目人员需要通过项目内嵌grafana的dashboard界面,了解项目指标情况,因此需要将Grafana的门户页内嵌到项目的iframe中,而iframe又不能携带请求头这些进行登录访问,如果设置匿名登录就会造成无需密码就可以查看,这又是不允许的,经查阅Grafna官方文档,评估后项目决定采用多种授权方式的jwt进行url拼接token来实现免密进行访问,现场Grafana版本:Version 10.1.1 (commit: 0cfa76b22d, branch: HEAD),注意低于8.0相关配置不生效,有些服务器不接受超过8 KB的标头。
2)JWK和JWT 介绍
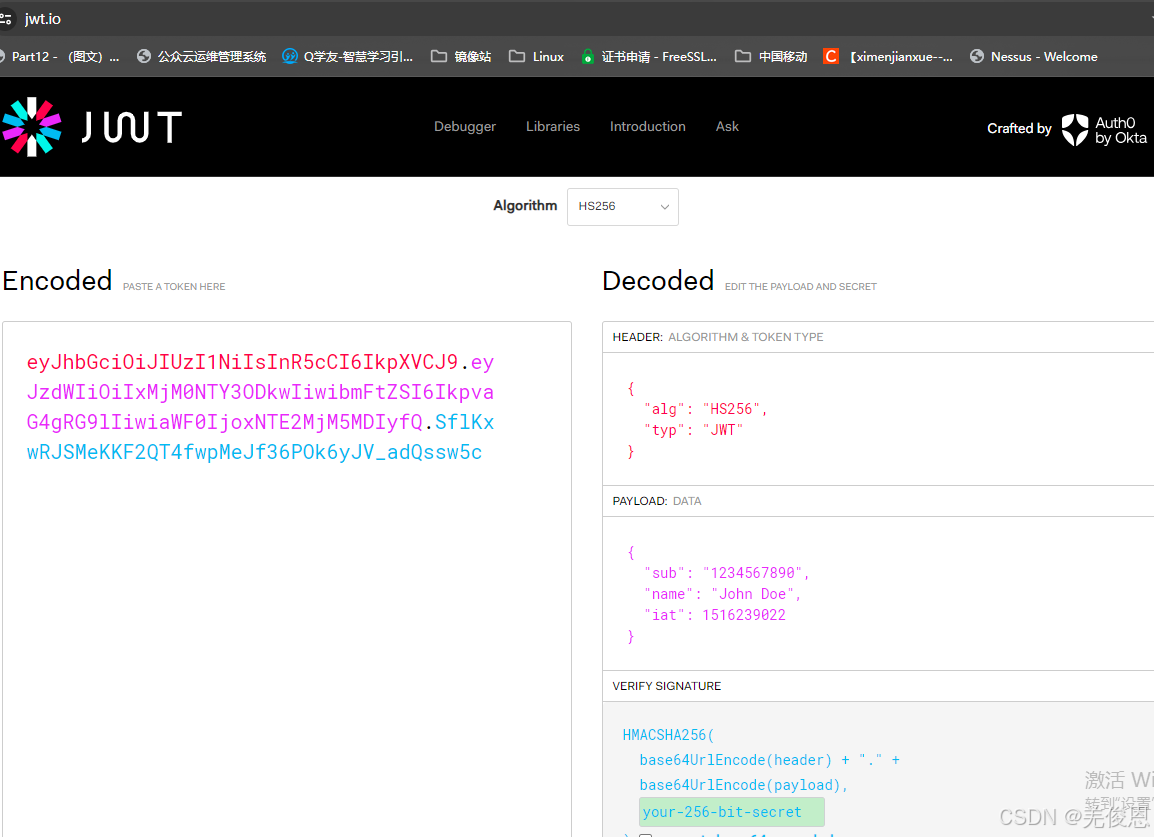
JWK (JSON Web Key) 和 JWT (JSON Web Token) 是现代Web应用程序中用于安全通信的两个重要概念。它们都是基于JSON的,是OAuth 2.0和OpenID Connect等协议的核心组成部分,更多参看JWT官网,在官网可以生成自己的token并完成验证:
JWK在OAuth 2.0中,JWK用于公开服务器用于验证JWT的公钥;在JWT验证过程中,客户端可以使用JWK来验证JWT (JSON Web Token)的签名。一个基本的JWK可能包含以下字段:
kty (Key Type): 密钥类型,如RSA、EC、Oct等。
kid (Key ID): 密钥的唯一标识符。
use (Public Key Use): 密钥的用途,如签名或加密。
n (Modulus for RSA and other modular algorithms): RSA密钥的模数。
e (Exponent for RSA and other modular algorithms): RSA密钥的公共指数。
d (Private Exponent for RSA and other modular algorithms): RSA密钥的私有指数。
x (X Coordinate for EC and other elliptic curve algorithms): 椭圆曲线密钥的X坐标。
y (Y Coordinate for EC and other elliptic curve algorithms): 椭圆曲线密钥的Y坐标。
其他还可参看:JWT的RFC文档和JWK和JWK Set的RFC文档,以下是一个JWT JSON示例:
{
  "alg": "HS256",   #指定使用的签名算法,alg就是: algorithm
  "typ": "JWT",      #指定token的类型,这里是JWT;下面是payload内容,即claim,它的名称只有3个字符长度
  "sub": "1234567890",   #指定要登录
  "name": "John Doe",
  "admin": true
}
- 1
- 2
- 3
- 4
- 5
- 6
- 7

