
从零开始的AGI开发:Gradio入门指南_gradio 安装
赞
踩
目录
序言:以用户界面为起点,探索底层大模型的学习之路
一、Gradio安装
二、Gradio 常用模块介绍
2.1 页面组件
2.2 功能组件
三、Hello World 认识Gradio程序
3.1 gr.Interface
3.2 gr.Blocks
四、Gradio的 gr.Blocks
4.1 Blocks的布局
五、Gadio 的AI demo案例
序言:以用户界面为起点,探索底层大模型的学习之路
AGI程序开发及学习往往从枯燥无味的代码开始,很容易让人感到困倦,甚至放弃。但是,我们可以选择一条不同的路径。让我们从用户界面出发,直接进入AGI程序的学习之旅,逐步探索底层大模型的奥秘。
在这门课程中,我们将以用户视角为起点,聚焦于Gradio的应用。Gradio是一个强大的工具,可以帮助我们快速构建交互式应用程序。通过Gradio,我们可以直观地与底层的AGI模型进行交互,无需深入研究复杂的代码。
我们将引导学员逐步探索如何使用Gradio构建用户友好的界面,以及如何将这些界面与底层大模型进行集成。通过这一学习路线,学员将能够从用户的角度深入理解AGI程序的工作原理,并逐步掌握底层大模型的开发技巧。
让我们摒弃枯燥的代码,从用户界面出发,开启一段充满探索和创造的AGI程序学习之旅吧!
为什么选择gradio作为AGI的UI工具:
- 基于Python:Gradio是基于Python开发的库,这使得它成为开发AGI程序时的理想选择。由于AGI开发通常涉及到使用Python编写底层模型和算法,使用Gradio作为UI工具可以避免语言切换的复杂性,使整个开发过程更加无缝和高效。
- 模块丰富:Gradio提供了丰富的模块和组件,可以轻松构建交互式应用程序的各个方面。它支持多种输入和输出类型,包括文本、图像、音频等,同时还提供了丰富的界面组件,如文本框、滑块、按钮等,以及自定义的输出展示方式。这些丰富的模块使得使用Gradio搭建AGI程序的过程更加方便、灵活和可定制。
- 简单易用:Gradio的设计目标之一是使开发者可以快速构建交互式应用程序,而无需繁琐的代码编写和复杂的配置。它提供了简洁的API和直观的界面,使得使用Gradio变得简单易懂。开发者可以快速定义输入和输出函数,并通过几行代码即可将它们与界面组件关联起来。这种简单易用的特性使得Gradio成为入门级开发者和初学者的理想选择。
Gradio有什么案例吗?
看过我AI绘画教程的朋友知道AI绘画开源 stable diffusion 的UI 就是基于Gradio
相关教程:
楚门:mac mini 安装stable diffusion 保姆级教程1 赞同 · 6 评论文章
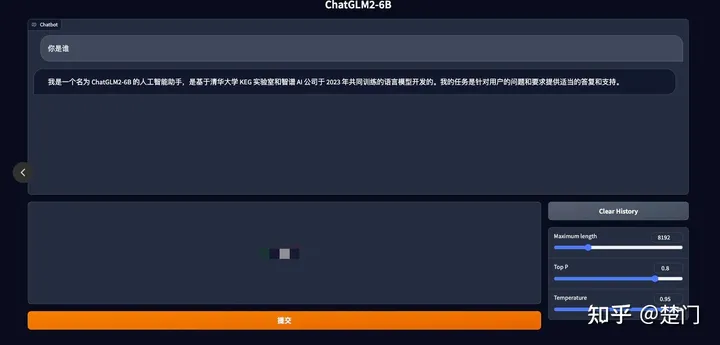
另外清华大学的ChatGLM2-6b的demo页面也是用的Gradio:
安装教程:
楚门:ChatGLM2-6B 阿里云部署保姆级教程5 赞同 · 3 评论文章
学习前置条件:
电脑一台(手动狗头)
开发环境:pycharm 或者jupter(建议新手)
python语言:也可以边学别看本教程,能看懂基本的语法就可以了
一、Gradio安装
安装Gradio非常简单,您只需按照以下步骤进行操作:
- 确保您已经安装了Python:在开始安装Gradio之前,请确保您的系统已经安装了Python。您可以从Python官方网站(https://www.python.org)下载并安装适合您操作系统的Python版本。
- 打开命令行界面:打开命令行界面(例如Windows上的命令提示符或Mac上的终端)。
- 使用pip安装Gradio:在命令行界面中输入以下命令,按下回车执行:
pip install gradio如果您在Mac系统上安装Gradio时遇到问题,请尝试使用pip3而不是pip。以下是针对Mac系统的Gradio安装命令:
pip3 install gradio如果是jupter环境

等待片刻,pip会自动下载并安装Gradio及其所需的依赖项。
验证安装:安装完成后,您可以使用以下命令验证Gradio是否成功安装:
gradio --version如果您看到Gradio的版本号信息,即表示安装成功。
至此,您已经成功安装了Gradio。现在您可以开始使用Gradio构建交互式应用程序了。
二、Gradio 常用模块介绍
2.1 页面组件
Gradio 提供两个类来构建应用程序UI:
- gr.Interface:gr.Interface模块用于创建简易场景下的应用界面。它是使用Gradio构建交互式应用程序的核心模块之一。通过gr.Interface,您可以快速定义输入和输出函数,并将它们与界面组件进行关联,以创建一个具有交互性的应用程序。这个模块提供了简洁的API和直观的界面,使得构建应用程序变得简单易懂。
- gr.Blocks:gr.Blocks模块用于定制化场景下的应用界面。它提供了更高级的界面定制和扩展功能,适用于需要更精细控制界面布局和组件交互的情况。通过gr.Blocks,您可以使用不同的布局块(Blocks)来组织界面组件,以实现更灵活、复杂的界面设计。这个模块适用于那些需要对界面进行高度定制的开发者,可以根据具体需求构建独特的应用界面。
Gradio的应用界面模块提供了不同的选择,根据开发者的需求和技术水平,可以选择使用gr.Interface进行简易场景的应用界面开发,或使用gr.Blocks进行更定制化的界面设计。
2.2 功能组件
输入输出组件:
-
- gr.Image(图像):用于处理图像输入和输出。
- gr.Textbox(文本框):用于接收和显示文本输入和输出。
- gr.DataFrame(数据框):用于处理表格数据的输入和输出。
- gr.Dropdown(下拉选项):用于创建下拉选项菜单,方便用户进行选择。
- gr.Number(数字):用于处理数值输入和输出。
- gr.Markdown:用于渲染和显示Markdown格式的文本。
- gr.Files:用于处理文件的输入和输出。
控制组件:
-
- gr.Button(按钮):用于创建按钮,用户可以点击按钮执行特定的操作。
- gr.Slider(滑块):用于创建可拖动的滑块,用于选择范围内的数值。
- gr.Checkbox(复选框):用于创建复选框,用户可以选择或取消选择。
- gr.Radio(单选框):用于创建单选框,用户可以从多个选项中选择一个。
- gr.Switch(开关):用于创建开关按钮,用户可以切换开关的状态。
- gr.ColorPicker(颜色选择器):用于选择颜色的输入和输出。
- 等等
布局组件:
-
- gr.Tab(标签页):用于创建多个标签页,使界面更加有组织和易于导航。
- gr.Row(行布局):用于将组件水平排列在一行中。
- gr.Column(列布局):用于将组件垂直排列在一列中。
三、Hello World 认识Gradio程序
3.1 gr.Interface
核心 Interface 类使用三个必需参数进行初始化:
fn:将 UI 包裹起来的函数inputs:用于输入的组件(例如"text","image"或"audio")outputs:用于输出的组件(例如"text","image"或"label")
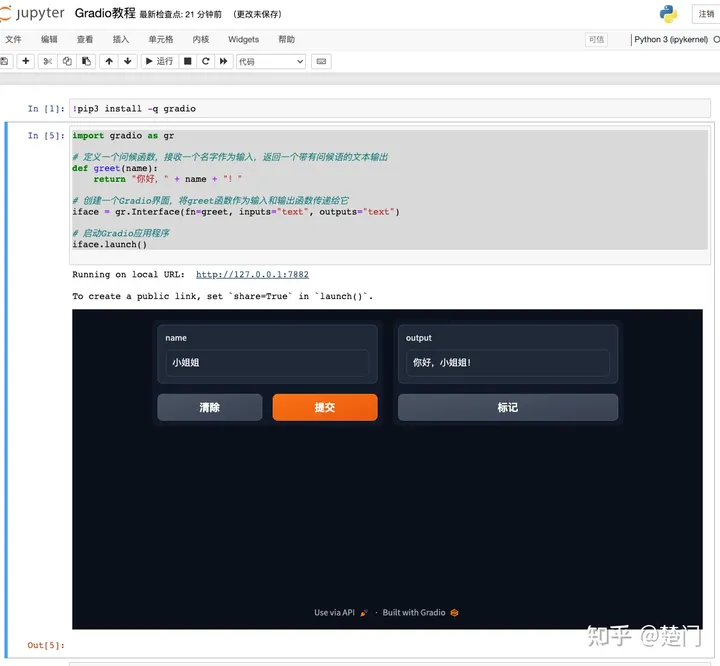
下面是一个简单示例代码,演示如何使用Gradio创建一个基本的交互式应用程序:
- import gradio as gr
-
- # 定义一个问候函数,接收一个名字作为输入,返回一个带有问候语的文本输出
- def greet(name):
- return "你好," + name + "!"
-
- # 创建一个Gradio界面,将greet函数作为输入和输出函数传递给它
- iface = gr.Interface(fn=greet, inputs="text", outputs="text")
-
- # 启动Gradio应用程序
- iface.launch()
-
3.2 gr.Blocks
Blocks使用with创建,在此with中创建的任何组件都会自动添加到应用程序中
组件按创建顺序垂直显示在应用中。
创建了Button,然后将click事件侦听器添加到此按钮与Interface一样,该方法click采用 Python 函数、输入组件和输出组件。
以下是基于Blocks的示例:
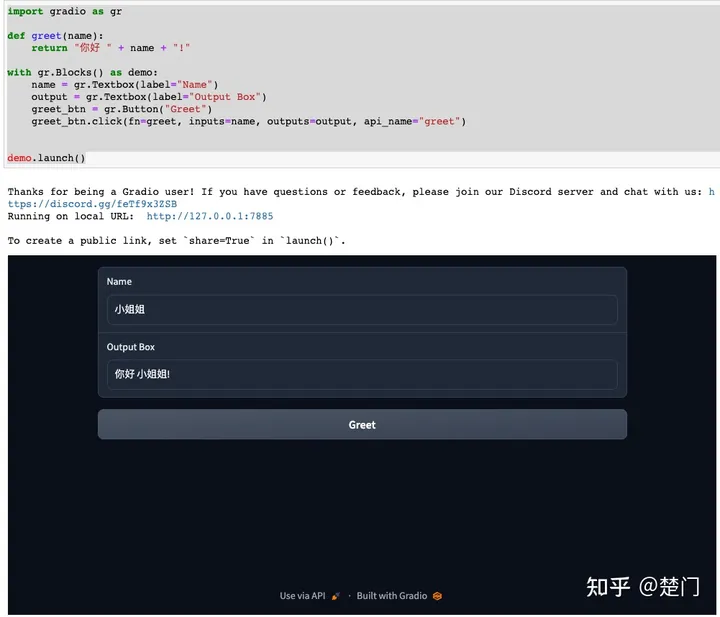
- import gradio as gr
-
- def greet(name):
- return "你好 " + name + "!"
-
- with gr.Blocks() as demo:
- name = gr.Textbox(label="Name")
- output = gr.Textbox(label="Output Box")
- greet_btn = gr.Button("Greet")
- greet_btn.click(fn=greet, inputs=name, outputs=output, api_name="greet")
-
-
- demo.launch()
- 导入gradio库并将其重命名为gr。gradio是一个用于创建简单Web应用程序的库,它允许用户通过浏览器与程序进行交互。
- 定义一个名为greet的函数,该函数接受一个参数name,并返回一个字符串,其中包含“问候语”+名字。
- 使用with语句创建一个名为demo的上下文管理器。在这个上下文中,我们将创建一个名为Blocks的对象,它将包含我们的GUI组件。
- 在Blocks对象内部,我们创建了一个名为name的文本框,它用于接收用户输入的名字。
- 我们还创建了一个名为output的文本框,它将在用户点击“Greet”按钮后显示问候语。
- 接下来,我们创建了一个名为greet_btn的按钮,它的标签为“Greet”。当用户点击此按钮时,将调用greet函数。
- 使用click方法为greet_btn按钮添加一个回调函数。当用户点击按钮时,将调用greet函数,并将name参数传递给它。同时,我们还将output参数设置为输出文本框,以便在函数执行后将结果显示在屏幕上。此外,我们还指定了api_name参数为“greet”,这意味着当我们在gradio网站上查看此应用程序时,它将显示为名为“greet”的API。
- 最后,我们使用launch方法启动应用程序。这将打开一个新窗口(或选项卡),其中包含我们的GUI。用户可以在其中输入名字并单击“Greet”按钮,然后他们将看到问候语显示在输出文本框中。
四、Gradio的 gr.Blocks
从使用角度上我们主要介绍Blocks ,后续的AGI应用开发也主要使用Blocks
4.1 Blocks的布局
Rows行
with gr.Row中的元素将全部水平显示。例如,并排显示两个按钮:
- with gr.Blocks() as demo:
- with gr.Row():
- btn1 = gr.Button("Button 1")
- btn2 = gr.Button("Button 2")
- demo.launch()

Columns列
with gr.Row 中的元素将全部垂直显示。例如:
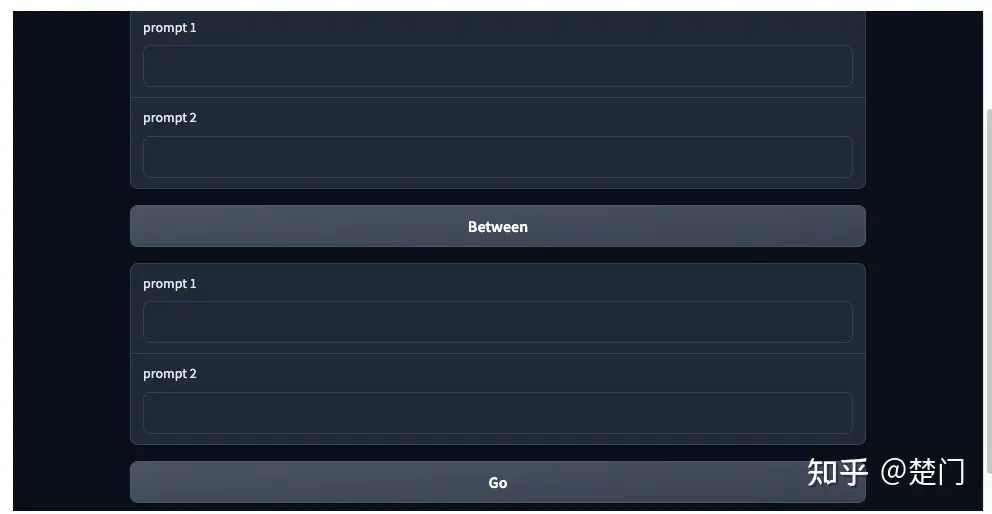
with gr.Blocks() as demo2:
with gr.Column(scale=1, min_width=600):
text1 = gr.Textbox(label="prompt 1")
text2 = gr.Textbox(label="prompt 2")
inbtw = gr.Button("Between")
text4 = gr.Textbox(label="prompt 1")
text5 = gr.Textbox(label="prompt 2")
demo2.launch()

行列嵌套
- import gradio as gr
-
- with gr.Blocks() as demo:
- with gr.Row():
- text1 = gr.Textbox(label="t1")
- slider2 = gr.Textbox(label="s2")
- drop3 = gr.Dropdown(["a", "b", "c"], label="d3")
- with gr.Row():
- with gr.Column(scale=1, min_width=600):
- text1 = gr.Textbox(label="prompt 1")
- text2 = gr.Textbox(label="prompt 2")
- inbtw = gr.Button("Between")
- text4 = gr.Textbox(label="prompt 1")
- text5 = gr.Textbox(label="prompt 2")
- with gr.Column(scale=2, min_width=600):
- #img1 = gr.Image("images/cheetah.jpg")
- btn = gr.Button("Go").style(full_width=True)
-
- demo.launch()

多标签
- import numpy as np
- import gradio as gr
-
- # 导入必要的库
-
- def flip_text(x):
- return x[::-1]
-
- # 定义翻转文本函数
-
- def flip_image(x):
- return np.fliplr(x)
-
- # 定义翻转图片函数,使用了NumPy中的fliplr函数
-
- with gr.Blocks() as demo:
- gr.Markdown("Flip text or image files using this demo.")
-
- # 创建一个包含Markdown说明的示例块
-
- with gr.Tab("Flip Text"):
- text_input = gr.Textbox()
- text_output = gr.Textbox()
- text_button = gr.Button("Flip")
-
- # 创建一个用于翻转文本的选项卡,包含一个文本输入框、一个文本输出框和一个按钮
-
- with gr.Tab("Flip Image"):
- with gr.Row():
- image_input = gr.Image()
- image_output = gr.Image()
- image_button = gr.Button("Flip")
-
- # 创建一个用于翻转图片的选项卡,包含一个图片输入框、一个图片输出框和一个按钮
-
- with gr.Accordion("Open for More!"):
- gr.Markdown("Look at me...")
-
- # 创建一个手风琴部分,包含一个Markdown文本
-
- text_button.click(flip_text, inputs=text_input, outputs=text_output)
- image_button.click(flip_image, inputs=image_input, outputs=image_output)
-
- # 为按钮添加点击事件,点击时调用相应的翻转函数
-
- demo.launch()
-
- # 启动Gradio演示
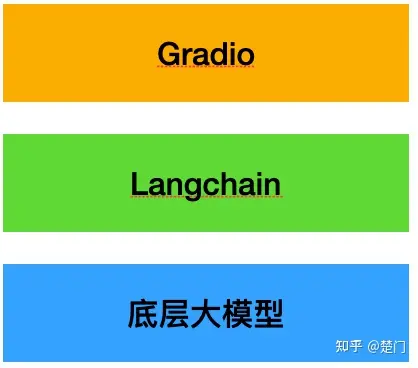
五、Gadio 的AI demo案例
所有的案例demo必须是智能的!呼应开头实操案例会直接结合 Langchain 进行AI demo的学习开发。

