
- 1skywalking使用ES做存储在K8S上的部署,使用实践_skywalking es
- 2【Python爬虫学习】总结了八种学习爬虫的常用技巧
- 3一步步带你解锁Stable Diffusion:SD 图生图功能保姆级入门指南「下」_用涂鸦重绘 空白潜空间 潜空间噪声 区别
- 4十大经典排序算法_综合几个排序表选择最优排序
- 5【题解】链表的奇偶重排_链表的奇偶重排python
- 6农村公交与异构无人机协同配送优化_公交与无人机协同配送优化需要用到什么原理
- 7汽车IVI中控开发入门及进阶(三十四):i.MX linux BSP
- 8添加、修改、删除以及查看本地git的用户名和邮箱_git删除用户名和email
- 9GLM-4开源版本终于发布!!性能超越Llama3,多模态媲美GPT-4V,MaaS平台全面升级_ollama glm4
- 10【JavaScript】如何使用正则表达式_javascript使用正则
教程 | 在Keras上实现GAN:构建消除图片模糊的应用
赞
踩
点击上方“小白学视觉”,选择加"星标"或“置顶”
重磅干货,第一时间送达2014 年,Ian Goodfellow 提出了生成对抗网络(GAN),今天,GAN 已经成为深度学习最热门的方向之一。本文将重点介绍如何利用 Keras 将 GAN 应用于图像去模糊(image deblurring)任务当中。
Keras 代码地址:https://github.com/RaphaelMeudec/deblur-gan
此外,请查阅 DeblurGAN 的原始论文(https://arxiv.org/pdf/1711.07064.pdf)及其 Pytorch 版本实现:https://github.com/KupynOrest/DeblurGAN/。
生成对抗网络简介
在生成对抗网络中,有两个网络互相进行训练。生成器通过生成逼真的虚假输入来误导判别器,而判别器会分辨输入是真实的还是人造的。
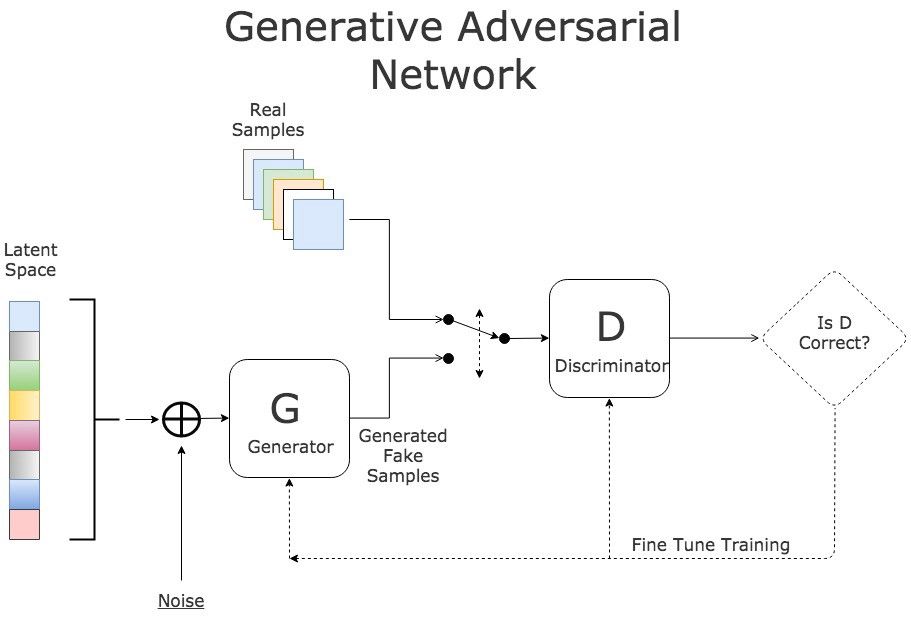
GAN 训练流程
训练过程中有三个关键步骤:
使用生成器根据噪声创造虚假输入;
利用真实输入和虚假输入训练判别器;
训练整个模型:该模型是判别器和生成器连接所构建的。
请注意,判别器的权重在第三步中被冻结。
对两个网络进行连接的原因是不存在单独对生成器输出的反馈。我们唯一的衡量标准是判别器是否能接受生成的样本。
以上,我们简要介绍了 GAN 的架构。如果你觉得不够详尽,可以参考这篇优秀的介绍:生成对抗网络初学入门:一文读懂 GAN 的基本原理(附资源)。
数据
Ian Goodfellow 首先应用 GAN 模型生成 MNIST 数据。而在本教程中,我们将生成对抗网络应用于图像去模糊。因此,生成器的输入不是噪声,而是模糊的图像。
我们采用的数据集是 GOPRO 数据集。该数据集包含来自多个街景的人工模糊图像。根据场景的不同,该数据集在不同子文件夹中分类。
你可以下载简单版:https://drive.google.com/file/d/1H0PIXvJH4c40pk7ou6nAwoxuR4Qh_Sa2/view
或完整版:https://drive.google.com/file/d/1SlURvdQsokgsoyTosAaELc4zRjQz9T2U/view
我们首先将图像分配到两个文件夹 A(模糊)B(清晰)中。这种 A&B 的架构对应于原始的 pix2pix 论文。为此我创建了一个自定义的脚本在 github 中执行这个任务,请按照 README 的说明去使用它:
https://github.com/RaphaelMeudec/deblur-gan/blob/master/organize_gopro_dataset.py
模型
训练过程保持不变。首先,让我们看看神经网络的架构吧!
生成器
该生成器旨在重现清晰的图像。该网络基于 ResNet 模块,它不断地追踪关于原始模糊图像的演变。本文同样使用了一个基于 UNet 的版本,但我还没有实现这个版本。这两种模块应该都适合图像去模糊。
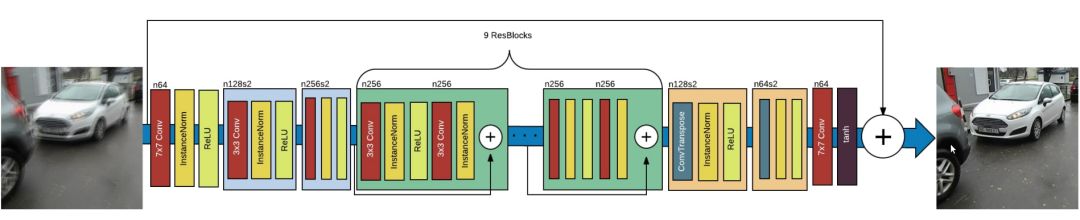
DeblurGAN 生成器网络架构,源论文《DeblurGAN: Blind Motion Deblurring Using Conditional Adversarial Networks》。
其核心是应用于原始图像上采样的 9 个 ResNet 模块。让我们来看看 Keras 上的代码实现!
- from keras.layers import Input, Conv2D, Activation, BatchNormalization
- from keras.layers.merge import Add
- from keras.layers.core import Dropout
-
- def res_block(input, filters, kernel_size=(3,3), strides=(1,1), use_dropout=False):
- """
- Instanciate a Keras Resnet Block using sequential API.
- :param input: Input tensor
- :param filters: Number of filters to use
- :param kernel_size: Shape of the kernel for the convolution
- :param strides: Shape of the strides for the convolution
- :param use_dropout: Boolean value to determine the use of dropout
- :return: Keras Model
- """
- x = ReflectionPadding2D((1,1))(input)
- x = Conv2D(filters=filters,
- kernel_size=kernel_size,
- strides=strides,)(x)
- x = BatchNormalization()(x)
- x = Activation('relu')(x)
-
- if use_dropout:
- x = Dropout(0.5)(x)
-
- x = ReflectionPadding2D((1,1))(x)
- x = Conv2D(filters=filters,
- kernel_size=kernel_size,
- strides=strides,)(x)
- x = BatchNormalization()(x)
-
- # Two convolution layers followed by a direct connection between input and output
- merged = Add()([input, x])
- return merged

该 ResNet 层基本是卷积层,其输入和输出都被添加以形成最终的输出。
- from keras.layers import Input, Activation, Add
- from keras.layers.advanced_activations import LeakyReLU
- from keras.layers.convolutional import Conv2D, Conv2DTranspose
- from keras.layers.core import Lambda
- from keras.layers.normalization import BatchNormalization
- from keras.models import Model
-
- from layer_utils import ReflectionPadding2D, res_block
-
- ngf = 64
- input_nc = 3
- output_nc = 3
- input_shape_generator = (256, 256, input_nc)
- n_blocks_gen = 9
-
-
- def generator_model():
- """Build generator architecture."""
- # Current version : ResNet block
- inputs = Input(shape=image_shape)
-
- x = ReflectionPadding2D((3, 3))(inputs)
- x = Conv2D(filters=ngf, kernel_size=(7,7), padding='valid')(x)
- x = BatchNormalization()(x)
- x = Activation('relu')(x)
-
- # Increase filter number
- n_downsampling = 2
- for i in range(n_downsampling):
- mult = 2**i
- x = Conv2D(filters=ngf*mult*2, kernel_size=(3,3), strides=2, padding='same')(x)
- x = BatchNormalization()(x)
- x = Activation('relu')(x)
-
- # Apply 9 ResNet blocks
- mult = 2**n_downsampling
- for i in range(n_blocks_gen):
- x = res_block(x, ngf*mult, use_dropout=True)
-
- # Decrease filter number to 3 (RGB)
- for i in range(n_downsampling):
- mult = 2**(n_downsampling - i)
- x = Conv2DTranspose(filters=int(ngf * mult / 2), kernel_size=(3,3), strides=2, padding='same')(x)
- x = BatchNormalization()(x)
- x = Activation('relu')(x)
-
- x = ReflectionPadding2D((3,3))(x)
- x = Conv2D(filters=output_nc, kernel_size=(7,7), padding='valid')(x)
- x = Activation('tanh')(x)
-
- # Add direct connection from input to output and recenter to [-1, 1]
- outputs = Add()([x, inputs])
- outputs = Lambda(lambda z: z/2)(outputs)
-
- model = Model(inputs=inputs, outputs=outputs, name='Generator')
- return model
生成器架构的 Keras 实现
按照计划,9 个 ResNet 模块会应用于输入的上采样版本。我们在其中添加了从输入到输出的连接,并对结果除以 2 以保持标准化输出。
这就是生成器的架构!让我们继续看看判别器怎么做吧。
判别器
判别器的目标是判断输入图像是否是人造的。因此,判别器的体系结构是卷积以及输出单一值。
- from keras.layers import Input
- from keras.layers.advanced_activations import LeakyReLU
- from keras.layers.convolutional import Conv2D
- from keras.layers.core import Dense, Flatten
- from keras.layers.normalization import BatchNormalization
- from keras.models import Model
-
- ndf = 64
- output_nc = 3
- input_shape_discriminator = (256, 256, output_nc)
-
-
- def discriminator_model():
- """Build discriminator architecture."""
- n_layers, use_sigmoid = 3, False
- inputs = Input(shape=input_shape_discriminator)
-
- x = Conv2D(filters=ndf, kernel_size=(4,4), strides=2, padding='same')(inputs)
- x = LeakyReLU(0.2)(x)
-
- nf_mult, nf_mult_prev = 1, 1
- for n in range(n_layers):
- nf_mult_prev, nf_mult = nf_mult, min(2**n, 8)
- x = Conv2D(filters=ndf*nf_mult, kernel_size=(4,4), strides=2, padding='same')(x)
- x = BatchNormalization()(x)
- x = LeakyReLU(0.2)(x)
-
- nf_mult_prev, nf_mult = nf_mult, min(2**n_layers, 8)
- x = Conv2D(filters=ndf*nf_mult, kernel_size=(4,4), strides=1, padding='same')(x)
- x = BatchNormalization()(x)
- x = LeakyReLU(0.2)(x)
-
- x = Conv2D(filters=1, kernel_size=(4,4), strides=1, padding='same')(x)
- if use_sigmoid:
- x = Activation('sigmoid')(x)
-
- x = Flatten()(x)
- x = Dense(1024, activation='tanh')(x)
- x = Dense(1, activation='sigmoid')(x)
-
- model = Model(inputs=inputs, outputs=x, name='Discriminator')
- return model
判别器架构的 Keras 实现
最后一步是构建完整的模型。本文中这个生成对抗网络的特殊性在于:其输入是实际图像而非噪声。因此,对于生成器的输出,我们能得到直接的反馈。
- from keras.layers import Input
- from keras.models import Model
-
- def generator_containing_discriminator_multiple_outputs(generator, discriminator):
- inputs = Input(shape=image_shape)
- generated_images = generator(inputs)
- outputs = discriminator(generated_images)
- model = Model(inputs=inputs, outputs=[generated_images, outputs])
- return model
让我们一起看看,如何利用两个损失函数来充分利用这种特殊性。
训练过程
损失函数
我们在两个级别提取损失函数:生成器的末尾和整个模型的末尾。
前者是一种知觉损失(perceptual loss),它直接根据生成器的输出计算而来。这种损失函数确保了 GAN 模型面向一个去模糊任务。它比较了 VGG 第一批卷积的输出值。
- import keras.backend as K
- from keras.applications.vgg16 import VGG16
- from keras.models import Model
-
- image_shape = (256, 256, 3)
-
- def perceptual_loss(y_true, y_pred):
- vgg = VGG16(include_top=False, weights='imagenet', input_shape=image_shape)
- loss_model = Model(inputs=vgg.input, outputs=vgg.get_layer('block3_conv3').output)
- loss_model.trainable = False
- return K.mean(K.square(loss_model(y_true) - loss_model(y_pred)))
而后者是对整个模型的输出执行的 Wasserstein 损失,它取的是两个图像差异的均值。这种损失函数可以改善生成对抗网络的收敛性。
- import keras.backend as K
-
- def wasserstein_loss(y_true, y_pred):
- return K.mean(y_true*y_pred)
训练过程
第一步是加载数据并初始化所有模型。我们使用我们的自定义函数加载数据集,同时在我们的模型中添加 Adam 优化器。我们通过设置 Keras 的可训练选项防止判别器进行训练。
- # Load dataset
- data = load_images('./images/train', n_images)
- y_train, x_train = data['B'], data['A']
-
- # Initialize models
- g = generator_model()
- d = discriminator_model()
- d_on_g = generator_containing_discriminator_multiple_outputs(g, d)
-
- # Initialize optimizers
- g_opt = Adam(lr=1E-4, beta_1=0.9, beta_2=0.999, epsilon=1e-08)
- d_opt = Adam(lr=1E-4, beta_1=0.9, beta_2=0.999, epsilon=1e-08)
- d_on_g_opt = Adam(lr=1E-4, beta_1=0.9, beta_2=0.999, epsilon=1e-08)
-
- # Compile models
- d.trainable = True
- d.compile(optimizer=d_opt, loss=wasserstein_loss)
- d.trainable = False
- loss = [perceptual_loss, wasserstein_loss]
- loss_weights = [100, 1]
- d_on_g.compile(optimizer=d_on_g_opt, loss=loss, loss_weights=loss_weights)
- d.trainable = True
然后,我们启动 epoch 并将数据集分成不同批量。
- for epoch in range(epoch_num):
- print('epoch: {}/{}'.format(epoch, epoch_num))
- print('batches: {}'.format(x_train.shape[0] / batch_size))
-
- # Randomize images into batches
- permutated_indexes = np.random.permutation(x_train.shape[0])
-
- for index in range(int(x_train.shape[0] / batch_size)):
- batch_indexes = permutated_indexes[index*batch_size:(index+1)*batch_size]
- image_blur_batch = x_train[batch_indexes]
- image_full_batch = y_train[batch_indexes]
最后,根据两种损失,我们先后训练判别器和生成器。我们用生成器产生虚假输入,然后训练判别器来区分虚假输入和真实输入,并训练整个模型。
- for epoch in range(epoch_num):
- for index in range(batches):
- # [Batch Preparation]
-
- # Generate fake inputs
- generated_images = g.predict(x=image_blur_batch, batch_size=batch_size)
-
- # Train multiple times discriminator on real and fake inputs
- for _ in range(critic_updates):
- d_loss_real = d.train_on_batch(image_full_batch, output_true_batch)
- d_loss_fake = d.train_on_batch(generated_images, output_false_batch)
- d_loss = 0.5 * np.add(d_loss_fake, d_loss_real)
-
- d.trainable = False
- # Train generator only on discriminator's decision and generated images
- d_on_g_loss = d_on_g.train_on_batch(image_blur_batch, [image_full_batch, output_true_batch])
- d.trainable = True
你可以参考如下 Github 地址查看完整的循环:
https://www.github.com/raphaelmeudec/deblur-gan
材料
我使用了 Deep Learning AMI(3.0 版本)中的 AWS 实例(p2.xlarge)。它在 GOPRO 数据集上的训练时间约为 5 小时(50 个 epoch)。
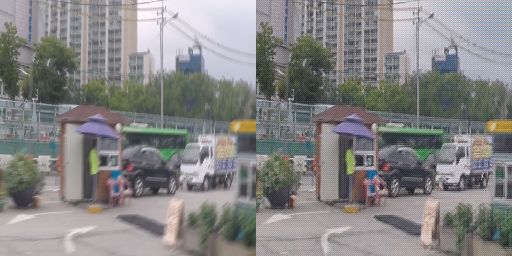
图像去模糊结果

从左到右:原始图像、模糊图像、GAN 输出。
上面的输出是我们 Keras Deblur GAN 的输出结果。即使是在模糊不清的情况下,网络也能够产生更令人信服的图像。车灯和树枝都会更清晰。

左图:GOPRO 测试图片;右图:GAN 输出。
其中的一个限制是图像顶部的噪点图案,这可能是由于使用 VGG 作为损失函数引起的。
左图:GOPRO 测试图片;右图:GAN 输出。
希望你在这篇「基于生成对抗网络进行图像去模糊」的文章中度过了一段愉快的阅读时光!
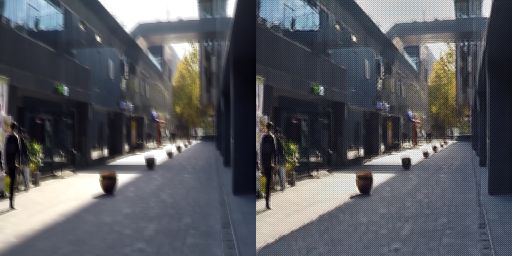
左图:GOPRO 测试图片;右图:GAN 输出。
论文:DeblurGAN: Blind Motion Deblurring Using Conditional Adversarial Networks
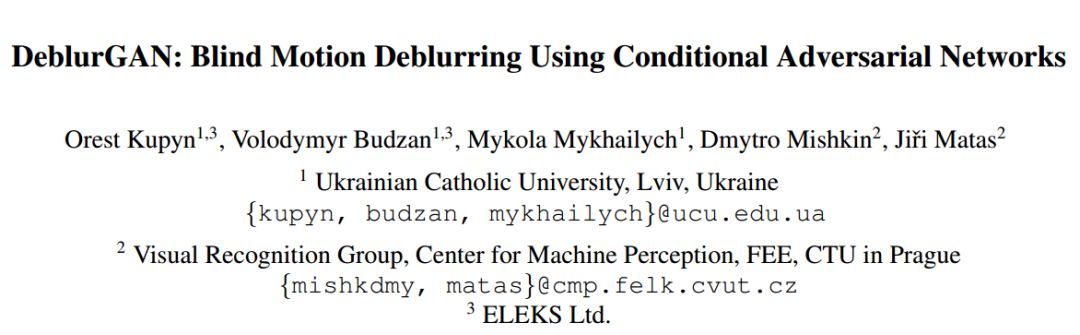
论文地址:https://arxiv.org/pdf/1711.07064.pdf
摘要:我们提出了一种基于有条件 GAN 和内容损失函数的运动去模糊的端到端学习方法——DeblurGAN。在结构相似性测量和视觉外观方面,DeblurGAN 达到了业内最先进的技术水平。去模糊模型的质量也以一种新颖的方式在现实问题中考量——即对(去)模糊图像的对象检测。该方法比目前最佳的竞争对手速度提升了 5 倍。另外,我们提出了一种从清晰图像合成运动模糊图像的新方法,它可以实现真实数据集的增强。
模型、训练代码和数据集都可以在以下地址获得:https://github.com/KupynOrest/DeblurGAN。
好消息!
小白学视觉知识星球
开始面向外开放啦
Copyright © 2003-2013 www.wpsshop.cn 版权所有,并保留所有权利。

