
- 12018年河北省对口高考计算机专业,2018年河北省普通高职单招考试十类和对口电子电工类、计算机类联考考试时间...
- 2uniapp 微信小程序使用高德地图Vue3不兼容Vue2问题_could not resolve "./amp-wx.130.js
- 3【LeetCode】96. 不同的二叉搜索树【卡特兰数】_卡特兰数 leetcode
- 4层次聚类的介绍_层次聚类优缺点
- 5十进制转十六进制
- 6K8S最新版本集群部署(v1.28) + 容器引擎Docker部署(下)_kubernetes-server-linux-amd64-v1.28.7
- 7第一个OpenHarmony应用程序_怎么新建一个openharmoney app
- 8OpenCV-白平衡(灰度世界算法)_android opencv 白平衡
- 9使用FFmpeg合并MP4视频_ffmpeg 视频 concat
- 10windows + VSCode + cMake + LLVM + clangd_llvm-16.0.0-win64.exe
Spring应用上下文生命周期详解及源码分析,Spring IOC容器启动及关闭过程超详细解释(上)_spring关闭过程
赞
踩
文章目录
- 写在前面
- 一、Spring 应用上下文启动准备阶段-prepareRefresh
- 二、BeanFactory 创建阶段-obtainFreshBeanFactory
- 三、BeanFactory 准备阶段-prepareBeanFactory
- 四、BeanFactory 后置处理阶段1-postProcessBeanFactory
- 五、BeanFactory 后置处理阶段2-invokeBeanFactoryPostProcessors
- 六、BeanFactory 注册 BeanPostProcessor 阶段-registerBeanPostProcessors
- 七、初始化內建 Bean:MessageSource
- 八、初始化內建 Bean:Spring 事件广播器
- 九、Spring 应用上下文刷新阶段-onRefresh
- 十、Spring 事件监听器注册阶段-registerListeners
- 十一、BeanFactory 初始化完成阶段-finishBeanFactoryInitialization
- 十二、Spring 应用上下刷新完成阶段-finishRefresh
- 未完待续
写在前面
Spring应用上下文生命周期详解及源码分析,Spring IOC容器启动及关闭过程超详细解释(上)
Spring应用上下文生命周期详解及源码分析,Spring IOC容器启动及关闭过程超详细解释(下)
书读百遍其义自见,一本书就算是隔几天去读,也会有不同的见解。
两年前,我学习并写了一篇spring系列-注解驱动原理及源码-spring容器创建流程,虽然说也是对IOC创建的流程过了一遍,但是对其中的很多东西都一知半解,可能仅仅达到“知道有这么个东西”的水平。
两年后,再次分析Spring应用上下文的生命周期,或许有着不同层次的见解。
SpringIOC容器启动的经典流程源码:
// org.springframework.context.support.AbstractApplicationContext#refresh
@Override
public void refresh() throws BeansException, IllegalStateException {
	synchronized (this.startupShutdownMonitor) {
		// Prepare this context for refreshing.
		prepareRefresh();

		// Tell the subclass to refresh the internal bean factory.
		ConfigurableListableBeanFactory beanFactory = obtainFreshBeanFactory();

		// Prepare the bean factory for use in this context.
		prepareBeanFactory(beanFactory);

		try {
			// Allows post-processing of the bean factory in context subclasses.
			postProcessBeanFactory(beanFactory);

			// Invoke factory processors registered as beans in the context.
			invokeBeanFactoryPostProcessors(beanFactory);

			// Register bean processors that intercept bean creation.
			registerBeanPostProcessors(beanFactory);

			// Initialize message source for this context.
			initMessageSource();

			// Initialize event multicaster for this context.
			initApplicationEventMulticaster();

			// Initialize other special beans in specific context subclasses.
			onRefresh();

			// Check for listener beans and register them.
			registerListeners();

			// Instantiate all remaining (non-lazy-init) singletons.
			finishBeanFactoryInitialization(beanFactory);

			// Last step: publish corresponding event.
			finishRefresh();
		}

		catch (BeansException ex) {
			if (logger.isWarnEnabled()) {
				logger.warn("Exception encountered during context initialization - " +
						"cancelling refresh attempt: " + ex);
			}

			// Destroy already created singletons to avoid dangling resources.
			destroyBeans();

			// Reset 'active' flag.
			cancelRefresh(ex);

			// Propagate exception to caller.
			throw ex;
		}

		finally {
			// Reset common introspection caches in Spring's core, since we
			// might not ever need metadata for singleton beans anymore...
			resetCommonCaches();
		}
	}
}

- 1
- 2
- 3
- 4
- 5
- 6
- 7
- 8
- 9
- 10
- 11
- 12
- 13
- 14
- 15
- 16
- 17
- 18
- 19
- 20
- 21
- 22
- 23
- 24
- 25
- 26
- 27
- 28
- 29
- 30
- 31
- 32
- 33
- 34
- 35
- 36
- 37
- 38
- 39
- 40
- 41
- 42
- 43
- 44
- 45
- 46
- 47
- 48
- 49
- 50
- 51
- 52
- 53
- 54
- 55
- 56
- 57
- 58
- 59
- 60
- 61
- 62
- 63
- 64
- 65
接下来我们对这个源码进行更加深入的分析和研究。
一、Spring 应用上下文启动准备阶段-prepareRefresh
// org.springframework.context.support.AbstractApplicationContext#prepareRefresh
protected void prepareRefresh() {
	// Switch to active.
	// 设置startupDate为IOC启动的当前系统时间戳
	this.startupDate = System.currentTimeMillis();
	// 将容器的状态标识修改成对应状态
	this.closed.set(false);
	this.active.set(true);

	if (logger.isDebugEnabled()) {
		if (logger.isTraceEnabled()) {
			logger.trace("Refreshing " + this);
		}
		else {
			logger.debug("Refreshing " + getDisplayName());
		}
	}

	// Initialize any placeholder property sources in the context environment.
	// 初始化 PropertySources,默认是空方法(见 1、)
	initPropertySources();

	// Validate that all properties marked as required are resolvable:
	// see ConfigurablePropertyResolver#setRequiredProperties
	// 检验 Environment 中必须属性(见 2、)
	getEnvironment().validateRequiredProperties();

	// Store pre-refresh ApplicationListeners...
	// 初始化事件监听器集合(见3、)
	if (this.earlyApplicationListeners == null) {
		this.earlyApplicationListeners = new LinkedHashSet<>(this.applicationListeners);
	}
	else {
		// Reset local application listeners to pre-refresh state.
		this.applicationListeners.clear();
		this.applicationListeners.addAll(this.earlyApplicationListeners);
	}

	// Allow for the collection of early ApplicationEvents,
	// to be published once the multicaster is available...
	// 初始化早期 Spring 事件集合
	this.earlyApplicationEvents = new LinkedHashSet<>();
}
- 1
- 2
- 3
- 4
- 5
- 6
- 7
- 8
- 9
- 10
- 11
- 12
- 13
- 14
- 15
- 16
- 17
- 18
- 19
- 20
- 21
- 22
- 23
- 24
- 25
- 26
- 27
- 28
- 29
- 30
- 31
- 32
- 33
- 34
- 35
- 36
- 37
- 38
- 39
- 40
- 41
- 42
- 43
1、初始化 PropertySources - initPropertySources()
AbstractApplicationContext中的initPropertySources方法默认是空方法,可以交由子类来自行实现。
AbstractApplicationContext的initPropertySources有三个默认的实现类:AbstractRefreshableWebApplicationContext、GenericWebApplicationContext、StaticWebApplicationContext。这三种实现顾名思义,都是Web实现,需要扩展我们的配置源。
我们来看一下AbstractRefreshableWebApplicationContext的initPropertySources方法:
// org.springframework.web.context.support.AbstractRefreshableWebApplicationContext#initPropertySources
@Override
protected void initPropertySources() {
	// 对Environment提前初始化了(Environment如果为null,就创建一个StandardEnvironment)
	ConfigurableEnvironment env = getEnvironment();
	if (env instanceof ConfigurableWebEnvironment) {
		// 将servletContext和servletConfig放入配置源
		((ConfigurableWebEnvironment) env).initPropertySources(this.servletContext, this.servletConfig);
	}
}
- 1
- 2
- 3
- 4
- 5
- 6
- 7
- 8
- 9
- 10
剩下两个实现类也基本大同小异。
2、检验 Environment 中必须属性-getEnvironment().validateRequiredProperties();
getEnvironment()方法就是获取当前Environment,没有就创建,返回一个ConfigurableEnvironment 。
// org.springframework.context.support.AbstractApplicationContext#getEnvironment
@Override
public ConfigurableEnvironment getEnvironment() {
	if (this.environment == null) {
		this.environment = createEnvironment();
	}
	return this.environment;
}
- 1
- 2
- 3
- 4
- 5
- 6
- 7
- 8
validateRequiredProperties方法是在AbstractEnvironment中实现的:
private final MutablePropertySources propertySources = new MutablePropertySources();
private final ConfigurablePropertyResolver propertyResolver =
		new PropertySourcesPropertyResolver(this.propertySources);


// org.springframework.core.env.AbstractEnvironment#validateRequiredProperties
@Override
public void validateRequiredProperties() throws MissingRequiredPropertiesException {
	this.propertyResolver.validateRequiredProperties();
}
- 1
- 2
- 3
- 4
- 5
- 6
- 7
- 8
- 9
- 10
最终会调用AbstractPropertyResolver的validateRequiredProperties方法,通过预设的必填属性,循环判断哪个属性是不存在的,进行判断。
// 预设必填属性(默认为空)
private final Set<String> requiredProperties = new LinkedHashSet<>();

// org.springframework.core.env.AbstractPropertyResolver#setRequiredProperties
@Override
public void setRequiredProperties(String... requiredProperties) {
	Collections.addAll(this.requiredProperties, requiredProperties);
}
- 1
- 2
- 3
- 4
- 5
- 6
- 7
- 8
// 循环判断预设必填属性是否存在
// org.springframework.core.env.AbstractPropertyResolver#validateRequiredProperties
@Override
public void validateRequiredProperties() {
	MissingRequiredPropertiesException ex = new MissingRequiredPropertiesException();
	for (String key : this.requiredProperties) {
		if (this.getProperty(key) == null) {
			ex.addMissingRequiredProperty(key);
		}
	}
	if (!ex.getMissingRequiredProperties().isEmpty()) {
		throw ex;
	}
}
- 1
- 2
- 3
- 4
- 5
- 6
- 7
- 8
- 9
- 10
- 11
- 12
- 13
- 14
3、初始化早期事件、监听器集合
关于Spring事件请移步:
Spring事件详解,Spring-Event源码详解,一文搞透Spring事件管理
这里初始化事件集合、事件监听集合,以备后续处理。
earlyApplicationListeners用于处理一些早期事件,上面关于Spring事件文章中有提到,当事件监听器还未初始化时产生的时间,会暂存在earlyApplicationListeners中,等到事件监听器初始化完成后统一处理。
二、BeanFactory 创建阶段-obtainFreshBeanFactory
// org.springframework.context.support.AbstractApplicationContext#obtainFreshBeanFactory
protected ConfigurableListableBeanFactory obtainFreshBeanFactory() {
	// 刷新 Spring 应用上下文底层 BeanFactory (见 1、)
	refreshBeanFactory();
	// 返回 Spring 应用上下文底层 BeanFactory (见 2、)
	return getBeanFactory();
}
- 1
- 2
- 3
- 4
- 5
- 6
- 7
1、刷新 Spring 应用上下文底层 BeanFactory
refreshBeanFactory方法实际上在AbstractApplicationContext是没有实现的,在AbstractRefreshableApplicationContext中有该方法的实现。
// org.springframework.context.support.AbstractRefreshableApplicationContext#refreshBeanFactory
@Override
protected final void refreshBeanFactory() throws BeansException {
	// 如果已经关联了BeanFactory,需要将Bean销毁、或关闭 BeanFactory
	if (hasBeanFactory()) {
		destroyBeans();
		closeBeanFactory();
	}
	try {
		// 创建BeanFactory,默认实现为DefaultListableBeanFactory,这里会有个设置parent的过程(见(1))
		DefaultListableBeanFactory beanFactory = createBeanFactory();
		// 设置 BeanFactory Id,唯一id,就是ApplicationContext自己的id
		beanFactory.setSerializationId(getId());
		// 设置“是否允许 BeanDefinition 重复定义”、设置“是否允许循环引用(依赖)”(见(2))
		customizeBeanFactory(beanFactory);
		// 加载 BeanDefinition(见(3))
		loadBeanDefinitions(beanFactory);
		// 关联新建 BeanFactory 到 Spring 应用上下文
		synchronized (this.beanFactoryMonitor) {
			this.beanFactory = beanFactory;
		}
	}
	catch (IOException ex) {
		throw new ApplicationContextException("I/O error parsing bean definition source for " + getDisplayName(), ex);
	}
}
- 1
- 2
- 3
- 4
- 5
- 6
- 7
- 8
- 9
- 10
- 11
- 12
- 13
- 14
- 15
- 16
- 17
- 18
- 19
- 20
- 21
- 22
- 23
- 24
- 25
- 26
(1)createBeanFactory
这里new了一个DefaultListableBeanFactory。
// org.springframework.context.support.AbstractRefreshableApplicationContext#createBeanFactory
protected DefaultListableBeanFactory createBeanFactory() {
	return new DefaultListableBeanFactory(getInternalParentBeanFactory());
}
- 1
- 2
- 3
- 4
getInternalParentBeanFactory就是获取父的BeanFactory:
// org.springframework.context.support.AbstractApplicationContext#getInternalParentBeanFactory
@Nullable
protected BeanFactory getInternalParentBeanFactory() {
	return (getParent() instanceof ConfigurableApplicationContext ?
			((ConfigurableApplicationContext) getParent()).getBeanFactory() : getParent());
}
- 1
- 2
- 3
- 4
- 5
- 6
构造方法传参我们一步一步照上去,就是设置了一个parent的BeanFactory。
public DefaultListableBeanFactory(@Nullable BeanFactory parentBeanFactory) {
	super(parentBeanFactory);
}

public AbstractAutowireCapableBeanFactory(@Nullable BeanFactory parentBeanFactory) {
	this();
	setParentBeanFactory(parentBeanFactory);
}

// org.springframework.beans.factory.support.AbstractBeanFactory#setParentBeanFactory
@Override
public void setParentBeanFactory(@Nullable BeanFactory parentBeanFactory) {
	if (this.parentBeanFactory != null && this.parentBeanFactory != parentBeanFactory) {
		throw new IllegalStateException("Already associated with parent BeanFactory: " + this.parentBeanFactory);
	}
	this.parentBeanFactory = parentBeanFactory;
}
- 1
- 2
- 3
- 4
- 5
- 6
- 7
- 8
- 9
- 10
- 11
- 12
- 13
- 14
- 15
- 16
- 17
(2)设置“是否允许 BeanDefinition 重复定义”、设置“是否允许循环引用(依赖)”
这里只是改了一个状态(如果有的话),是Boolean类型,用于后续判断。
这两个标识默认就是true。
// org.springframework.context.support.AbstractRefreshableApplicationContext#customizeBeanFactory
protected void customizeBeanFactory(DefaultListableBeanFactory beanFactory) {
	// 设置是否允许BeanDefinition的重复定义
	if (this.allowBeanDefinitionOverriding != null) {
		beanFactory.setAllowBeanDefinitionOverriding(this.allowBeanDefinitionOverriding);
	}
	if (this.allowCircularReferences != null) {
		// 设置是否允许循环引用
		beanFactory.setAllowCircularReferences(this.allowCircularReferences);
	}
}
- 1
- 2
- 3
- 4
- 5
- 6
- 7
- 8
- 9
- 10
- 11
(3)加载 BeanDefinition
loadBeanDefinitions方法在AbstractRefreshableApplicationContext类中并没有实现,在其子类实现中是存在差异的。
默认有四个实现,AbstractXmlApplicationContext、AnnotationConfigWebApplicationContext、GroovyWebApplicationContext、XmlWebApplicationContext,顾名思义,对应着不同的实现方式。
比如说我们看一下AbstractXmlApplicationContext的实现,读取xml、解析、注册加载BeanDefinition等操作:
// org.springframework.context.support.AbstractXmlApplicationContext#loadBeanDefinitions(org.springframework.beans.factory.support.DefaultListableBeanFactory)
@Override
protected void loadBeanDefinitions(DefaultListableBeanFactory beanFactory) throws BeansException, IOException {
	// Create a new XmlBeanDefinitionReader for the given BeanFactory.
	XmlBeanDefinitionReader beanDefinitionReader = new XmlBeanDefinitionReader(beanFactory);

	// Configure the bean definition reader with this context's
	// resource loading environment.
	beanDefinitionReader.setEnvironment(this.getEnvironment());
	beanDefinitionReader.setResourceLoader(this);
	beanDefinitionReader.setEntityResolver(new ResourceEntityResolver(this));

	// Allow a subclass to provide custom initialization of the reader,
	// then proceed with actually loading the bean definitions.
	initBeanDefinitionReader(beanDefinitionReader);
	loadBeanDefinitions(beanDefinitionReader);
}
- 1
- 2
- 3
- 4
- 5
- 6
- 7
- 8
- 9
- 10
- 11
- 12
- 13
- 14
- 15
- 16
- 17
AnnotationConfigWebApplicationContext负责加载注解驱动、web应用注册的BeanDefinition,它的实现与xml、groovy的差别较大,因为不需要读取配置文件了:
// org.springframework.web.context.support.AnnotationConfigWebApplicationContext#loadBeanDefinitions
@Override
protected void loadBeanDefinitions(DefaultListableBeanFactory beanFactory) {
	AnnotatedBeanDefinitionReader reader = getAnnotatedBeanDefinitionReader(beanFactory);
	ClassPathBeanDefinitionScanner scanner = getClassPathBeanDefinitionScanner(beanFactory);

	// 注册Bean命名器
	BeanNameGenerator beanNameGenerator = getBeanNameGenerator();
	if (beanNameGenerator != null) {
		reader.setBeanNameGenerator(beanNameGenerator);
		scanner.setBeanNameGenerator(beanNameGenerator);
		beanFactory.registerSingleton(AnnotationConfigUtils.CONFIGURATION_BEAN_NAME_GENERATOR, beanNameGenerator);
	}

	// 注册ScopeMetadata的解析器
	ScopeMetadataResolver scopeMetadataResolver = getScopeMetadataResolver();
	if (scopeMetadataResolver != null) {
		reader.setScopeMetadataResolver(scopeMetadataResolver);
		scanner.setScopeMetadataResolver(scopeMetadataResolver);
	}

	if (!this.componentClasses.isEmpty()) {
		if (logger.isDebugEnabled()) {
			logger.debug("Registering component classes: [" +
					StringUtils.collectionToCommaDelimitedString(this.componentClasses) + "]");
		}
		reader.register(ClassUtils.toClassArray(this.componentClasses));
	}

	if (!this.basePackages.isEmpty()) {
		if (logger.isDebugEnabled()) {
			logger.debug("Scanning base packages: [" +
					StringUtils.collectionToCommaDelimitedString(this.basePackages) + "]");
		}
		// 扫描所有的Component
		scanner.scan(StringUtils.toStringArray(this.basePackages));
	}

	String[] configLocations = getConfigLocations();
	if (configLocations != null) {
		for (String configLocation : configLocations) {
			try {
				Class<?> clazz = ClassUtils.forName(configLocation, getClassLoader());
				if (logger.isTraceEnabled()) {
					logger.trace("Registering [" + configLocation + "]");
				}
				reader.register(clazz);
			}
			catch (ClassNotFoundException ex) {
				if (logger.isTraceEnabled()) {
					logger.trace("Could not load class for config location [" + configLocation +
							"] - trying package scan. " + ex);
				}
				int count = scanner.scan(configLocation);
				if (count == 0 && logger.isDebugEnabled()) {
					logger.debug("No component classes found for specified class/package [" + configLocation + "]");
				}
			}
		}
	}
}
- 1
- 2
- 3
- 4
- 5
- 6
- 7
- 8
- 9
- 10
- 11
- 12
- 13
- 14
- 15
- 16
- 17
- 18
- 19
- 20
- 21
- 22
- 23
- 24
- 25
- 26
- 27
- 28
- 29
- 30
- 31
- 32
- 33
- 34
- 35
- 36
- 37
- 38
- 39
- 40
- 41
- 42
- 43
- 44
- 45
- 46
- 47
- 48
- 49
- 50
- 51
- 52
- 53
- 54
- 55
- 56
- 57
- 58
- 59
- 60
- 61
2、返回 Spring 应用上下文底层 BeanFactory
getBeanFactory方法默认在AbstractApplicationContext是没有实现的,在AbstractRefreshableApplicationContext有其实现:
// org.springframework.context.support.AbstractRefreshableApplicationContext#getBeanFactory
@Override
public final ConfigurableListableBeanFactory getBeanFactory() {
	synchronized (this.beanFactoryMonitor) {
		if (this.beanFactory == null) {
			throw new IllegalStateException("BeanFactory not initialized or already closed - " +
					"call 'refresh' before accessing beans via the ApplicationContext");
		}
		return this.beanFactory;
	}
}
- 1
- 2
- 3
- 4
- 5
- 6
- 7
- 8
- 9
- 10
- 11
- 12
三、BeanFactory 准备阶段-prepareBeanFactory
// org.springframework.context.support.AbstractApplicationContext#prepareBeanFactory
protected void prepareBeanFactory(ConfigurableListableBeanFactory beanFactory) {
	// Tell the internal bean factory to use the context's class loader etc.
	// 关联ClassLoader,用于加载Class(见 1、)
	beanFactory.setBeanClassLoader(getClassLoader());
	// 设置 Bean 表达式处理器,和SpringEL表达式密切相关
	beanFactory.setBeanExpressionResolver(new StandardBeanExpressionResolver(beanFactory.getBeanClassLoader()));
	// 添加 PropertyEditorRegistrar 实现 - ResourceEditorRegistrar,类型转换相关
	beanFactory.addPropertyEditorRegistrar(new ResourceEditorRegistrar(this, getEnvironment()));

	// Configure the bean factory with context callbacks.
	// 添加 Aware 回调接口 BeanPostProcessor 实现(见 2、)
	beanFactory.addBeanPostProcessor(new ApplicationContextAwareProcessor(this));
	// 忽略 Aware 回调接口作为依赖注入接口,在ApplicationContextAwareProcessor已经自动注入了
	beanFactory.ignoreDependencyInterface(EnvironmentAware.class);
	beanFactory.ignoreDependencyInterface(EmbeddedValueResolverAware.class);
	beanFactory.ignoreDependencyInterface(ResourceLoaderAware.class);
	beanFactory.ignoreDependencyInterface(ApplicationEventPublisherAware.class);
	beanFactory.ignoreDependencyInterface(MessageSourceAware.class);
	beanFactory.ignoreDependencyInterface(ApplicationContextAware.class);

	// BeanFactory interface not registered as resolvable type in a plain factory.
	// MessageSource registered (and found for autowiring) as a bean.
	// 注册 ResolvableDependency 内建对象 - BeanFactory、ResourceLoader、ApplicationEventPublisher 以及ApplicationContext(见 3、)
	beanFactory.registerResolvableDependency(BeanFactory.class, beanFactory);
	beanFactory.registerResolvableDependency(ResourceLoader.class, this);
	beanFactory.registerResolvableDependency(ApplicationEventPublisher.class, this);
	beanFactory.registerResolvableDependency(ApplicationContext.class, this);

	// Register early post-processor for detecting inner beans as ApplicationListeners.
	// 注册 ApplicationListenerDetector 对象,用于处理ApplicationListener的单例对象(见 4、)
	beanFactory.addBeanPostProcessor(new ApplicationListenerDetector(this));

	// Detect a LoadTimeWeaver and prepare for weaving, if found.
	if (beanFactory.containsBean(LOAD_TIME_WEAVER_BEAN_NAME)) {
		// 注册注册 LoadTimeWeaverAwareProcessor 对象,AOP相关,编译时的ASpecJ支持。
		beanFactory.addBeanPostProcessor(new LoadTimeWeaverAwareProcessor(beanFactory));
		// Set a temporary ClassLoader for type matching.
		beanFactory.setTempClassLoader(new ContextTypeMatchClassLoader(beanFactory.getBeanClassLoader()));
	}

	// Register default environment beans.
	// 注册单例对象 - Environment、Java System Properties 以及 OS 环境变量
	if (!beanFactory.containsLocalBean(ENVIRONMENT_BEAN_NAME)) {
		beanFactory.registerSingleton(ENVIRONMENT_BEAN_NAME, getEnvironment());
	}
	if (!beanFactory.containsLocalBean(SYSTEM_PROPERTIES_BEAN_NAME)) {
		beanFactory.registerSingleton(SYSTEM_PROPERTIES_BEAN_NAME, getEnvironment().getSystemProperties());
	}
	if (!beanFactory.containsLocalBean(SYSTEM_ENVIRONMENT_BEAN_NAME)) {
		beanFactory.registerSingleton(SYSTEM_ENVIRONMENT_BEAN_NAME, getEnvironment().getSystemEnvironment());
	}
}
- 1
- 2
- 3
- 4
- 5
- 6
- 7
- 8
- 9
- 10
- 11
- 12
- 13
- 14
- 15
- 16
- 17
- 18
- 19
- 20
- 21
- 22
- 23
- 24
- 25
- 26
- 27
- 28
- 29
- 30
- 31
- 32
- 33
- 34
- 35
- 36
- 37
- 38
- 39
- 40
- 41
- 42
- 43
- 44
- 45
- 46
- 47
- 48
- 49
- 50
- 51
- 52
- 53
1、关联ClassLoader
通过XML等配置,我们只能获取类的全限定名,需要通过ClassLoader进行加载。
这个ClassLoader其实是可以通过API设置,如果不设置才用默认的ClassLoader,这个ClassLoader是可以替换的,基于这个可以实现类隔离这样一种隔离机制,来实现一些特殊需求。
// org.springframework.core.io.DefaultResourceLoader#getClassLoader
@Override
@Nullable
public ClassLoader getClassLoader() {
	return (this.classLoader != null ? this.classLoader : ClassUtils.getDefaultClassLoader());
}
- 1
- 2
- 3
- 4
- 5
- 6
2、添加 Aware 回调接口 BeanPostProcessor 实现
ApplicationContextAwareProcessor的postProcessBeforeInitialization方法,实现了对EnvironmentAware、EmbeddedValueResolverAware、ResourceLoaderAware、ApplicationEventPublisherAware、MessageSourceAware、ApplicationContextAware接口的set方法回调。
// org.springframework.context.support.ApplicationContextAwareProcessor#invokeAwareInterfaces
private void invokeAwareInterfaces(Object bean) {
	if (bean instanceof EnvironmentAware) {
		((EnvironmentAware) bean).setEnvironment(this.applicationContext.getEnvironment());
	}
	if (bean instanceof EmbeddedValueResolverAware) {
		((EmbeddedValueResolverAware) bean).setEmbeddedValueResolver(this.embeddedValueResolver);
	}
	if (bean instanceof ResourceLoaderAware) {
		((ResourceLoaderAware) bean).setResourceLoader(this.applicationContext);
	}
	if (bean instanceof ApplicationEventPublisherAware) {
		((ApplicationEventPublisherAware) bean).setApplicationEventPublisher(this.applicationContext);
	}
	if (bean instanceof MessageSourceAware) {
		((MessageSourceAware) bean).setMessageSource(this.applicationContext);
	}
	if (bean instanceof ApplicationContextAware) {
		((ApplicationContextAware) bean).setApplicationContext(this.applicationContext);
	}
}
- 1
- 2
- 3
- 4
- 5
- 6
- 7
- 8
- 9
- 10
- 11
- 12
- 13
- 14
- 15
- 16
- 17
- 18
- 19
- 20
- 21
这也是为什么后面忽略了 Aware 回调接口作为依赖注入接口,因为Aware接口只有一个set方法,此处已经处理过了。
关于Aware接口回调请移步:
Spring Bean生命周期——从源码角度详解Spring Bean的生命周期(下)
3、注册 ResolvableDependency 对象
外部化配置的单体对象其实有两种注册方式,一种是SingletonBeanRegistry的registerSingleton(String beanName, Object singletonObject);方法注册的,需要传入一个bean的名称,一个对象,这个对象可以是同一种Class类型,但是必须是不同的名字。
ResolvableDependency 对象的注册只能靠beanFactory.registerResolvableDependency(ApplicationEventPublisher.class, this);的方式,一种Class类型只能对应一个对象,一般用于复杂的对象。
关于ResolvableDependency 对象请移步:
SpringIOC容器的依赖来源都有哪些?这次一起捋清楚~
4、注册 ApplicationListenerDetector 对象
从源码我们可以发现,注册的ApplicationListenerDetector通过构造器将当前的ApplicationContext传入了,这为ApplicationListenerDetector提供了依赖查找的功能。
ApplicationListenerDetector实现了DestructionAwareBeanPostProcessor, MergedBeanDefinitionPostProcessor。
在Bean的Merge之后做了处理,将ApplicationListener的Bean的名称放到集合中。
关于Bean的合并,请移步:Spring Bean生命周期——从源码角度详解Spring Bean的生命周期(上)
// org.springframework.context.support.ApplicationListenerDetector#postProcessMergedBeanDefinition
@Override
public void postProcessMergedBeanDefinition(RootBeanDefinition beanDefinition, Class<?> beanType, String beanName) {
	if (ApplicationListener.class.isAssignableFrom(beanType)) {
		this.singletonNames.put(beanName, beanDefinition.isSingleton());
	}
}
- 1
- 2
- 3
- 4
- 5
- 6
- 7
在Bean的初始化后阶段进行的操作如下:
关于Bean的初始化阶段生命周期请移步:Spring Bean生命周期——从源码角度详解Spring Bean的生命周期(下)
// org.springframework.context.support.ApplicationListenerDetector#postProcessAfterInitialization
@Override
public Object postProcessAfterInitialization(Object bean, String beanName) {
	if (bean instanceof ApplicationListener) { // 判断是否是ApplicationListener
		// potentially not detected as a listener by getBeanNamesForType retrieval
		Boolean flag = this.singletonNames.get(beanName);
		if (Boolean.TRUE.equals(flag)) { // 单例,增加到应用上下文中
			// singleton bean (top-level or inner): register on the fly
			this.applicationContext.addApplicationListener((ApplicationListener<?>) bean);
		}
		else if (Boolean.FALSE.equals(flag)) {
			if (logger.isWarnEnabled() && !this.applicationContext.containsBean(beanName)) {
				// inner bean with other scope - can't reliably process events
				logger.warn("Inner bean '" + beanName + "' implements ApplicationListener interface " +
						"but is not reachable for event multicasting by its containing ApplicationContext " +
						"because it does not have singleton scope. Only top-level listener beans are allowed " +
						"to be of non-singleton scope.");
			}
			// 不是单例全部删掉
			this.singletonNames.remove(beanName);
		}
	}
	return bean;
}
- 1
- 2
- 3
- 4
- 5
- 6
- 7
- 8
- 9
- 10
- 11
- 12
- 13
- 14
- 15
- 16
- 17
- 18
- 19
- 20
- 21
- 22
- 23
- 24
在Bean的销毁阶段,移除监听器:
关于Bean的初始化阶段生命周期请移步:Spring Bean生命周期——从源码角度详解Spring Bean的生命周期(下)
// org.springframework.context.support.ApplicationListenerDetector#postProcessBeforeDestruction
@Override
public void postProcessBeforeDestruction(Object bean, String beanName) {
	if (bean instanceof ApplicationListener) {
		try {
			ApplicationEventMulticaster multicaster = this.applicationContext.getApplicationEventMulticaster();
			multicaster.removeApplicationListener((ApplicationListener<?>) bean);
			multicaster.removeApplicationListenerBean(beanName);
		}
		catch (IllegalStateException ex) {
			// ApplicationEventMulticaster not initialized yet - no need to remove a listener
		}
	}
}
- 1
- 2
- 3
- 4
- 5
- 6
- 7
- 8
- 9
- 10
- 11
- 12
- 13
- 14
四、BeanFactory 后置处理阶段1-postProcessBeanFactory
AbstractApplicationContext的postProcessBeanFactory方法是一个空方法,交由子类来进行实现。
// org.springframework.context.support.AbstractApplicationContext#postProcessBeanFactory
protected void postProcessBeanFactory(ConfigurableListableBeanFactory beanFactory) {
}
- 1
- 2
- 3
1、举例:SpringBoot该方法的一个实现-AnnotationConfigServletWebApplicationContext
// org.springframework.boot.web.servlet.context.AnnotationConfigServletWebApplicationContext#postProcessBeanFactory
@Override
protected void postProcessBeanFactory(ConfigurableListableBeanFactory beanFactory) {
	super.postProcessBeanFactory(beanFactory);
	// 基于注解的方式扫描包路径
	if (!ObjectUtils.isEmpty(this.basePackages)) {
		this.scanner.scan(this.basePackages);
	}
	// 基于AnnotatedBeanDefinitionReader进行注册的类进行注册
	if (!this.annotatedClasses.isEmpty()) {
		this.reader.register(ClassUtils.toClassArray(this.annotatedClasses));
	}
}
- 1
- 2
- 3
- 4
- 5
- 6
- 7
- 8
- 9
- 10
- 11
- 12
- 13
该方法调用了父类的一个方法:
// org.springframework.web.context.support.GenericWebApplicationContext#postProcessBeanFactory
@Override
protected void postProcessBeanFactory(ConfigurableListableBeanFactory beanFactory) {
	if (this.servletContext != null) {
		// 增加Aware回调,并忽略该接口
		beanFactory.addBeanPostProcessor(new ServletContextAwareProcessor(this.servletContext));
		beanFactory.ignoreDependencyInterface(ServletContextAware.class);
	}
	// 设置request、session的Scope
	WebApplicationContextUtils.registerWebApplicationScopes(beanFactory, this.servletContext);
	// 注册servlet环境相关的servletContext、servletConfig及一些参数
	WebApplicationContextUtils.registerEnvironmentBeans(beanFactory, this.servletContext);
}
- 1
- 2
- 3
- 4
- 5
- 6
- 7
- 8
- 9
- 10
- 11
- 12
- 13
实际上,Reactive不同于Servlet,它是没有GenericWebApplicationContext的postProcessBeanFactory中这些逻辑的。
2、分析
postProcessBeanFactory方法其实是通过子类继承的方式来进行扩展的,这并不是最优选择,最优的是下面的invokeBeanFactoryPostProcessors方法,是通过组合的方式进行扩展,毕竟组合优于继承。
五、BeanFactory 后置处理阶段2-invokeBeanFactoryPostProcessors
该方式是组合的方式,扩展性更高。
// org.springframework.context.support.AbstractApplicationContext#invokeBeanFactoryPostProcessors
protected void invokeBeanFactoryPostProcessors(ConfigurableListableBeanFactory beanFactory) {
	// Spring 4.0新增,调用 BeanFactoryPostProcessor 或 BeanDefinitionRegistry 后置处理方法(见 1、)
	PostProcessorRegistrationDelegate.invokeBeanFactoryPostProcessors(beanFactory, getBeanFactoryPostProcessors());

	// Detect a LoadTimeWeaver and prepare for weaving, if found in the meantime
	// (e.g. through an @Bean method registered by ConfigurationClassPostProcessor)
	// 注册 LoadTimeWeaverAwareProcessor 对象
	if (beanFactory.getTempClassLoader() == null && beanFactory.containsBean(LOAD_TIME_WEAVER_BEAN_NAME)) {
		beanFactory.addBeanPostProcessor(new LoadTimeWeaverAwareProcessor(beanFactory));
		beanFactory.setTempClassLoader(new ContextTypeMatchClassLoader(beanFactory.getBeanClassLoader()));
	}
}
- 1
- 2
- 3
- 4
- 5
- 6
- 7
- 8
- 9
- 10
- 11
- 12
- 13
1、PostProcessorRegistrationDelegate的invokeBeanFactoryPostProcessors方法
首先我们注意方法参数,第一个参数是传入beanFactory可能是用于依赖查找等操作。第二个参数调用了getBeanFactoryPostProcessors(),我们看一下该方法:
// org.springframework.context.support.AbstractApplicationContext#getBeanFactoryPostProcessors
public List<BeanFactoryPostProcessor> getBeanFactoryPostProcessors() {
	return this.beanFactoryPostProcessors;
}
- 1
- 2
- 3
- 4
getBeanFactoryPostProcessors()方法返回在Application已经注册好的BeanFactoryPostProcessor。
这个BeanFactoryPostProcessor的集合,Spring默认并不会添加,而是提供了一个addBeanFactoryPostProcessor方法可以手动添加BeanFactoryPostProcessor进行扩展:
// org.springframework.context.support.AbstractApplicationContext#addBeanFactoryPostProcessor
@Override
public void addBeanFactoryPostProcessor(BeanFactoryPostProcessor postProcessor) {
	Assert.notNull(postProcessor, "BeanFactoryPostProcessor must not be null");
	this.beanFactoryPostProcessors.add(postProcessor);
}
- 1
- 2
- 3
- 4
- 5
- 6
此时我们进去PostProcessorRegistrationDelegate的invokeBeanFactoryPostProcessors方法进行分析:
// org.springframework.context.support.PostProcessorRegistrationDelegate#invokeBeanFactoryPostProcessors(org.springframework.beans.factory.config.ConfigurableListableBeanFactory, java.util.List<org.springframework.beans.factory.config.BeanFactoryPostProcessor>)
public static void invokeBeanFactoryPostProcessors(
		ConfigurableListableBeanFactory beanFactory, List<BeanFactoryPostProcessor> beanFactoryPostProcessors) {

	// Invoke BeanDefinitionRegistryPostProcessors first, if any.
	Set<String> processedBeans = new HashSet<>();

	// 如果beanFactory 是BeanDefinitionRegistry
	if (beanFactory instanceof BeanDefinitionRegistry) {
		BeanDefinitionRegistry registry = (BeanDefinitionRegistry) beanFactory;
		// 用于存储BeanDefinitionRegistryPostProcessor和BeanFactoryPostProcessor
		List<BeanFactoryPostProcessor> regularPostProcessors = new ArrayList<>();
		List<BeanDefinitionRegistryPostProcessor> registryProcessors = new ArrayList<>();

		for (BeanFactoryPostProcessor postProcessor : beanFactoryPostProcessors) {
			// 先执行BeanDefinitionRegistryPostProcessor的postProcessBeanDefinitionRegistry方法
			if (postProcessor instanceof BeanDefinitionRegistryPostProcessor) {
				BeanDefinitionRegistryPostProcessor registryProcessor =
						(BeanDefinitionRegistryPostProcessor) postProcessor;
				registryProcessor.postProcessBeanDefinitionRegistry(registry);
				registryProcessors.add(registryProcessor); // 临时存储
			}
			else {
				regularPostProcessors.add(postProcessor); // 临时存储
			}
		}

		// Do not initialize FactoryBeans here: We need to leave all regular beans
		// uninitialized to let the bean factory post-processors apply to them!
		// Separate between BeanDefinitionRegistryPostProcessors that implement
		// PriorityOrdered, Ordered, and the rest.
		// 通过bean查找BeanDefinitionRegistryPostProcessor,并排序
		List<BeanDefinitionRegistryPostProcessor> currentRegistryProcessors = new ArrayList<>();

		// First, invoke the BeanDefinitionRegistryPostProcessors that implement PriorityOrdered.
		// 先处理实现了PriorityOrdered的
		String[] postProcessorNames =
				beanFactory.getBeanNamesForType(BeanDefinitionRegistryPostProcessor.class, true, false);
		for (String ppName : postProcessorNames) {
			if (beanFactory.isTypeMatch(ppName, PriorityOrdered.class)) {
				currentRegistryProcessors.add(beanFactory.getBean(ppName, BeanDefinitionRegistryPostProcessor.class));
				processedBeans.add(ppName);
			}
		}
		// 排序
		sortPostProcessors(currentRegistryProcessors, beanFactory);
		registryProcessors.addAll(currentRegistryProcessors);
		// 调用postProcessBeanDefinitionRegistry方法
		invokeBeanDefinitionRegistryPostProcessors(currentRegistryProcessors, registry);
		currentRegistryProcessors.clear();

		// Next, invoke the BeanDefinitionRegistryPostProcessors that implement Ordered.
		// 再处理实现了Ordered的
		postProcessorNames = beanFactory.getBeanNamesForType(BeanDefinitionRegistryPostProcessor.class, true, false);
		for (String ppName : postProcessorNames) {
			if (!processedBeans.contains(ppName) && beanFactory.isTypeMatch(ppName, Ordered.class)) {
				currentRegistryProcessors.add(beanFactory.getBean(ppName, BeanDefinitionRegistryPostProcessor.class));
				processedBeans.add(ppName);
			}
		}
		sortPostProcessors(currentRegistryProcessors, beanFactory);
		registryProcessors.addAll(currentRegistryProcessors);
		invokeBeanDefinitionRegistryPostProcessors(currentRegistryProcessors, registry);
		currentRegistryProcessors.clear();

		// Finally, invoke all other BeanDefinitionRegistryPostProcessors until no further ones appear.
		// 最后处理剩下的,有多层次的递归
		boolean reiterate = true;
		while (reiterate) {
			reiterate = false;
			postProcessorNames = beanFactory.getBeanNamesForType(BeanDefinitionRegistryPostProcessor.class, true, false);
			for (String ppName : postProcessorNames) {
				if (!processedBeans.contains(ppName)) {
					currentRegistryProcessors.add(beanFactory.getBean(ppName, BeanDefinitionRegistryPostProcessor.class));
					processedBeans.add(ppName);
					reiterate = true;
				}
			}
			sortPostProcessors(currentRegistryProcessors, beanFactory);
			registryProcessors.addAll(currentRegistryProcessors);
			invokeBeanDefinitionRegistryPostProcessors(currentRegistryProcessors, registry);
			currentRegistryProcessors.clear();
		}

		// Now, invoke the postProcessBeanFactory callback of all processors handled so far.
		// 调用BeanFactoryPostProcessor的postProcessBeanFactory方法
		invokeBeanFactoryPostProcessors(registryProcessors, beanFactory);
		invokeBeanFactoryPostProcessors(regularPostProcessors, beanFactory);
	}

	else {// 如果beanFactory 不是BeanDefinitionRegistry,不会处理BeanDefinitionRegistryPostProcessor接口。
		// Invoke factory processors registered with the context instance.
		invokeBeanFactoryPostProcessors(beanFactoryPostProcessors, beanFactory);
	}

	// 如果没有初始化beanFactory,也会进行处理,处理方式同上
	// Do not initialize FactoryBeans here: We need to leave all regular beans
	// uninitialized to let the bean factory post-processors apply to them!
	String[] postProcessorNames =
			beanFactory.getBeanNamesForType(BeanFactoryPostProcessor.class, true, false);

	// Separate between BeanFactoryPostProcessors that implement PriorityOrdered,
	// Ordered, and the rest.
	List<BeanFactoryPostProcessor> priorityOrderedPostProcessors = new ArrayList<>();
	List<String> orderedPostProcessorNames = new ArrayList<>();
	List<String> nonOrderedPostProcessorNames = new ArrayList<>();
	for (String ppName : postProcessorNames) {
		if (processedBeans.contains(ppName)) {
			// skip - already processed in first phase above
		}
		else if (beanFactory.isTypeMatch(ppName, PriorityOrdered.class)) {
			priorityOrderedPostProcessors.add(beanFactory.getBean(ppName, BeanFactoryPostProcessor.class));
		}
		else if (beanFactory.isTypeMatch(ppName, Ordered.class)) {
			orderedPostProcessorNames.add(ppName);
		}
		else {
			nonOrderedPostProcessorNames.add(ppName);
		}
	}

	// First, invoke the BeanFactoryPostProcessors that implement PriorityOrdered.
	sortPostProcessors(priorityOrderedPostProcessors, beanFactory);
	invokeBeanFactoryPostProcessors(priorityOrderedPostProcessors, beanFactory);

	// Next, invoke the BeanFactoryPostProcessors that implement Ordered.
	List<BeanFactoryPostProcessor> orderedPostProcessors = new ArrayList<>(orderedPostProcessorNames.size());
	for (String postProcessorName : orderedPostProcessorNames) {
		orderedPostProcessors.add(beanFactory.getBean(postProcessorName, BeanFactoryPostProcessor.class));
	}
	sortPostProcessors(orderedPostProcessors, beanFactory);
	invokeBeanFactoryPostProcessors(orderedPostProcessors, beanFactory);

	// Finally, invoke all other BeanFactoryPostProcessors.
	List<BeanFactoryPostProcessor> nonOrderedPostProcessors = new ArrayList<>(nonOrderedPostProcessorNames.size());
	for (String postProcessorName : nonOrderedPostProcessorNames) {
		nonOrderedPostProcessors.add(beanFactory.getBean(postProcessorName, BeanFactoryPostProcessor.class));
	}
	invokeBeanFactoryPostProcessors(nonOrderedPostProcessors, beanFactory);

	// Clear cached merged bean definitions since the post-processors might have
	// modified the original metadata, e.g. replacing placeholders in values...
	beanFactory.clearMetadataCache();
}
- 1
- 2
- 3
- 4
- 5
- 6
- 7
- 8
- 9
- 10
- 11
- 12
- 13
- 14
- 15
- 16
- 17
- 18
- 19
- 20
- 21
- 22
- 23
- 24
- 25
- 26
- 27
- 28
- 29
- 30
- 31
- 32
- 33
- 34
- 35
- 36
- 37
- 38
- 39
- 40
- 41
- 42
- 43
- 44
- 45
- 46
- 47
- 48
- 49
- 50
- 51
- 52
- 53
- 54
- 55
- 56
- 57
- 58
- 59
- 60
- 61
- 62
- 63
- 64
- 65
- 66
- 67
- 68
- 69
- 70
- 71
- 72
- 73
- 74
- 75
- 76
- 77
- 78
- 79
- 80
- 81
- 82
- 83
- 84
- 85
- 86
- 87
- 88
- 89
- 90
- 91
- 92
- 93
- 94
- 95
- 96
- 97
- 98
- 99
- 100
- 101
- 102
- 103
- 104
- 105
- 106
- 107
- 108
- 109
- 110
- 111
- 112
- 113
- 114
- 115
- 116
- 117
- 118
- 119
- 120
- 121
- 122
- 123
- 124
- 125
- 126
- 127
- 128
- 129
- 130
- 131
- 132
- 133
- 134
- 135
- 136
- 137
- 138
- 139
- 140
- 141
- 142
- 143
- 144
(1)BeanFactoryPostProcessor和BeanDefinitionRegistryPostProcessor
BeanDefinitionRegistryPostProcessor接口继承了BeanFactoryPostProcessor接口。
BeanDefinitionRegistryPostProcessor接口:
public interface BeanDefinitionRegistryPostProcessor extends BeanFactoryPostProcessor {

	void postProcessBeanDefinitionRegistry(BeanDefinitionRegistry registry) throws BeansException;
}
- 1
- 2
- 3
- 4
BeanFactoryPostProcessor接口:
@FunctionalInterface
public interface BeanFactoryPostProcessor {

	void postProcessBeanFactory(ConfigurableListableBeanFactory beanFactory) throws BeansException;
}
- 1
- 2
- 3
- 4
- 5
由上面的源码我们可以分析出,当一个BeanFactoryPostProcessor进行处理时,是先调用的postProcessBeanDefinitionRegistry方法而后才调用的postProcessBeanFactory方法。
(2)总结PostProcessorRegistrationDelegate的invokeBeanFactoryPostProcessors方法
1.处理当前上下文的BeanDefinitionRegistryPostProcessor,执行postProcessBeanDefinitionRegistry(BeanDefinitionRegistry registry) 方法。
2.处理beanFactory中的BeanDefinitionRegistryPostProcessor-开发者实现了BeanDefinitionRegistryPostProcessor接口的实现类,如果有多个实现类,按照@PriorityOrdered,@Ordered,顺序执行 postProcessBeanDefinitionRegistry 方法。
3.处理当前上下文中的BeanDefinitionRegistryPostProcessor和BeanFactoryPostProcessor,执行 postProcessBeanFactory 方法。
4.处理beanFactory中的BeanFactoryPostProcessor-开发者实现了BeanDefinitionRegistryPostProcessor 或者 BeanFactoryPostProcessor 的实现类,执行 postProcessBeanFactory 方法。
2、总结invokeBeanFactoryPostProcessors
invokeBeanFactoryPostProcessors也是一种后置处理,这种方式是基于组合的方式,比postProcessBeanFactory方法更优。
invokeBeanFactoryPostProcessors处理了两个接口,BeanFactoryPostProcessor、BeanDefinitionRegistryPostProcessor,提供了更加灵活的扩展机制。
六、BeanFactory 注册 BeanPostProcessor 阶段-registerBeanPostProcessors
当BeanFactory后置处理完成之后,我们认为BeanFactory基本已经完成了它的初始化(不绝对)。
此时进入到BeanFactory的registerBeanPostProcessors阶段,这个阶段和我们上面那个阶段非常相似,也根据排序进行注册。
// org.springframework.context.support.AbstractApplicationContext#registerBeanPostProcessors
protected void registerBeanPostProcessors(ConfigurableListableBeanFactory beanFactory) {
	PostProcessorRegistrationDelegate.registerBeanPostProcessors(beanFactory, this);
}
- 1
- 2
- 3
- 4
// org.springframework.context.support.PostProcessorRegistrationDelegate#registerBeanPostProcessors(org.springframework.beans.factory.config.ConfigurableListableBeanFactory, org.springframework.context.support.AbstractApplicationContext)
public static void registerBeanPostProcessors(
		ConfigurableListableBeanFactory beanFactory, AbstractApplicationContext applicationContext) {

	// 获取所有BeanPostProcessor的name
	String[] postProcessorNames = beanFactory.getBeanNamesForType(BeanPostProcessor.class, true, false);

	// Register BeanPostProcessorChecker that logs an info message when
	// a bean is created during BeanPostProcessor instantiation, i.e. when
	// a bean is not eligible for getting processed by all BeanPostProcessors.
	int beanProcessorTargetCount = beanFactory.getBeanPostProcessorCount() + 1 + postProcessorNames.length;
	beanFactory.addBeanPostProcessor(new BeanPostProcessorChecker(beanFactory, beanProcessorTargetCount));

	// Separate between BeanPostProcessors that implement PriorityOrdered,
	// Ordered, and the rest.
	// 标记过PriorityOrdered接口的
	List<BeanPostProcessor> priorityOrderedPostProcessors = new ArrayList<>();
	// 标记过PriorityOrdered的MergedBeanDefinitionPostProcessor
	List<BeanPostProcessor> internalPostProcessors = new ArrayList<>();
	// 标记过Ordered的
	List<String> orderedPostProcessorNames = new ArrayList<>();
	// 什么都没标记的
	List<String> nonOrderedPostProcessorNames = new ArrayList<>();
	for (String ppName : postProcessorNames) {
		if (beanFactory.isTypeMatch(ppName, PriorityOrdered.class)) {
			// getBean方法如果没有会进行bean的初始化
			BeanPostProcessor pp = beanFactory.getBean(ppName, BeanPostProcessor.class);
			priorityOrderedPostProcessors.add(pp);
			if (pp instanceof MergedBeanDefinitionPostProcessor) {
				internalPostProcessors.add(pp);
			}
		}
		else if (beanFactory.isTypeMatch(ppName, Ordered.class)) {
			orderedPostProcessorNames.add(ppName);
		}
		else {
			nonOrderedPostProcessorNames.add(ppName);
		}
	}

	// First, register the BeanPostProcessors that implement PriorityOrdered.
	sortPostProcessors(priorityOrderedPostProcessors, beanFactory);
	registerBeanPostProcessors(beanFactory, priorityOrderedPostProcessors);

	// Next, register the BeanPostProcessors that implement Ordered.
	List<BeanPostProcessor> orderedPostProcessors = new ArrayList<>(orderedPostProcessorNames.size());
	for (String ppName : orderedPostProcessorNames) {
		BeanPostProcessor pp = beanFactory.getBean(ppName, BeanPostProcessor.class);
		orderedPostProcessors.add(pp);
		if (pp instanceof MergedBeanDefinitionPostProcessor) {
			internalPostProcessors.add(pp);
		}
	}
	sortPostProcessors(orderedPostProcessors, beanFactory);
	registerBeanPostProcessors(beanFactory, orderedPostProcessors);

	// Now, register all regular BeanPostProcessors.
	List<BeanPostProcessor> nonOrderedPostProcessors = new ArrayList<>(nonOrderedPostProcessorNames.size());
	for (String ppName : nonOrderedPostProcessorNames) {
		BeanPostProcessor pp = beanFactory.getBean(ppName, BeanPostProcessor.class);
		nonOrderedPostProcessors.add(pp);
		if (pp instanceof MergedBeanDefinitionPostProcessor) {
			internalPostProcessors.add(pp);
		}
	}
	registerBeanPostProcessors(beanFactory, nonOrderedPostProcessors);

	// Finally, re-register all internal BeanPostProcessors.
	sortPostProcessors(internalPostProcessors, beanFactory);
	registerBeanPostProcessors(beanFactory, internalPostProcessors);

	// Re-register post-processor for detecting inner beans as ApplicationListeners,
	// moving it to the end of the processor chain (for picking up proxies etc).
	beanFactory.addBeanPostProcessor(new ApplicationListenerDetector(applicationContext));
}
- 1
- 2
- 3
- 4
- 5
- 6
- 7
- 8
- 9
- 10
- 11
- 12
- 13
- 14
- 15
- 16
- 17
- 18
- 19
- 20
- 21
- 22
- 23
- 24
- 25
- 26
- 27
- 28
- 29
- 30
- 31
- 32
- 33
- 34
- 35
- 36
- 37
- 38
- 39
- 40
- 41
- 42
- 43
- 44
- 45
- 46
- 47
- 48
- 49
- 50
- 51
- 52
- 53
- 54
- 55
- 56
- 57
- 58
- 59
- 60
- 61
- 62
- 63
- 64
- 65
- 66
- 67
- 68
- 69
- 70
- 71
- 72
- 73
- 74
- 75
此处也是优先注册PriorityOrdered,再Ordered,再注册什么也没标记的。
1、源码中调用的registerBeanPostProcessors方法
// org.springframework.context.support.PostProcessorRegistrationDelegate#registerBeanPostProcessors(org.springframework.beans.factory.config.ConfigurableListableBeanFactory, java.util.List<org.springframework.beans.factory.config.BeanPostProcessor>)
private static void registerBeanPostProcessors(
		ConfigurableListableBeanFactory beanFactory, List<BeanPostProcessor> postProcessors) {

	for (BeanPostProcessor postProcessor : postProcessors) {
		beanFactory.addBeanPostProcessor(postProcessor);
	}
}
- 1
- 2
- 3
- 4
- 5
- 6
- 7
- 8
该方法循环迭代,将BeanPostProcessor注册到beanFactory中,通过addBeanPostProcessor将BeanPostProcessor加入到集合中
// org.springframework.beans.factory.support.AbstractBeanFactory#addBeanPostProcessor
@Override
public void addBeanPostProcessor(BeanPostProcessor beanPostProcessor) {
	Assert.notNull(beanPostProcessor, "BeanPostProcessor must not be null");
	// Remove from old position, if any
	this.beanPostProcessors.remove(beanPostProcessor);
	// Track whether it is instantiation/destruction aware
	if (beanPostProcessor instanceof InstantiationAwareBeanPostProcessor) {
		this.hasInstantiationAwareBeanPostProcessors = true;
	}
	if (beanPostProcessor instanceof DestructionAwareBeanPostProcessor) {
		this.hasDestructionAwareBeanPostProcessors = true;
	}
	// Add to end of list
	this.beanPostProcessors.add(beanPostProcessor);
}
- 1
- 2
- 3
- 4
- 5
- 6
- 7
- 8
- 9
- 10
- 11
- 12
- 13
- 14
- 15
- 16
2、总结
AbstractApplicationContext#registerBeanPostProcessors(ConfigurableListableBeanFactory) 方法,主要初始化 BeanPostProcessor 类型的 Bean(依赖查找),会做以下事情:
- 获取所有 BeanPostProcessor 类型的 beanName
- 添加 BeanPostProcessor - BeanPostProcessorChecker,用于打印日志(所有 BeanPostProcessor 还没有全部实例化就有 Bean 初始化完成)
- 获取所有 BeanPostProcessor 实现类(依赖查找),添加至 BeanFactory 容器中(顺序:PriorityOrdered > Ordered > 无)
- 注意,第
3步添加的 BeanPostProcessor 如果是 MergedBeanDefinitionPostProcessor 类型,会再次添加(先移除在添加,也就是将顺序往后挪) - 重新添加 BeanPostProcessor - ApplicationListenerDetector,目的将其移至最后,因为这个后置处理器用于探测 ApplicationListener 类型的 Bean,需要保证 Bean 完全初始化,放置最后比较合适
PriorityOrdered类型的beanpostprocessor提前初始化,这个时候beanpost processor还没注册,那依赖的bean是很有可能初始化不正常,扩展时要注意这一情况。
七、初始化內建 Bean:MessageSource
该模块是用于处理国际化相关的东西,关于国际化相关该文已经讲过了:
Spring国际化详解,Spring国家化实例及源码详解
// org.springframework.context.support.AbstractApplicationContext#initMessageSource
protected void initMessageSource() {
	ConfigurableListableBeanFactory beanFactory = getBeanFactory();
	if (beanFactory.containsLocalBean(MESSAGE_SOURCE_BEAN_NAME)) {// 只在当前beanFactory找,并不在parent找
		this.messageSource = beanFactory.getBean(MESSAGE_SOURCE_BEAN_NAME, MessageSource.class);
		// Make MessageSource aware of parent MessageSource.
		if (this.parent != null && this.messageSource instanceof HierarchicalMessageSource) {
			HierarchicalMessageSource hms = (HierarchicalMessageSource) this.messageSource;
			if (hms.getParentMessageSource() == null) {
				// Only set parent context as parent MessageSource if no parent MessageSource
				// registered already.
				hms.setParentMessageSource(getInternalParentMessageSource());
			}
		}
		if (logger.isTraceEnabled()) {
			logger.trace("Using MessageSource [" + this.messageSource + "]");
		}
	}
	else {// 如果找不到MessageSource,新建一个
		// Use empty MessageSource to be able to accept getMessage calls.
		DelegatingMessageSource dms = new DelegatingMessageSource();
		dms.setParentMessageSource(getInternalParentMessageSource()); // parent
		this.messageSource = dms;
		beanFactory.registerSingleton(MESSAGE_SOURCE_BEAN_NAME, this.messageSource);// 注册singleton Bean
		if (logger.isTraceEnabled()) {
			logger.trace("No '" + MESSAGE_SOURCE_BEAN_NAME + "' bean, using [" + this.messageSource + "]");
		}
	}
}
- 1
- 2
- 3
- 4
- 5
- 6
- 7
- 8
- 9
- 10
- 11
- 12
- 13
- 14
- 15
- 16
- 17
- 18
- 19
- 20
- 21
- 22
- 23
- 24
- 25
- 26
- 27
- 28
- 29
SpringBoot在MessageSourceAutoConfiguration自动化装配MessageSource,通过外部化配置ResourceBundleMessageSource的方式创建MessageSource。此处就不会新建DelegatingMessageSource了。
我们想要扩展时,基本上可以使用BeanPostProcessor进行注册一个MessageSource,以扩展MessageSource覆盖默认实现。
八、初始化內建 Bean:Spring 事件广播器
关于Spring事件广播器ApplicationEventMulticaster请移步:
Spring事件详解,Spring-Event源码详解,一文搞透Spring事件管理
// org.springframework.context.support.AbstractApplicationContext#initApplicationEventMulticaster
protected void initApplicationEventMulticaster() {
	ConfigurableListableBeanFactory beanFactory = getBeanFactory();
	if (beanFactory.containsLocalBean(APPLICATION_EVENT_MULTICASTER_BEAN_NAME)) { // applicationEventMulticaster
		this.applicationEventMulticaster =
				beanFactory.getBean(APPLICATION_EVENT_MULTICASTER_BEAN_NAME, ApplicationEventMulticaster.class);
		if (logger.isTraceEnabled()) {
			logger.trace("Using ApplicationEventMulticaster [" + this.applicationEventMulticaster + "]");
		}
	}
	else { // 兜底,创建SimpleApplicationEventMulticaster
		this.applicationEventMulticaster = new SimpleApplicationEventMulticaster(beanFactory);
		beanFactory.registerSingleton(APPLICATION_EVENT_MULTICASTER_BEAN_NAME, this.applicationEventMulticaster);
		if (logger.isTraceEnabled()) {
			logger.trace("No '" + APPLICATION_EVENT_MULTICASTER_BEAN_NAME + "' bean, using " +
					"[" + this.applicationEventMulticaster.getClass().getSimpleName() + "]");
		}
	}
}
- 1
- 2
- 3
- 4
- 5
- 6
- 7
- 8
- 9
- 10
- 11
- 12
- 13
- 14
- 15
- 16
- 17
- 18
- 19
事件广播器是必需存在的,如果我们想要定制,可以使用BeanPostProcessor注册一个事件广播器,bean的名称必需为applicationEventMulticaster,可以覆盖Spring默认的SimpleApplicationEventMulticaster实现。
分析到这我们可以明白了,为什么需要使用earlyApplicationEvents 临时存储事件了,而在上面分享的事件文章中也提到过,BeanPostProcessor是在事件广播器初始化前就进行初始化的。
九、Spring 应用上下文刷新阶段-onRefresh
AbstractApplicationContext的onRefresh方法实际上是一个空方法,交由子类来进行实现。
// org.springframework.context.support.AbstractApplicationContext#onRefresh
protected void onRefresh() throws BeansException {
	// For subclasses: do nothing by default.
}
- 1
- 2
- 3
- 4
onRefresh方法基本有以下五个实现类,都是web场景,也就是说,非web场景不需要实现该方法。
1、AbstractRefreshableWebApplicationContext#onRefresh()
引入风格主题。
// org.springframework.web.context.support.AbstractRefreshableWebApplicationContext#onRefresh
@Override
protected void onRefresh() {
	this.themeSource = UiApplicationContextUtils.initThemeSource(this);
}
- 1
- 2
- 3
- 4
- 5
2、GenericWebApplicationContext#onRefresh()
引入风格主题。
// org.springframework.web.context.support.GenericWebApplicationContext#onRefresh
@Override
protected void onRefresh() {
	this.themeSource = UiApplicationContextUtils.initThemeSource(this);
}
- 1
- 2
- 3
- 4
- 5
3、ReactiveWebServerApplicationContext#onRefresh()
webflux场景,在springboot中的扩展。
// org.springframework.boot.web.reactive.context.ReactiveWebServerApplicationContext#onRefresh
@Override
protected void onRefresh() {
	super.onRefresh();
	try {
		// 创建一个webServer
		createWebServer();
	}
	catch (Throwable ex) {
		throw new ApplicationContextException("Unable to start reactive web server", ex);
	}
}
- 1
- 2
- 3
- 4
- 5
- 6
- 7
- 8
- 9
- 10
- 11
- 12
4、ServletWebServerApplicationContext#onRefresh()
servlet场景,在springboot中的扩展。
// org.springframework.boot.web.servlet.context.ServletWebServerApplicationContext#onRefresh
@Override
protected void onRefresh() {
	super.onRefresh();
	try {
		createWebServer();
	}
	catch (Throwable ex) {
		throw new ApplicationContextException("Unable to start web server", ex);
	}
}
- 1
- 2
- 3
- 4
- 5
- 6
- 7
- 8
- 9
- 10
- 11
与fluxweb类似,springboot在该方法中启动web容器(默认是tomcat),更多细节请移步:
springboot-嵌入式Servlet容器(Tomcat)源码分析以及容器切换
5、StaticWebApplicationContext#onRefresh()
引入风格主题。
// org.springframework.web.context.support.StaticWebApplicationContext#onRefresh
@Override
protected void onRefresh() {
	this.themeSource = UiApplicationContextUtils.initThemeSource(this);
}
- 1
- 2
- 3
- 4
- 5
十、Spring 事件监听器注册阶段-registerListeners
关于Spring事件更多详细内容请移步:
Spring事件详解,Spring-Event源码详解,一文搞透Spring事件管理
// org.springframework.context.support.AbstractApplicationContext#registerListeners
protected void registerListeners() {
	// Register statically specified listeners first.
	// 添加当前应用上下文所关联的 ApplicationListener 对象(集合)(见 1、)
	for (ApplicationListener<?> listener : getApplicationListeners()) {
		getApplicationEventMulticaster().addApplicationListener(listener);
	}

	// Do not initialize FactoryBeans here: We need to leave all regular beans
	// uninitialized to let post-processors apply to them!
	// 添加 BeanFactory 所注册 ApplicationListener Beans(见 2、)
	String[] listenerBeanNames = getBeanNamesForType(ApplicationListener.class, true, false);
	for (String listenerBeanName : listenerBeanNames) {
		getApplicationEventMulticaster().addApplicationListenerBean(listenerBeanName);
	}

	// Publish early application events now that we finally have a multicaster...
	// 广播早期 Spring 事件( 3、)
	Set<ApplicationEvent> earlyEventsToProcess = this.earlyApplicationEvents;
	this.earlyApplicationEvents = null;
	if (earlyEventsToProcess != null) {
		for (ApplicationEvent earlyEvent : earlyEventsToProcess) {
			getApplicationEventMulticaster().multicastEvent(earlyEvent);
		}
	}
}
- 1
- 2
- 3
- 4
- 5
- 6
- 7
- 8
- 9
- 10
- 11
- 12
- 13
- 14
- 15
- 16
- 17
- 18
- 19
- 20
- 21
- 22
- 23
- 24
- 25
- 26
1、添加当前应用上下文所关联的 ApplicationListener 对象(集合)
此处的getApplicationListeners方法,会获取AbstractApplicationContext中存储的ApplicationListener集合,而该集合就是通过AbstractApplicationContext的addApplicationListener方法添加进去的。
@Override
public void addApplicationListener(ApplicationListener<?> listener) {
	Assert.notNull(listener, "ApplicationListener must not be null");
	if (this.applicationEventMulticaster != null) {
		this.applicationEventMulticaster.addApplicationListener(listener);
	}
	this.applicationListeners.add(listener);
}

public Collection<ApplicationListener<?>> getApplicationListeners() {
	return this.applicationListeners;
}
- 1
- 2
- 3
- 4
- 5
- 6
- 7
- 8
- 9
- 10
- 11
- 12
这里的集合都是使用的Set,可以去重。
2、添加 BeanFactory 所注册 ApplicationListener Beans
此处仅仅只是通过类型查找出所有该类型的bean名称,将名称传入事件广播器中。
这个操作并不会初始化这些ApplicationListener Beans,而是用的时候才初始化。
3、广播早期 Spring 事件
关于Spring早期事件,在Spring事件详解,Spring-Event源码详解,一文搞透Spring事件管理文章中已经介绍过。
使用事件广播器发送事件时,如果earlyApplicationEvents 不为空的话,会存储在earlyApplicationEvents 列表中,就等此刻所有的监听器、事件广播器都初始化完毕之后,才进行回放。
Spring3版本中,并没有这个earlyApplicationEvents ,这也导致在Listener或者ApplicationEventMulticaster还没准备之前发送事件的话,会报错。该问题在后续版本才进行优化。
十一、BeanFactory 初始化完成阶段-finishBeanFactoryInitialization
// org.springframework.context.support.AbstractApplicationContext#finishBeanFactoryInitialization
protected void finishBeanFactoryInitialization(ConfigurableListableBeanFactory beanFactory) {
	// Initialize conversion service for this context.
	// BeanFactory 关联 ConversionService Bean,如果存在 ,类型转换相关
	if (beanFactory.containsBean(CONVERSION_SERVICE_BEAN_NAME) &&
			beanFactory.isTypeMatch(CONVERSION_SERVICE_BEAN_NAME, ConversionService.class)) {
		beanFactory.setConversionService(
				beanFactory.getBean(CONVERSION_SERVICE_BEAN_NAME, ConversionService.class));
	}

	// Register a default embedded value resolver if no bean post-processor
	// (such as a PropertyPlaceholderConfigurer bean) registered any before:
	// at this point, primarily for resolution in annotation attribute values.
	// 添加 StringValueResolver 对象
	if (!beanFactory.hasEmbeddedValueResolver()) {
		beanFactory.addEmbeddedValueResolver(strVal -> getEnvironment().resolvePlaceholders(strVal));
	}

	// Initialize LoadTimeWeaverAware beans early to allow for registering their transformers early.
	// 依赖查找 LoadTimeWeaverAware Bean
	String[] weaverAwareNames = beanFactory.getBeanNamesForType(LoadTimeWeaverAware.class, false, false);
	for (String weaverAwareName : weaverAwareNames) {
		getBean(weaverAwareName);
	}

	// Stop using the temporary ClassLoader for type matching.
	// BeanFactory 临时 ClassLoader 置为 null
	beanFactory.setTempClassLoader(null);

	// Allow for caching all bean definition metadata, not expecting further changes.
	// BeanFactory 冻结配置(见 1、)
	beanFactory.freezeConfiguration();

	// Instantiate all remaining (non-lazy-init) singletons.
	// BeanFactory 初始化非延迟单例 Beans(见 2、)
	beanFactory.preInstantiateSingletons();
}
- 1
- 2
- 3
- 4
- 5
- 6
- 7
- 8
- 9
- 10
- 11
- 12
- 13
- 14
- 15
- 16
- 17
- 18
- 19
- 20
- 21
- 22
- 23
- 24
- 25
- 26
- 27
- 28
- 29
- 30
- 31
- 32
- 33
- 34
- 35
- 36
- 37
1、BeanFactory 冻结配置
freezeConfiguration方法在DefaultListableBeanFactory类中有具体实现:
// org.springframework.beans.factory.support.DefaultListableBeanFactory#freezeConfiguration
@Override
public void freezeConfiguration() {
	this.configurationFrozen = true; // 修改状态
	this.frozenBeanDefinitionNames = StringUtils.toStringArray(this.beanDefinitionNames); // 快照
}
- 1
- 2
- 3
- 4
- 5
- 6
configurationFrozen 这个属性,有个isConfigurationFrozen方法返回该属性的状态:
// org.springframework.beans.factory.support.DefaultListableBeanFactory#isConfigurationFrozen
@Override
public boolean isConfigurationFrozen() {
	return this.configurationFrozen;
}
- 1
- 2
- 3
- 4
- 5
该方法在此处进行调用:
// org.springframework.beans.factory.support.DefaultListableBeanFactory#getBeanNamesForType(java.lang.Class<?>, boolean, boolean)
@Override
public String[] getBeanNamesForType(@Nullable Class<?> type, boolean includeNonSingletons, boolean allowEagerInit) {
	if (!isConfigurationFrozen() || type == null || !allowEagerInit) {
		return doGetBeanNamesForType(ResolvableType.forRawClass(type), includeNonSingletons, allowEagerInit);
	}
	Map<Class<?>, String[]> cache =
			(includeNonSingletons ? this.allBeanNamesByType : this.singletonBeanNamesByType);
	String[] resolvedBeanNames = cache.get(type);
	if (resolvedBeanNames != null) {
		return resolvedBeanNames;
	}
	resolvedBeanNames = doGetBeanNamesForType(ResolvableType.forRawClass(type), includeNonSingletons, true);
	if (ClassUtils.isCacheSafe(type, getBeanClassLoader())) {
		cache.put(type, resolvedBeanNames);
	}
	return resolvedBeanNames;
}
- 1
- 2
- 3
- 4
- 5
- 6
- 7
- 8
- 9
- 10
- 11
- 12
- 13
- 14
- 15
- 16
- 17
- 18
也就是说,在进行根据类型查找bean的名称时,如果你当前这个配置没有被冻结之前,对操作进行拦截。
我们再看frozenBeanDefinitionNames就是生成一个beanDefinitionName的快照,相当于BeanDefinition在这个阶段已经基本确定了,不会再发生添加删除等操作,相当于做了优化。
// org.springframework.beans.factory.support.DefaultListableBeanFactory#getBeanDefinitionNames
@Override
public String[] getBeanDefinitionNames() {
	String[] frozenNames = this.frozenBeanDefinitionNames;
	if (frozenNames != null) {
		return frozenNames.clone(); // 克隆,有一定代价的,该方法不要经常调用
	}
	else {
		return StringUtils.toStringArray(this.beanDefinitionNames);
	}
}
- 1
- 2
- 3
- 4
- 5
- 6
- 7
- 8
- 9
- 10
- 11
2、BeanFactory 初始化非延迟单例 Beans
该方法在DefaultListableBeanFactory中有具体实现:
// org.springframework.beans.factory.support.DefaultListableBeanFactory#preInstantiateSingletons
@Override
public void preInstantiateSingletons() throws BeansException {
	if (logger.isTraceEnabled()) {
		logger.trace("Pre-instantiating singletons in " + this);
	}

	// Iterate over a copy to allow for init methods which in turn register new bean definitions.
	// While this may not be part of the regular factory bootstrap, it does otherwise work fine.
	// 所有的beanName
	List<String> beanNames = new ArrayList<>(this.beanDefinitionNames);

	// Trigger initialization of all non-lazy singleton beans...
	// Bean的生命周期
	for (String beanName : beanNames) {
		RootBeanDefinition bd = getMergedLocalBeanDefinition(beanName);
		if (!bd.isAbstract() && bd.isSingleton() && !bd.isLazyInit()) {
			if (isFactoryBean(beanName)) { // 区别一些场景,细节
				Object bean = getBean(FACTORY_BEAN_PREFIX + beanName);
				if (bean instanceof FactoryBean) {
					final FactoryBean<?> factory = (FactoryBean<?>) bean;
					boolean isEagerInit;
					if (System.getSecurityManager() != null && factory instanceof SmartFactoryBean) {
						isEagerInit = AccessController.doPrivileged((PrivilegedAction<Boolean>)
										((SmartFactoryBean<?>) factory)::isEagerInit,
								getAccessControlContext());
					}
					else {
						isEagerInit = (factory instanceof SmartFactoryBean &&
								((SmartFactoryBean<?>) factory).isEagerInit());
					}
					if (isEagerInit) {
						getBean(beanName);
					}
				}
			}
			else {
				getBean(beanName);
			}
		}
	}

	// Trigger post-initialization callback for all applicable beans...
	// 这里会执行SmartInitializingSingleton的afterSingletonsInstantiated方法。
	for (String beanName : beanNames) {
		Object singletonInstance = getSingleton(beanName);
		if (singletonInstance instanceof SmartInitializingSingleton) {
			final SmartInitializingSingleton smartSingleton = (SmartInitializingSingleton) singletonInstance;
			if (System.getSecurityManager() != null) {
				AccessController.doPrivileged((PrivilegedAction<Object>) () -> {
					smartSingleton.afterSingletonsInstantiated();
					return null;
				}, getAccessControlContext());
			}
			else {
				smartSingleton.afterSingletonsInstantiated();
			}
		}
	}
}
- 1
- 2
- 3
- 4
- 5
- 6
- 7
- 8
- 9
- 10
- 11
- 12
- 13
- 14
- 15
- 16
- 17
- 18
- 19
- 20
- 21
- 22
- 23
- 24
- 25
- 26
- 27
- 28
- 29
- 30
- 31
- 32
- 33
- 34
- 35
- 36
- 37
- 38
- 39
- 40
- 41
- 42
- 43
- 44
- 45
- 46
- 47
- 48
- 49
- 50
- 51
- 52
- 53
- 54
- 55
- 56
- 57
- 58
- 59
- 60
这里涉及Bean的生命周期,关于Bean的生命周期,请移步:
Spring Bean生命周期——从源码角度详解Spring Bean的生命周期(上)
Spring Bean生命周期——从源码角度详解Spring Bean的生命周期(下)
这里只初始化非延迟加载的单例对象,因为该对象是唯一的。原型对象是需要的时候才去创建加载。
十二、Spring 应用上下刷新完成阶段-finishRefresh
// org.springframework.context.support.AbstractApplicationContext#finishRefresh
protected void finishRefresh() {
	// Clear context-level resource caches (such as ASM metadata from scanning).
	// 清除 ResourceLoader 缓存 - clearResourceCaches() @since 5.0,比如说ASM的元数据
	clearResourceCaches();

	// Initialize lifecycle processor for this context.
	// 初始化 LifecycleProcessor 对象 - initLifecycleProcessor()(见 1、)
	initLifecycleProcessor();

	// Propagate refresh to lifecycle processor first.
	// 调用 LifecycleProcessor#onRefresh() 方法(见 2、)
	getLifecycleProcessor().onRefresh();

	// Publish the final event.
	// 发布 Spring 应用上下文已刷新事件 - ContextRefreshedEvent,当前上下文已经可用了
	publishEvent(new ContextRefreshedEvent(this));

	// Participate in LiveBeansView MBean, if active.
	// 向 MBeanServer 托管 Live Beans,JMX中的(见 4、)
	LiveBeansView.registerApplicationContext(this);
}
- 1
- 2
- 3
- 4
- 5
- 6
- 7
- 8
- 9
- 10
- 11
- 12
- 13
- 14
- 15
- 16
- 17
- 18
- 19
- 20
- 21
- 22
1、初始化 LifecycleProcessor 对象 - initLifecycleProcessor()
// org.springframework.context.support.AbstractApplicationContext#initLifecycleProcessor
protected void initLifecycleProcessor() {
	ConfigurableListableBeanFactory beanFactory = getBeanFactory();
	if (beanFactory.containsLocalBean(LIFECYCLE_PROCESSOR_BEAN_NAME)) { // lifecycleProcessor
		this.lifecycleProcessor =
				beanFactory.getBean(LIFECYCLE_PROCESSOR_BEAN_NAME, LifecycleProcessor.class);
		if (logger.isTraceEnabled()) {
			logger.trace("Using LifecycleProcessor [" + this.lifecycleProcessor + "]");
		}
	}
	else { // 没有的话,创建DefaultLifecycleProcessor
		DefaultLifecycleProcessor defaultProcessor = new DefaultLifecycleProcessor();
		defaultProcessor.setBeanFactory(beanFactory);
		this.lifecycleProcessor = defaultProcessor;
		beanFactory.registerSingleton(LIFECYCLE_PROCESSOR_BEAN_NAME, this.lifecycleProcessor);
		if (logger.isTraceEnabled()) {
			logger.trace("No '" + LIFECYCLE_PROCESSOR_BEAN_NAME + "' bean, using " +
					"[" + this.lifecycleProcessor.getClass().getSimpleName() + "]");
		}
	}
}
- 1
- 2
- 3
- 4
- 5
- 6
- 7
- 8
- 9
- 10
- 11
- 12
- 13
- 14
- 15
- 16
- 17
- 18
- 19
- 20
- 21
2、调用 LifecycleProcessor#onRefresh() 方法
此处获取的lifecycleProcessor就是上面创建的lifecycleProcessor,调用其onRefresh方法,默认是DefaultLifecycleProcessor实现。
// org.springframework.context.support.DefaultLifecycleProcessor#onRefresh
@Override
public void onRefresh() {
	startBeans(true);
	this.running = true;
}

// org.springframework.context.support.DefaultLifecycleProcessor#startBeans
private void startBeans(boolean autoStartupOnly) { // true
	Map<String, Lifecycle> lifecycleBeans = getLifecycleBeans();
	Map<Integer, LifecycleGroup> phases = new HashMap<>();
	lifecycleBeans.forEach((beanName, bean) -> {
		if (!autoStartupOnly || (bean instanceof SmartLifecycle && ((SmartLifecycle) bean).isAutoStartup())) {
			int phase = getPhase(bean);
			LifecycleGroup group = phases.get(phase);
			if (group == null) {
				group = new LifecycleGroup(phase, this.timeoutPerShutdownPhase, lifecycleBeans, autoStartupOnly);
				phases.put(phase, group);
			}
			group.add(beanName, bean);
		}
	});
	if (!phases.isEmpty()) {
		List<Integer> keys = new ArrayList<>(phases.keySet());
		Collections.sort(keys);
		for (Integer key : keys) {
			phases.get(key).start();
		}
	}
}
- 1
- 2
- 3
- 4
- 5
- 6
- 7
- 8
- 9
- 10
- 11
- 12
- 13
- 14
- 15
- 16
- 17
- 18
- 19
- 20
- 21
- 22
- 23
- 24
- 25
- 26
- 27
- 28
- 29
- 30
3、关于Lifecycle接口
Lifecycle接口顾名思义,就是生命周期。
public interface Lifecycle {

	void start();

	void stop();

	boolean isRunning();
}
- 1
- 2
- 3
- 4
- 5
- 6
- 7
- 8
该接口有很多应用场景,RSocket以及tomcat就有相关的应用。
4、向 MBeanServer 托管 Live Beans
// org.springframework.context.support.LiveBeansView#registerApplicationContext
static void registerApplicationContext(ConfigurableApplicationContext applicationContext) {
	// 查找spring.liveBeansView.mbeanDomain
	String mbeanDomain = applicationContext.getEnvironment().getProperty(MBEAN_DOMAIN_PROPERTY_NAME);
	if (mbeanDomain != null) {
		synchronized (applicationContexts) {
			if (applicationContexts.isEmpty()) {
				try {
					// JMX相关
					MBeanServer server = ManagementFactory.getPlatformMBeanServer();
					applicationName = applicationContext.getApplicationName();
					server.registerMBean(new LiveBeansView(),
							new ObjectName(mbeanDomain, MBEAN_APPLICATION_KEY, applicationName));
				}
				catch (Throwable ex) {
					throw new ApplicationContextException("Failed to register LiveBeansView MBean", ex);
				}
			}
			applicationContexts.add(applicationContext);
		}
	}
}
- 1
- 2
- 3
- 4
- 5
- 6
- 7
- 8
- 9
- 10
- 11
- 12
- 13
- 14
- 15
- 16
- 17
- 18
- 19
- 20
- 21
- 22
LiveBeansView会返回一个json,在Springboot的Endpoint中会应用到。
(1)代码实例
// 添加 LiveBeansView 的 ObjectName 的 domain
System.setProperty(LiveBeansView.MBEAN_DOMAIN_PROPERTY_NAME, "com.demo");

AnnotationConfigApplicationContext context = new AnnotationConfigApplicationContext();

// 注册 Configuration Class
context.register(LiveBeansViewDemo.class);

// 启动 Spring 应用上下文
context.refresh();

// 用于阻塞
System.out.println("按任意键继续...");
System.in.read();

context.close();
// 关闭 Spring 应用上下文
- 1
- 2
- 3
- 4
- 5
- 6
- 7
- 8
- 9
- 10
- 11
- 12
- 13
- 14
- 15
- 16
- 17
我们使用cmd输入jconsole,打开我们的程序。
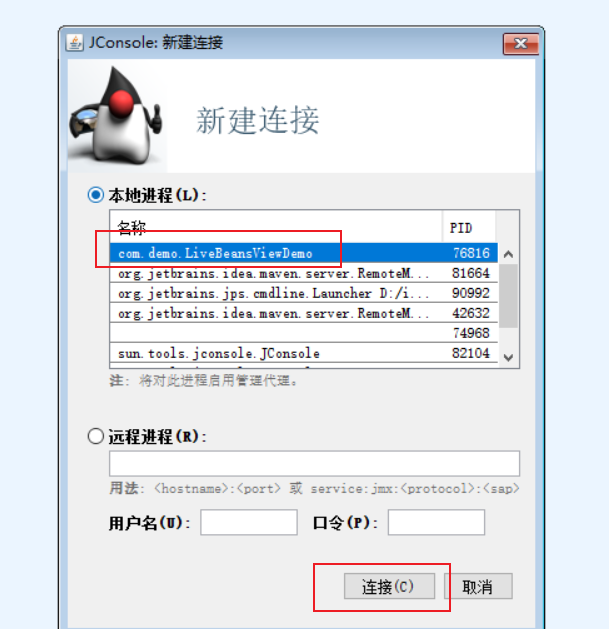
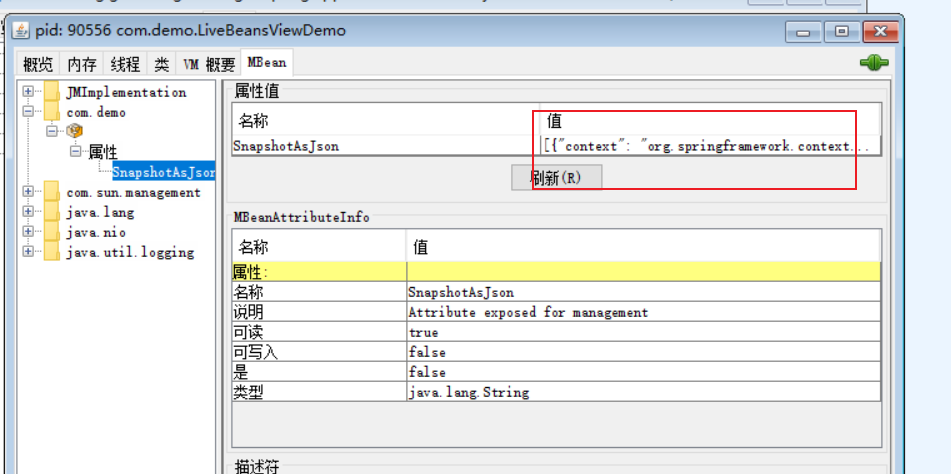
我们将这段值粘出来:
[
    {
        "context": "org.springframework.context.annotation.AnnotationConfigApplicationContext@30c7da1e",
        "parent": null,
        "beans": [
            {
                "bean": "liveBeansViewDemo",
                "aliases": [],
                "scope": "singleton",
                "type": "com.demo.LiveBeansViewDemo",
                "resource": "null",
                "dependencies": []
            }
        ]
    }
]
- 1
- 2
- 3
- 4
- 5
- 6
- 7
- 8
- 9
- 10
- 11
- 12
- 13
- 14
- 15
- 16
这就是使用Spring的方式委派到MBeanServer里面去了,来帮助我们做这个事情。
以上,Spring IOC容器正式启动完成。

