
- 1git cherry-pick_git cherry pick 冲突
- 2opencv 存储像素值为浮点数的图像 (.tiff)_opencv 存储tiff
- 3【网页设计】基于HTML+CSS上海旅游网站网页作业制作
- 4啥,字节扣子Bot通过API调用百度文心一言?_扣子api
- 5【超硬核】-1万字详尽大厂团队SQL开发规范,Review没人能笑着出来_sql开发规范文档
- 6【机器学习】为什么使用Scikit-Learn来进行逻辑回归以及如何使用Scikit-Learn进行逻辑回归
- 7VMware Workstation Pro 17 虚拟机安装_vmware workstation17 pro虚拟机
- 8kali linux 安装教程(最新)_虚拟机安装kali
- 9用SQL语句删除数据库重复数据,只保留一条有效数据_sql删除重复数据只保留一条
- 10【github】github 获取 token 的网址_公开 github token 有哪些?
QEMU开发入门_qemu学习
赞
踩
1. 简介
QEMU(Quick EMUlator)是一个开源的虚拟化软件,它能够模拟多种硬件平台,并在这些平台上运行各种操作系统。QEMU可以在不同的主机架构之间进行虚拟化,例如x86、ARM、PowerPC、Risc-V等。QEMU是一个功能强大且灵活的虚拟化软件,可用于多种应用场景,包括系统仿真、硬件虚拟化、交叉编译以及设备模拟等。它广泛应用于开发、测试和部署各种软件和操作系统。
以下是QEMU的一些重要特点和用途:
- 系统仿真:QEMU可以模拟整个计算机系统,包括处理器、内存、硬盘、网络接口等。这使得用户可以在自己的计算机上运行不同体系结构的操作系统,如在x86主机上运行ARM操作系统。
- 虚拟化支持:QEMU提供了硬件虚拟化功能,允许在宿主机上创建和管理虚拟机。这样可以在一台物理机上同时运行多个操作系统实例,每个实例都像独立的计算机一样运行。
- 交叉编译支持:QEMU可以为不同的目标平台提供交叉编译环境,以便在一种体系结构上编译代码并在另一种体系结构上执行。
- 快速启动时间:QEMU通过使用动态二进制翻译技术(Dynamic Binary Translation)来提高性能。它将客户机指令动态转换为主机指令,从而提供接近原生速度的执行效率。
- 虚拟设备模拟:QEMU提供了许多虚拟设备模拟,如磁盘驱动器、网络接口卡、显卡等。这些设备可以用于测试和开发目的,或者在虚拟机中运行嵌入式操作系统。
2. 安装
QEMU适用于Windows、Linux和Mac,因为Linux开源的原因,QEMU在Linux上能够更好地利用虚拟化等技术,使得虚拟的性能相较其他平台会更好一些。通用情况下,可以直接使用预编译后的二进制版本,如果需要进行额外地扩展,可以自行编译版本。
2.1. Windows
2.1.1. 二进制版本
● 可以从https://qemu.weilnetz.de/下载相应的版本。
● 可以在MSYS32中通过命令 pacman -S qemu 来安装。
2.1.2. 编译版本
Windows版本的QEMU需要使用mingw来编译,可以在Linux下编译,也可以在Windows下编译。Windows下推荐使用MSYS2进行编译。
- 从MSYS2官网下载安装最新版本。
- 启用MSYS2,更新最新源。
pacman -Syu
- 重启MSYS2,更新最新软件包。
pacman -Su
- 安装基本开发工具包
pacman -S base-devel mingw-w64-x86_64-toolchain git python ninja
- 安装QEMU相关依赖包
pacman -S mingw-w64-x86_64-glib2 mingw-w64-x86_64-pixman python-setuptools
- 添加扩展特性依赖包
pacman -S mingw-w64-x86_64-gtk3 mingw-w64-x86_64-SDL2 mingw-w64-x86_64-libslirp
- 关闭MSYS2控制台。
- 启动msys目录下的mingw64.exe。
- 下载最新的QEMU源代码
git clone https://gitlab.com/qemu-project/qemu.git
// gitlab较慢时,可以使用国内镜像
git clone https://gitee.com/mirrors/qemu.git
- 编译
cd qemu
./configure
make
更多编译方法参见:QEMU Build for Windows
2.2. Linux
此处主要以ubuntu 22.04版本为例。
2.2.1. 二进制版本
Linux下的qemu各版本需要分别安装,如:
sudo apt install qemu-system-arm
sudo apt install qemu-system-aarch64
sudo apt install qemu-system-riscv32
sudo apt install qemu-system-riscv64
2.2.2. 编译安装
推荐从源码编译安装,更方便调试添加打印信息。推荐以tag版本安装,更可靠。以下测试是基于从gitee上克隆的版本进行测试。安装可以配置–enable-debug启用调试。
git clone https://gitee.com/mirrors/qemu.git
cd qemu
mkdir build
cd build
…/configure
make -j8
sudo make install
2.2.3. 测试
输入qemu-system-aarch64 -version显示以下信息表示安装成功。
QEMU emulator version 8.1.93 (v8.2.0-rc3)
Copyright © 2003-2023 Fabrice Bellard and the QEMU Project developers
3. 使用
3.1. 嵌入式裸机
此处以最小系统嵌入式固件来演示使用过程,并且分别演示Windows和Linux下的交叉编译,以及基于Cortext-M和risc-v两个当下流行的单片机为例。代码只执行一个Uart打印信息。
int main (void)
{
    InitUart();
    UartWrite("Hello World!\n", 13);
    while (1)
    {
        /* code */
    }

    return 0;
}
- 1
- 2
- 3
- 4
- 5
- 6
- 7
- 8
- 9
- 10
- 11
3.1.1. Cortex-M7
- 下载交叉编译工具,https://developer.arm.com/downloads/-/gnu-rm
- 将工具目录(如D:/toolchains/arm/arm-eabi-v103/bin)添加进环境目录。
- 进入代码目录,以make编译生成elf文件。
- 运行elf
qemu-system-arm.exe -machine mps2-an385 -monitor null -semihosting --semihosting-config enable=on,target=native -kernel $(APP) -serial stdio -nographic

- 调试运行elf
a. -S表示暂停在固件的起始指令。
b. -s是-gdb tcp::1234的简写,表示启动tcp远程调试。
qemu-system-arm.exe -machine mps2-an385 -monitor null -semihosting --semihosting-config enable=on,target=native -kernel $(APP) -serial stdio -nographic -S -s

-
gdb调试
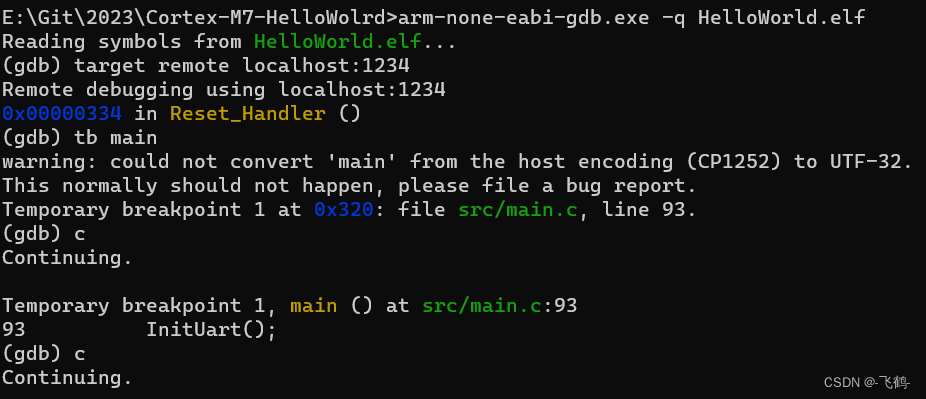
-
结果

3.1.2. RISC-V
riscv-v使用Linux进行测试。
-
安装交叉编译工具链
在https://www.sifive.com/software上下载工具链,并将路径添加进环境路径。 -
编译并运行

-
调试
方法同cortext-m7。
3.1.3. VSCode调试
gdb调试不太方便,利用VSCode可以更方便地查看变量,单步调试代码。添加lanch.json文件,将以下内容覆盖。按F5启动调试,代码即停止在main函数处。
 {
    // Use IntelliSense to learn about possible attributes.
    // Hover to view descriptions of existing attributes.
    // For more information, visit: https://go.microsoft.com/fwlink/?linkid=830387
    "version": "0.2.0",
    "configurations": [
        {
            "name": "Launch QEMU to debug HelloWorld.elf",
            "type": "cppdbg",
            "request": "launch",
            "program": "${workspaceFolder}/HelloWorld.elf",
            "cwd": "${workspaceFolder}",
            "miDebuggerPath": "arm-none-eabi-gdb",
            "miDebuggerServerAddress": "localhost:1234",
            "stopAtEntry": true,
            "preLaunchTask": "Run QEMU"
        }
    ]
}

- 1
- 2
- 3
- 4
- 5
- 6
- 7
- 8
- 9
- 10
- 11
- 12
- 13
- 14
- 15
- 16
- 17
- 18
- 19
3.1.4. 代码
代码包括完整的固件,只需要安装交叉编译工具和qemu,即可以测试。
- make 编译。
- make qemu 仿真运行。
- make qemu-remote
- gdb -x gdbinit启用调试。
代码路径:https://github.com/feihe027/qemu_mcu
3.2. 嵌入式Linux
3.2.1. ubuntu
3.2.1.1. 安装运行
下面是Cortex-A57 CPU来安装Linux。
- 下载Linux镜像,从官方网站下载ubuntu-20.04-live-server-arm64.iso。(服务器版本无UI)
- 下载EFI启动文件
wget http://releases.linaro.org/components/kernel/uefi-linaro/16.02/release/qemu64/QEMU_EFI.fd -O /data/kvm/QEMU_EFI.fd
- 创建启动盘镜像
qemu-img create ubuntu20.04-arm64.img 32G
- 创建nvme SSD镜像
qemu-img create -f qcow2 nvme.qcow2 10G
- 安装系统
注意,上面4个文件统一放到新建的虚拟机目录,进入目录执行下列命令
qemu-system-aarch64 -machine virt
-cpu cortex-a57
-smp 2
-m 4G
-bios QEMU_EFI.fd
-device virtio-scsi-device
-device scsi-cd,drive=cdrom
-drive if=none,file=ubuntu-20.04-live-server-arm64.iso,id=cdrom,media=cdrom
-device virtio-blk-device,drive=vd0
-drive if=none,file=ubuntu20.04-arm64.img,id=vd0
-drive file=nvme.qcow2,if=none,id=nvme0 -device nvme,drive=nvme0,serial=foo
-net nic -net tap,ifname=tap0,script=no,downscript=no -nographic
几分钟后安装界面,默认往下执行即可,设置用户名密码等,最终进入安装流程,安装会比较慢。安装完成之后,直接关闭当前控制台窗口,不要选Restart,会重新进行安装。
6. 启动虚拟机
启动虚拟机和安装差不多,只是不用cdrom系统文件,直接从镜像启动即可。
qemu-system-aarch64 -machine virt
-cpu cortex-a57
-smp 2
-m 4G
-bios QEMU_EFI.fd
-device virtio-blk-device,drive=vd0
-drive if=none,file=ubuntu20.04-arm64.img,id=vd0
-drive file=nvme.qcow2,if=none,id=nvme0 -device nvme,drive=nvme0,serial=foo
-net nic -net tap,ifname=tap0,script=no,downscript=no -nographic
启动之后,等一两分钟,就会进入系统,输入用户名密码登录。
3.2.2. 调试内核
3.2.2.1. 编译内核
- 下载Kernel代码,测试使用6.8-rc5
git clone https://gitee.com/mirrors/linux_old1.git
- 安装工具链
sudo apt-getinstall gcc-aarch64-linux-gnu
- 配置内核选项
cd linux_old1
// arch/arm64/configs/defconfig 中将CONFIG_RANDOMIZE_BASE=y修改成CONFIG_RANDOMIZE_BASE=n
// 检查CONFIG_DEBUG_KERNEL=y
// 检查CONFIG_DEBUG_INFO_REDUCED=y
make ARCH=arm64 CROSS_COMPILE=aarch64-linux-gnu- defconfig
- 编译内核
make ARCH=arm64 CROSS_COMPILE=aarch64-linux-gnu- Image -j8
根文件系统制作
根文件系统制作 - 下载最新busybox
- 配置busybox
make menuconfig
Settings —>
[] Build static binary (no shared libs) //静态编译
[] Build with debug information //可选,带调试信息,方便后续调试 - 编译
make && make install
3.2.2.2. 制作根文件
qemu-img create rootfs.img 512m
mkfs.ext4 rootfs.img
mkdir rootfs
sudo mount rootfs.img rootfs
sudo cp -rf _install/* rootfs
cd rootfs
sudo mkdir proc sys dev etc etc/init.d
sudo vim etc/init.d/rcS
sudo chmod +x etc/init.d/rcS
cd …
sudo umount rootfs
//# etc/init.d/rcS文件内容如下
#!/bin/sh
mount -t proc none /proc
mount -t sysfs none /sys
mount -t debugfs none /sys/kernel/debug
3.2.2.3. 运行
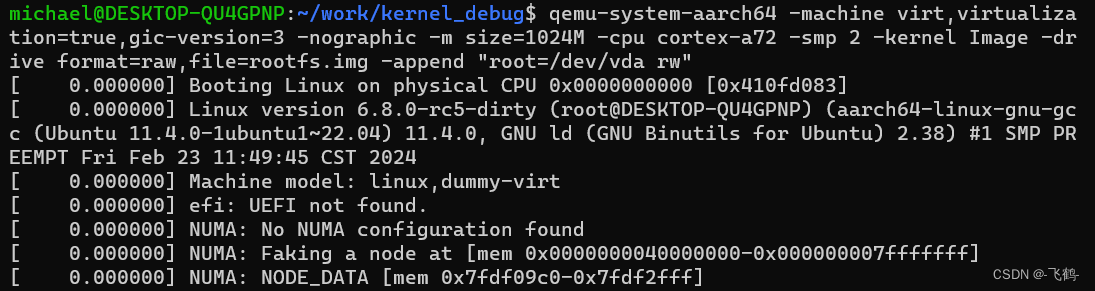
- 将arch/arm64/boot/Image 和rootfs.img 文件拷贝到任意目录。
- 执行下面命令
qemu-system-aarch64 -machine virt,virtualization=true,gic-version=3 -nographic -m size=1024M -cpu cortex-a72 -smp 2 -kernel Image -drive format=raw,file=rootfs.img -append “root=/dev/vda rw”
- 系统开始启动
3.2.2.4. 调试
- 远程启动
qemu-system-aarch64 -machine virt,virtualization=true,gic-version=3 -nographic -m size=1024M -cpu cortex-a72 -smp 2 -kernel Image -drive format=raw,file=rootfs.img -append “root=/dev/vda rw nokaslr” -S -s
- 调整GDB权限问题
创建/root/.gdbinit文件,并写入以下信息
set auto-load safe-path /
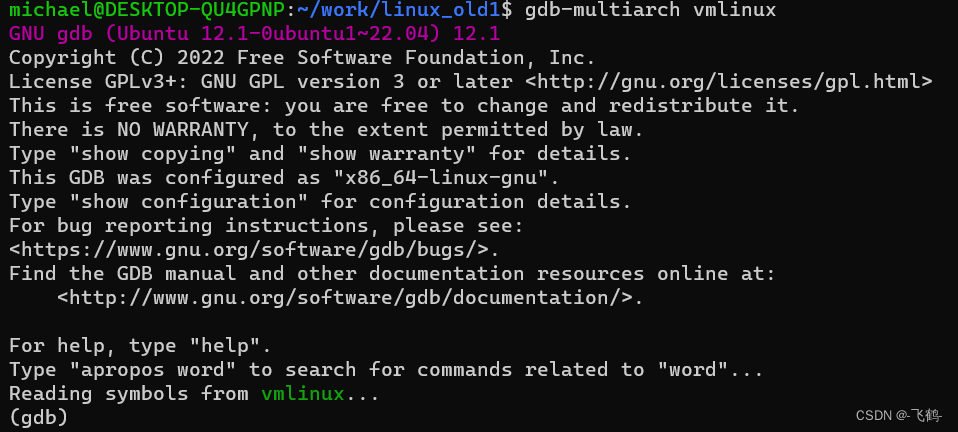
- 启动GDB
进入Kernel源代码目录,执行gdb-multiarch vmlinux。vmlinux是原始的内核elf文件,Image文件则是压缩之后的elf文件。
- 连接远程调试,添加断点函数
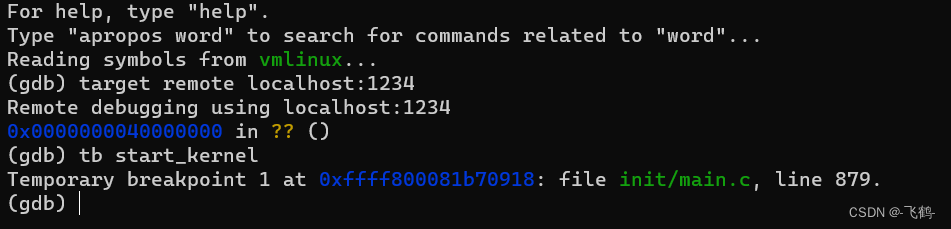
- VSCode调试
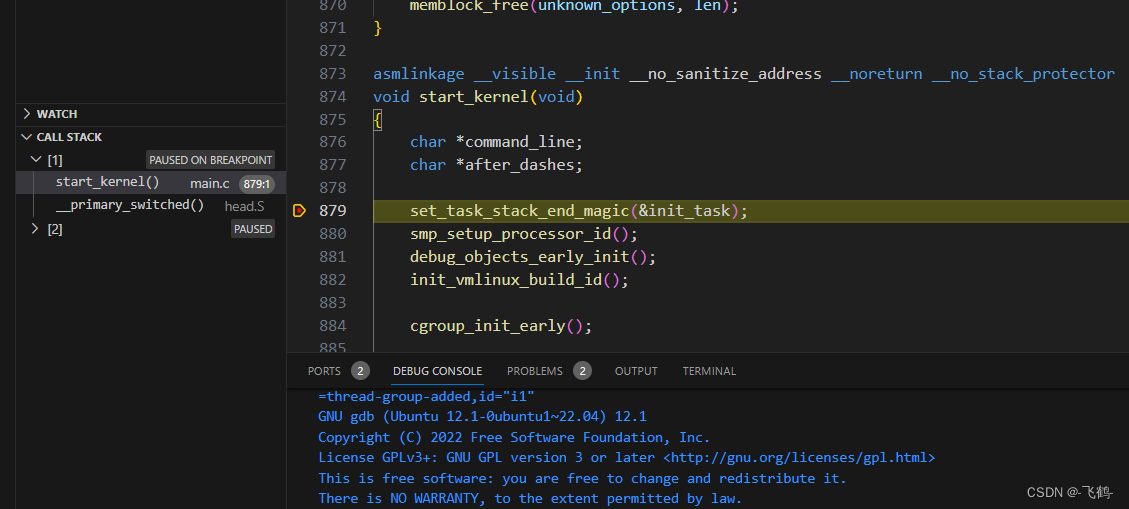
gdb调试不太方便,用VSCode更方便。用VSCode打开Kernel源代码,在.vscode目录添加launch.josn文件,内容如下,然后找到init/main.c的的start_kernel函数下断点,然后按F5启动调试。
{
    // Use IntelliSense to learn about possible attributes.
    // Hover to view descriptions of existing attributes.
    // For more information, visit: https://go.microsoft.com/fwlink/?linkid=830387
    "version": "0.2.0",
    "configurations": [
        {
            "name": "Launch QEMU to debug HelloWorld.elf",
            "type": "cppdbg",
            "request": "launch",
            "program": "${workspaceFolder}/vmlinux",
            "cwd": "${workspaceFolder}",
            "miDebuggerPath": "gdb-multiarch",
            "miDebuggerServerAddress": "localhost:1234",
            "stopAtConnect": true,
            "stopAtEntry": true,
        }
    ]
}
- 1
- 2
- 3
- 4
- 5
- 6
- 7
- 8
- 9
- 10
- 11
- 12
- 13
- 14
- 15
- 16
- 17
- 18
- 19
4. 扩展QEMU
4.1. 下载代码
开发代码基于qemu 8.2.1版本。
git clone https://gitee.com/mirrors/qemu.git
4.2. 编译
要扩展QEMU的功能,肯定需要用到调试,所以编译时需要打开debug选项,并且可以指定编译的工具来减少编译时间。详细编译配置,参见./configure -help。如下只编译riscv版本。
./configure --target-list=riscv32-softmmu --enable-debug --disable-werror
make -j8
4.3. 添加uart
qemu是默认一块完整的开发板,其模拟的硬件不仅有cpu,还有各种外设。相关代码放在hw目录,uart外设则放 在char目录中。
- 添加uart代码。
cmsdk-apb-uart是mps2主板(支持Cortext-M7)配套的uart,我们将其移植到riscv中来。将cmsdk-apb-uart改为ys_uart。并将函数中的cmsdk-apb-uart也相应修改为ys_uart。 - 添加打印函数
uart中用到的一些函数,是编译时python调用trace-event文件中的相关描述生成的。所以在trace-event中添加:
ys_uart.c
ys_uart_read(uint64_t offset, uint64_t data, unsigned size) “CMSDK APB UART read: offset 0x%” PRIx64 " data 0x%" PRIx64 " size %u"
ys_uart_write(uint64_t offset, uint64_t data, unsigned size) “CMSDK APB UART write: offset 0x%” PRIx64 " data 0x%" PRIx64 " size %u"
ys_uart_reset(void) “CMSDK APB UART: reset”
ys_uart_receive(uint8_t c) “CMSDK APB UART: got character 0x%x from backend”
ys_uart_tx_pending(void) “CMSDK APB UART: character send to backend pending”
ys_uart_tx(uint8_t c) “CMSDK APB UART: character 0x%x sent to backend”
ys_uart_set_params(int speed) “CMSDK APB UART: params set to %d 8N1”
- 编译配置
qemu是采用kconfig配置和meson来编译的,所以需要配置char目录的Kconfig文件,添加:
system_ss.add(when: ‘CONFIG_YS_UART’, if_true: files(‘ys_uart.c’))
Kconfig文件添加
config YS_UART
bool
- 给hw/riscv/virt.c添加自定义的uart
#include "hw/char/ys_uart.h"  // 添加头文件

// 在函数virt_machine_inti中添加如下代码
DeviceState *dev = qdev_new(TYPE_YS_UART);
SysBusDevice *sbd = SYS_BUS_DEVICE(dev);
qdev_prop_set_chr(dev, "chardev", serial_hd(0));
qdev_prop_set_uint32(dev, "pclk-frq", 25000000);
sysbus_realize_and_unref(sbd, &error_fatal);
sysbus_mmio_map(sbd, 0, 0x40004000);
// 上面的代码为新添加
serial_mm_init(system_memory, memmap[VIRT_UART0].base,
                   0, qdev_get_gpio_in(mmio_irqchip, UART0_IRQ), 399193,
                   serial_hd(1), DEVICE_LITTLE_ENDIAN);
- 1
- 2
- 3
- 4
- 5
- 6
- 7
- 8
- 9
- 10
- 11
- 12
- 13
- 修改machine名
将hw/riscv/virt.c、virt.h中的
MACHINE_TYPE_NAME(“virt”),
// 修改为
MACHINE_TYPE_NAME(“ys_virt”), - 代码
相关代码见:https://gitee.com/michael_duan/qemu_riscv.git
4.4. 测试
4.4.1. 固件
#define UART0_ADDRESS (0x40004000UL)
#define UART0_DATA (*(((volatile uint32_t *)(UART0_ADDRESS + 0UL))))
#define UART0_STATE (*(((volatile uint32_t *)(UART0_ADDRESS + 4UL))))
#define UART0_CTRL (*(((volatile uint32_t *)(UART0_ADDRESS + 8UL))))
#define UART0_BAUDDIV (*(((volatile uint32_t *)(UART0_ADDRESS + 16UL))))
#define TX_BUFFER_MASK (1UL)

static void InitUart(void)
{
    UART0_BAUDDIV = 16;
    UART0_CTRL = 1;
}
/*-----------------------------------------------------------*/

static int UartWrite(char *pcString, int iStringLength)
{
    int iNextChar;

    /* Output the formatted string to the UART. */
    for (iNextChar = 0; iNextChar < iStringLength; iNextChar++)
    {
        while ((UART0_STATE & TX_BUFFER_MASK) != 0)
        {
        }

        UART0_DATA = *pcString;
        pcString++;
    }

    return iStringLength;
}

int main(void)
{
    InitUart();
    UartWrite("Hello World!\n", 13);

    while (1)
    {
        /* code */
    }
}
- 1
- 2
- 3
- 4
- 5
- 6
- 7
- 8
- 9
- 10
- 11
- 12
- 13
- 14
- 15
- 16
- 17
- 18
- 19
- 20
- 21
- 22
- 23
- 24
- 25
- 26
- 27
- 28
- 29
- 30
- 31
- 32
- 33
- 34
- 35
- 36
- 37
- 38
- 39
- 40
- 41
- 42
- 43
- 44
4.4.2. 调试
调试qemu,利用VSCode更,在.vscode目录中添加launch.json文件,添加如下内容:
{
    "version": "0.2.0",
    "configurations": [
        {
            "name": "Debug",
            "type": "cppdbg",
            "request": "launch",
            "args": ["-machine", "ys_virt", "-serial", "stdio", "-nodefaults",  "-bios", "none", "-smp", "1",  "-nographic",  "-kernel", "e:\\HelloWorld_riscv.elf"],
            "cwd": "${workspaceFolder}",
            "environment": [],
            "externalConsole": false,
            "stopAtEntry": false,
            "windows": {
                "MIMode": "gdb",
                "miDebuggerPath": "C:\\msys64\\mingw64\\bin\\gdb.exe",
                "program": "${workspaceFolder}\\build\\qemu-system-riscv32.exe",
            },
        }
    ]
}
- 1
- 2
- 3
- 4
- 5
- 6
- 7
- 8
- 9
- 10
- 11
- 12
- 13
- 14
- 15
- 16
- 17
- 18
- 19
- 20
- 21
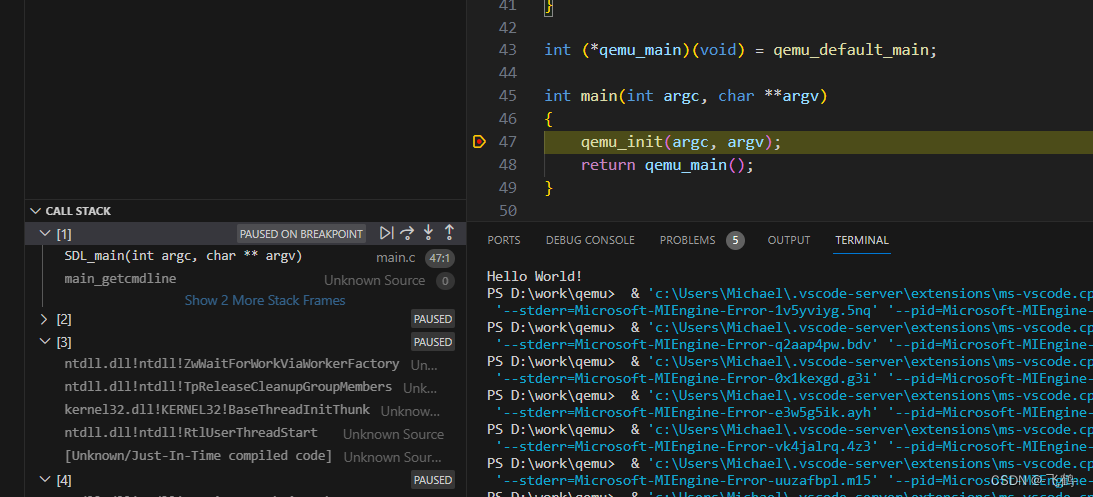
在\system\main.c的int main(int argc, char **argv)处添加断点,按F5调试,显示如下:
4.4.3. 验证
./build/qemu-system-riscv32.exe -machine ys_virt -serial stdio -nodefaults -bios none -kernel /e/HelloWorld_riscv.elf -nographic


