- 1设置hive的执行引擎_0506如何将Hue4.0版本中默认执行引擎设置为Hive而非Impala
- 2高校导师在微信群里公然委托关照考研复试,学校通报处理情况!
- 3腾讯AniPortrait开源:音频合成逼真人脸动画,对标阿里EMO_腾讯aniportrait 模型下载
- 4stable diffusion常用的模型_stable diffusion 常用模型
- 5基于Kafka+Flink+Redis的电商大屏实时计算案例
- 6前端自动化测试(二)Vue Test Utils + Jest_vue+jest 测试api
- 7【前端】从零开始学习编写HTML
- 820240624 每日AI必读资讯
- 9数据结构之冒泡排序图文详解及代码(C++实现)_c++冒泡算法代码
- 10Dagger2 在 Android SystemUI 中的应用_android systemui11 dagger2
实战Elasticsearch集群的部署_elasticserrch集群
赞
踩
目录
2.上传elasticsearch包并解压存放在/usr/local下
3.编译配置文件 /usr/local/congif/elasticsearch.yml
5、安装配置head监控插件 (只在第一台es部署 例elk机器)
1.安装插件Elasticsearch-head-master
1、环境准备
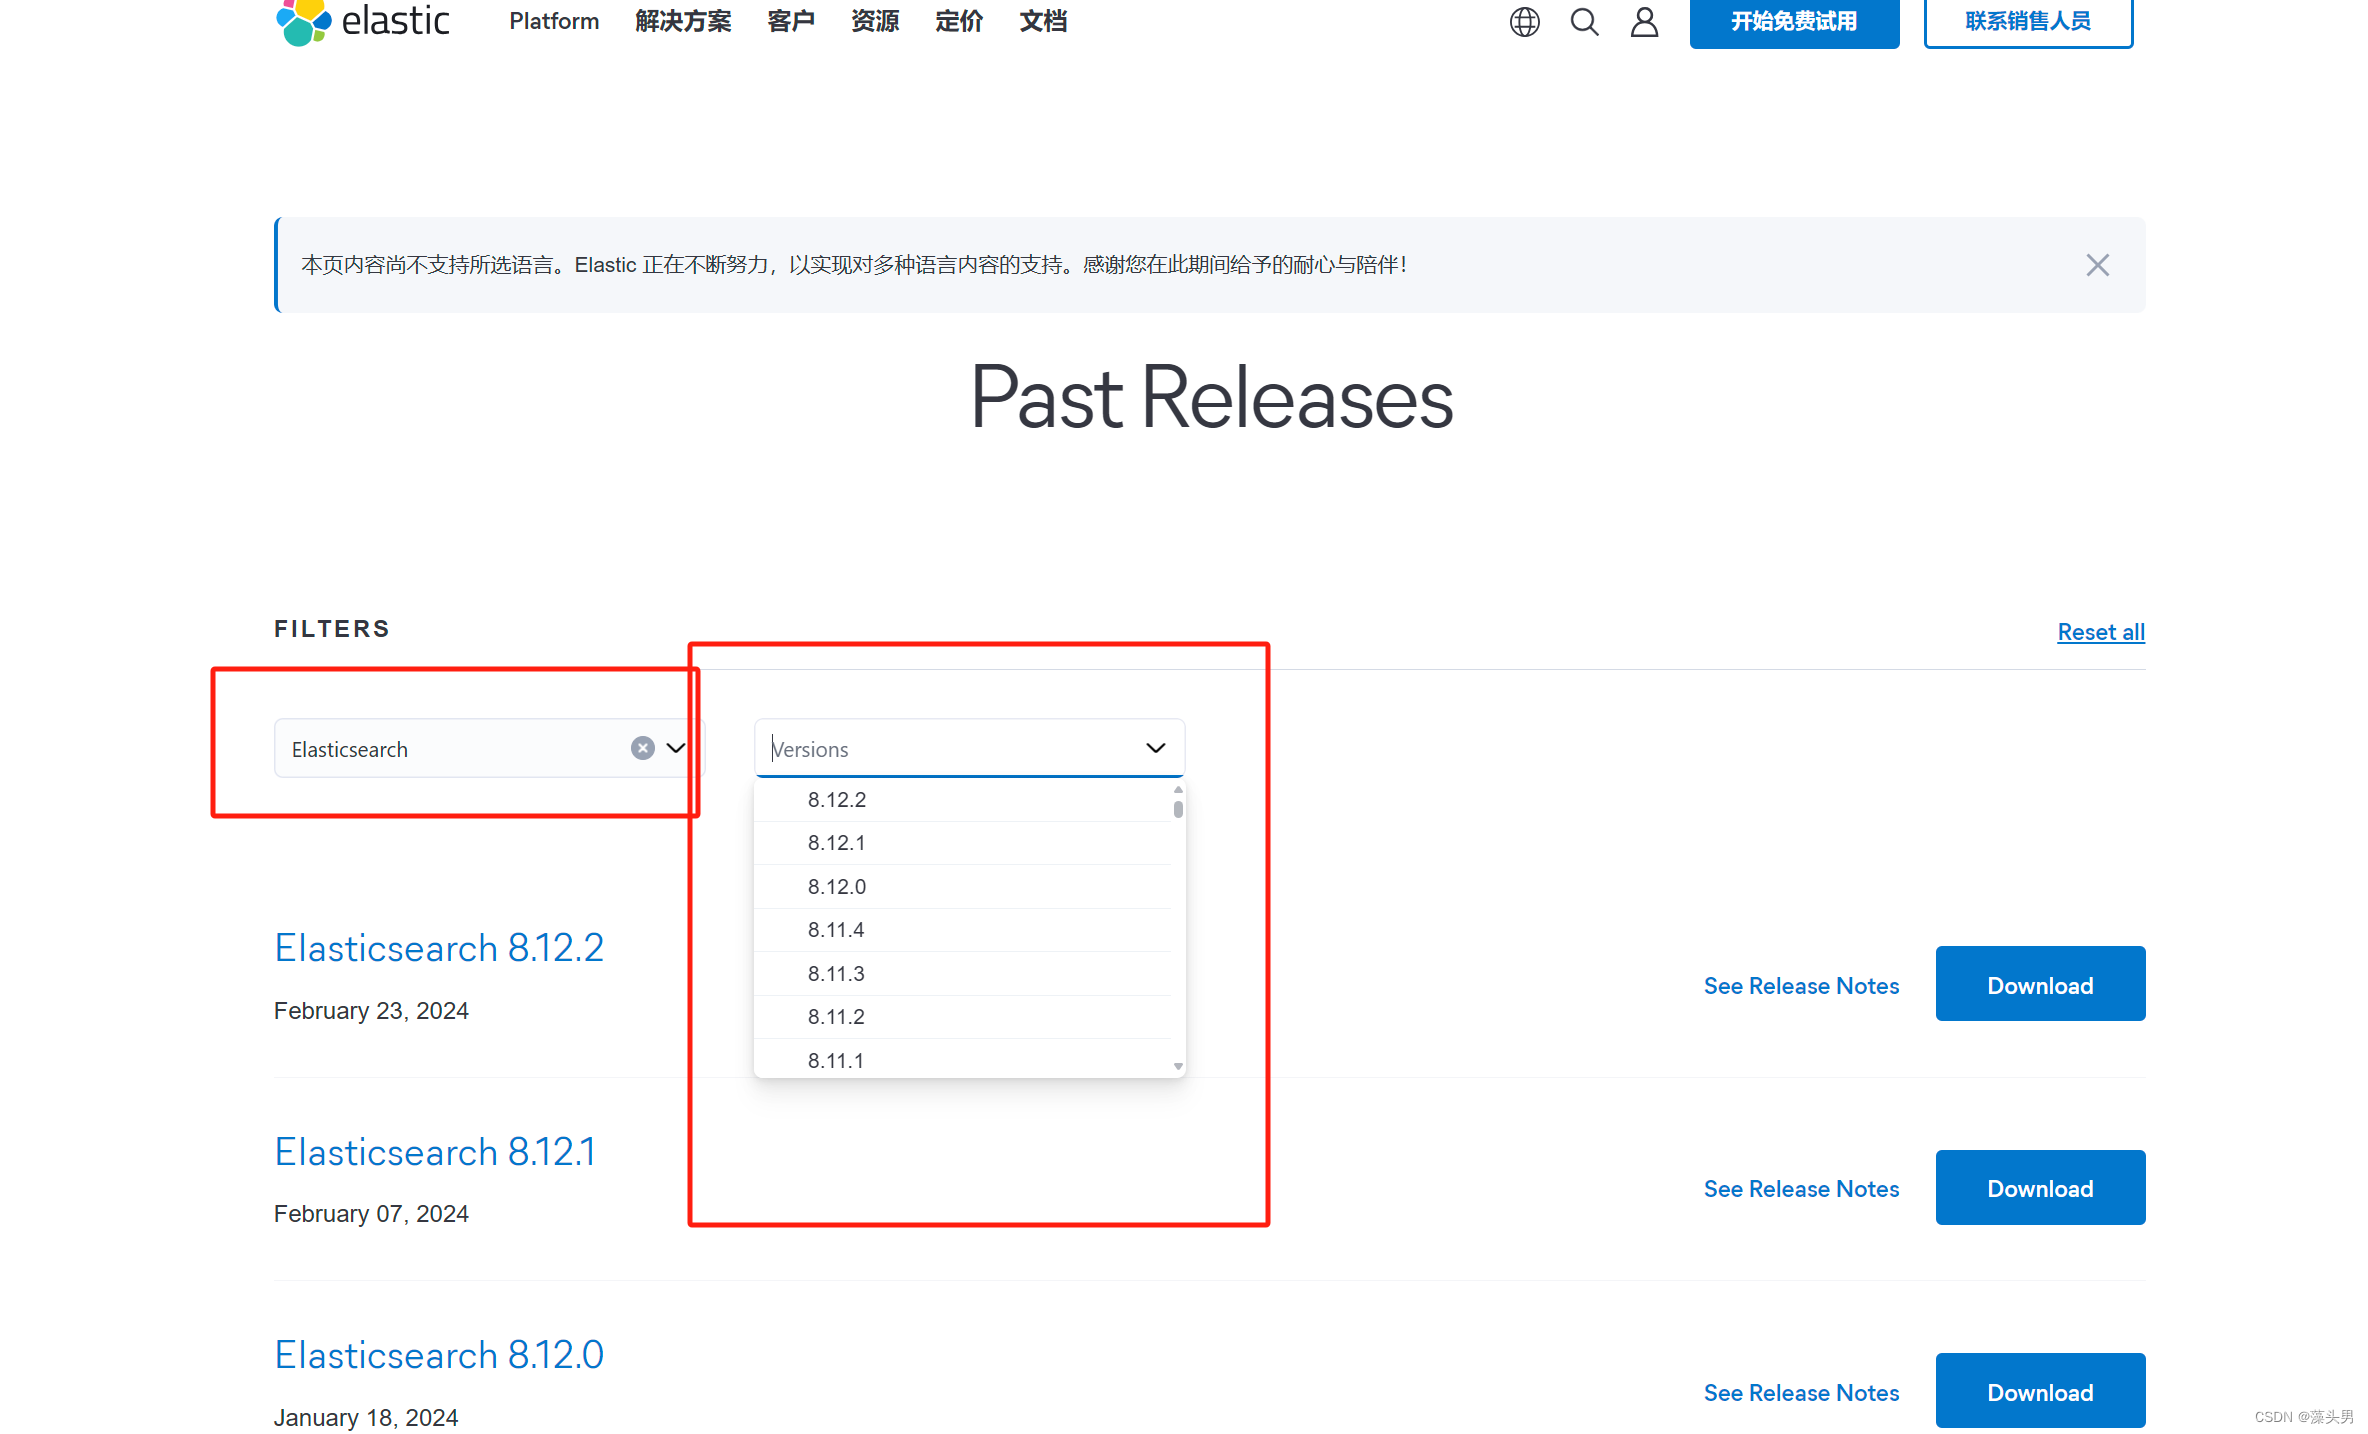
官网版本选择
Past Releases of Elastic Stack Software | Elastic
这里我们选择的是
Elasticsearch: 7.13.2
Logstash: 7.13.2
Kibana: 7.13.2
Kafka: 2.11-1
Filebeat: 7.13.2
准备三台机器
| 安装软件 | 主机名 | IP地址 | 系统版本 | 配置 |
|---|---|---|---|---|
| Elasticsearch | Elk | 10.12.153.71 | centos7.5.1804 | 2核4G |
| Elasticsearch | Es1 | 10.12.153.72 | centos7.5.1804 | 2核4G |
| Elasticsearch | Es2 | 10.12.153.133 | centos7.5.1804 | 2核4G |
1)关闭防火墙 selinux
2)修改主机名
3)域名解析
2、配置es集群 (三台机器同时操作)
1.创建es用户密码
- useradd es
- echo "密码" | passwd --stdin "es"
2.上传elasticsearch包并解压存放在/usr/local下
Past Releases of Elastic Stack Software | Elastic
选择对应版本下载

tar xf /usr/local/package/elasticsearch-7.13.2-linux-x86_64.tar.gz -C /usr/local/改名
mv /usr/local/elasticsearch-7.13.2 /usr/local/es3.编译配置文件 /usr/local/congif/elasticsearch.yml
vim /usr/local/es/config/elasticsearch.yml全部删除,添加以下内容
cluster.name: bjbpe01-elk
cluster.initial_master_nodes: ["10.12.153.71","10.12.153.72","10.12.153.133"] # 单节点模式这里的地址只填写本机地>址
node.name: elk01 #节点名三台机器不能一样 可以设置为elk01 elk02 elk03
node.master: true
node.data: true
path.data: /data/elasticsearch/data
path.logs: /data/elasticsearch/logs
bootstrap.memory_lock: false
bootstrap.system_call_filter: false
network.host: 0.0.0.0
http.port: 9200
transport.tcp.port: 9300
#单节点模式下,将discovery开头的行注释
discovery.seed_hosts: ["10.12.153.71","10.12.153.72"] #写另外两台es的ip
discovery.zen.minimum_master_nodes: 2
discovery.zen.ping_timeout: 150s
discovery.zen.fd.ping_retries: 10
client.transport.ping_timeout: 60s
http.cors.enabled: true
http.cors.allow-origin: "*"由于我们的笔记本性能有限,如果要使用单节点多实例的话,添加在原有配置中添加
node.max_local_storage_nodes: 这个配置限制了单节点上可以开启的ES存储实例的个数
4.设置JVM堆大小 #7.0默认为4G
- sed -i 's/## -Xms4g/-Xms4g/' /usr/local/es/config/jvm.options
- sed -i 's/## -Xmx4g/-Xmx4g/' /usr/local/es/config/jvm.options
注:
确保堆内存最小值(Xms)与最大值(Xmx)的大小相同,防止程序在运行时改变堆内存大小。
如果系统内存足够大,将堆内存最大和最小值设置为31G,因为有一个32G性能瓶颈问题。
堆内存大小不要超过系统内存的50%
5.创建es数据及日志存储目录
- mkdir -p /data/elasticsearch/data
- mkdir -p /data/elasticsearch/logs
6.修改安装目录及存储目录权限
- chown -R es.es /data/elasticsearch
- chown -R es.es /usr/local/es
3、系统优化
1.增加最大文件打开数
永久生效
echo "* soft nofile 65536" >> /etc/security/limits.conf2.增加最大进程数
echo "* soft nproc 65536" >> /etc/security/limits.conf* soft nofile 65536
* hard nofile 131072
* soft nproc 4096
* hard nproc 4096
更多的参数调整可以直接用这个
3.增加最大内存映射数
- echo "vm.max_map_count=262144" >> /etc/sysctl.conf
- sysctl -p
4、启动
启动命令
su - es -c "cd /usr/local/es && nohup bin/elasticsearch "启动时报4096 错解决方法如下:
切换到root用户下面,
vim /etc/security/limits.conf在最后添加
* hard nofile 65536
* hard nofile 65536
重新启动elasticsearch,还是无效?
必须重新登录启动elasticsearch的账户才可以,例如我的账户名是elasticsearch,退出重新登录。
另外*也可以换为启动elasticsearch的账户也可以,* 代表所有,其实比较不合适
启动还会遇到另外一个问题,就是
max virtual memory areas vm.max_map_count [65530] is too low, increase to at least [262144]
意思是:elasticsearch用户拥有的内存权限太小了,至少需要262114。这个比较简单,也不需要重启,直接执行
sysctl -w vm.max_map_count=262144
就可以了
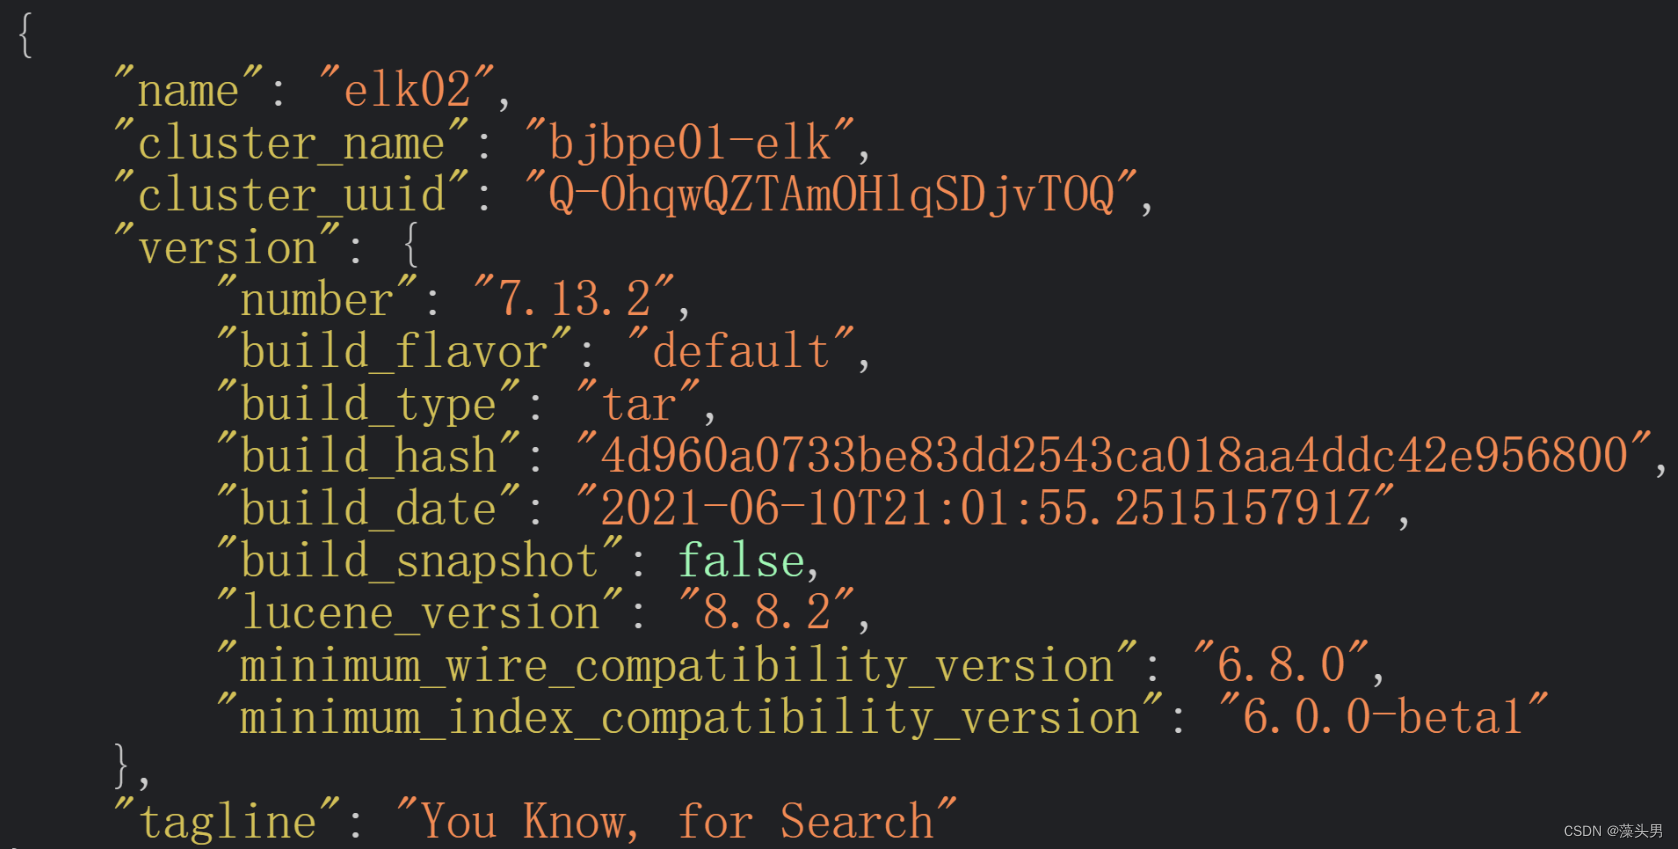
浏览器访问ip:9200
例:es2
正常页面显示如下
5、安装配置head监控插件 (只在第一台es部署 例elk机器)
1.安装插件Elasticsearch-head-master
GitHub - mobz/elasticsearch-head: A web front end for an elastic search cluster

下载zip包到本地上传
![]()
安装gzip解压工具解压
- yum -y install unzip
-
- unzip elasticsearch-head-master.zip
-
- mv elasticsearch-head-master /usr/local/
2.安装node
- tar xf node-v10.24.1-linux-x64.tar.gz
-
- mv node-v10.24.1-linux-x64 /usr/local/node
添加环境变量
- vim /etc/profile.d/node.sh
-
- export PATH=/usr/local/node/bin:$PATH
-
- 保存退出
-
- 重新加载环境变量
-
- source /etc/profile.d/node.sh
-
- node --version
3.安装grunt
cd /usr/local/elasticsearch-head-master切换淘宝源
npm config set registry https://registry.npmmirror.com- npm install -g grunt-cli
- grunt -version
4.修改head的源码
vim /usr/local/elasticsearch-head-master/Gruntfile.js +99 
添加hostname,注意在上一行末尾添加逗号`,`hostname 不需要添加逗号
vim /usr/local/elasticsearch-head-master/_site/app.js +4374
原本是`http://localhost:9200 `,如果head和ES不在同一个节点,注意修改成ES的IP地址
5.下载head必要的文件

安装bzip2解压工具
yum -y install bzip2创建phantomjs目录
- mkdir /tmp/phantomjs
-
- mv phantomjs-2.1.1-linux-x86_64.tar.bz2 /tmp/phantomjs/
- 修改权限
- chmod 777 /tmp/phantomjs -R
6.运行head
- cd /usr/local/elasticsearch-head-master/
- npm install
- nohup grunt server &
- ss -tnlp
npm install 执行错误解析:
npm ERR! code ELIFECYCLE
npm ERR! errno 1
npm ERR! phantomjs-prebuilt@2.1.16 install: `node install.js`
npm ERR! Exit status 1
npm ERR!
npm ERR! Failed at the phantomjs-prebuilt@2.1.16 install script.
npm ERR! This is probably not a problem with npm. There is likely additional logging output above.npm ERR! A complete log of this run can be found in:
npm ERR! /root/.npm/_logs/2021-04-21T09_49_34_207Z-debug.log
解决:
npm install phantomjs-prebuilt@2.1.16 --ignore-scripts # 具体的版本按照上述报错修改7.测试
浏览器页面访问ip:9100
查看集群状态以及数据

扩展
Kibana部署 (还是在elk机器操作)
1. 安装配置Kibana
Past Releases of Elastic Stack Software | Elastic

![]()
tar zxf kibana-7.13.2-linux-x86_64.tar.gz -C /usr/local/2.修改配置文件
vim /usr/local/kibana-7.13.2-linux-x86_64/config/kibana.yml添加以下内容
server.port: 5601
server.host: "10.12.153.71"
elasticsearch.hosts: ["http://10.12.153.71:9200"]
kibana.index: ".kibana"
i18n.locale: "zh-CN"
配置项含义:
server.port kibana服务端口,默认5601
server.host kibana主机IP地址,默认localhost
elasticsearch.url 用来做查询的ES节点的URL,默认http://localhost:9200
kibana.index kibana在Elasticsearch中使用索引来存储保存的searches, visualizations和dashboards,默认.kibana
3.启动
- cd /usr/local/kibana-7.13.2-linux-x86_64/
- 启动命令
- ./bin/kibana
如果报错为

我们在启动命令后加--allow-root重新执行即可
./bin/kibana --allow-root4.浏览器页面访问ip:5601

希望能够帮助到大家!!!