
热门标签
热门文章
- 1华为的热机备份和流量限制
- 2前端7大常用布局方式_前端布局
- 3超简单,手把手教你在本地运行Llama 3大模型_ollama run llama3
- 4直播系统源码性能调优方案最全最详细
- 5【项目开发记录】微信小程序_colorui底部导航栏
- 6基于Hadoop2.7.2+ ICTCLAS2015的并行化中文分词
- 7HarmonyOS Next开发学习手册——UI开发 (兼容JS的类Web开发范式)
- 8信创基础软件之信创云介绍_信创软件
- 9英伟达A100、A800、H100、H800、V100以及RTX 4090的详细性能参数对比_a100 a800 h100 h800
- 10基于复旦微的 FMQL45T900 ARM+FPGA+AD全国产化解决方案,兼容XILINX的XC7Z045-2FFG900I (即ZYNQ7045)
当前位置: article > 正文
Vue.js基础-14-axios(json-server,get,post,put,delete,传参,Query,Params,Body)_vue前端的get请求中带params与body
作者:代码探险家 | 2024-07-12 17:26:23
赞
踩
vue前端的get请求中带params与body
引用:
<script src="https://unpkg.com/axios/dist/axios.min.js"></script>
- 1
1. 创建json-server(工具准备,非必要)
创建一个json-server 服务,以便为之后axios练习提供各种访问方法。
1.1 安装
npm install -g json-server
- 1
1.2 启动服务
- 配置服务
创建shibi-test目录,并在目录下创建 db.json 文件,内容如下:
{
  "xishu": [
    {
      "id": 1,
      "name": "关羽",
      "attack": 93
    },
    {
      "id": 2,
      "name": "张飞",
      "attack": 91
    },
	{
      "id": 3,
      "name": "赵云",
      "attack": 95
    }
  ],
  "dongwu": [
    {
      "id": 1,
      "name": "吕蒙",
      "attack": 82
    },
    {
      "id": 2,
      "name": "甘宁",
      "attack": 85
    }
  ],
    "caowei": [
    {
      "id": 1,
      "name": "张辽",
      "attack": 88
    },
    {
      "id": 2,
      "name": "许褚",
      "attack": 90
    }
  ],
  "battleinfo": {
    "location": "赤壁",
	"time": "208 A.D"
  }
}
- 1
- 2
- 3
- 4
- 5
- 6
- 7
- 8
- 9
- 10
- 11
- 12
- 13
- 14
- 15
- 16
- 17
- 18
- 19
- 20
- 21
- 22
- 23
- 24
- 25
- 26
- 27
- 28
- 29
- 30
- 31
- 32
- 33
- 34
- 35
- 36
- 37
- 38
- 39
- 40
- 41
- 42
- 43
- 44
- 45
- 46
- 47
- 启动
json-server --watch db.json
- 1
输出
  \{^_^}/ hi!

  Loading db.json
  Done

  Resources
  http://localhost:3000/xishu
  http://localhost:3000/dongwu
  http://localhost:3000/caowei
  http://localhost:3000/battleinfo

  Home
  http://localhost:3000

  Type s + enter at any time to create a snapshot of the database
  Watching...
- 1
- 2
- 3
- 4
- 5
- 6
- 7
- 8
- 9
- 10
- 11
- 12
- 13
- 14
- 15
- 16
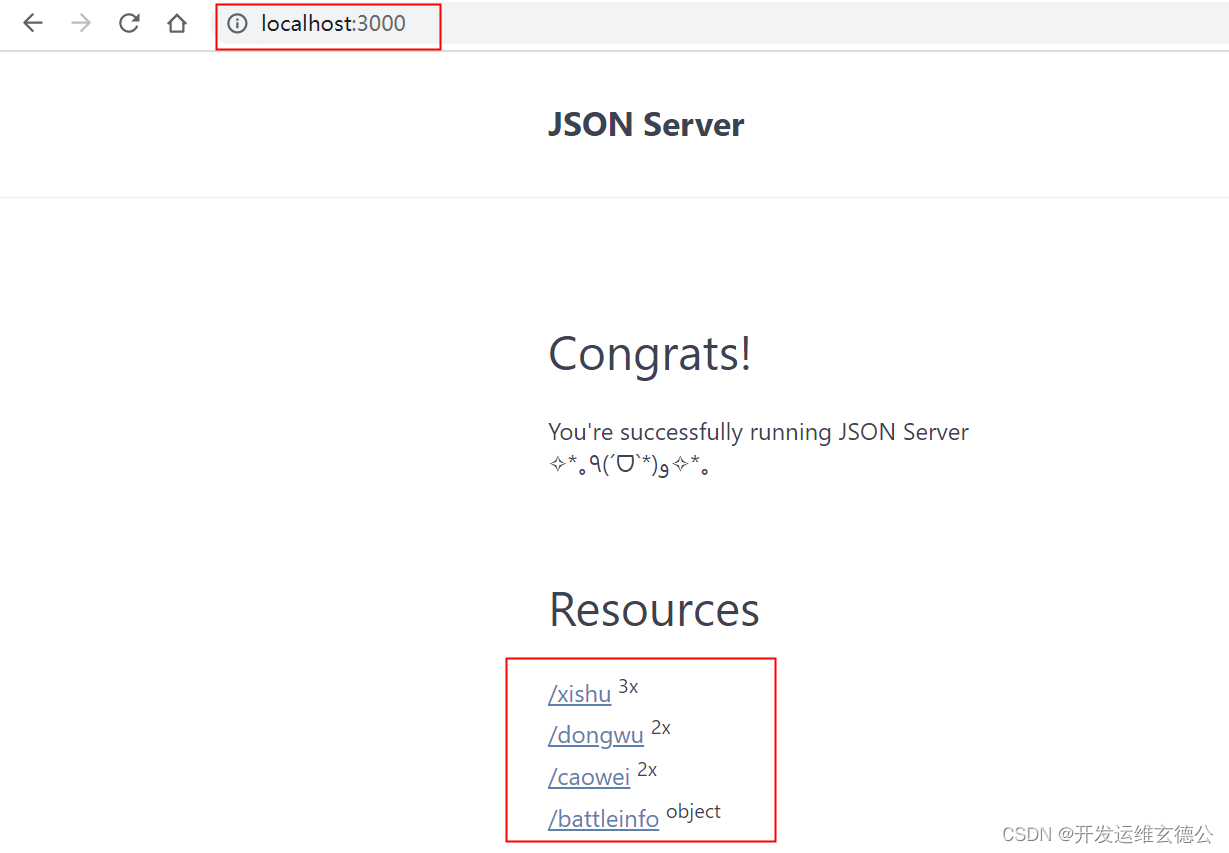
1.3 查看结果
- url
按上边输出中可见:http://localhost:3000 - 页面
2. 发送请求
2.1 get 请求
完整示例
<!DOCTYPE html>
<html lang="en">

<head>
  <meta charset="UTF-8">
  <title>axios基本使用</title>
</head>

<body>
  <button id="xishu">发送GET请求</button> <br><br>

</body>
<script src="https://unpkg.com/axios/dist/axios.min.js"></script>
<script>
  //发送get
  document.getElementById("xishu").onclick = function () {
    axios.get("http://localhost:3000/xishu/1")
      .then(response => {
        console.log(response);
      })
  };
</script>

</html>
- 1
- 2
- 3
- 4
- 5
- 6
- 7
- 8
- 9
- 10
- 11
- 12
- 13
- 14
- 15
- 16
- 17
- 18
- 19
- 20
- 21
- 22
- 23
- 24
-
结果显示
-
点击 按钮发送请求
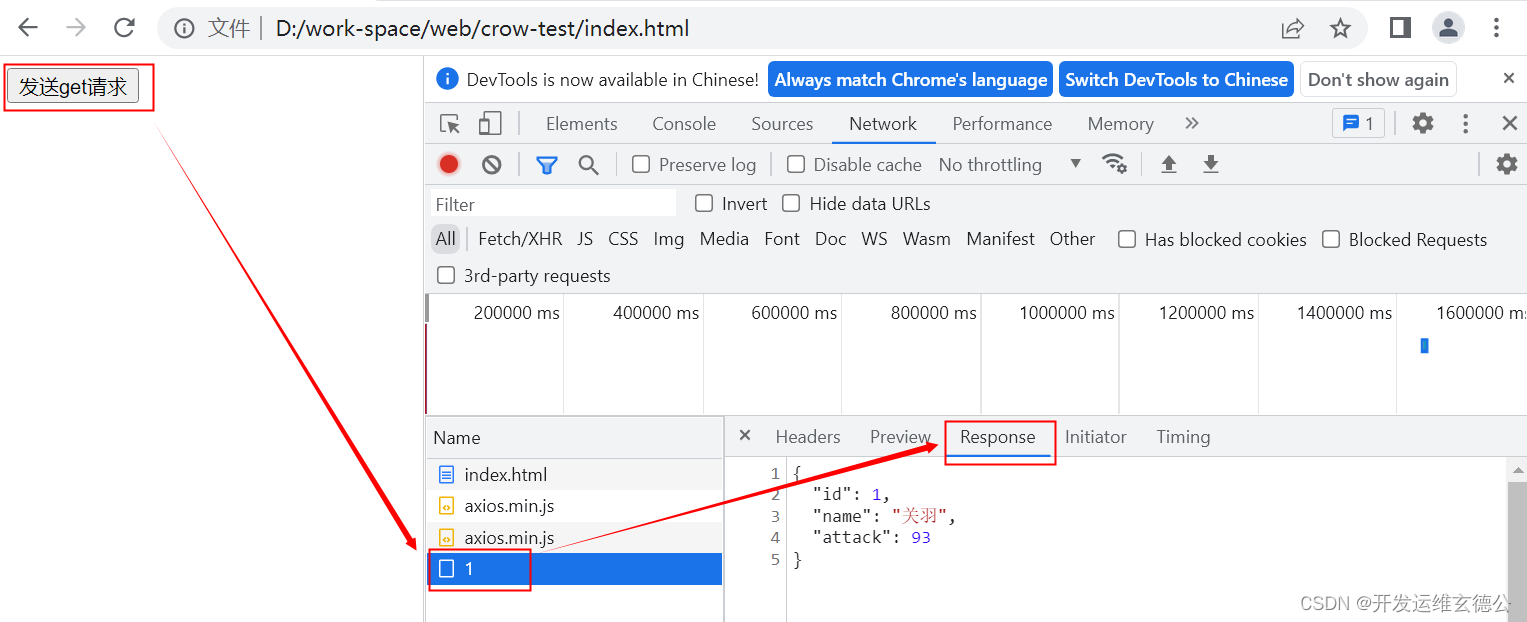
控制台输出

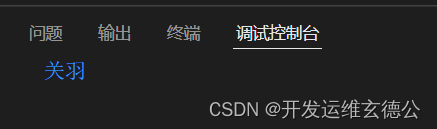
- 控制台中我们可以看到 response的结果如上边所示,因此我们可以过滤取到的值:
比如,我们要取那么的结果,现在打印到控制台日志(当然也可以在任意地方使用)
console.log(response.data.name);
- 1
- 控制台输出
另一个方法
<!DOCTYPE html>
<html lang="en">
<head>
    <meta charset="UTF-8">
    <title>axios基本使用</title>
</head>
<body>
    <button id="xishu">发送get请求</button> <br><br>

</body>
<script src="https://unpkg.com/axios/dist/axios.min.js"></script>
<script>
    //发送get
    document.getElementById("xishu").onclick = function(){
       axios({
        method:"GET",
        url:"http://localhost:3000/xishu/1"
       }).then(response=>{
           console.log(response);
       })
    };
</script>
</html>
- 1
- 2
- 3
- 4
- 5
- 6
- 7
- 8
- 9
- 10
- 11
- 12
- 13
- 14
- 15
- 16
- 17
- 18
- 19
- 20
- 21
- 22
- 23
2.2 POST请求
完整示例
<!DOCTYPE html>
<html lang="en">

<head>
  <meta charset="UTF-8">
  <title>axios基本使用</title>
</head>

<body>
  <button id="xishu">发送POST请求</button> <br><br>

</body>
<script src="https://unpkg.com/axios/dist/axios.min.js"></script>
<script>
  document.getElementById("xishu").onclick = function () {
    axios.post("http://localhost:3000/xishu",
      {
        name: "马超",
        attack: 93
      })
      .then(response => {
        console.log(response);
      })
  };
</script>

</html>
- 1
- 2
- 3
- 4
- 5
- 6
- 7
- 8
- 9
- 10
- 11
- 12
- 13
- 14
- 15
- 16
- 17
- 18
- 19
- 20
- 21
- 22
- 23
- 24
- 25
- 26
- 27
- 控制台输出

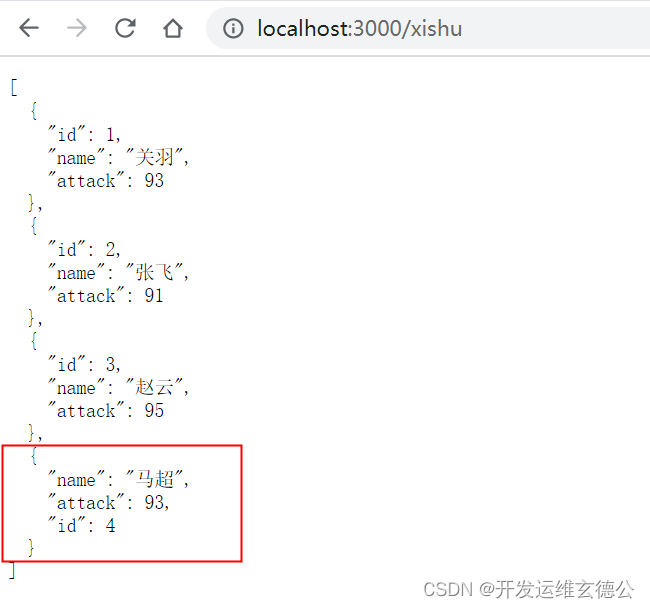
- 查看页面
如下可见多了马超的记录
另一个方法
```html
<!DOCTYPE html>
<html lang="en">
<head>
    <meta charset="UTF-8">
    <title>axios基本使用</title>
</head>
<body>
    <button id="xishu">发送POST请求</button> <br><br>

</body>
<script src="https://unpkg.com/axios/dist/axios.min.js"></script>
<script>
document.getElementById("xishu").onclick = function(){
       axios({
        method:"POST",
        url:"http://localhost:3000/xishu",
        data:{
            name: "马超",
            attack: 93
        }
       }).then(response=>{
           console.log(response);
       })
    };
</script>
</html>
- 1
- 2
- 3
- 4
- 5
- 6
- 7
- 8
- 9
- 10
- 11
- 12
- 13
- 14
- 15
- 16
- 17
- 18
- 19
- 20
- 21
- 22
- 23
- 24
- 25
- 26
- 27
2.3 PUT请求
完整示例
<!DOCTYPE html>
<html lang="en">

<head>
  <meta charset="UTF-8">
  <title>axios基本使用</title>
</head>

<body>
  <button id="xishu4">发送PUT请求</button> <br><br>

</body>
<script src="https://unpkg.com/axios/dist/axios.min.js"></script>
<script>
  document.getElementById("xishu4").onclick = function () {
    axios.put("http://localhost:3000/xishu/4",
      {
        name: "马超",
        attack: 92
      })
      .then(response => {
        console.log(response);
      })
  };
</script>

</html>
- 1
- 2
- 3
- 4
- 5
- 6
- 7
- 8
- 9
- 10
- 11
- 12
- 13
- 14
- 15
- 16
- 17
- 18
- 19
- 20
- 21
- 22
- 23
- 24
- 25
- 26
- 27
- 控制台输出

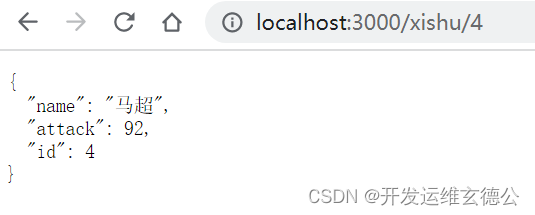
- 页面结果
可见,马超的结果已经修改了。
另一种方法
<!DOCTYPE html>
<html lang="en">
<head>
    <meta charset="UTF-8">
    <title>axios基本使用</title>
</head>
<body>
    <button id="xishu4">发送PUT请求</button> <br><br>

</body>
<script src="https://unpkg.com/axios/dist/axios.min.js"></script>
<script>
    document.getElementById("xishu4").onclick = function(){
       axios({
        method:"PUT",
        url:"http://localhost:3000/xishu/4",
        data:{
            name: "马超",
            attack: 92
        }
       }).then(response=>{
           console.log(response);
       })
    };
</script>
</html>
- 1
- 2
- 3
- 4
- 5
- 6
- 7
- 8
- 9
- 10
- 11
- 12
- 13
- 14
- 15
- 16
- 17
- 18
- 19
- 20
- 21
- 22
- 23
- 24
- 25
- 26
2.4 DELETE 请求
完整示例
- 完整代码
<!DOCTYPE html>
<html lang="en">

<head>
  <meta charset="UTF-8">
  <title>axios基本使用</title>
</head>

<body>
  <button id="xishu4">发送DELETE请求</button> <br><br>

</body>
<script src="https://unpkg.com/axios/dist/axios.min.js"></script>
<script>
  //发送get
  document.getElementById("xishu4").onclick = function () {
    axios.delete("http://localhost:3000/xishu/4")
      .then(response => {
        console.log(response);
      })
  };
</script>

</html>
- 1
- 2
- 3
- 4
- 5
- 6
- 7
- 8
- 9
- 10
- 11
- 12
- 13
- 14
- 15
- 16
- 17
- 18
- 19
- 20
- 21
- 22
- 23
- 24
- 控制台结果

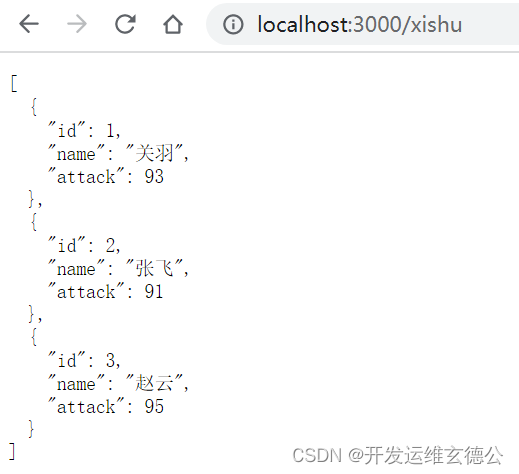
- 页面显示
如图可见,马超的信息被删除。
另一种方法
<!DOCTYPE html>
<html lang="en">
<head>
    <meta charset="UTF-8">
    <title>axios基本使用</title>
</head>
<body>
    <button id="xishu4">发送DELETE请求</button> <br><br>

</body>
<script src="https://unpkg.com/axios/dist/axios.min.js"></script>
<script>
    document.getElementById("xishu4").onclick = function(){
       axios({
        method:"DELETE",
        url:"http://localhost:3000/xishu/4",
       }).then(response=>{
           console.log(response);
       })
    };
</script>
</html>
- 1
- 2
- 3
- 4
- 5
- 6
- 7
- 8
- 9
- 10
- 11
- 12
- 13
- 14
- 15
- 16
- 17
- 18
- 19
- 20
- 21
- 22
3. 传参
3.1 Query
axios.get('URL?page_num=2&page_size=20')
- 1
3.2 Params
axios.post('URL', {
    params: {
      KEY: VALUE
    }
  })
- 1
- 2
- 3
- 4
- 5
3.3 Body
    axios.put("http://localhost:3000/xishu/4",
      {
        KEY1: VALUE1,
        KEY2: VALUE2
      })
- 1
- 2
- 3
- 4
- 5

声明:本文内容由网友自发贡献,不代表【wpsshop博客】立场,版权归原作者所有,本站不承担相应法律责任。如您发现有侵权的内容,请联系我们。转载请注明出处:https://www.wpsshop.cn/w/代码探险家/article/detail/815116
推荐阅读
相关标签

