- 1python关联分析代码_1行代码实现关联分析(Apriori)算法
- 2git本地创建新分支以及与远程分支关联_gitlab新建本地分支并关联远程分支
- 3python基础项目:超市服务管理系统(控制台实现)_python超市管理系统管理用户和普通用户
- 4zookeeper伪分布式集群搭建_第1关:仲裁模式与伪分布式环境搭建 头歌实践平台
- 5Android 7.0 之后抓包 unknown 和证书无效的解决方案(无需改代码)
- 6Strom、SparkStreaming以及Flink三种流式框架了解_storm flink sparkstreaming
- 7区块链挖矿的机制原理解析_stratum协议
- 8hadoop hdfs的datanode的一块磁盘故障导致服务器的根分区写满了_hdfs 磁盘故障
- 9flink-cdc 基础教程 附报错解决 2万字 (一)_windows flinkcdc操作
- 10Guitar Pro8.0吉他打谱作曲中文版有哪些新功能?_guitar pro 8
基于SpringSecurityOAuth2实现单点登录, 简单示例用于学习SpringSecurityOAuth2. 解决了遇到的所有SpringSecurityOAuth2的坑_springsecurity6-oauth2 客户端
赞
踩
概述
基于SpringSecurityOAuth2实现单点登录, 简单示例用于学习SpringSecurityOAuth2. 解决了遇到的所有SpringSecurityOAuth2的坑。添加了注销登录,扩展了短信登录, 验证码等功能,实现了Vue前后端分离情况下的OAuth2单点登录。 麻雀虽小五脏俱全,满足企业级应用.
详细
一、需求(要做什么)
1.基于SpringSecurityOAuth2实现单点登录,实现基于SpringSecurityOAuth2的客户端对接认证中心, 实现基于OAuth2协议的原始方法对接认证中心, 基于vue前后端分离的方式对接认证中心。
2.编写基于oauth2认证的4种认证模式的demo, 让初学者一看就懂。
3.实现登陆,登录通过账户密码登录, 也可通过手机验证码登录, 实现记住我,十天免登陆功能。
4.实现注销登录。
二、理论概述
OAuth(开放授权)是一个开放标准,允许用户授权第三方应用访问他们存储在另外的服务提供者上的信息,而不需要将用户名和密码提供给第三方移动应用或分享他们数据的所有内容。 这是一个标准, spring也推荐也默认采用这种登录授权的模式, 所以跟着spring来,方向不会错。
OAuth 的核心就是向第三方应用颁发令牌,资源服务器可以向客户端颁发令牌。客户端通过令牌,去请求数据。
OAuth 2.0 规定了四种获得令牌的流程:
authorization code(授权码模式)
implicit(简化模式)
resource owner password credentials(密码模式)
client credentials(客户端模式)
授权码模式是最常用的流程,安全性也最高,它适用于那些有后端的 Web 应用, 目前阿里,腾讯等大型互联网公司,甚至一些政府项目等都用这种方式, 看来不学不行了。
三、代码分析
1.首先引入pom
- <dependency>
- <groupId>org.springframework.boot</groupId>
- <artifactId>spring-boot-starter-security</artifactId>
- </dependency>
-
- <dependency>
- <groupId>org.springframework.security.oauth</groupId>
- <artifactId>spring-security-oauth2</artifactId>
- </dependency>
- <dependency>
- <groupId>org.springframework.security.oauth.boot</groupId>
- <artifactId>spring-security-oauth2-autoconfigure</artifactId>
- </dependency>
-
- <dependency>
- <groupId>org.springframework.security</groupId>
- <artifactId>spring-security-jwt</artifactId>
- </dependency>
- <dependency>
- <groupId>com.nimbusds</groupId>
- <artifactId>nimbus-jose-jwt</artifactId>
- </dependency>

2. 认证中心的核心代码
- @Configuration
- @EnableWebSecurity
- public class WebSecurityConfig extends WebSecurityConfigurerAdapter {
-
-
- @Autowired
- private DataSource dataSource;
-
- @Bean
- public PersistentTokenRepository persistentTokenRepository() {
- JdbcTokenRepositoryImpl tokenRepository=new JdbcTokenRepositoryImpl();
- tokenRepository.setDataSource(dataSource);
- //第一次创建开启
- //tokenRepository.setCreateTableOnStartup(true);
- return tokenRepository;
- }
-
- @Autowired
- SsoUserDetailsServiceImpl myUserDetailsService;
-
- @Autowired
- SsoSavedRequestAwareAuthenticationSuccessHandler myOwnSavedRequestAwareAuthenticationSuccessHandler;
-
- @Autowired
- SsoAuthenticationFailureHandler myAuthenticationFailureHandler;
-
- @Autowired
- SsoLogoutSuccessHandler myLogoutSuccessHandler;
-
- @Autowired
- ValidateCodeFilterSecurityConfiguration validateCodeFilterSecurityConfiguration;
-
- @Autowired
- LoginFormSecurityConfiguration loginFormSecurityConfiguration;
-
-
- @Override
- protected void configure(HttpSecurity http) throws Exception {
-
- //跨站请求伪造
- http.csrf().disable();
- //解决iframe问题
- http.headers().frameOptions().disable();
-
- http
- .apply(validateCodeFilterSecurityConfiguration)
- .and()
- // .addFilterBefore(parametersFilter, UsernamePasswordAuthenticationFilter.class)
- //表单登录
- .formLogin()
- //自定义登陆的页面
- .loginPage("/authentication/require")
- //指定登陆action 的 url
- .loginProcessingUrl("/authentication/form")
- //登录成功处理
- .successHandler(myOwnSavedRequestAwareAuthenticationSuccessHandler)
- //登出失败处理
- .failureHandler(myAuthenticationFailureHandler)
- .and()
- .rememberMe()
- .tokenRepository(persistentTokenRepository())
- .tokenValiditySeconds(3600)
- .userDetailsService(myUserDetailsService)
- .and()
- //请求认证模块 所有请求都需要认证
- .authorizeRequests()
- .antMatchers("/authentication/require",
- "/authentication/form",
- "/logout",
- "/login",
- "/login/time",
- "/getBackPasswordIndex",
- "/register",
- "/code/image",
- "/code/sms",
- "/error",
- "/oauth/exit",
- "/oauth/authorize/**",
- "/oauth/token/**",
- "/auth/oauth/token/**",
- "/oauth/check_token/**",
- "/oauth/confirm_access/**",
- "/oauth/error/**",
- "/images/**",
- "/plugin/**",
- "/js/**",
- "/css/**").permitAll()
- //所有请求认证
- .anyRequest().authenticated()
- .and()
- .logout()
- .logoutUrl("/logout")
- .logoutSuccessHandler(myLogoutSuccessHandler)
- .and()
- .apply(loginFormSecurityConfiguration);
-
- }
-
-
-
- @Bean
- public PasswordEncoder passwordEncoder() {
- return new BCryptPasswordEncoder();
- }
-
-
- /**
- * session过期
- * @return
- */
- @Bean
- public HttpSessionEventPublisher httpSessionEventPublisher() {
- return new HttpSessionEventPublisher();
- }
- }
- /**
- * DefaultTokenServices 实现了ConsumerTokenServices接口, revokeToken方法定义了删除token的方法
- */
- @Autowired
- @Qualifier("consumerTokenServices")
- private ConsumerTokenServices consumerTokenServices;
-
-
- @RequestMapping("/remove/token")
- public void removeToken(HttpServletRequest request, HttpServletResponse response) throws IOException {
- String tokenValue = request.getParameter("access_token");
- String redirectUri = request.getParameter("redirect_uri");
- consumerTokenServices.revokeToken(tokenValue);
-
- // 清除记住我的数据
- request.getSession().invalidate();
-
- response.sendRedirect(redirectUri);
- }
3. 客户端的核心代码
- @Configuration
- @EnableOAuth2Sso
- public class SecurityConfig extends WebSecurityConfigurerAdapter {
-
- @Autowired
- MyLogoutSuccessHandler myLogoutSuccessHandler;
-
- @Override
- protected void configure(HttpSecurity http) throws Exception {
-
- //跨站请求伪造
- http.csrf().disable();
- //解决iframe问题
- http.headers().frameOptions().disable();
-
- http.antMatcher("/**")
- .authorizeRequests()
- .antMatchers("/login**","/logout/**","/js/**","/outer/**").permitAll()
- .anyRequest()
- .authenticated()
- .and()
- .logout()
- .logoutUrl("/logout")
- .logoutSuccessHandler(myLogoutSuccessHandler);
-
- super.configure(http);
- }
-
- /**
- * session过期
- * @return
- */
- @Bean
- public HttpSessionEventPublisher httpSessionEventPublisher() {
- return new HttpSessionEventPublisher();
- }
-
-
- }
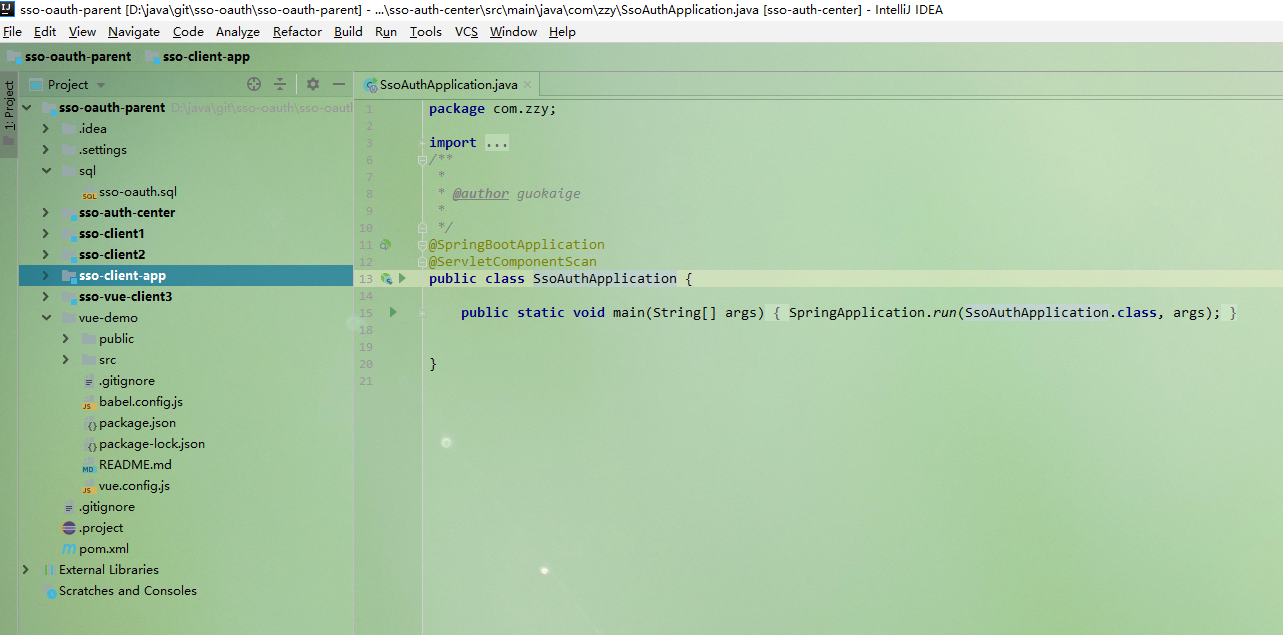
四、项目文件结构截图
五、启动部署流程
1. 首先 在mysql创建数据库sso-oauth,在数据库执行sqlj脚本: sso-oauth-parent/sql/sso-oauth.sql
2. 然后用idea导入maven项目sso-oauth-parent, 待pom依赖jar包下载完成后执行下一步。
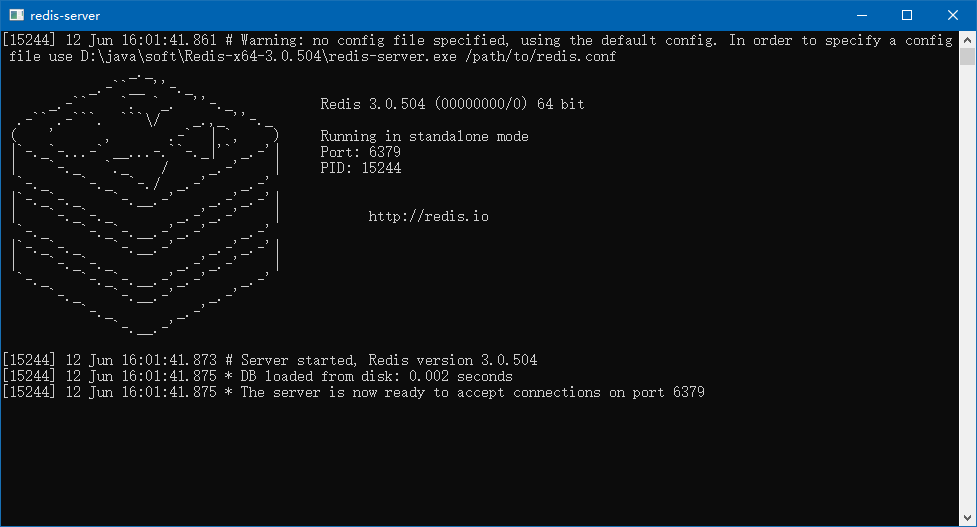
3. 配置redis
解压 so-oauth-parent\Redis-x64-3.0.504.zip
双击 redis-server.exe 启动redis

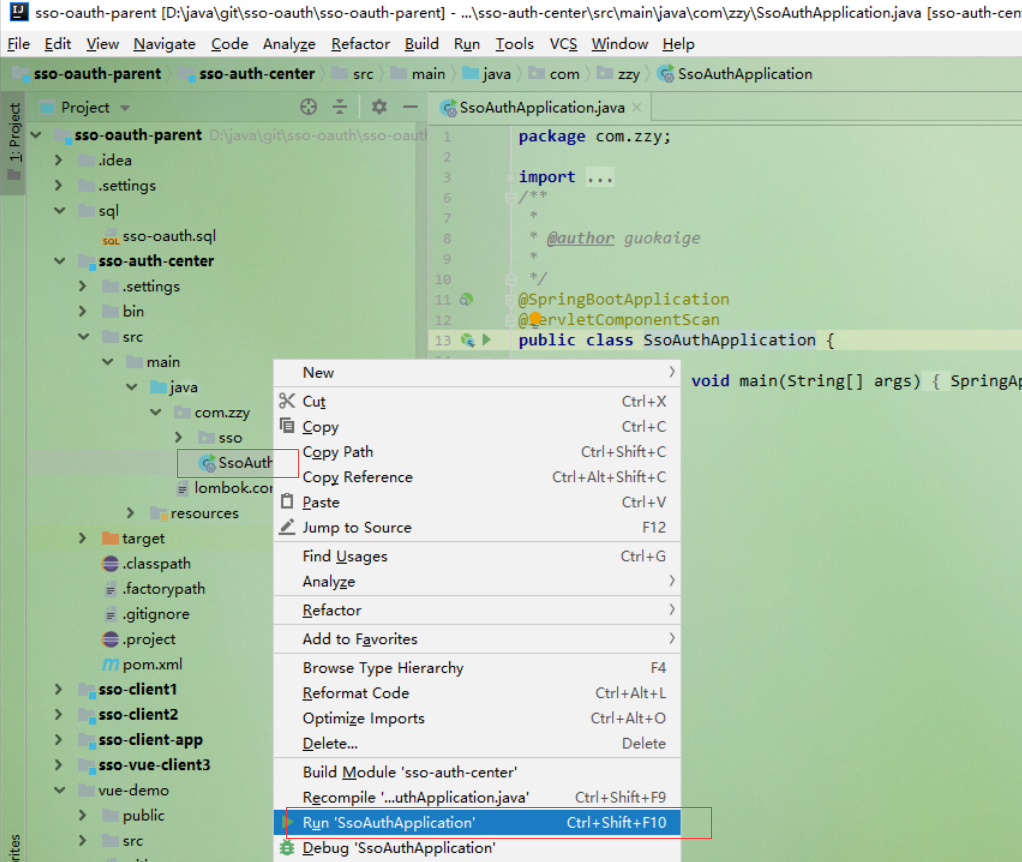
4. 启动认证中心 , 启动client1, client2, client3
其余client项目类似
4. 编译启动vue-demo( 如果没有前后端分离vue认证需求, 可以忽略本步。)
要想启动vue项目, 首先安装nodejs环境 和vue环境, 比较简单参考百度
接下来进入: sso-oauth-parent\vue-demo 目录, 执行cmd命令
npm install # 安装vue依赖
npm install jquery #安装jquery插件
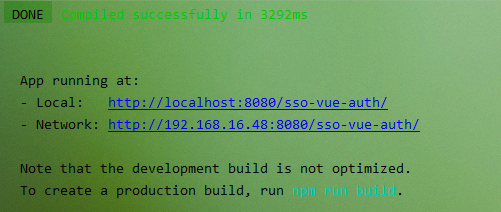
npm run serve 启动服务
成功启动看到如下
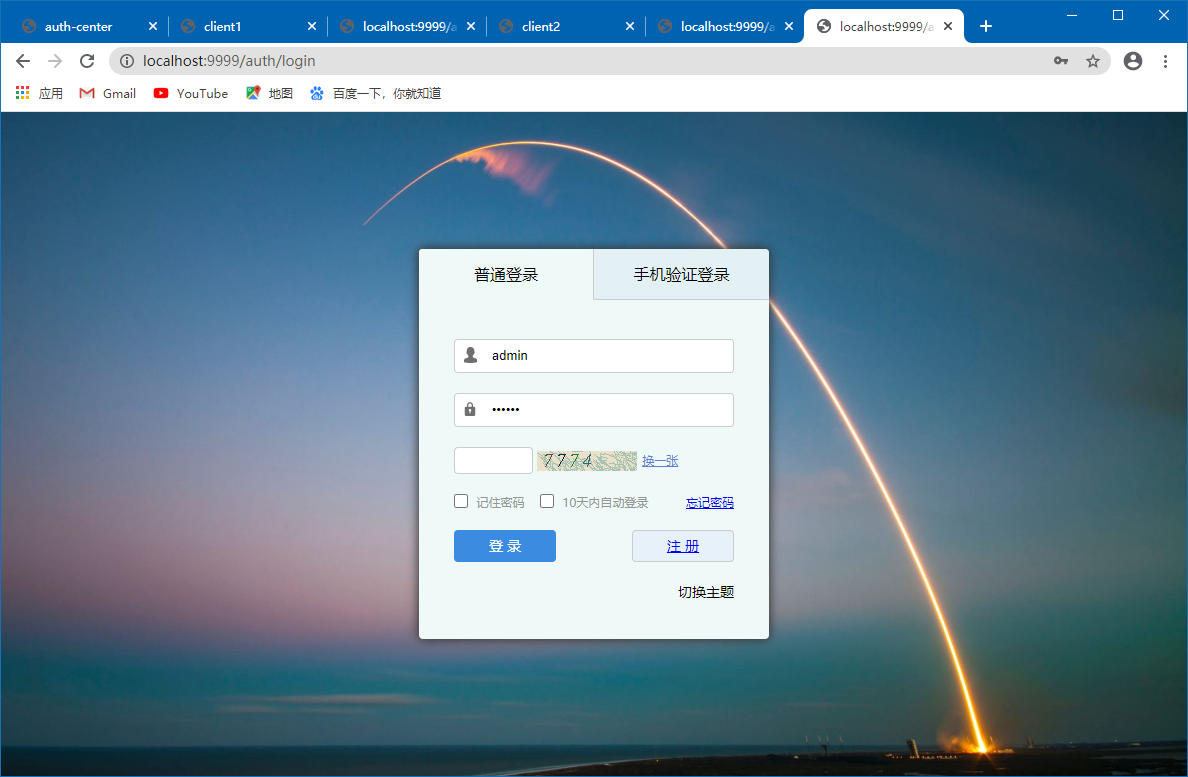
六、演示效果
认证中心登录界面:

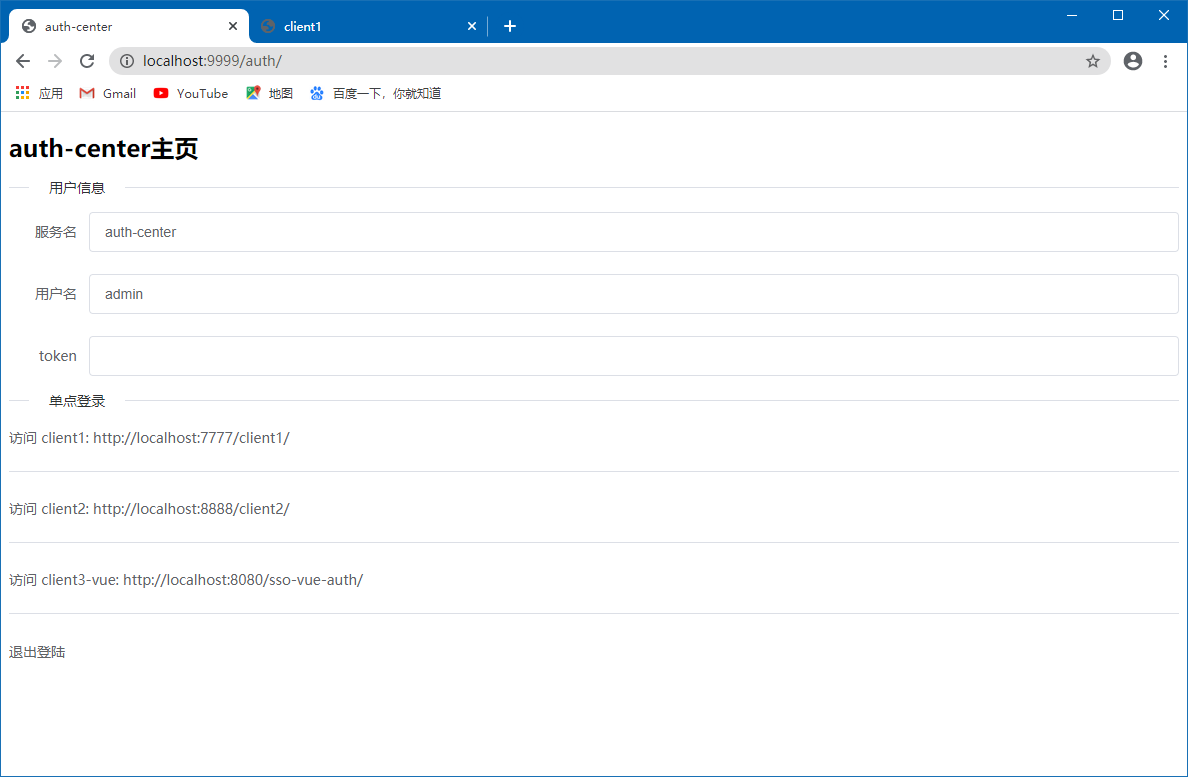
auth-center主页
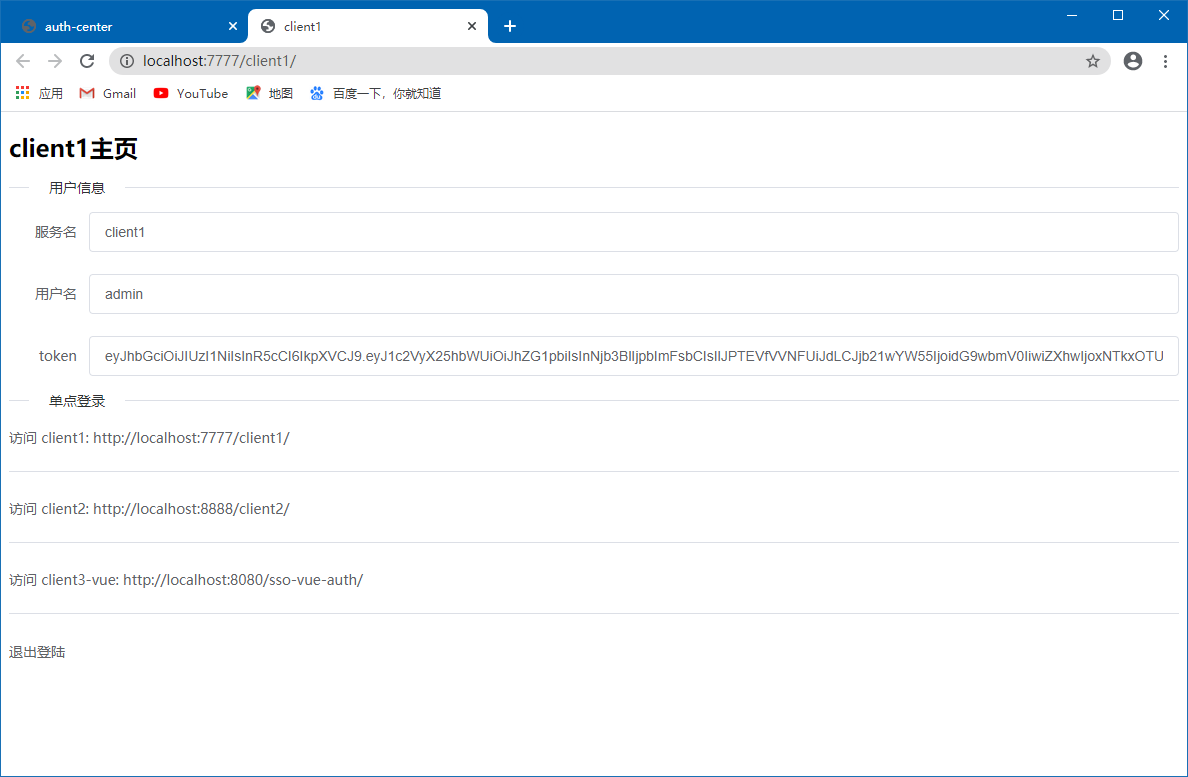
无登录跳转client1主页
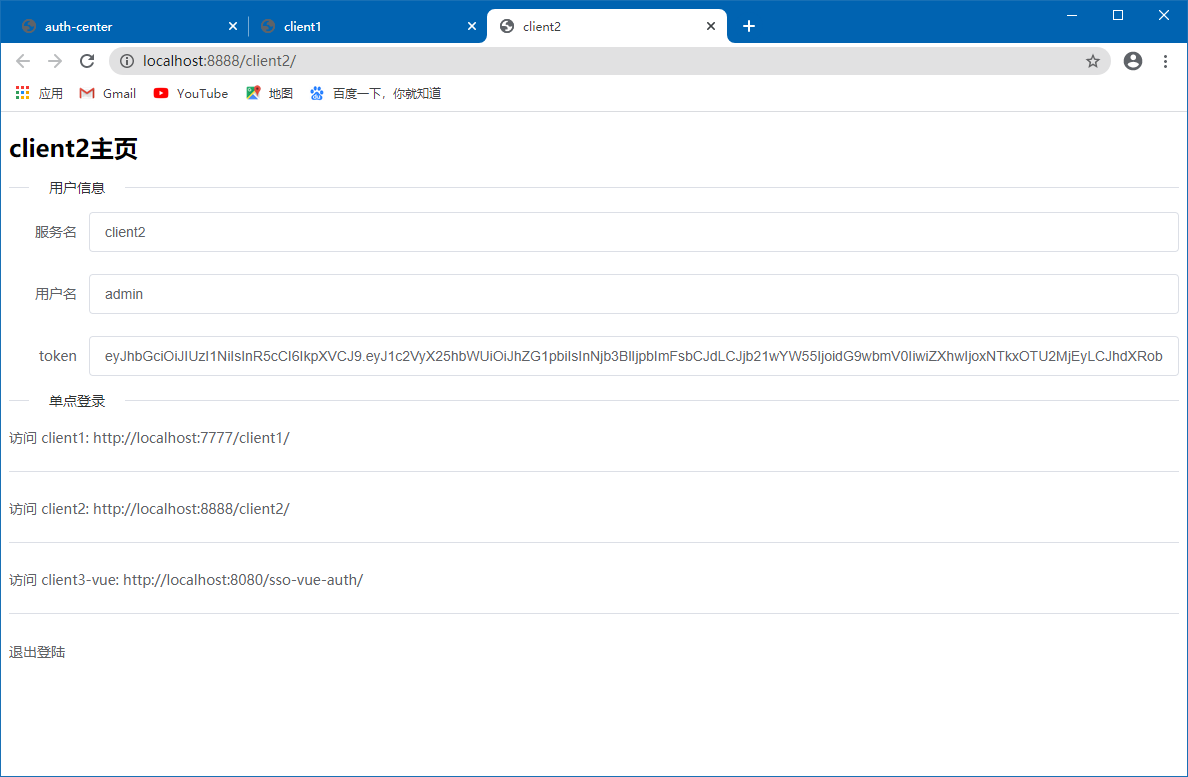
无登录跳转client2主页
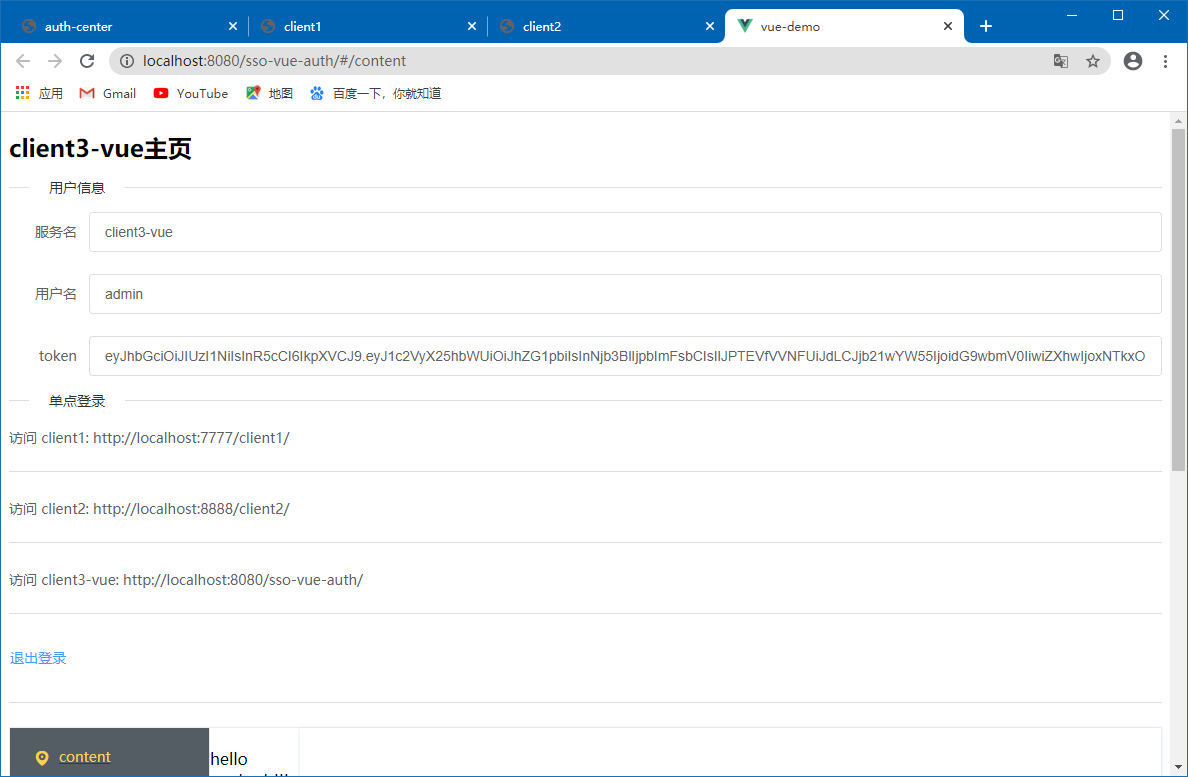
无登录跳转client3-vue主页
退出登录