
热门标签
热门文章
- 1深入理解加密、解密、数字签名(签名证书、加密证书)的组成和数字证书_怎么样将加密和数字签名合并
- 2ElasticSearch搜不出来数据原因以及使用RabbitMQ出现问题和SpringBoot单体项目集成RabbitMQ_elasticsearch 搜索能连接上 不能搜索
- 3tokenization of html
- 4数据科学导引上机(6)神经网络_神经网络nums work
- 5使用扣子 coze 搭建你的专属程序员鼓励师女友_扣子工作流
- 6离线高德地图_高德离线地图api
- 7Python造数据工具:在数据库中批量生成有关联关系的数据-dbfaker_基于数据库 测试数据生成 业务关联
- 8IT大学生成长周报 | 第 4 期_zinc搜索日志
- 9使用 CocoaPods 的国内镜像_nexus cocoapods 国内镜像站
- 10pd.shift()
当前位置: article > 正文
springboot maven方式多环境配置_springboot maven 多环境
作者:从前慢现在也慢 | 2024-08-18 03:56:36
赞
踩
springboot maven 多环境
前提
使用多个环境的时候,一直想只需要修改profiles,然后运行即可生效的方法;网上查到的内容,有误导,也不全生效,这里将整理的记录一下.
总结
完整的多环境配置:
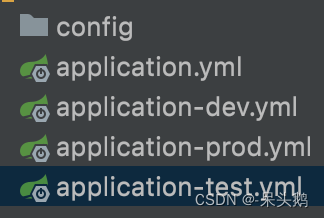
1.添加多个配置文件
2.application.yml 配置修改
3.pom.xml配置内容
4.pom.xml配置,(有两种方式,任选一种即可,不需要都配上)
5.项目启动前的build过程移交给maven(这点网上没查到)
其中前3步,哪里的文章都有,重点是后两步
1.添加多个配置文件
2.application.yml 配置修改
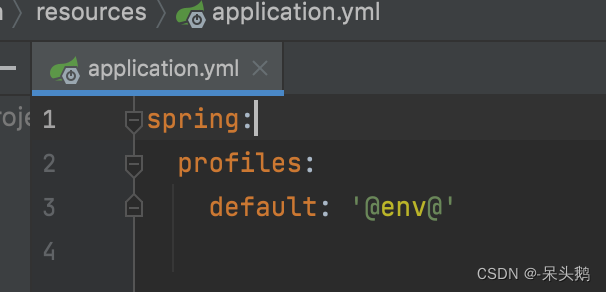
spring:
  profiles:
    default: '@env@'
- 1
- 2
- 3
3.pom.xml中配置<profiles>
    <profiles>
        <profile>
            <id>test</id>
            <properties>
                <env>test</env>
            </properties>
            <activation>
            	<!-- 默认环境 -->
                <activeByDefault>true</activeByDefault>
            </activation>
        </profile>
        <profile>
            <id>dev</id>
            <properties>
                <env>dev</env>
            </properties>
        </profile>
        <profile>
            <id>prod</id>
            <properties>
                <env>prod</env>
            </properties>
        </profile>
    </profiles>

- 1
- 2
- 3
- 4
- 5
- 6
- 7
- 8
- 9
- 10
- 11
- 12
- 13
- 14
- 15
- 16
- 17
- 18
- 19
- 20
- 21
- 22
- 23
- 24
4.pom.xml配置
这里有两种方式,选一个即可,个人使用第一种,也推荐第一种:
- 配置spring-boot-maven-plugin组件;
- 配置<resources>
4.1配置spring-boot-maven-plugin组件
    <build>
        <!-- 设置jar打包时名称-->
        <finalName>project-model</finalName>
        <plugins>
            <plugin>
                <groupId>org.springframework.boot</groupId>
                <artifactId>spring-boot-maven-plugin</artifactId>
                <!-- version随springboot的版本,我这里如果不显式指定插件会飘红 -->
                <version>2.7.3</version>
                <configuration>
                    <fork>true</fork>
                    <!-- spring-boot:run 中文乱码解决 -->
                    <jvmArguments>-Dfile.encoding=UTF-8</jvmArguments>
                    <mainClass>com.gxl.life.web.ProjectModelApplication</mainClass>
                </configuration>
            </plugin>
        </plugins>

    </build>
- 1
- 2
- 3
- 4
- 5
- 6
- 7
- 8
- 9
- 10
- 11
- 12
- 13
- 14
- 15
- 16
- 17
- 18
- 19
插件的作用请自己动手
4.2 配置<resources>
注意如果使用了4.1的方式就跳过这里,并且我自身没有使用这种方式,也没有删除4.1的单独去验证,所以配置上可能有误;
<build>
    <resources>
        <resource>
            <directory>src/main/resources</directory>
        </resource>
        <resource>
            <directory>src/main/resources-env/${env}</directory>
            <filtering>true</filtering>
        </resource>
    </resources>
</build>
- 1
- 2
- 3
- 4
- 5
- 6
- 7
- 8
- 9
- 10
- 11
5.build过程移交给maven
如果没有这一步,在每次切换环境后手动执行compile也可以运行;但是如果切换环境后直接运行就容易出错;
原因是直接运行前会先使用idea自身的build编译,此时不会替换配置文件中的@env@;
所以按下图设置,作用是将build过程移交给maven

声明:本文内容由网友自发贡献,不代表【wpsshop博客】立场,版权归原作者所有,本站不承担相应法律责任。如您发现有侵权的内容,请联系我们。转载请注明出处:https://www.wpsshop.cn/w/从前慢现在也慢/article/detail/995831
推荐阅读
相关标签

