
- 1RocketMQ源码解析之消息消费者(rebalance)_this.mqclientfactory.rebalanceimmediately()
- 2官方YOLOV5的torch模型->ONNX模型->RKNN模型_onnx模型rknn
- 3万字详解数据仓库、数据湖、数据中台和湖仓一体_数据仓库 数据湖
- 4计算机网络原理摘要,计算机网络原理与应用2摘要.ppt
- 5Python学习总结之路--第二周
- 6你身边的博士刚毕业以及稳定下来后的年薪大约是 多少?
- 72024年GitHub-上那些优秀Android开源库,这里是Top10!_github android
- 8Matlab 模拟退火算法模型代码
- 9如何将大视频文件从 iPhone 传输到 PC?_苹果手机大文件视频怎么导入电脑
- 10macOS Sequoia 15 beta 4 (24A5298h) ISO、IPSW、PKG 下载_macos15beta4镜像下载
Three.js 入门(一)— 开发环境搭建_threejs环境搭建
赞
踩
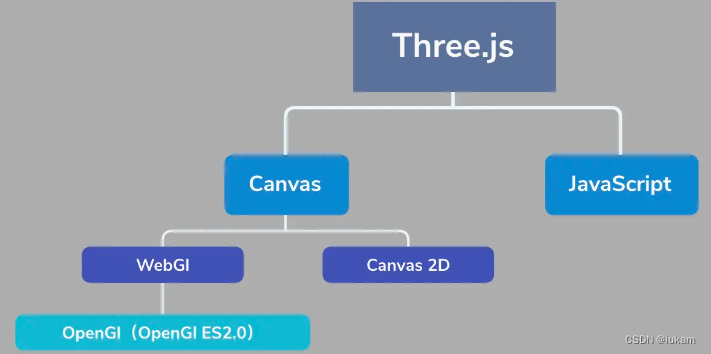
WebGL介绍
WebGL
WebGL :WebGL(Web图形库)是一个JavaScript API,可在任何兼容的Web浏览器中渲染高性能的交互式3D和2D图形,而无需使用插件。WebGL通过引入一个与OpenGL ES 2.0非常一致的API来做到这一点,该API可以在HTML5 元素中使用。
详细了解可参考官方文档。
Canvas
Canvas是HTML5的画布元素,在使用Canvas时,需要用到Canvas的上下文,可以用2D上下文绘制二维的图像,也可以使用3D上下文绘制三维的图像,其中3D上下文就是指WebGL。
渲染管线
Webgl的渲染依赖底层GPU的渲染能力。所以WEBGL 渲染流程和 GPU 内部的渲染管线是相符的。

Threejs 介绍
Three.js是基于webGL的封装的一个易于使用且轻量级的3D库,Three.js对WebGL提供的接口进行了非常好的封装,简化了很多细节,大大降低了学习成本,极大地提高了性能,功能也非常强大,用户不需要详细地学习 WebGL,就能轻松创作出三维图形,是前端开发者研发3D绘图的主要工具。
WebGL和Three.js的关系:
本地搭建threejs官方网站
从Github上下载three.js
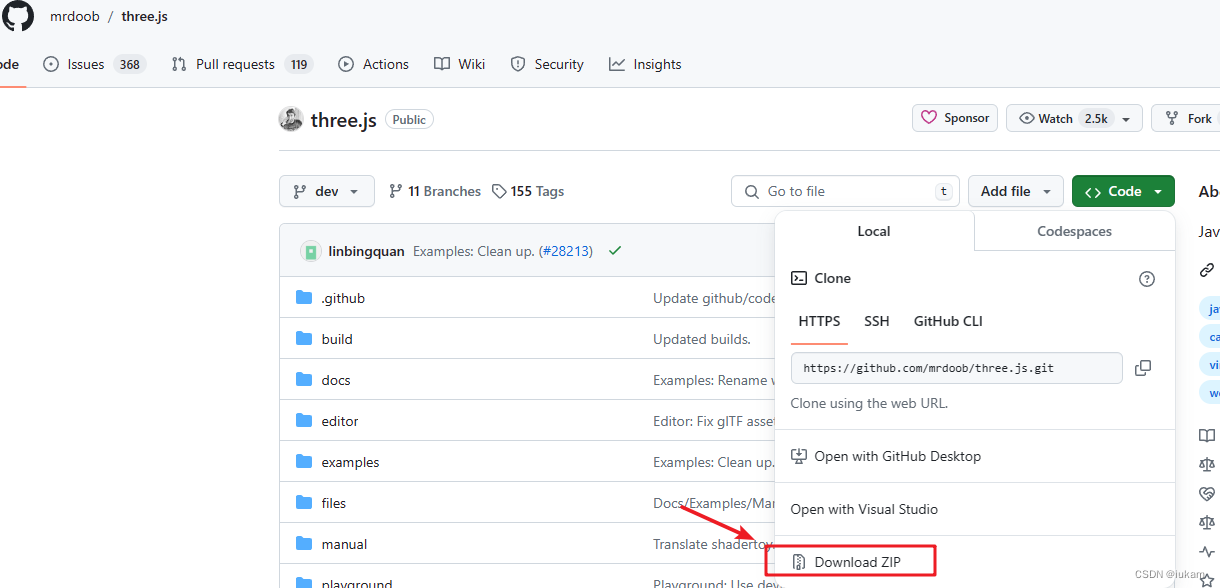
推荐直接下载ZIP包,文件有点大。
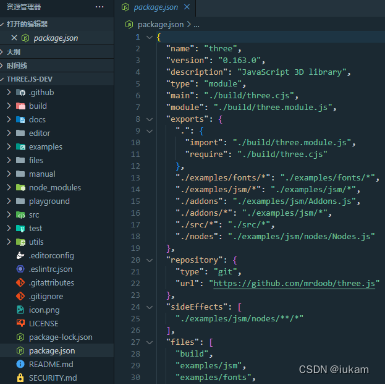
下载解压后,使用VSCode打开:
使用npm(yarn)运行安装依赖:npm install
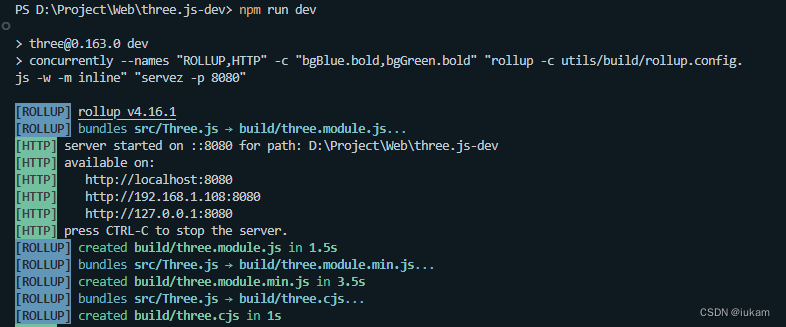
运行之后:
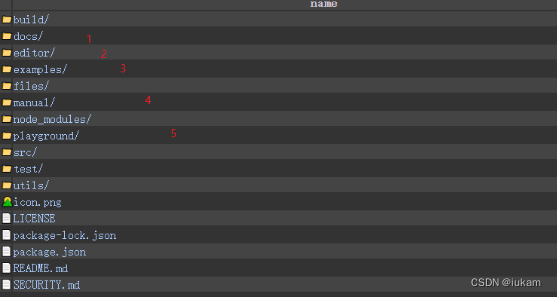
这里介绍几个重要的部分:
- docs :three.js的官方文档,支持中文,介绍了入门开发,环境安装配置等等;
- editor:threejs可视化编辑器,只有一些简单功能;
- examples:介绍了官方给的案例,有源码可供学习;
- manual:官方使用手册,介绍了相关开发功能和源码;
- playground:材质编辑器,类似UE材质编辑蓝图和Unity中的ShaderGraph;
使用Parcel搭建three.js开发环境
为了方便模块化进行three.js项目的学习和开发,又不用学习太多的配置,增加学习成本,所以就使用Parcel这个web应用打包工具。
Parcel官网
安装
在开始之前,您需要安装 Node 和 Yarn 或 npm,并为您的项目创建一个目录。然后,使用 Yarn 将 Parcel 安装到您的应用程序中:
Yarn:yarn add --dev parcel
npm:npm install --save-dev parcel
安装three:npm install --save three
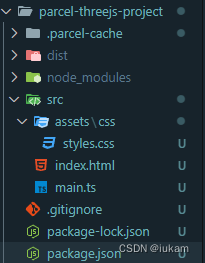
项目设置
创建src文件夹,并且创建index.html、styles.css、main.js文件
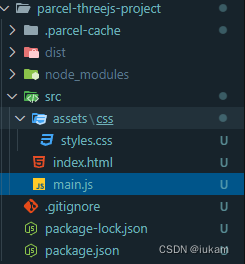
index.html
<!DOCTYPE html>
<html lang="en">
  <head>
    <meta charset="UTF-8" />
    <meta http-equiv="X-UA-Compatible" content="IE=edge" />
    <meta name="viewport" content="width=device-width, initial-scale=1.0" />
    <title>Threejs Parcel App</title>
    <link rel="stylesheet" href="./assets/css/styles.css" />
  </head>
  <body>
    <script src="./main.js" type="module"></script>
  </body>
</html>
- 1
- 2
- 3
- 4
- 5
- 6
- 7
- 8
- 9
- 10
- 11
- 12
- 13
styles.css
* {
  margin: 0;
  padding: 0;
}
body {
  background-color: skyblue;
}
- 1
- 2
- 3
- 4
- 5
- 6
- 7
main.js
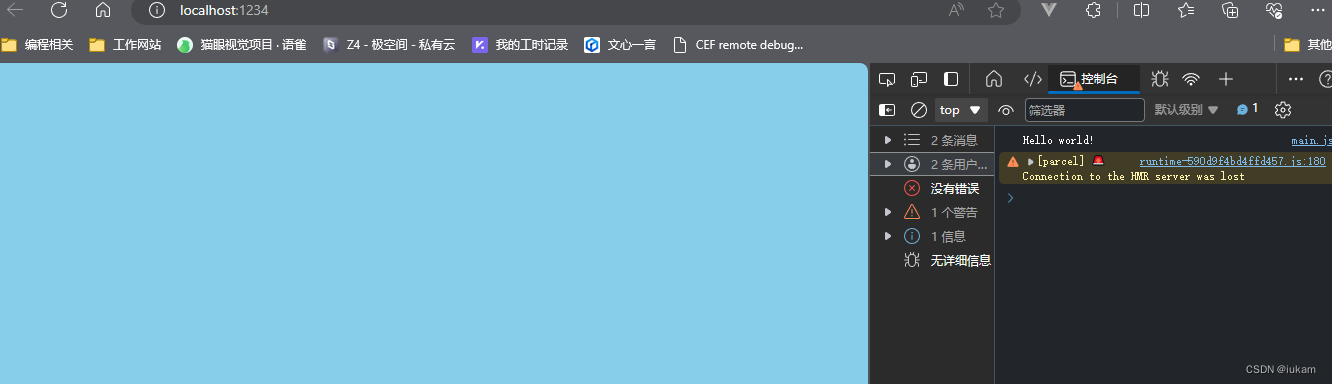
console.log('Hello world!');
- 1
package.json
{
  "name": "threejs-parcel-app",
  "version": "1.0.0",
  "description": "",
  "main": "index.js",
  "scripts": {
    "dev": "parcel src/index.html",
    "build": "parcel build src/index.html"
  },
  "author": "",
  "license": "ISC",
  "devDependencies": {
    "parcel": "^2.12.0"
  },
  "dependencies": {
    "three": "^0.163.0"
  }
}

- 1
- 2
- 3
- 4
- 5
- 6
- 7
- 8
- 9
- 10
- 11
- 12
- 13
- 14
- 15
- 16
- 17
- 18
- 19
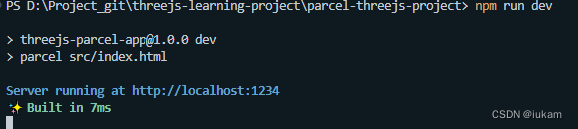
执行npm run dev 运行后:
渲染第一个场景和物体
场景
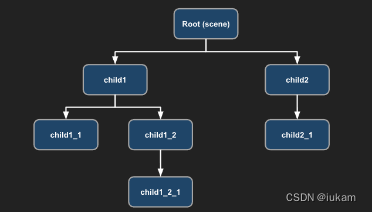
Three.js 的核心可以说是它的场景图(scene graph)。场景图在 3D 引擎是一个图中节点的层次结构,其中每个节点代表了一个局部空间(local space)。
const scene = new THREE.Scene();
- 1
相机
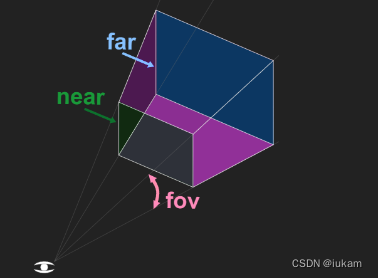
// 2、创建相机
const camera = new THREE.PerspectiveCamera(
  75,//视野角度(FOV)
  window.innerWidth / window.innerHeight,//长宽比(aspect ratio)
  0.1,//近截面(near)
  1000//远截面(far)
);
// 设置相机位置
camera.position.set(0, 0, 10);
- 1
- 2
- 3
- 4
- 5
- 6
- 7
- 8
- 9
渲染器
通过WebGL 将画面渲染到canvas上显示出来。
// 初始化渲染器
const renderer = new THREE.WebGLRenderer();
// 设置渲染的尺寸大小
renderer.setSize(window.innerWidth, window.innerHeight);
// console.log(renderer);
// 将webgl渲染的canvas内容添加到body
document.body.appendChild(renderer.domElement);
// 使用渲染器,通过相机将场景渲染进来
renderer.render(scene, camera);
- 1
- 2
- 3
- 4
- 5
- 6
- 7
- 8
- 9
加入立方体
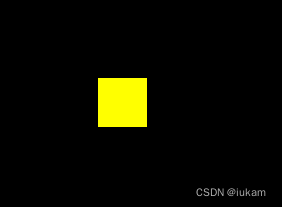
// 添加物体
// 创建几何体
const cubeGeometry = new THREE.BoxGeometry(1, 1, 1);
//给它一个材质,来让它有颜色
const cubeMaterial = new THREE.MeshBasicMaterial({ color: 0xffff00 });
// 根据几何体和材质创建物体
const cube = new THREE.Mesh(cubeGeometry, cubeMaterial);
// 将几何体添加到场景中
scene.add(cube);
- 1
- 2
- 3
- 4
- 5
- 6
- 7
- 8
- 9
完整脚本
main.js
import * as THREE from "three";

// 1、创建场景
const scene = new THREE.Scene();

// 2、创建相机
const camera = new THREE.PerspectiveCamera(
  75,
  window.innerWidth / window.innerHeight,
  0.1,
  1000
);

// 设置相机位置
camera.position.set(0, 0, 10);
scene.add(camera);

// 添加物体
// 创建几何体
const cubeGeometry = new THREE.BoxGeometry(1, 1, 1);
const cubeMaterial = new THREE.MeshBasicMaterial({ color: 0xffff00 });
// 根据几何体和材质创建物体
const cube = new THREE.Mesh(cubeGeometry, cubeMaterial);
// 将几何体添加到场景中
scene.add(cube);

// 初始化渲染器
const renderer = new THREE.WebGLRenderer();
// 设置渲染的尺寸大小
renderer.setSize(window.innerWidth, window.innerHeight);
// console.log(renderer);
// 将webgl渲染的canvas内容添加到body
document.body.appendChild(renderer.domElement);

// 使用渲染器,通过相机将场景渲染进来
renderer.render(scene, camera);
- 1
- 2
- 3
- 4
- 5
- 6
- 7
- 8
- 9
- 10
- 11
- 12
- 13
- 14
- 15
- 16
- 17
- 18
- 19
- 20
- 21
- 22
- 23
- 24
- 25
- 26
- 27
- 28
- 29
- 30
- 31
- 32
- 33
- 34
- 35
- 36
如果这里报警告 :
需要npm i --save-dev @types/three 安装依赖。
运行效果:
其他
个人比较喜欢用ts,这里把项目改成ts配置附上
index.html
<!DOCTYPE html>
<html lang="en">
  <head>
    <meta charset="UTF-8" />
    <meta http-equiv="X-UA-Compatible" content="IE=edge" />
    <meta name="viewport" content="width=device-width, initial-scale=1.0" />
    <title>Threejs Parcel App</title>
    <link rel="stylesheet" href="./assets/css/styles.css" />
  </head>
  <body>
    <script src="./main.ts" type="module"></script>
  </body>
</html>
- 1
- 2
- 3
- 4
- 5
- 6
- 7
- 8
- 9
- 10
- 11
- 12
- 13
styles.css
* {
  margin: 0;
  padding: 0;
}
body {
  background-color: skyblue;
}
- 1
- 2
- 3
- 4
- 5
- 6
- 7
main.ts
import * as THREE from "three";

// 1、创建场景
const scene = new THREE.Scene();

// 2、创建相机
const camera = new THREE.PerspectiveCamera(
  75,
  window.innerWidth / window.innerHeight,
  0.1,
  1000
);

// 设置相机位置
camera.position.set(0, 0, 10);
scene.add(camera);

// 添加物体
// 创建几何体
const cubeGeometry = new THREE.BoxGeometry(1, 1, 1);
const cubeMaterial = new THREE.MeshBasicMaterial({ color: 0xffff00 });
// 根据几何体和材质创建物体
const cube = new THREE.Mesh(cubeGeometry, cubeMaterial);
// 将几何体添加到场景中
scene.add(cube);

// 初始化渲染器
const renderer = new THREE.WebGLRenderer();
// 设置渲染的尺寸大小
renderer.setSize(window.innerWidth, window.innerHeight);
// console.log(renderer);
// 将webgl渲染的canvas内容添加到body
document.body.appendChild(renderer.domElement);

// 使用渲染器,通过相机将场景渲染进来
renderer.render(scene, camera);
- 1
- 2
- 3
- 4
- 5
- 6
- 7
- 8
- 9
- 10
- 11
- 12
- 13
- 14
- 15
- 16
- 17
- 18
- 19
- 20
- 21
- 22
- 23
- 24
- 25
- 26
- 27
- 28
- 29
- 30
- 31
- 32
- 33
- 34
- 35
- 36
- 37
package.json
{
  "name": "threejs-parcel-app",
  "version": "1.0.0",
  "description": "",
  "main": "main.js",
  "types": "dist/types.d.ts",
  "scripts": {
    "dev": "parcel src/index.html",
    "build": "parcel build src/index.html"
  },
  "author": "",
  "license": "ISC",
  "devDependencies": {
    "@types/three": "^0.163.0",
    "parcel": "^2.12.0"
  },
  "dependencies": {
    "three": "^0.163.0"
  }
}
- 1
- 2
- 3
- 4
- 5
- 6
- 7
- 8
- 9
- 10
- 11
- 12
- 13
- 14
- 15
- 16
- 17
- 18
- 19
- 20
- 21


