
热门标签
热门文章
- 1代理的使用_webmagic proxyprovider
- 2IT人职业规划(绝对给力)_公司内it总监的职业规划
- 3spacy 中文语义分析下载安装使用_spacy的中文模型下载
- 4Ubuntu 22.04.4配置静态IP_ubuntu-22.04.4配置
- 5VScode中通过PYTHONPATH引入自定义模块终极方案_vscode python path
- 62024-北京智源大会-通用人工智能的关键问题及思考-李开复、张亚勤_智源大会会议具身智能层面机器人和自动驾驶的机会评价
- 7在Node.js中访问MongoDB数据库_检查防火墙设置,确保mongodb服务端口可以被nodejs访问
- 8深入浅出讲解Stable Diffusion原理,新手也能看明白_stable diffusion能做什么
- 9【读论文】变化环境的Visual place recognition_visual place recognition的代表论文
- 10Git和Github_ic项目 github
当前位置: article > 正文
tkinter入门(9)--布局管理器(pack,grid,place)_tk pack 两个组件并排
作者:从前慢现在也慢 | 2024-07-02 05:38:06
赞
踩
tk pack 两个组件并排
1、布局管理器
布局管理器(pack,grid,place,均用于管理统一父组件下的所有组件的布局)。
pack,按添加的顺序进行排列。
grid,网格化排列。
place,允许程序员指定组件的大小和位置。
布局管理器选择:
pack,少量组件排列。
grid,组件多时使用。
place,组件多时使用。
2、pack方法,将一个组件放入另一个组件中,完全填充
import tkinter as tk
root = tk.Tk()#生成顶层窗口
root.title("组件使用!")#设置图形用户界面标题
#pack方法#将一个组件放入另一个组件中,完全填充
listbox = tk.Listbox(root)
listbox.pack(fill = 'both',expand = True)#pack函数设置横向填充使用side属性,side=LEFT,
#fill设置完全填满父控件,值为x横向填充,值为y纵向填充,expand设置当父控件拉伸时,内容随之填充
for i in range(10):
    listbox.insert('end',str(i))
root.mainloop()#重要步骤,进入主事件循环,由tkinter主管、监听
- 1
- 2
- 3
- 4
- 5
- 6
- 7
- 8
- 9
- 10
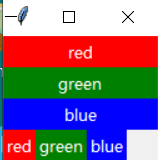
3、pack方法(纵向填充,横向填充)
import tkinter as tk
root = tk.Tk()#生成顶层窗口
root.title("组件使用!")#设置图形用户界面标题

#pack方法#纵向填充
tk.Label(root,text = 'red',bg = 'red',fg = 'white').pack(fill = 'x')
tk.Label(root,text = 'green',bg = 'green',fg = 'white').pack(fill = 'x')
tk.Label(root,text = 'blue',bg = 'blue',fg = 'white').pack(fill = 'x')
#pack方法#横向填充
tk.Label(root,text = 'red',bg = 'red',fg = 'white').pack(side = 'left' )
tk.Label(root,text = 'green',bg = 'green',fg = 'white').pack(side = 'left')
tk.Label(root,text = 'blue',bg = 'blue',fg = 'white').pack(side = 'left')
root.mainloop()#重要步骤,进入主事件循环,由tkinter主管、监听
- 1
- 2
- 3
- 4
- 5
- 6
- 7
- 8
- 9
- 10
- 11
- 12
- 13
运行截图:
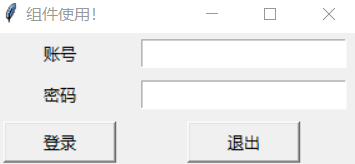
4、grid组件使用,模拟登陆界面
import tkinter as tk
root = tk.Tk()#生成顶层窗口
root.title("组件使用!")#设置图形用户界面标题

#grid组件
#grid函数中使用rowspan= 数字,跨行;columnspan =数字,跨列
#grid函数中使用sticky = 东西南北方向英文首字母设置对齐方式
tk.Label(root,text = '账号').grid(row = 0,column = 0)
tk.Label(root,text = '密码').grid(row = 1,column = 0)
entry1 = tk.Entry(root)
entry1.grid(row = 0,column = 1,padx = 10, pady = 5,columnspan = 2)
entry2 = tk.Entry(root,show = '*')#Entry的show属性可以设置显示内容,保护个人隐私,可以设为'*','$'等
entry2.grid(row = 1,column = 1,padx = 10, pady = 5,columnspan = 2)
def show():
    print("账号: %s"%entry1.get())
    print("密码: %s" % entry2.get())
tk.Button(root,text = "登录",width = 10, command = show)\
    .grid(row = 2,column = 0,sticky = 'w',padx = 10,pady = 5)
tk.Button(root,text = "退出",width = 10, command = root.quit)\
    .grid(row = 2,column = 1,sticky = 'e',padx = 10,pady = 5)
root.mainloop()#重要步骤,进入主事件循环,由tkinter主管、监听

- 1
- 2
- 3
- 4
- 5
- 6
- 7
- 8
- 9
- 10
- 11
- 12
- 13
- 14
- 15
- 16
- 17
- 18
- 19
- 20
- 21
运行截图:
5、place组件使用
代码描述:新建一个位于界面中心的按钮并用place布局,以pack布局背景图片。
import tkinter as tk
root = tk.Tk()#生成顶层窗口
root.title("组件使用!")#设置图形用户界面标题

#place组件
image1 = tk.PhotoImage(file = r'C:\Users\lengxiaohua\Pictures\m.png')
tk.Label(root,image = image1).pack()#pack可以和place组合使用
def callback():
    print("按钮被点!")
tk.Button(root,text = '点我',command = callback).place(relx = 0.5,rely = 0.5,anchor = 'center')
root.mainloop()#重要步骤,进入主事件循环,由tkinter主管、监听
- 1
- 2
- 3
- 4
- 5
- 6
- 7
- 8
- 9
- 10
- 11
- 12
运行截图:

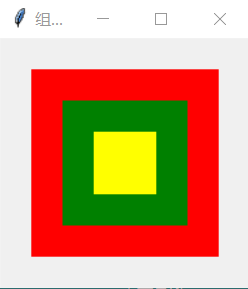
6、place组件 ,组合覆盖显示
代码描述:使用place方法进行页面布局,组件间可能有覆盖。
import tkinter as tk
root = tk.Tk()#生成顶层窗口
root.title("组件使用!")#设置图形用户界面标题

#place组件 ,组合覆盖显示
tk.Label(root,bg = 'red').place(relx = 0.5,rely = 0.5,anchor = 'center',relheight = 0.75,relwidth= 0.75)
tk.Label(root,bg = 'green').place(relx = 0.5,rely = 0.5,anchor = 'center',relheight = 0.5,relwidth= 0.5)
tk.Label(root,bg = 'yellow').place(relx = 0.5,rely = 0.5,anchor = 'center',relheight = 0.25,relwidth= 0.25)#relheight,relwidth设置相对父组件的宽和高
root.mainloop()#重要步骤,进入主事件循环,由tkinter主管、监听
- 1
- 2
- 3
- 4
- 5
- 6
- 7
- 8
- 9
- 10
运行截图:
声明:本文内容由网友自发贡献,不代表【wpsshop博客】立场,版权归原作者所有,本站不承担相应法律责任。如您发现有侵权的内容,请联系我们。转载请注明出处:https://www.wpsshop.cn/w/从前慢现在也慢/article/detail/778737
推荐阅读
相关标签

