
热门标签
热门文章
- 1stm32(十五)SPI_stm32 spi
- 2力扣的使用简介及代码编写说明_力扣怎么写代码
- 3LOD技术详解
- 4Git使用总结(2020版)_git2.26.0怎么使用
- 5SpringBoot整合Dubbo,dubbo提供的服务无法注册进zookeeper的坑_dubbo 注册没报错 但是zookeeper上没有注册信息
- 6Unity 中有关iOS Player 设置属性大全_unity ios高性能模式关闭
- 720.云原生之GitLab集成Runner
- 8mingw64安装_错误:数据库 'mingw64' 无效 (无效或已损坏的数据库 (PGP 签名))...
- 9PMP考试报名条件是什么?_pmp报考条件及费用
- 10解决页面favicon.ico文件不存在提示404问题
当前位置: article > 正文
springboot整合elasticsearch实现增删改查,elasticsearch学习二_springboot整合elasticsearch实现mysql模糊查询
作者:从前慢现在也慢 | 2024-02-08 11:10:29
赞
踩
springboot整合elasticsearch实现mysql模糊查询
前提:首先当然是配置好es的环境,可以参考我的上一篇博客https://blog.csdn.net/weixin_39025362/article/details/105359306
Elasticsearch Java API 大致分如下四类:
- TransportClient
- RestClient
- Jest
- Spring Data Elasticsearch
笔者在本篇中主要会和大家讲Spring Data,因为使用springdata jpa操作比较方便简单
1.创建springboot工程,引入es和lombok的maven依赖,添加yml配置
<dependency>
   <groupId>org.springframework.boot</groupId>
    <artifactId>spring-boot-starter-data-elasticsearch</artifactId>
</dependency>
<!--lombok是创建实体类通过注解@Data为实体创建get、set、toString等方法,使我们的实体类非常简洁-->
 <dependency>
   <groupId>org.projectlombok</groupId>
    <artifactId>lombok</artifactId>
    <optional>true</optional>
</dependency>
- 1
- 2
- 3
- 4
- 5
- 6
- 7
- 8
- 9
- 10
spring
  #------------------------ elasticsearch -----------------------------
  main:
    allow-bean-definition-overriding: true
  data:
    elasticsearch:
      repositories:
        enabled: true
      cluster-name: elasticsearch
      cluster-nodes: 127.0.0.1:9300
- 1
- 2
- 3
- 4
- 5
- 6
- 7
- 8
- 9
- 10
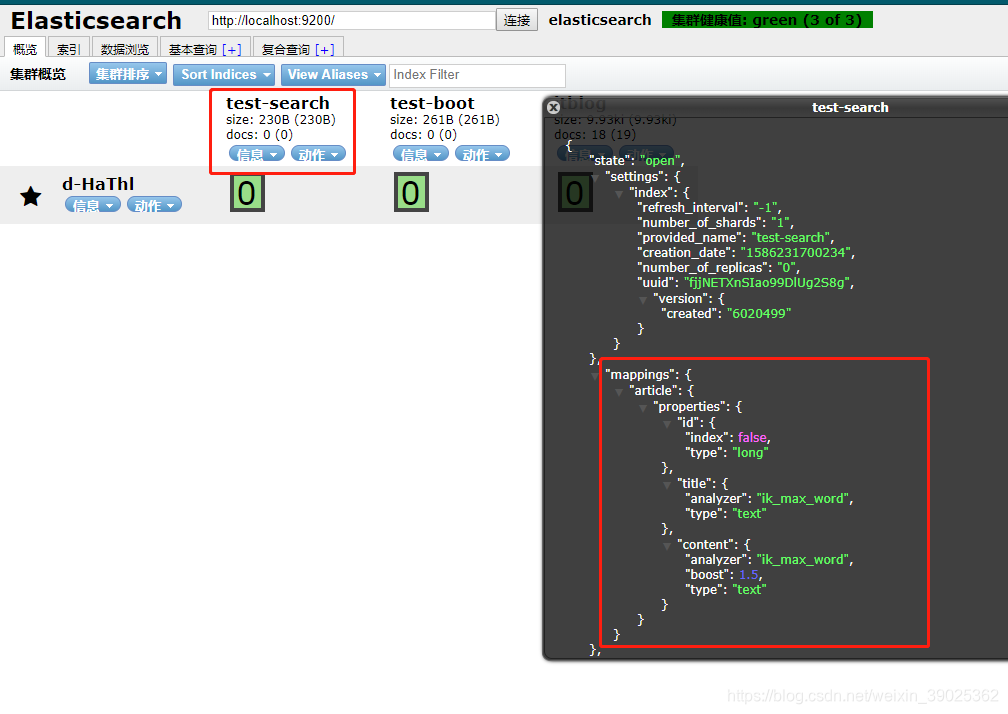
2,创建es的索引库
1.可以通过postman或者head插件来创建索引库,笔者使用的是es6.2.4
以下介绍使用postman创建es索引库,put请求,url:http://localhost:9200/test-search
像mysql一样描述的话,就是创建一个名字叫做test-search的数据库,然后一个叫article的数据表,
有三个字段,id long类型,title text类型 使用ik分词搜索,content text类型,使用ik分词搜索
{
  "settings": {
    "index.number_of_shards": 1,
    "index.number_of_replicas": 0,
    "index.refresh_interval": "-1"
  },
  "mappings": {
    "article": {
      "properties": {
        "id": {
          "type": "long",
          "index": false
        },
        "title": {
          "type": "text",
          "analyzer": "ik_max_word",
          "search_analyzer": "ik_max_word"
        },
        "content": {
          "type": "text",
          "analyzer": "ik_max_word",
          "search_analyzer": "ik_max_word",
          "boost": 1.5
        }
      }
    }
  }
}

- 1
- 2
- 3
- 4
- 5
- 6
- 7
- 8
- 9
- 10
- 11
- 12
- 13
- 14
- 15
- 16
- 17
- 18
- 19
- 20
- 21
- 22
- 23
- 24
- 25
- 26
- 27
- 28

索引库创建成功
3,回到springboot的工程,开始写代码
1.创建一个叫article的实体类,其中的注解代表的含义分别是:
- @Document: 代表一个文档记录 ,indexName: 用来指定索引名称, type: 用来指定索引类型
- @Id: 用来将对象中id和ES中_id映射
- @Field: 用来指定ES中的字段对应Mapping,其中的type: 用来指定ES中存储类型,analyzer: 用来指定使用哪种分词器
@Data
@Document(indexName = "test-search",type = "article",shards = 1,replicas = 0, refreshInterval = "-1")
public class Article implements Serializable {
	@Id
    private Long id;

	@Field(type = FieldType.Text,analyzer = "ik_max_word", searchAnalyzer = "ik_max_word")
    private String title; //标题

	@Field(type = FieldType.Text,analyzer = "ik_max_word", searchAnalyzer = "ik_max_word")
    private String content;// 缩略内容

}
- 1
- 2
- 3
- 4
- 5
- 6
- 7
- 8
- 9
- 10
- 11
- 12
- 13
- 14
2.dao层,创建一个ArticleRepository的接口,继承ElasticsearchRepository
public interface ArticleRepository extends ElasticsearchRepository<Article,Long> {
    /**
     * 使用jpa的一个好处就是你想联合title和content去搜索,它就会有方法出现,使用pageable分页
     * @param title
     * @param content
     * @param pageable
     * @return
     */
    Page<Article> findByTitleLikeOrContentLike(String title, String content, Pageable pageable);

    /**
     * 根据article的content内容去搜索,使用pageable份额有
     * @param content
     * @param pageable
     * @return
     */
    Page<Article> findByContentLike(String content, Pageable pageable);
}
- 1
- 2
- 3
- 4
- 5
- 6
- 7
- 8
- 9
- 10
- 11
- 12
- 13
- 14
- 15
- 16
- 17
- 18
- 19
3.service层,
@Service
public class ArticleService {
    @Autowired
    private ArticleRepository articleRepository;

    public void save(Article article){
        articleRepository.save(article);
    }

    public Page<Article> search(String title, String content, Pageable pageable){
        return articleRepository.findByTitleLikeOrContentLike(title,content,pageable);
    }

    public Page<Article> search(String content,Pageable pageable){
        return articleRepository.findByContentLike(content,pageable);
    }
    public Page<Article> findAll(Pageable pageable){
        return articleRepository.findAll(pageable);
    }
}
- 1
- 2
- 3
- 4
- 5
- 6
- 7
- 8
- 9
- 10
- 11
- 12
- 13
- 14
- 15
- 16
- 17
- 18
- 19
- 20
4,controller
@RestController
public class ArticleController {
    @Autowired
    private ArticleRepository articleRepository;

    @Autowired
    private ArticleService articleService;

	//可以插入单条也可以多条
    @RequestMapping("/articleSave")
    public String save(){
    List<Article> articles = new ArrayList<>();
    articles.add(new Article(System.currentTimeMillis(),"小米",
            "小米手机"));
    articles.add(new Article(System.currentTimeMillis(),"华为",
            "华为手机"));

    for(int i=0; i<articles.size(); i++){
        articleRepository.save(articles.get(i));
        System.out.println(articles.get(i));
    }
    return "success";
    }

    @RequestMapping("/search")
    public String search(HttpServletRequest request){
        int pageNum = 0;
        int pageSize = 10;
        String title = request.getParameter("title");
        String content = request.getParameter("content");
        Pageable pageable = PageRequest.of(pageNum,pageSize);
        Page<Article> articles = articleService.search(title,content,pageable);
        return articles.toString();
    }
}
- 1
- 2
- 3
- 4
- 5
- 6
- 7
- 8
- 9
- 10
- 11
- 12
- 13
- 14
- 15
- 16
- 17
- 18
- 19
- 20
- 21
- 22
- 23
- 24
- 25
- 26
- 27
- 28
- 29
- 30
- 31
- 32
- 33
- 34
- 35
- 36
- 37
5.其实只要集成了jpa他的增删改查就会变得特别简单,只要一点就会有提示

我们可以试着删除一下1001


然后1001就被删除了

然后我们测试一下搜索


声明:本文内容由网友自发贡献,不代表【wpsshop博客】立场,版权归原作者所有,本站不承担相应法律责任。如您发现有侵权的内容,请联系我们。转载请注明出处:https://www.wpsshop.cn/w/从前慢现在也慢/article/detail/68768

