- 1无需WIFI的投屏神器 爱奇艺电视果4G 来自当贝优选 作者 青春向荣_爱奇遇4g投屏器
- 2Android 启用dataBinding报错:Execution failed for task :app:mergeDebugResources Caused by: java.lang.Null_execution failed for task ':app:generatepackagelis
- 3C语言中动态内存相关的4个函数free、malloc、calloc、realloc,常⻅的动态内存的错误
- 42021-04-06_自定义a*
- 5自媒体内容创作ai写作神器:10款你一定要知道的工具! #科技#学习
- 6Waymo Open Dataset (WOD) 数据集详解(比官网详细版)
- 7华为手机百度云息屏后停止下载_华为智选车载智慧屏评测:像手机一般好用,行车体验更便捷...
- 8小程序VR全景图_小程序实现vr全景图
- 9[WinAPI]通过Windows系统CLSID(GUID)打开系统指定窗口,及部分[上帝模式]命令_26ee0668-a00a-44d7-9371-beb064c98683
- 10ArkTS-组件内转场动画_arkts组件转场动画纵向收缩
图像特征匹配总结
赞
踩
大部分转自 https://blog.csdn.net/ssw_1990/article/details/72629655
OpenCV官方文档:https://docs.opencv.org
参考文献:Feature Matching:http://docs.opencv.org/3.0-beta/doc/py_tutorials/py_feature2d/py_matcher/py_matcher.html#matcher
https://docs.opencv.org/master/dc/dc3/tutorial_py_matcher.html
一. Brute-Force的匹配基础
蛮力匹配器:首先在第一幅图像中选取一个关键点然后依次与第二幅图像的每个关键点进行(描述符)距离测试,最后返回距离最近的关键点。函数原型 BFMatcher::BFMatcher(int normType=NORM_L2, bool crossCheck=false),构造函数如下所示:
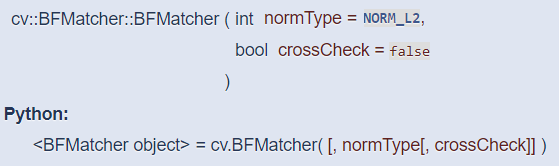
- normType:用来指定要使用的距离测试类型。默认值为cv2.Norm_L2,这很适合SIFT和SURF等(c2.NORM_L1也可)。对于使用二进制描述符的ORB、BRIEF和BRISK算法等,要使用cv2.NORM_HAMMING,这样就会返回两个测试对象之间的汉明距离。如果ORB算法的参数设置为WTA_K==3或4,normType就应该设置成cv2.NORM_HAMMING2。
- crossCheck:默认值为False。如果设置为True,匹配条件就会更加严格,只有到A中的第
个特征点与B中的第
个特征点距离最近,并且B中的第
,即这两个特征点要互相匹配才行。
BFMatcher对象有两个方法BFMatcher.match()和BFMatcher.knnMatch()。
第一个方法会返回最佳匹配。第二个方法为每个关键点返回个最佳匹配,其中
是由用户设定的。
使用cv2.drawMatches()来绘制匹配的点,它会将两幅图像先水平排列,然后在最佳匹配的点之间绘制直线。
如果前面使用的是BFMatcher.knnMatch(),现在可以使用函数cv2.drawMatchsKnn为每个关键点和它的个最佳匹配点绘制匹配线。
如果要选择性绘制就要给函数传入一个掩模。
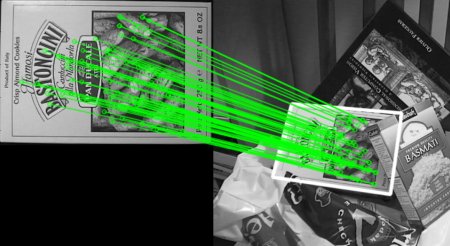
二. 对ORB描述符进行蛮力匹配
使用ORB描述符来进行特征匹配,在目标图像中寻找查询图像的位置,如下所示:
- import cv2
- from matplotlib import pyplot as plt
-
- img1 = cv2.imread('box.png',0) # queryImage
- img2 = cv2.imread('box_in_scene.png',0) # trainImage
- # Initiate SIFT detector
- orb = cv2.ORB()
- # find the keypoints and descriptors with SIFT
- kp1, des1 = orb.detectAndCompute(img1,None)
- kp2, des2 = orb.detectAndCompute(img2,None)
- # create BFMatcher object
- bf = cv2.BFMatcher(cv2.NORM_HAMMING, crossCheck=True)
- # Match descriptors.
- matches = bf.match(des1,des2)
- # Sort them in the order of their distance.
- matches = sorted(matches,key=lambda x:x.distance)
- # Draw first 10 matches.
- img3 = cv2.drawMatches(img1,kp1,img2,kp2,matches[:10],flags=2)
- plt.imshow(img3)
- plt.show()

结果输出,如下所示:
matches=bf.match(des1,des2) 返回值是一个DMatch对象列表。DMatch对象具有属性:
- DMatch.distance,表示描述符之间的距离,越小越好。
- DMatch.trainIdx,表示目标图像中描述符的索引。
- DMatch.queryIdx,表示查询图像中描述符的索引。
- DMatch.imgIdx,表示目标图像的索引。
三. 对SIFT描述符进行蛮力匹配和比值测试
如果 k 等于2,就会为每个关键点绘制两条最佳匹配直线。
比值测试的意思是首先获取与A距离最近的点B(最近)和C(次近),只有当B/C小于阈值(0.75)才被认为是匹配。
因为假设匹配是一一对应,真正匹配的理想距离为0。
- import cv2
- from matplotlib import pyplot as plt
-
- img1 = cv2.imread('box.png',0) # queryImage
- img2 = cv2.imread('box_in_scene.png',0) # trainImage
- # Initiate SIFT detector
- sift = cv2.SIFT()
- # find the keypoints and descriptors with SIFT
- kp1, des1 = sift.detectAndCompute(img1,None)
- kp2, des2 = sift.detectAndCompute(img2,None)
- # BFMatcher with default params
- bf = cv2.BFMatcher()
- matches = bf.knnMatch(des1,des2,k=2)
- # Apply ratio test
- good = []
- for m,n in matches:
- if m.distance < 0.75*n.distance:
- good.append([m])
- # cv2.drawMatchesKnn expects list of lists as matches
- img3 = cv2.drawMatchesKnn(img1,kp1,img2,kp2,good,flags=2)
- plt.imshow(img3)
- plt.show()
结果输出,如下所示:

四. FLANN匹配器
快速最近邻搜索包(Fast Library for Approximate NearestNeighbors,FLANN)是一个对大数据集和高维特征进行最近邻搜索的算法的集合,在面对大数据集时它的效果要好于BFMatcher。
使用FLANN匹配需要传入两个字典参数,第一个参数是IndexParams:
- 对于SIFT和SURF,可以传入参数index_params=dict(algorithm=FLANN_INDEX_KDTREE, trees=5)
- 对于ORB,可以传入参数index_params=dict(algorithm=FLANN_INDEX_LSH, table_number=6, key_size=12, multi_probe_level=1)
第二个参数是SearchParams,可以传入参数search_params=dict(checks=100),它来指定递归遍历的次数,值越高结果越准确,但是消耗的时间也越多。
- import cv2
- from matplotlib import pyplot as plt
-
- img1 = cv2.imread('box.png',0) # queryImage
- img2 = cv2.imread('box_in_scene.png',0) # trainImage
- # Initiate SIFT detector
- sift = cv2.SIFT()
- # find the keypoints and descriptors with SIFT
- kp1, des1 = sift.detectAndCompute(img1,None)
- kp2, des2 = sift.detectAndCompute(img2,None)
- # FLANN parameters
- FLANN_INDEX_KDTREE=0
- index_params = dict(algorithm=FLANN_INDEX_KDTREE, trees=5)
- search_params = dict(checks=50)
- flann = cv2.FlannBasedMatcher(index_params,search_params)
- matches = flann.knnMatch(des1,des2,k=2)
- # Need to draw only good matches, so create a mask
- matchesMask = [[0,0] for i in xrange(len(matches))]
- # ratio test as per Lowe's paper
- for i,(m,n) in enumerate(matches):
- if m.distance < 0.7*n.distance:
- matchesMask[i]=[1,0]
- draw_params = dict(matchColor=(0,255,0),
- singlePointColor=(255,0,0),
- matchesMask=matchesMask,
- flags=0)
- img3 = cv2.drawMatchesKnn(img1,kp1,img2,kp2,matches,None,**draw_params)
- plt.imshow(img3)
- plt.show()
结果输出,如下所示:

函数原型cv2.drawMatchesKnn(img1, keypoints1, img2, keypoints2, matches1to2[, outImg[, matchColor[, singlePointColor[,matchesMask[, flags]]]]]) → outImg,如下所示:
1. matches1to2:Matches from the first image to the second one, which means that keypoints1[i] has a corresponding point in keypoints2[matches[i]].
2. matchesMask:Mask determining which matches are drawn. If the mask is empty, all matches are drawn.
3. flags:Flags setting drawing features. Possible flags bit values are defined by DrawMatchesFlags.
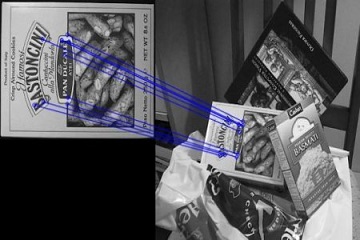
五. 使用特征匹配和单应性查找对象
联合使用特征提取和calib3d模块中的findHomography在复杂图像中查找已知对象。
基本思路是首先将这两幅图像中的特征点集传给该函数,它就会找到这个对象的透视图变换。
然后使用函数cv2.perspectiveTransform()找到这个对象。
至少需要4个正确的点才能找到这种变换。
为了解决匹配过程中的错误,使用RANSAC和LEAST_MEDIAN算法来解决这个问题。
好的匹配提供的正确的估计被称为inliers,剩下的被称为outliers。
cv2.findHomography()返回一个掩模,这个掩模确定了inlier和outlier。
- import numpy as np
- import cv2
- from matplotlib import pyplot as plt
-
- MIN_MATCH_COUNT = 10
- img1 = cv2.imread('box.png',0) # queryImage
- img2 = cv2.imread('box_in_scene.png',0) # trainImage
- # Initiate SIFT detector
- sift = cv2.SIFT()
- # find the keypoints and descriptors with SIFT
- kp1, des1 = sift.detectAndCompute(img1,None)
- kp2, des2 = sift.detectAndCompute(img2,None)
- FLANN_INDEX_KDTREE = 0
- index_params = dict(algorithm = FLANN_INDEX_KDTREE, trees = 5)
- search_params = dict(checks = 50)
- flann = cv2.FlannBasedMatcher(index_params, search_params)
- matches = flann.knnMatch(des1,des2,k=2)
- # store all the good matches as per Lowe's ratio test.
- good = []
- for m,n in matches:
- if m.distance < 0.7*n.distance:
- good.append(m)
- if len(good)>MIN_MATCH_COUNT:
- # 获取关键点的坐标
- src_pts = np.float32([ kp1[m.queryIdx].pt for m in good ]).reshape(-1,1,2)
- dst_pts = np.float32([ kp2[m.trainIdx].pt for m in good ]).reshape(-1,1,2)
- M, mask = cv2.findHomography(src_pts, dst_pts, cv2.RANSAC, 5.0)
- matchesMask = mask.ravel().tolist()
- h,w = img1.shape
- # 使用得到的变换矩阵对原图像的四个角进行变换,获得在目标图像上对应的坐标
- pts = np.float32([ [0,0],[0,h-1],[w-1,h-1],[w-1,0] ]).reshape(-1,1,2)
- dst = cv2.perspectiveTransform(pts,M)
- cv2.polylines(img2,[np.int32(dst)],True,255,10, cv2.LINE_AA)
- else:
- print "Not enough matches are found - %d/%d" % (len(good),MIN_MATCH_COUNT)
- matchesMask = None
- draw_params = dict(matchColor=(0,255,0),
- singlePointColor=None,
- matchesMask=matchesMask,
- flags=2)
- img3 = cv2.drawMatches(img1,kp1,img2,kp2,good,None,**draw_params)
- plt.imshow(img3, 'gray')
- plt.show()
结果输出,如下所示: