
- 1python的元组、字典介绍,变量引用以及可变类型不可变类型_info={'name'=班长,'id':100,''}
- 2零基础入门小程序,实战经验分享
- 3异构计算, GPU和框架选型指南
- 4Stable Diffusion Webui里如何设置 clip skip 和ENSD 31337
- 5100个ArcGIS属性查询公式_arcgis where
- 6unity接入华为sdk之原生接入_unity openharmony sdk
- 7mysql8022改密码_mysql 8.0 修改密码
- 8ltp(linux test project)的安装和使用
- 9图书馆自动预约的小demo_中南大学图书馆预约脚本
- 10利用pexpect实现ssh自动登录时命令行无法自动换行问题解决
如何拥有自己的本地大语言模型_bge-large-zh-v1.5
赞
踩
一、环境需求
本次demo是在win 11上进行搭建,模型选择为ChatGLM3-6B,python 版本为3.11,java 版本为jdk 17,node 版本为 node18.x。由于本人不擅长python,所以用java进行项目开发。
项目思路是用ChatGLM3-6B开源大模型进行本地搭建,以api_server方式启动。此时搭配开源的ui框架就已经可以实现一个基本的GLM模型。进行模型微调和定制开发则采用spring ai + langchain4j。
注意想在本地运行chatglm3-6b模型需要12G显存,否则以cpu方式运行程序会非常慢,内存要求也会要32g。
二、环境搭建
conda安装直接跳过,直接进入正题
1、安装pytorch环境
1.1官网 PyTorch
1.2 pip安装
注意安装时选择对应自己cuda版本的torch版本
pip3 install torch torchvision torchaudio --index-url https://download.pytorch.org/whl/cu1212、下载ChatGLM3项目
2.1仓库地址GitHub - THUDM/ChatGLM3: ChatGLM3 series: Open Bilingual Chat LLMs | 开源双语对话语言模型
3、下载chatglm3-6b模型
3.1模型地址 https://huggingface.co/THUDM/chatglm3-6b
3.2模型下载命令
git clone https://huggingface.co/THUDM/chatglm3-6b4、下载bge-large-zh-v1.5模型
4.1模型地址https://huggingface.co/BAAI/bge-large-zh-v1.5
4.2模型下载命令
git clone https://huggingface.co/BAAI/bge-large-zh-v1.5上面这两个模型下载需要科学上网,后面补充网盘资源
4.3把下载好的两个模型文件夹复制到ChatGLM3项目根目录下,复制好后文件目录如下 
4.4修改openai_api_demo/api_server.py文件中设置模型路径的位置为以下路径
- # set LLM path
- MODEL_PATH = os.environ.get('MODEL_PATH', 'chatglm3-6b')
- TOKENIZER_PATH = os.environ.get("TOKENIZER_PATH", MODEL_PATH)
-
- # set Embedding Model path
- EMBEDDING_PATH = os.environ.get('EMBEDDING_PATH', 'bge-large-zh-v1.5')
4.5执行 下面命令以openai-api模式启动
python ./openai_api_demo/api_server.py 出现以下日志时启动成功 
此时可以通过api形式进行访问,编写自己的程序了,如果想直接使用本地模型,官方提供了一个带ui的启动方式,启动前修改basic_demo/web_demo_streamlit.py文件中设置模型路径的位置如下
- MODEL_PATH = os.environ.get('MODEL_PATH', './chatglm3-6b')
- TOKENIZER_PATH = os.environ.get("TOKENIZER_PATH", MODEL_PATH)
然后执行下面命令即可弹出一个webui界面
streamlit run basic_demo/web_demo_streamlit.py
5、下载ChatGPT-Next-Web项目(使用开源web-ui)
5.2在项目目录下新建一个.env.local文件,指定大模型地址为本地大模型,内容如下
- OPENAI_API_KEY=none
- BASE_URL=http://0.0.0.0:8000
5.3执行 yarn run dev即可启动ui项目
6、搭建spring ai环境
注意,该项目必须使用jdk>=17。
6.1 创建一个springboot 3.x项目,pom如下
- <?xml version="1.0" encoding="UTF-8"?>
- <project xmlns="http://maven.apache.org/POM/4.0.0" xmlns:xsi="http://www.w3.org/2001/XMLSchema-instance"
- xsi:schemaLocation="http://maven.apache.org/POM/4.0.0 https://maven.apache.org/xsd/maven-4.0.0.xsd">
- <modelVersion>4.0.0</modelVersion>
- <parent>
- <groupId>org.springframework.boot</groupId>
- <artifactId>spring-boot-starter-parent</artifactId>
- <version>3.2.3</version>
- <relativePath/> <!-- lookup parent from repository -->
- </parent>
- <groupId>com.iai</groupId>
- <artifactId>iask</artifactId>
- <version>0.0.1-SNAPSHOT</version>
- <name>iask</name>
- <description>iask</description>
- <properties>
- <java.version>17</java.version>
- <spring-ai.version>0.8.0</spring-ai.version>
- </properties>
- <dependencies>
- <dependency>
- <groupId>org.springframework.boot</groupId>
- <artifactId>spring-boot-starter-web</artifactId>
- <exclusions>
- <exclusion>
- <groupId>org.springframework.boot</groupId>
- <artifactId>spring-boot-starter-tomcat</artifactId>
- </exclusion>
- </exclusions>
- </dependency>
- <dependency>
- <groupId>org.springframework.boot</groupId>
- <artifactId>spring-boot-starter-undertow</artifactId>
- </dependency>
- <dependency>
- <groupId>org.springframework.ai</groupId>
- <artifactId>spring-ai-openai-spring-boot-starter</artifactId>
- </dependency>
-
- <dependency>
- <groupId>org.springframework.boot</groupId>
- <artifactId>spring-boot-devtools</artifactId>
- <scope>runtime</scope>
- <optional>true</optional>
- </dependency>
- <dependency>
- <groupId>com.mysql</groupId>
- <artifactId>mysql-connector-j</artifactId>
- <scope>runtime</scope>
- </dependency>
- <dependency>
- <groupId>org.projectlombok</groupId>
- <artifactId>lombok</artifactId>
- <optional>true</optional>
- </dependency>
- <dependency>
- <groupId>org.springframework.boot</groupId>
- <artifactId>spring-boot-starter-test</artifactId>
- <scope>test</scope>
- </dependency>
-
- <dependency>
- <groupId>dev.langchain4j</groupId>
- <artifactId>langchain4j</artifactId>
- <version>0.27.1</version>
- </dependency>
-
- <dependency>
- <groupId>dev.langchain4j</groupId>
- <artifactId>langchain4j-spring-boot-starter</artifactId>
- <version>0.24.0</version>
- </dependency>
- </dependencies>
- <dependencyManagement>
- <dependencies>
- <dependency>
- <groupId>org.springframework.ai</groupId>
- <artifactId>spring-ai-bom</artifactId>
- <version>${spring-ai.version}</version>
- <type>pom</type>
- <scope>import</scope>
- </dependency>
- </dependencies>
- </dependencyManagement>
-
- <build>
- <plugins>
- <plugin>
- <groupId>org.springframework.boot</groupId>
- <artifactId>spring-boot-maven-plugin</artifactId>
- <configuration>
- <excludes>
- <exclude>
- <groupId>org.projectlombok</groupId>
- <artifactId>lombok</artifactId>
- </exclude>
- </excludes>
- </configuration>
- </plugin>
- </plugins>
- </build>
- <repositories>
- <repository>
- <id>spring-milestones</id>
- <name>Spring Milestones</name>
- <url>https://repo.spring.io/milestone</url>
- <snapshots>
- <enabled>false</enabled>
- </snapshots>
- </repository>
- </repositories>
-
- </project>

6.2配置application.yaml
6.3解决undertow使用默认websocket缓冲池警告(非必须)
创建一个配置类UndertowConfig.java
- package com.iai.iask.config;
-
- import io.undertow.server.DefaultByteBufferPool;
- import io.undertow.websockets.jsr.WebSocketDeploymentInfo;
- import org.springframework.boot.web.embedded.undertow.UndertowServletWebServerFactory;
- import org.springframework.boot.web.server.WebServerFactoryCustomizer;
- import org.springframework.stereotype.Component;
-
- /**
- * @author: wongcai
- * @date: 2024-03-12 15:42
- * @description: 解决启动io.undertow.websockets.jsr UT026010: Buffer pool was not set on WebSocketDeploymentInfo, the default pool will be used的警告
- */
- @Component
- public class UndertowConfig implements WebServerFactoryCustomizer<UndertowServletWebServerFactory> {
-
- /**
- * 设置 Undertow 的 websocket 缓冲池
- */
- @Override
- public void customize(UndertowServletWebServerFactory factory) {
- // 默认不直接分配内存 如果项目中使用了 websocket 建议直接分配
- factory.addDeploymentInfoCustomizers(deploymentInfo -> {
- WebSocketDeploymentInfo webSocketDeploymentInfo = new WebSocketDeploymentInfo();
- webSocketDeploymentInfo.setBuffers(new DefaultByteBufferPool(false, 512));
- deploymentInfo.addServletContextAttribute("io.undertow.websockets.jsr.WebSocketDeploymentInfo", webSocketDeploymentInfo);
- });
- }
-
- }
7、测试代码
7.1编写测试AiController.java
- package com.iai.iask.aicontroller;
-
-
- import org.springframework.ai.openai.OpenAiChatClient;
- import org.springframework.beans.factory.annotation.Autowired;
- import org.springframework.web.bind.annotation.RequestMapping;
- import org.springframework.web.bind.annotation.RequestParam;
- import org.springframework.web.bind.annotation.RestController;
-
- @RestController
- @RequestMapping("/api/v1")
- public class AiController {
- private final OpenAiChatClient chatClient;
-
- @Autowired
- public AiController(OpenAiChatClient chatClient) {
- this.chatClient = chatClient;
- }
-
- @RequestMapping("/chat")
- public String chat(@RequestParam(value = "message",defaultValue = "Hi") String message){
- return chatClient.call(message);
- }
- }
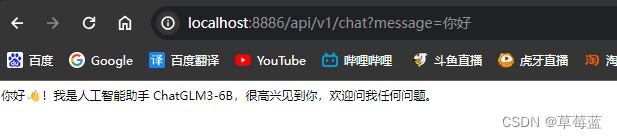
7.2浏览器访问测试
三、相关文件
缺少部分逐渐补全

