
- 1xshell配置隧道连接_xshell隧道配置方法
- 2自然语言处理NLP星空智能对话机器人系列:深入理解Transformer自然语言处理 BertViz_bertviz 使用
- 3GAN之父NIPS 2016演讲现场直击:全方位解读生成对抗网络的原理及未来(附PPT)
- 4button样式
- 5AI续写工具:让文字更生动更有趣
- 6《幻兽帕鲁》多人游戏专属服务器搭建:从配置到运行,一站式解决方案!_帕鲁多人专用服务器
- 7mysql的基本知识点——JOIN联表查询
- 8Android Studio 修改默认代码仓库为阿里仓库_android改阿里云的库
- 9Logstash 零基础教程_lostash安装使用日志收集教程 csdn
- 10java rest post 多个参数_Spring cloud restTemplate 传递复杂参数的方式(多个对象)
android library依赖 aar_Android-模块化、组件化、插件化、热修复-组件化工程构建+页面路由多种方式实践...
赞
踩
上一篇MonkeyLei:Android-模块化、组件化、插件化、热修复-组件化一下试试 我们大概尝试了下一个Module的library与application切换。这也是为为后续的继续做准备...今天我们就尝试自己搭建一个组件化工程,并初步做一个页面的跳转(组件间的通信其中一个点),后续还会完善组件间相互通信的方式。
工程实践完后,我会设置下Module的状态(Library和Module直接做切换),然后单独运行App或者Module,如果都没问题,这才能保证组件之间无耦合!!!
工程走起!

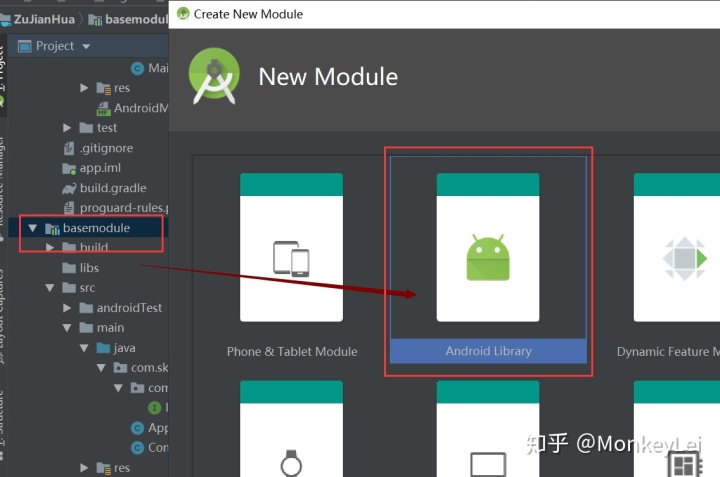
1. 公共库Module一般作为Library使用。而组件Module我们可以来回切换,但是我们新建Module的时候还是如下方式(保证有启动的manifest配置):
2. 然后按照上一篇学到的知识,代码配置下Module的Library和Application切换;然而为了方便统一管理App基础信息,各个Module的版本信息,以及第三方依赖库的版本信息等,我们项目根目录下新建一个config.gradle,专门用来配置:
config.gradle
- /**
- * 全局统一配置
- */
- ext {
- /**
- * module开关统一声明在此处
- * true:module作为application,可单独打包为apk
- * false:module作为library,可作为宿主application的组件
- */
- isLoginModule = false
- isPersonalModule = false
-
- /**
- * 版本统一管理
- */
- versions = [
- applicationId : "com.skl.zujianhua", // 应用ID
- versionCode : 1, // 版本号
- versionName : "1.0.0", // 版本名称
-
- compileSdkVersion : 28,
- minSdkVersion : 15,
- targetSdkVersion : 28,
- buildToolsVersion : "29.0.0",
-
- constraintlayoutVersion: "1.1.3",
- runnerVersion : "1.0.2",
- espressoVersion : "3.0.2",
- junitVersion : "4.12",
- appcompatVersion : "28.0.0",
-
- arouterApiVersion : "1.5.0",
- arouterCompilerVersion : "1.2.2",
- ]
-
- dependencies = [
- "appcompat" : "com.android.support:appcompat-v7:${versions["appcompatVersion"]}",
- "constraintlayout": "com.android.support.constraint:constraint-layout:${versions["constraintlayoutVersion"]}",
- "runner" : "com.android.support.test:runner:${versions["runnerVersion"]}",
- "espresso_core" : "com.android.support.test.espresso:espresso-core:${versions["espressoVersion"]}",
- "junit" : "junit:junit:${versions["junitVersion"]}",
- // TODO MD等新增支持库
- // //注释处理器
- // "support_annotations" : "com.android.support:support-annotations:${versions["annotationsVersion"]}",
- // "design" : "com.google.android.material:material:${versions["designVersion"]}",
-
- // TODO 其他公共的依赖都可以配置到这里
- // //方法数超过65535解决方法64K MultiDex分包方法
- // "multidex" : "androidx.multidex:multidex:2.0.0",
-
- //阿里路由
- "arouter_api" : "com.alibaba:arouter-api:${versions["arouterApiVersion"]}",
- "arouter_compiler": "com.alibaba:arouter-compiler:${versions["arouterCompilerVersion"]}",
- // "arouter_annotation" : "com.alibaba:arouter-annotation:${versions["arouterAnnotationVersion"]}",
- //
- // //黄油刀
- // "butterknife" : "com.jakewharton:butterknife:${versions["butterknifeVersion"]}",
- // "butterknife_compiler": "com.jakewharton:butterknife-compiler:${versions["butterknifeVersion"]}"
- ]
- }

2.1 根目录下的build.gradle下添加config配置:
apply from: "config.gradle" 3. 此时我们不想每个Library/Application用到第三方库(比如Butterknife、Arouter、MultiDex等)都去依赖,因此我们新建一个基础模块basemodule: - (Arouter实践过了,所以就一并贴出来算了。不过我们的学习过程一般都是渐进式的,先实现基础工程,模块的构建,完事三方依赖都配置好,切换都测试成功了,然后再开始搞路由!)
重点看下build.gradle配置:
- apply plugin: 'com.android.library'
-
- android {
- compileSdkVersion 28
- buildToolsVersion "29.0.0"
-
-
- defaultConfig {
- minSdkVersion 15
- targetSdkVersion 28
- versionCode 1
- versionName "1.0"
-
- testInstrumentationRunner "android.support.test.runner.AndroidJUnitRunner"
- javaCompileOptions {
- annotationProcessorOptions {
- arguments = [AROUTER_MODULE_NAME: project.getName()]
- }
- }
- }
-
- buildTypes {
- release {
- minifyEnabled false
- proguardFiles getDefaultProguardFile('proguard-android-optimize.txt'), 'proguard-rules.pro'
- }
- }
-
- }
-
- dependencies {
- implementation fileTree(dir: 'libs', include: ['*.jar'])
-
- // 把implementation 用api代替,它是对外部公开的, 所有其他的module就不需要添加该依赖
- api rootProject.ext.dependencies["appcompat"]
- api rootProject.ext.dependencies["constraintlayout"]
- api rootProject.ext.dependencies["junit"]
- api rootProject.ext.dependencies["runner"]
- api rootProject.ext.dependencies["espresso_core"]
-
- // //注释处理器,butterknife所必需
- // api rootProject.ext.dependencies["support_annotations"]
- //
- // //MultiDex分包方法
- // api rootProject.ext.dependencies["multidex"]
- //
- // //Material design
- // api rootProject.ext.dependencies["design"]
- //
- // //黄油刀
- // api rootProject.ext.dependencies["butterknife"]
- // annotationProcessor rootProject.ext.dependencies["butterknife_compiler"]
-
- //Arouter路由
- annotationProcessor rootProject.ext.dependencies["arouter_compiler"]
- api rootProject.ext.dependencies["arouter_api"]
- // api rootProject.ext.dependencies["arouter_annotation"]
- }
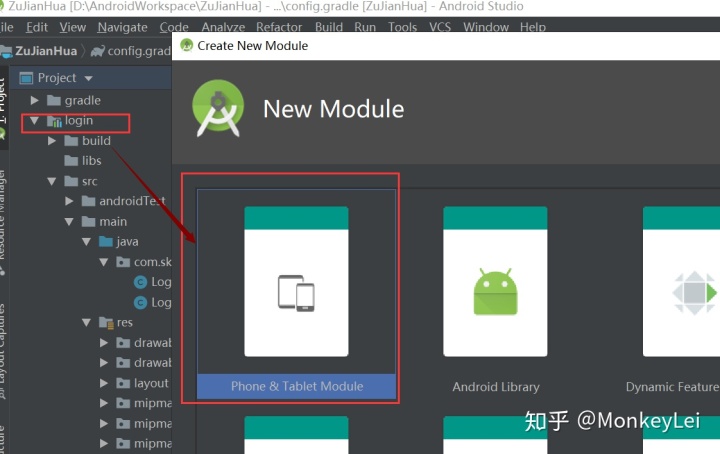
4. 然后接着我们创建Appliaction模块Login和Personal,这样创建出来就直接配置上了,然后单独可以运行啦,记得都依赖上basemodule - 后续的公共模块都可以放到basemodule中去!
4.1 然后根据之前的知识配置下和Library的切换: - 参数都是根目录/congig.gradle配置的,别忘记了
login/build.gradle
- if (Boolean.valueOf(rootProject.ext.isLoginModule)) {
- apply plugin: 'com.android.application'
- } else {
- apply plugin: 'com.android.library'
- }
-
- // TODO 虽然依赖了公共库,但是有些配置还是要模块内部自己配置
- // apply plugin: 'com.jakewharton.butterknife'
-
- android {
- compileSdkVersion 28
- buildToolsVersion "29.0.0"
-
-
- defaultConfig {
- // Application模式下设置applicationId
- if (Boolean.valueOf(rootProject.ext.isLoginModule)) {
- applicationId "com.skl.login"
- }
- minSdkVersion 15
- targetSdkVersion 28
- versionCode 1
- versionName "1.0"
-
- testInstrumentationRunner "android.support.test.runner.AndroidJUnitRunner"
- javaCompileOptions {
- annotationProcessorOptions {
- arguments = [AROUTER_MODULE_NAME: project.getName()]
- }
- }
- }
-
- buildTypes {
- release {
- minifyEnabled false
- proguardFiles getDefaultProguardFile('proguard-android-optimize.txt'), 'proguard-rules.pro'
- }
- }
-
- sourceSets {
- main {
- if (Boolean.valueOf(rootProject.ext.isLoginModule)) {
- manifest.srcFile 'src/main/AndroidManifest.xml'
- } else {
- // Library模式可以不用配置manifest文件
- }
- }
- }
- }
-
- dependencies {
- implementation fileTree(dir: 'libs', include: ['*.jar'])
-
- // 公共依赖库
- implementation project(path: ':basemodule')
-
- // TODO 虽然依赖了公共库,但是有些配置还是要模块内部自己配置
- // //黄油刀
- // annotationProcessor rootProject.ext.dependencies["butterknife_compiler"]
- //Arouter路由
- annotationProcessor rootProject.ext.dependencies["arouter_compiler"]
- }
personal/build.gradle
- if (Boolean.valueOf(rootProject.ext.isPersonalModule)) {
- apply plugin: 'com.android.application'
- } else {
- apply plugin: 'com.android.library'
- }
-
- // TODO 虽然依赖了公共库,但是有些配置还是要模块内部自己配置
- // apply plugin: 'com.jakewharton.butterknife'
-
- android {
- compileSdkVersion 28
- buildToolsVersion "29.0.0"
-
-
- defaultConfig {
- // Application模式下设置applicationId
- if (Boolean.valueOf(rootProject.ext.isLoginModule)) {
- applicationId "com.skl.personal"
- }
- minSdkVersion 15
- targetSdkVersion 28
- versionCode 1
- versionName "1.0"
-
- testInstrumentationRunner "android.support.test.runner.AndroidJUnitRunner"
- javaCompileOptions {
- annotationProcessorOptions {
- arguments = [AROUTER_MODULE_NAME: project.getName()]
- }
- }
- }
-
- buildTypes {
- release {
- minifyEnabled false
- proguardFiles getDefaultProguardFile('proguard-android-optimize.txt'), 'proguard-rules.pro'
- }
- }
-
- sourceSets {
- main {
- if (Boolean.valueOf(rootProject.ext.isPersonalModule)) { // apk
- manifest.srcFile 'src/main/AndroidManifest.xml'
- } else {
- // Library模式可以不用配置manifest文件
- }
- }
- }
- }
-
- dependencies {
- implementation fileTree(dir: 'libs', include: ['*.jar'])
-
- // 公共依赖库
- implementation project(path: ':basemodule')
-
- // TODO 虽然依赖了公共库,但是有些配置还是要模块内部自己配置
- // //黄油刀
- // annotationProcessor rootProject.ext.dependencies["butterknife_compiler"]
- //Arouter路由
- annotationProcessor rootProject.ext.dependencies["arouter_compiler"]
- }
5. 修改下app主模块下的布局,做一个点击按钮事件,分别用来跳转到login和personal页面:
app/activity_main.xml
- <?xml version="1.0" encoding="utf-8"?>
- <android.support.constraint.ConstraintLayout xmlns:android="http://schemas.android.com/apk/res/android"
- xmlns:app="http://schemas.android.com/apk/res-auto"
- xmlns:tools="http://schemas.android.com/tools"
- android:layout_width="match_parent"
- android:layout_height="match_parent"
- tools:context=".MainActivity">
-
- <Button
- android:layout_width="wrap_content"
- android:layout_height="wrap_content"
- android:onClick="GoLogin"
- android:text="跳转到Login界面"
- app:layout_constraintLeft_toLeftOf="parent"
- app:layout_constraintTop_toTopOf="parent" />
-
- <Button
- android:layout_width="wrap_content"
- android:layout_height="wrap_content"
- android:onClick="GoPersonal"
- android:text="跳转到个人信息页面"
- app:layout_constraintEnd_toEndOf="parent"
- app:layout_constraintTop_toTopOf="parent" />
-
- </android.support.constraint.ConstraintLayout>
MainActivity.java
- package com.skl.zujianhua;
-
- import android.support.v7.app.AppCompatActivity;
- import android.os.Bundle;
- import android.view.View;
-
- import com.alibaba.android.arouter.launcher.ARouter;
-
- public class MainActivity extends AppCompatActivity {
-
- @Override
- protected void onCreate(Bundle savedInstanceState) {
- super.onCreate(savedInstanceState);
- setContentView(R.layout.activity_main);
- }
-
- /**
- * 跳转到登录页面
- *
- * @param view
- */
- public void GoLogin(View view) {
- // 跳转方式1: 通过反射
- // try {
- // Class clazz = Class.forName("com.skl.login.LoginActivity");
- // Intent intent = new Intent(this, clazz);
- // startActivity(intent);
- // // startActivityForResult(intent, 110);
- // } catch (ClassNotFoundException e) {
- // e.printStackTrace();
- // }
-
- // 跳转方式2:每个页面都注册到base模块,由base模块提供跳转服务
- // CompomentsService.getiAppComponentHashMap(AppConfig.PAGE_TYPE.LOGIN).launch(this, null);
-
- // 跳转方式3:采用URI方式
- // startActivity(new Intent(Intent.ACTION_VIEW, Uri.parse("activity://login")));
-
- // 跳转方式4:采用 Arouter
- ARouter.getInstance().build("/hl/login")
- // .withString("nothing", "Gone with the Wind")
- // .withObject("author", Object)
- .navigation(this, 110);
- }
-
- /**
- * 跳转到个人中心
- *
- * @param view
- */
- public void GoPersonal(View view) {
- // 跳转方式4:采用 Arouter
- ARouter.getInstance().build("/ppx/personal")
- // .withString("nothing", "Gone with the Wind")
- // .withObject("author", Object)
- .navigation(this, 110);
- }
- }
5.1 上面分别列出了四种跳转方式,首先反射的方式,这个要试试哈。记得页面是需要配置到AndroidManifest.xml的哟。
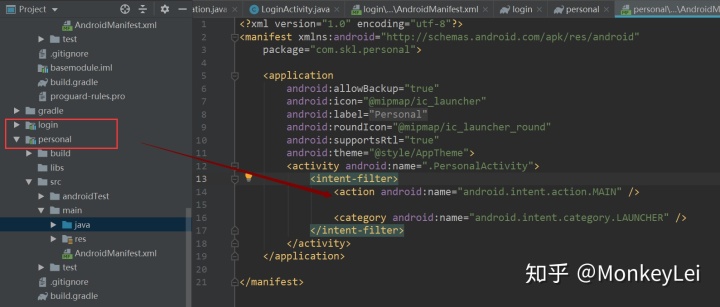
5.2 先说跳转方式3, URI的方式,这个需要配置待跳转页面的scheme、host、action、category信息,然后跳转时根据scheme和host做路由:
login/src/main/AndroidManifest.xml
- <?xml version="1.0" encoding="utf-8"?>
- <manifest xmlns:android="http://schemas.android.com/apk/res/android"
- package="com.skl.login">
-
- <application
- android:allowBackup="true"
- android:icon="@mipmap/ic_launcher"
- android:label="@string/app_name"
- android:roundIcon="@mipmap/ic_launcher_round"
- android:supportsRtl="true"
- android:theme="@style/AppTheme">
- <activity android:name=".LoginActivity">
- <!--跳转方式3:提供URI方式-->
- <intent-filter>
- <action android:name="android.intent.action.VIEW" />
- <category android:name="android.intent.category.DEFAULT" />
- <category android:name="android.intent.category.BROWSABLE" />
- <data android:scheme="activity" />
- <data android:host="login" />
- </intent-filter>
- </activity>
- </application>
-
- </manifest>
然后 startActivity(new Intent(Intent.ACTION_VIEW, Uri.parse("activity://login")));就可以跳转了啦.....
5.3 接着说跳转方式4 ,ARouter的方式,github地址,上面配置方式都有啦:alibaba/ARouter
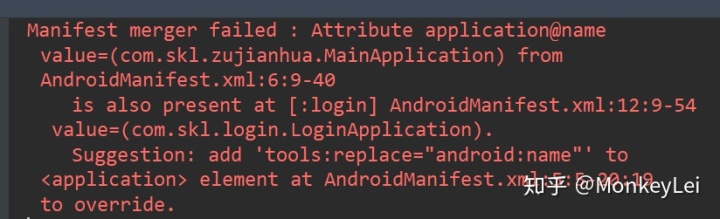
照着配置就行,不过要注意我们有basemodule,多个library,so,注意下面这个说明: - javaCompileOptions比较关键,不然你的路由就会报="http://www.baidu.com/link?url=SFoQYEc0VH3o8IZkDe1H0v2W30NKqGHpsDU24PfR5pLn_c7GdXgkmO8moxxq7YGDO8VFzM4u0FFIwpTv25xIgKeKXK3YTN6DS8bTFKQuthy">ARouter there's no route matched
- 虽然我们basemodule采用api的方式引入了arouter:
- basemodule/build.gradle
- //Arouter路由
- annotationProcessor rootProject.ext.dependencies["arouter_compiler"]
- api rootProject.ext.dependencies["arouter_api"]
-
-
- 但是其他的Module需要使用的地方同样需要添加如下配置:
- login/build.gradle
- personal/build.gradle
-
- android {
- compileSdkVersion 28
- buildToolsVersion "29.0.0"
-
- defaultConfig {
- ......
- javaCompileOptions {
- annotationProcessorOptions {
- arguments = [AROUTER_MODULE_NAME: project.getName()]
- }
- }
- }
- .....
- }
-
- dependencies {
- implementation fileTree(dir: 'libs', include: ['*.jar'])
-
- // 公共依赖库
- implementation project(path: ':basemodule')
-
- // TODO 虽然依赖了公共库,但是有些配置还是要模块内部自己配置
- // //黄油刀
- // annotationProcessor rootProject.ext.dependencies["butterknife_compiler"]
- // Arouter路由
- annotationProcessor rootProject.ext.dependencies["arouter_compiler"]
- }
5.3.1 然后我们的login,personal都配置上路由信息,方便路由跳转(其他用法待深入) - 路由配置注意:不同module的路由路径的一级命名不能相同。

login/ LoginActivity.java
- package com.skl.login;
-
- import android.support.v7.app.AppCompatActivity;
- import android.os.Bundle;
- import android.view.View;
-
- import com.alibaba.android.arouter.facade.annotation.Route;
-
- @Route(path = "/hl/login")
- public class LoginActivity extends AppCompatActivity {
-
- @Override
- protected void onCreate(Bundle savedInstanceState) {
- super.onCreate(savedInstanceState);
- setContentView(R.layout.activity_login);
- }
-
- /**
- * 登录 + 可以保存数据到本地(采用sharedpreferences的方式存储)
- * TODO 注意:这里为了模拟组件间的接口调用,采用其他方式
- * @param view
- */
- public void logining(View view) {
-
- }
- }
personal/PersonalActivity.java
- package com.skl.personal;
-
- import android.support.v7.app.AppCompatActivity;
- import android.os.Bundle;
- import android.view.View;
-
- import com.alibaba.android.arouter.facade.annotation.Route;
-
- @Route(path = "/ppx/personal")
- public class PersonalActivity extends AppCompatActivity {
-
- @Override
- protected void onCreate(Bundle savedInstanceState) {
- super.onCreate(savedInstanceState);
- setContentView(R.layout.activity_personal);
- }
-
- /**
- * 获取登录页面个人信息并展示
- * @param view
- */
- public void getLoginInfo(View view) {
-
- }
- }
然后开始路由前,主模块app下的MainApplication需要初始化路由组件 - 直接文档添加过来稍加处理就行
- // ARouter路由初始化
- if (BuildConfig.DEBUG) { // These two lines must be written before init, otherwise these configurations will be invalid in the init process
- ARouter.openLog(); // Print log
- ARouter.openDebug(); // Turn on debugging mode (If you are running in InstantRun mode, you must turn on debug mode! Online version needs to be closed, otherwise there is a security risk)
- }
- ARouter.init(this); // As early as possible, it is recommended to initialize in the Application
5.3.2 此时就可以进行路由跳转了呀
- // 跳转方式4:采用 Arouter
- ARouter.getInstance().build("/hl/login")
- // .withString("nothing", "Gone with the Wind")
- // .withObject("author", Object)
- .navigation(this, 110);
6. 最后跳转方式2,这里采用下沉到base模块的方式,各个组件注册到base模块的服务页面,然后由各个模块提供lunch方法。其他模块使用的时候只需要调用base模块的注册的组件对应的lunch方法既可!这个就主要涉及到接口的使用了。
处理方式:6.1 定义IAppComponent接口
- package com.skl.basemodule.common_interface;
-
- import android.app.Application;
- import android.content.Context;
-
- /**
- * 组件Application初始化时需要实现的接口
- */
- public interface IAppComponent {
- void initialize(Application app);
- void launch(Context context, String extra);
- }
6.2 此时就需要各个模块添加Application类(basemodule纯粹是一个library,不参与),然后统一由主Application去调用各个模块的initialize方法(这个时候模块Library要注意,如果不涉及到单独运行,不用去配置application,不然运行报错啦),如下:

6.3 主模块此时由于不能直接与其他模块产生耦合,所以采用反射的方式去初始化各个组件的Application:
实现之前先定义一个basemodule/AppConfig.java用来存储组件信息: - 我采用的接口和其他人略有不同,主要是方便到时候根据枚举进行页面注册,同时根据枚举进行页面跳转,后面就知道了
- package com.skl.basemodule;
-
- import java.util.HashMap;
-
- public class AppConfig {
- public enum PAGE_TYPE {
- LOGIN, PERSONAL
- }
-
- /**
- * 组件集合
- */
- public static HashMap<PAGE_TYPE, String> COMPONENTS = new HashMap<PAGE_TYPE, String>() {
- {
- // 登录页面
- put(PAGE_TYPE.LOGIN, "com.skl.login.LoginApplication");
- // 登录页面
- put(PAGE_TYPE.PERSONAL, "com.skl.login.PersonalApplication");
- }
- };
- }
app/src/main/xxxxx/MainApplication.java - MainApplication也实现组件通信的接口IAppComponent,其他页面有可能也需要跳转到主页面
- package com.skl.zujianhua;
-
- import android.app.Application;
- import android.content.Context;
- import android.content.Intent;
- import android.os.Build;
- import android.os.Bundle;
-
- import com.alibaba.android.arouter.launcher.ARouter;
- import com.skl.basemodule.AppConfig;
- import com.skl.basemodule.common_interface.IAppComponent;
-
- import java.util.Map;
-
- public class MainApplication extends Application implements IAppComponent {
- @Override
- public void onCreate() {
- super.onCreate();
- initialize(this);
- }
-
- @Override
- public void initialize(Application app) {
- // 遍历所有的组件的Application类,依次用反射的方式实现组件初始化和注册
- for(Map.Entry<AppConfig.PAGE_TYPE, String> entry: AppConfig.COMPONENTS.entrySet())
- {
- try {
- Class classz = Class.forName(entry.getValue());
- Object object = classz.newInstance();
- // 实例化后,调用各个组件的initialize方法(init会实现组件的注册)
- if (object instanceof IAppComponent) {
- ((IAppComponent) object).initialize(app);
- }
- } catch (IllegalAccessException e) {
- e.printStackTrace();
- } catch (InstantiationException e) {
- e.printStackTrace();
- } catch (ClassNotFoundException e) {
- e.printStackTrace();
- }
- }
-
- // ARouter路由初始化
- if (BuildConfig.DEBUG) { // These two lines must be written before init, otherwise these configurations will be invalid in the init process
- ARouter.openLog(); // Print log
- ARouter.openDebug(); // Turn on debugging mode (If you are running in InstantRun mode, you must turn on debug mode! Online version needs to be closed, otherwise there is a security risk)
- }
- ARouter.init(this); // As early as possible, it is recommended to initialize in the Application
- }
-
- @Override
- public void launch(Context context, String extra) {
- Intent intent = new Intent(context, MainActivity.class);
- if (Build.VERSION.SDK_INT >= Build.VERSION_CODES.JELLY_BEAN) {
- Bundle bundle = new Bundle();
- if (null != extra && !extra.equals(""))
- bundle.putString("extra_data", extra);
- context.startActivity(intent, bundle);
- } else {
- if (null != extra && !extra.equals(""))
- intent.putExtra("extra_data", extra);
- context.startActivity(intent);
- }
- }
- }
6.4 为了实现组件Application初始化,并且能全局存储组件的信息,我们定一个组件服务类CompomentsService.java - 注册组件时根据枚举存储组件信息,同时提供了获取组件(类型就是通信接口IAppComponent )
- package com.skl.basemodule;
-
- import com.skl.basemodule.common_interface.IAppComponent;
-
- import java.util.HashMap;
-
- /**
- * 组件初始化时都注册到这个服务里面
- */
- public class CompomentsService {
- private static HashMap<AppConfig.PAGE_TYPE, IAppComponent> iAppComponentHashMap = new HashMap<>();
-
- public static void setiAppComponentHashMap(AppConfig.PAGE_TYPE componentName, IAppComponent iAppComponent){
- iAppComponentHashMap.put(componentName, iAppComponent);
- }
-
- public static IAppComponent getiAppComponentHashMap(AppConfig.PAGE_TYPE componentName){
- if (iAppComponentHashMap.containsKey(componentName)){
- return iAppComponentHashMap.get(componentName);
- }
- return null;
- }
- }
6.5 然后此时我们就可以把login、personal模块初始化并注册了:
login/ LoginApplication.java - 里面有注释,相对好理解
- package com.skl.login;
-
- /**
- * 单独运行时需要的话可以配置到AndroidManifest,不需要就不要配置,不然运行报错
- */
- import android.app.Application;
- import android.content.Context;
- import android.content.Intent;
- import android.os.Build;
- import android.os.Bundle;
-
- import com.skl.basemodule.AppConfig;
- import com.skl.basemodule.CompomentsService;
- import com.skl.basemodule.common_interface.IAppComponent;
-
- public class LoginApplication extends Application implements IAppComponent {
- /**
- * 单独作为Application时会走该方法
- */
- @Override
- public void onCreate() {
- super.onCreate();
- // TODO 单独运行时没有需要可以不用调用
- initialize(this);
- }
-
- /**
- * App的Application注册组件时会调用initialize方法!
- *
- * @param app
- */
- @Override
- public void initialize(Application app) {
- // 注册自己到组件服务
- CompomentsService.setiAppComponentHashMap(AppConfig.PAGE_TYPE.LOGIN, this);
- }
-
- /**
- * 启动自己
- *
- * @param context
- * @param extra
- */
- @Override
- public void launch(Context context, String extra) {
- Intent intent = new Intent(context, LoginActivity.class);
- if (Build.VERSION.SDK_INT >= Build.VERSION_CODES.JELLY_BEAN) {
- Bundle bundle = new Bundle();
- if (null != extra && !extra.equals(""))
- bundle.putString("extra_data", extra);
- context.startActivity(intent, bundle);
- } else {
- if (null != extra && !extra.equals(""))
- intent.putExtra("extra_data", extra);
- context.startActivity(intent);
- }
- }
- }
personal/PersonalApplication.java
- package com.skl.personal;
-
- import android.app.Application;
- import android.content.Context;
- import android.content.Intent;
- import android.os.Build;
- import android.os.Bundle;
-
- import com.skl.basemodule.AppConfig;
- import com.skl.basemodule.CompomentsService;
- import com.skl.basemodule.common_interface.IAppComponent;
-
- /**
- * 单独运行时需要的话可以配置到AndroidManifest,不需要就不要配置,不然运行报错
- */
- public class PersonalApplication extends Application implements IAppComponent {
- /**
- * 单独作为Application时会走该方法
- */
- @Override
- public void onCreate() {
- super.onCreate();
- // TODO 单独运行时没有需要可以不用调用
- initialize(this);
- }
-
- /**
- * App的Application注册组件时会调用initialize方法!
- *
- * @param app
- */
- @Override
- public void initialize(Application app) {
- // 注册自己到组件服务
- CompomentsService.setiAppComponentHashMap(AppConfig.PAGE_TYPE.PERSONAL, this);
- }
-
- /**
- * 启动自己
- *
- * @param context
- * @param extra
- */
- @Override
- public void launch(Context context, String extra) {
- Intent intent = new Intent(context, PersonalActivity.class);
- if (Build.VERSION.SDK_INT >= Build.VERSION_CODES.JELLY_BEAN) {
- Bundle bundle = new Bundle();
- if (null != extra && !extra.equals(""))
- bundle.putString("extra_data", extra);
- context.startActivity(intent, bundle);
- } else {
- if (null != extra && !extra.equals(""))
- intent.putExtra("extra_data", extra);
- context.startActivity(intent);
- }
- }
- }
7. 完事了我们就可以采用下沉到公共模块的方式来实现页面跳转 - 枚举方便我们清晰知道要跳转到哪里。相比Arouter,还是不安逸。但是了解一下也好鸭.....
- // 跳转方式2:每个页面都注册到base模块,由base模块提供跳转服务
- CompomentsService.getiAppComponentHashMap(AppConfig.PAGE_TYPE.LOGIN).launch(this, null);
8. 大概一个组件化工程目前一天两天的学习过程和实践就是酱紫。。。还有很多我们可以去联想和实践的,比如页面之间的相互通信,主动回调通知刷新等。以及Eventbus相关集成,如何集成的更好,其他的路由通信方式等等一堆问题!。。。。
组件化如果产生了耦合就尴尬了,这就是设计的魅力!
附上工程地址吧: https://gitee.com/heyclock/doc/tree/master/组件化
一些个参考:可以多像网友学习,但是还是要有自己的想法,哪怕改成自己顺手都是可以的,可能会实践的不好也没关系,至少大的方向应该是对的了。。
https://blog.csdn.net/jiyidehao/article/details/85390370
Android组件化
https://blog.csdn.net/sziitjin/article/details/97761949
Android组件化框架搭建
https://blog.csdn.net/hailong0529/article/details/89392064
https://blog.csdn.net/gaolei1201/article/details/77601027 - 如何跳转页面的方式
alibaba/ARouter

