
- 1余弦相似度总结_余弦相似度的特点是什么?
- 2Springboot项目优化篇_一个springboot项目有哪些需要优化的地方
- 3空间面板数据模型及Stata实现_空间面板模型
- 4关于GPT的Open API,看这一篇就够了(教你搭建)_gpt api
- 5android seekbar 大小,SeekBar中的三个宽度
- 6docker安装RabbitMQ_docker 安装rabbitmq
- 7大数据可视化分析基于Python的某地区空气质量数据分析及可视化_空气质量可视化
- 8121-基于stm32单片机出租车计价器收费系统Proteus仿真+程序源码_基于stm32单片机的出租车计价器
- 9【大数据Hive】hive 加载数据常用方案使用详解_hive 加载hdfs分区数据到表
- 10三维重建算法综述|传统+深度学习方式_三维重建综述
1.1【Mask-RCNN训练自己的数据集】---- Part One:制作数据集(全部流程总结+部分释义)_maskrcnn训练自己的数据集
赞
踩
写在前面
该实现基于Tensorflow、Keras框架,在Ubuntu16.04下运行。
一.制作数据集
1.1 下载安装Labelme
Labelme用来制作图像分割数据集,在安装Labelme之前需要安装下载其所需要的一些依赖库,具体的安装方式见这篇博客
Labelme安装
Labelme github链接
由于笔者之前已经安装过所需要的依赖库,所以在ubuntu终端下直接运行pip install labelme即可,这里就不在赘述。
启动Labelme
labelme
- 1
1.2 标注数据集
- 在正式标注数据集之前最好对自己的数据集进行一定的处理。样本量如果太小则需进行数据增强,其次在制作数据集时需要考虑所训练网络对input image的需求,就MaskRcnn而言需要保证输入图片是square。

(在阅读部分博客时有的博主说输入图片需要保证是64的倍数,这个笔者暂时还无法给出确定的答案,有待求证。欢迎有明白的博友们留言,不胜感激。)本次训练笔者所使用的数据resize为960*960。 - 接下来就是漫长的手动标注数据的工作了,需要提醒的是,在标注数据集时, 倘若你的一张照片当中包含有多个同类物体,在标注时需要对其进行编号。 以标注apple为例,倘若image中只有一个apple,仅许对其打上apple的标签即可,倘若image中有三个apple,则需要分别打上apple1, apple2, apple3的标签。
- labelme标注数据集之后会在所保存的文件路径下生成一系列的json文件,这些json文件无法直接送入网络进行训练,需要对其进行一定的转换,Labelme提供了一定的脚本可以对json文件进行转换。
labelme_json_to_dataset ***.json #***表示文件名
- 1
该脚本位于"/usr/local/lib/python3.5/dist-packages/labelme/cli/"
转换之后会得到***_json这样一个文件夹,文件夹下存放有下述文件。
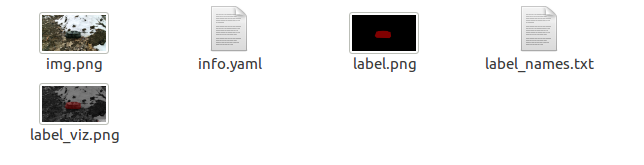
后续要用到的主要有label.png 和 info.yaml文件
(温馨提示:打开某个yaml文件查看一下其格式是否正确,正确格式如下:)
label_names:
- _background_
- apple
- 1
- 2
- 3
原始labelme_json_to_dataset脚本只能对单个json文件进行转换,比较繁琐,so,修改脚本文件使其可以进行批量转换
- json_to_dataset.py 批量转换json文件
# -*- coding: utf-8 -*-
import argparse
import json
import os
import os.path as osp
import warnings

import imgviz
import PIL.Image
import yaml

from labelme.logger import logger
from labelme import utils
import base64

def main():
    # warnings.warn("This script is aimed to demonstrate how to convert the\n"
    #               "JSON file to a single image dataset, and not to handle\n"
    #               "multiple JSON files to generate a real-use dataset.")
    parser = argparse.ArgumentParser()
    parser.add_argument('json_file')
    parser.add_argument('-o', '--out', default=None)
    args = parser.parse_args()

    json_file = args.json_file
    if args.out is None:
        out_dir = osp.basename(json_file).replace('.', '_')
        out_dir = osp.join(osp.dirname(json_file), out_dir)
    else:
        out_dir = args.out
    if not osp.exists(out_dir):
        os.mkdir(out_dir)

    count = os.listdir(json_file)
    for i in range(0, len(count)):
        path = os.path.join(json_file, count[i])
        if os.path.isfile(path):
            data = json.load(open(path))

            if data['imageData']:
                imageData = data['imageData']
            else:
                imagePath = os.path.join(os.path.dirname(path), data['imagePath'])
                with open(imagePath, 'rb') as f:
                    imageData = f.read()
                    imageData = base64.b64encode(imageData).decode('utf-8')
            img = utils.img_b64_to_arr(imageData)
            label_name_to_value = {'_background_': 0}
            for shape in data['shapes']:
                label_name = shape['label']
                if label_name in label_name_to_value:
                    label_value = label_name_to_value[label_name]
                else:
                    label_value = len(label_name_to_value)
                    label_name_to_value[label_name] = label_value

            # label_values must be dense
            label_values, label_names = [], []
            for ln, lv in sorted(label_name_to_value.items(), key=lambda x: x[1]):
                label_values.append(lv)
                label_names.append(ln)
            assert label_values == list(range(len(label_values)))

            lbl = utils.shapes_to_label(img.shape, data['shapes'], label_name_to_value)

            captions = ['{}: {}'.format(lv, ln)
                for ln, lv in label_name_to_value.items()]
            lbl_viz = imgviz.label2rgb(label=lbl, img=imgviz.rgb2gray(img), label_names=label_names, loc='rb')
            # lbl_viz = utils.draw_label(lbl, img, captions)

            out_dir = osp.basename(count[i]).replace('.', '_')
            save_folder_name = out_dir #文件夹名称
            split_file_name = osp.basename(count[i]).split('.')#分隔文件名和文件类型
            save_file_name = split_file_name[0]

            out_dir = osp.join(osp.dirname(count[i]), out_dir)

            if not osp.exists(json_file + '/' + 'labelme_json'):
                os.mkdir(json_file + '/' + 'labelme_json')
            labelme_json = json_file + 'labelme_json'
            out_dir1 = labelme_json + '/' + save_folder_name
            if not osp.exists(out_dir1):
                os.mkdir(out_dir1)

            PIL.Image.fromarray(img).save(osp.join(out_dir1, 'img.png'))#save_file_name文件名
            #PIL.Image.fromarray(lbl).save(osp.join(out_dir1, save_file_name+'_label.png'))
            utils.lblsave(osp.join(out_dir1, 'label.png'), lbl)
            PIL.Image.fromarray(lbl_viz).save(osp.join(out_dir1, 'label_viz.png'))

            if not osp.exists(json_file + '/' + 'cv2_mask'):
                os.mkdir(json_file + '/' + 'cv2_mask')
            mask_save2png_path = json_file + '/' + 'cv2_mask'

            if not osp.exists(json_file + '/' + 'pic'):
                os.mkdir(json_file + '/' + 'pic')
            img_save2png_path = json_file + '/' + 'pic'

            utils.lblsave(osp.join(mask_save2png_path, save_file_name+'.png'), lbl)
            PIL.Image.fromarray(img).save(osp.join(img_save2png_path, save_file_name+'.png'))


            with open(osp.join(out_dir1, 'label_names.txt'), 'w') as f:
                for lbl_name in label_names:
                    f.write(lbl_name + '\n')

            # warnings.warn('info.yaml is being replaced by label_names.txt')
            info = dict(label_names=label_names)
            with open(osp.join(out_dir1, 'info.yaml'), 'w') as f:
                yaml.safe_dump(info, f, default_flow_style=False)

            print('Saved to: %s' % out_dir1)
if __name__ == '__main__':
    main()
- 1
- 2
- 3
- 4
- 5
- 6
- 7
- 8
- 9
- 10
- 11
- 12
- 13
- 14
- 15
- 16
- 17
- 18
- 19
- 20
- 21
- 22
- 23
- 24
- 25
- 26
- 27
- 28
- 29
- 30
- 31
- 32
- 33
- 34
- 35
- 36
- 37
- 38
- 39
- 40
- 41
- 42
- 43
- 44
- 45
- 46
- 47
- 48
- 49
- 50
- 51
- 52
- 53
- 54
- 55
- 56
- 57
- 58
- 59
- 60
- 61
- 62
- 63
- 64
- 65
- 66
- 67
- 68
- 69
- 70
- 71
- 72
- 73
- 74
- 75
- 76
- 77
- 78
- 79
- 80
- 81
- 82
- 83
- 84
- 85
- 86
- 87
- 88
- 89
- 90
- 91
- 92
- 93
- 94
- 95
- 96
- 97
- 98
- 99
- 100
- 101
- 102
- 103
- 104
- 105
- 106
- 107
- 108
- 109
- 110
- 111
- 112
- 113
- 114
用上述demo代替”/usr/local/lib/python3.5/dist-packages/labelme/cli/“下的json_to_dataset.py即可。
彩蛋: 上述demo除了可以进行批量转换,还可以直接将我们后续所需要用到的数据分别整理到各自的文件夹下,如图所示:
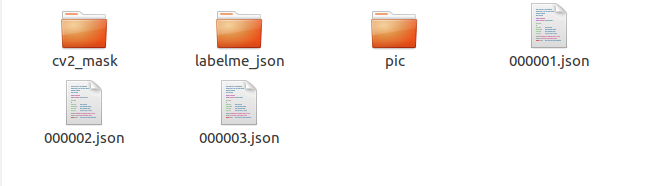
其中cv2_mask下存放的是每张图片的掩码,labelme_json文件夹下存放的是批量转换后各个json文件生成的文件夹,pic下存放的是原始数据图片。
Tip:json文件转换之后所生成的掩码图象必须保证是8位的,如果不是8位则需要进行转换。(如果你用的是最新版的labelme,则不需要考虑这个问题,因为其生成的json文件转换得到的掩码图就是8位。)
可利用下述代码查看图片的位数
import cv2
img = cv2.imread('***.jpg')
print(img.dtype)
- 1
- 2
- 3
参考博客1
参考博客2
复习内容1:python对文件夹或文件的操作
复习内容2:python对文件夹或文件的操作
1.3 下载MaskRCNN模型并制作一定的数据格式
github 下载MaskRCNN demo
在MaskRCNN文件夹下新建一个文件命名为train_data
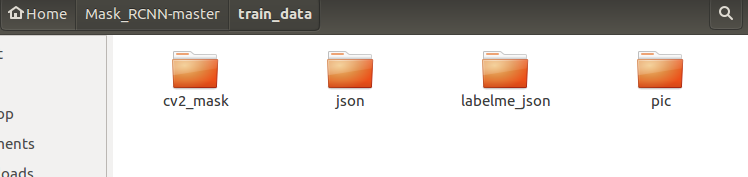
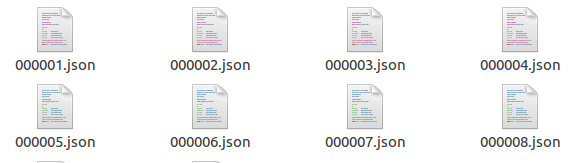
在该文件夹下新建四个文件夹,分别命名为cv2_mask、json、labelme_json、pic;其中cv2_mask、labelme_json、pic是之前生成的三个文件夹,直接放进来即可。json是labelme标注之后得到的json文件。
到此为止,MaskRCNN的数据格式已经准备就绪,接下来就可以开始进行训练了。
2.2 Mask-RCNN训练自己的数据集【Part Two: 模型训练】(全部流程总结+部分释义)
2.3 Mask-RCNN训练自己的数据集【Part Three: 用自己训练的模型进行测试】(全部流程总结+部分释义)


