
- 1Android进阶——AIDL详解_android aidl
- 2【Python】成功解决ValueError: not enough values to unpack (expected 2, got 1)_python中出现value error:not enough values to unpack 怎
- 3Metaio in Unity3d 教学--- 四.再谈谈图片扫描之tracking配置文件
- 4yolov9目标检测可视化图形界面GUI源码
- 5stm32的hal库软件模拟iic通信学习(以M24C02/AT24C02为例) 从数据手册到配置到代码看这一个就够啦
- 6Android开发中遇到的报错及解决方法_@defaultvalue' not applicable to field
- 7Cisco:DHCP自动获取IP地址_思科dhcp自动获取ip地址
- 8【WMCA】《Biometric Face Presentation Attack Detection with Multi-Channel Convolutional Neural Network》_wmca数据集
- 9C++ 疑难点
- 10给一段文本提出重点内容,并完成摘要,用python写成代码
STM32笔记之 Systick(滴答定时器)_systick_init
赞
踩
写在前面: 本文章旨在总结备份、方便以后查询,由于是个人总结,如有不对,欢迎指正;另外,内容大部分来自网络、书籍、和各类手册,如若侵权请告知,马上删帖致歉。
目录
一、Systick介绍
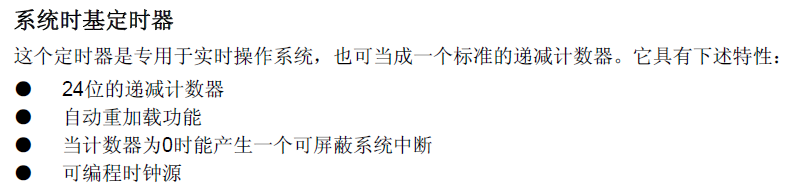
在 ARM Cortex-M3内核中有一个 Systick定时器,它是一个 24bit的定时器,可用于系统中的时钟节拍,因此系统滴答定时器能用于 Cortex‐M3处理器芯片的快速移植(ps:正是因为这一特点,大部分在运行 RTOS都基于 Systick来用作时钟节拍,以便移植)


附上两张 Cortex-M3简视图,同时再附上两个关于 Cortex-M3核心了解的链接:
二、Systick时钟分析

根据时钟树,我们可以看见在 SYSCLK出来后,可能会认为滴答定时器是系统时钟的 1/8,其实不是,滴答定时器的时钟既可以是 HCLK/8,也可以是 HCLK,这个是通过 CTRL寄存器进行设定的(可以通过查看《STM32F10xxx Cortex-M3编程手册》找到)如下图所示:
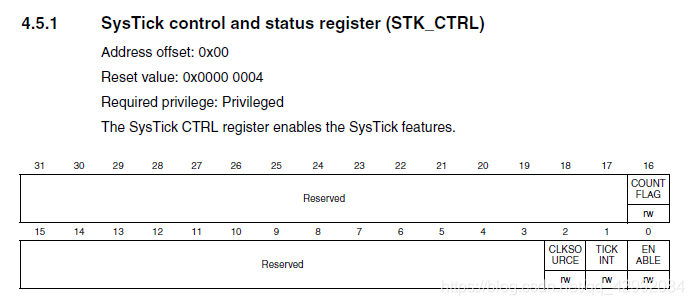

Systick 相关寄存器介绍:

实现思路:利用 systick定时器为递减计数器,设定初值并使能它后,它会每过一个系统时钟周期计数器进行减,直到计数到 0时,SysTick计数器会自动重装初值并继续计数,同时触发中断。
初值计数:根据上一篇配置的时钟使用 72MHz作为系统时钟,那么计数器每次减一所用的时间是 1/72MHz,假设我们的计数器初值是72000,那么每次计数器减到 0,时间经过(1/72M) * 72000 = 0.001,即1ms。(可以理解为:72MHz的时钟频率,那他表示 1s计数72000000次(周期数),那 1ms就计数72000次,所以计数值为72000)
三、Systick时钟节拍代码实现
bsp.c 源文件
- #include "bsp.h"
-
-
- static __IO u32 TimingDelay = 0;
-
- /* Setup SysTick Timer for 1 msec interrupts.
- ------------------------------------------
- 1. The SysTick_Config() function is a CMSIS function which configure:
- - The SysTick Reload register with value passed as function parameter.
- - Configure the SysTick IRQ priority to the lowest value (0x0F).
- - Reset the SysTick Counter register.
- - Configure the SysTick Counter clock source to be Core Clock Source (HCLK).
- - Enable the SysTick Interrupt.
- - Start the SysTick Counter.
- 2. You can change the SysTick Clock source to be HCLK_Div8 by calling the
- SysTick_CLKSourceConfig(SysTick_CLKSource_HCLK_Div8) just after the
- SysTick_Config() function call. The SysTick_CLKSourceConfig() is defined
- inside the misc.c file.
- 3. You can change the SysTick IRQ priority by calling the
- NVIC_SetPriority(SysTick_IRQn,...) just after the SysTick_Config() function
- call. The NVIC_SetPriority() is defined inside the core_cm3.h file.
- 4. To adjust the SysTick time base, use the following formula:
-
- Reload Value = SysTick Counter Clock (Hz) x Desired Time base (s)
- - Reload Value is the parameter to be passed for SysTick_Config() function
- - Reload Value should not exceed 0xFFFFFF
- */
-
- /************************************************
- 函数名称 : SysTick_Init
- 功 能 : 启动系统滴答定时器 SysTick
- 参 数 : 无
- 返 回 值 : 无
- *************************************************/
- void SysTick_Init(void)
- {
- /* SystemCoreClock / 1000 1ms中断一次
- * SystemCoreClock / 100000 10us中断一次
- * SystemCoreClock / 1000000 1us中断一次
- */
-
- /* 嘀嗒定时器每计数一次为 1/72M,此处计数 72个数,即1uS中断一次 */
- if(SysTick_Config(SystemCoreClock / 1000000)) // ST V3.5.0库版本
- {
- /* Capture error */
- while(1);
- }
-
- // 关闭滴答定时器
- SysTick->CTRL &= ~SysTick_CTRL_ENABLE_Msk;
- }
-
- /************************************************
- 函数名称 : Delay_us
- 功 能 : us延时程序,1us为一个单位
- 参 数 : nTime ---- 时间次数
- 返 回 值 : 无
- *************************************************/
- void Delay_us( __IO u32 nTime )
- {
- TimingDelay = nTime;
-
- // 使能滴答定时器
- SysTick->CTRL |= SysTick_CTRL_ENABLE_Msk;
-
- while( TimingDelay != 0 );
-
- // 关闭滴答定时器
- SysTick->CTRL &= ~SysTick_CTRL_ENABLE_Msk;
- }
-
- /************************************************
- 函数名称 : TimingDelay_Decrement
- 功 能 : 获取节拍程序
- 参 数 : 无
- 返 回 值 : 无
- 注 意 : 在 SysTick 中断函数 SysTick_Handler()调用
- *************************************************/
- void TimingDelay_Decrement(void)
- {
- if(TimingDelay != 0x00)
- {
- TimingDelay--;
- }
-
- }
-
-
- /*---------------------------- END OF FILE ----------------------------*/
-
-

根据上面的注释,选择对应参数传参进行 SysTick_Config() 配置,本篇是制作以微秒为单位的延时定时器,所以传入的参数为 SystemCoreClock / 1000000次,SystemCoreClock的数值,在上一篇 STM32笔记之系统时钟上有讲到
bsp.h 头文件
- #ifndef __BSP_H
- #define __BSP_H
-
-
- #include "stm32f10x.h"
-
- void SysTick_Init(void);
- void Delay_us( __IO u32 nTime );
- void TimingDelay_Decrement(void);
- void SystemSoftReset(void);
-
-
- #endif /* __BSP_H */
-
-
- /*---------------------------- END OF FILE ----------------------------*/
-
接着我们再在 stm32f10x_it.c 文件中的 SysTick_Handler()函数里调用 TimingDelay_Decrement()函数进行计数递减
- /**
- * @brief This function handles SysTick Handler.
- * @param None
- * @retval None
- */
- void SysTick_Handler(void)
- {
- TimingDelay_Decrement();
- }
最后,我们在主函数中调用函数 SysTick_Init() 完成初始化,就可以使用利用 Systick获取节拍的时钟延时 Delay_us()函数了


