
- 1hadoop slaves文件_Hadoop完全分布式搭建步骤
- 2常见注册中心对比_注册中心对比分析
- 3互联网,因特网和万维网的区别是什么?_万维网与因特网的区别
- 4在Mac系统下的CLion中用C++从TXT文本中按行读取数据并存入数组中_macos c++ 读写文件
- 5群晖SSL证书导入设置_群晖证书导入
- 6使用cloudflare worker反代网站_反代技术 网站
- 7RabbitMQ:Plugin configuration unchanged;解决RabbitMQ启动问题,Win10用户中文问题解决_plugin start error: com.pdos.mq.rabbitmqconsumerpl
- 8vue2 项目中axios二次封装以及拦截器 (全篇超级详细哦 ) 新手小白也适合哦_vue2封装axios请求
- 9zotero style最新(可全文翻译)_zotero style github
- 10Linux命令之useradd命令_linux useradd
使用golang从零开始搭建基于UTXO模型的区块链(二、项目重构+POW)_golang lsh
赞
踩
本文mirror链接:使用golang从零开始搭建基于UTXO模型的区块链(二、项目重构+PoW)
前言
在上一章中我们了解了区块是什么以及区块与区块链之间的关系。在这一章中我们将此项目重构,并拓宽区块的头部信息,并讲解区块如何通过共识机制合法的被添加进区块链中。
项目重构
在上一章中,我们所有的代码都写在了main.go中,这显然不利于我们继续构建项目。我们希望main.go只用于最后启动我们的区块链系统,为此我们需要将设计的区块与区块链移植其它文件夹中。重构部分就不做过多讲解了。
结构:
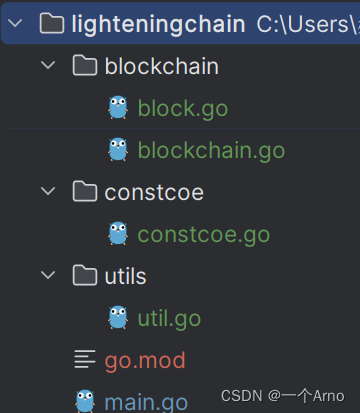
utils包负责放置一些工具方法,随拿随用;constcoe放置全局常量;blockchain种放置区块链实现的主体。
我们把之前的int64转byte函数放到utils里
package utils

import (
	"encoding/binary"
)

func Int64ToByte(num int64) []byte {
	var buf = make([]byte, 8)
	binary.BigEndian.PutUint64(buf, uint64(num))
	return buf
}
- 1
- 2
- 3
- 4
- 5
- 6
- 7
- 8
- 9
- 10
- 11
- 12
constcoe里面先存上难度系数,这个后面会详细说
package constcoe

const (
	Difficulty = 12
)
- 1
- 2
- 3
- 4
- 5
block.go和blockchain.go把之前写的结构体和函数放入
//block.go

package blockchain

import (
	"bytes"
	"crypto/sha256"
	"lighteningchain/utils"
	"time"
)

type Block struct {
	Timestamp int64
	Hash      []byte
	PrevHash  []byte
	Data      []byte
}

func (b *Block) SetHash() {
	information := bytes.Join([][]byte{utils.Int64ToByte(b.Timestamp), b.PrevHash, b.Data}, []byte{})
	hash := sha256.Sum256(information)
	b.Hash = hash[:]
}

func CreateBlock(prevhash, data []byte) *Block {
	block := Block{time.Now().Unix(), []byte{}, prevhash, data}
	block.SetHash()
	return &block
}

func GenesisBlock() *Block {
	genesisWords := "HelloWorld"
	return CreateBlock([]byte{}, []byte(genesisWords))
}

- 1
- 2
- 3
- 4
- 5
- 6
- 7
- 8
- 9
- 10
- 11
- 12
- 13
- 14
- 15
- 16
- 17
- 18
- 19
- 20
- 21
- 22
- 23
- 24
- 25
- 26
- 27
- 28
- 29
- 30
- 31
- 32
- 33
- 34
- 35
//blockchain.go

package blockchain

type BlockChain struct {
	Blocks []*Block
}

func (bc *BlockChain) AddBlock(data string) {
	newBlock := CreateBlock(bc.Blocks[len(bc.Blocks)-1].Hash, []byte(data))
	bc.Blocks = append(bc.Blocks, newBlock)
}

func CreateBlockChain() *BlockChain {
	blockchain := BlockChain{}
	blockchain.Blocks = append(blockchain.Blocks, GenesisBlock())
	return &blockchain
}
- 1
- 2
- 3
- 4
- 5
- 6
- 7
- 8
- 9
- 10
- 11
- 12
- 13
- 14
- 15
- 16
- 17
- 18
main.go中,就剩下这些了
package main

import (
	"fmt"
	"lighteningchain/blockchain"
	"time"
)

func main() {
	blockchain := blockchain.CreateBlockChain()
	time.Sleep(time.Second)
	blockchain.AddBlock("This is first Block after Genesis")
	time.Sleep(time.Second)
	blockchain.AddBlock("This is second!")
	time.Sleep(time.Second)
	blockchain.AddBlock("Awesome!")
	time.Sleep(time.Second)

	for num, block := range blockchain.Blocks {
		fmt.Printf("number:%d Timestamp: %d\n", num, block.Timestamp)
		fmt.Printf("number:%d hash: %x\n", num, block.Hash)
		fmt.Printf("number:%d Previous hash: %x\n", num, block.PrevHash)
		fmt.Printf("number:%d data: %s\n", num, block.Data)

	}
}
- 1
- 2
- 3
- 4
- 5
- 6
- 7
- 8
- 9
- 10
- 11
- 12
- 13
- 14
- 15
- 16
- 17
- 18
- 19
- 20
- 21
- 22
- 23
- 24
- 25
- 26
试着运行一下,运行成功!项目重构完成,这样对以后开发方便多了
区块链共识机制
所谓“共识机制”是通过特殊节点的投票,在很短的时间内完成对交易的验证和确认,对一笔交易,如果利益不相干的若干个节点能够达成共识,我们就可以认为全网对此也能够达成共识。再通俗一点来讲,如果中国一名微博大V、美国一名虚拟币玩家、一名非洲留学生和一名欧洲旅行者互不相识,但他们都一致认为你是个好人,那么基本上就可以断定你这人还不坏。
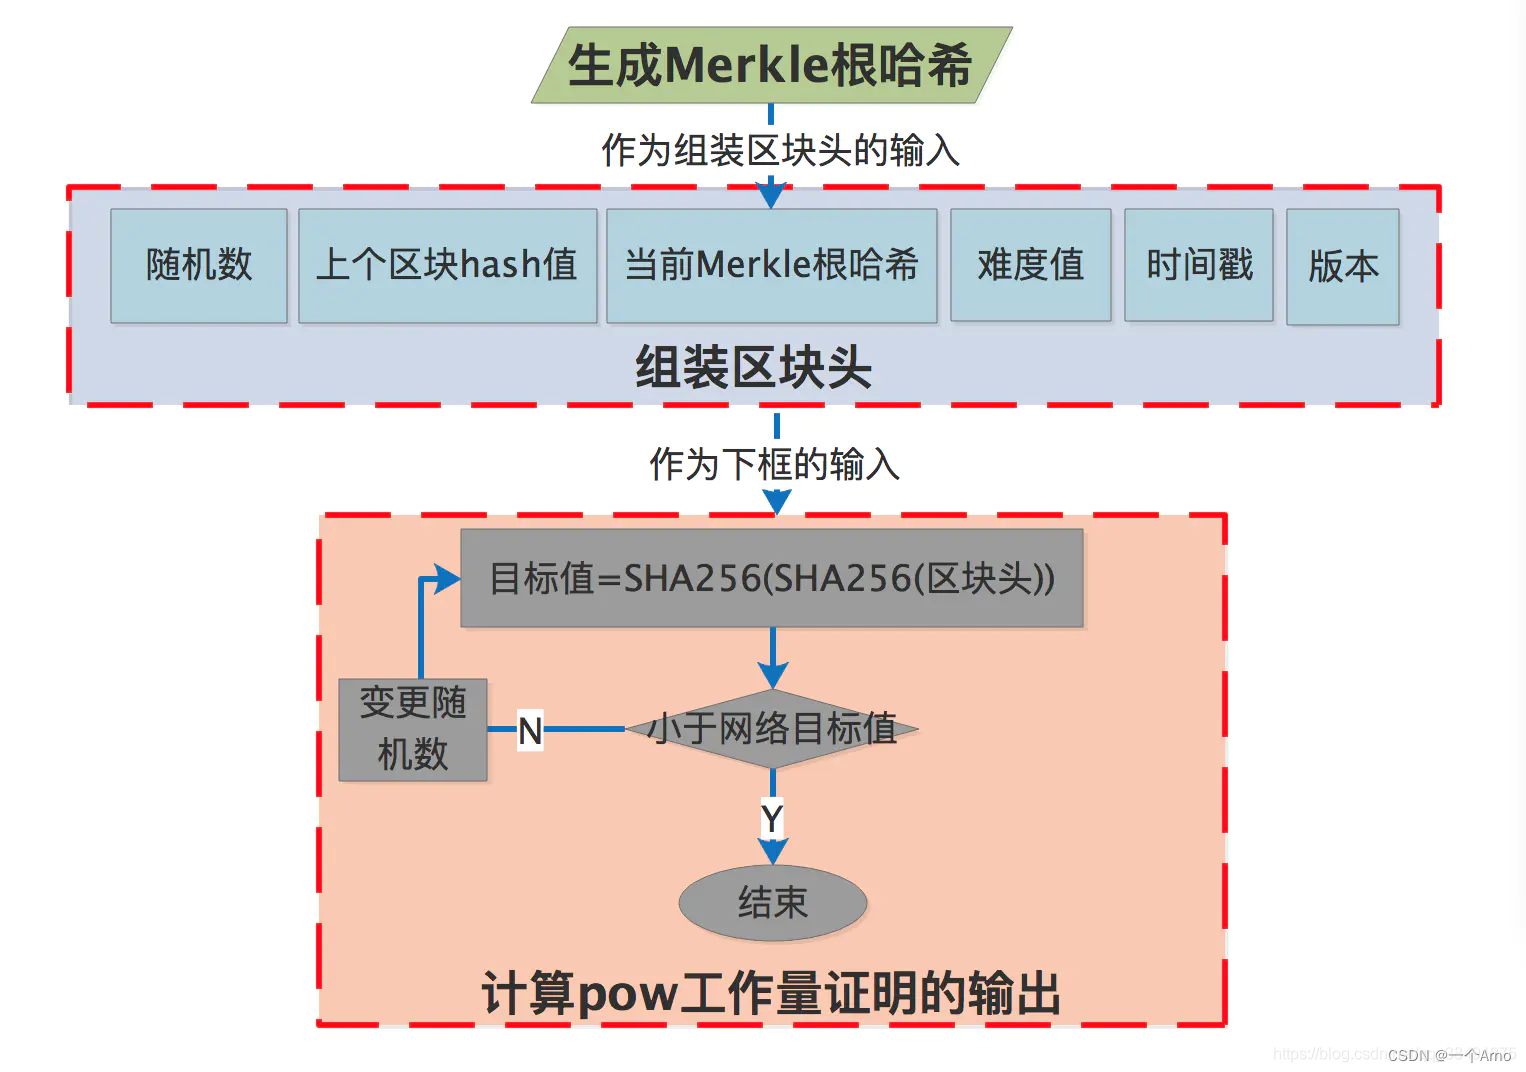
pow共识机制看下图
接下来就用我们的闪电链来实现这个共识机制
添加Nonce
nonce就是上图中我们要找的那个随机数,这是能证明你工作量的最关键的部分。首先在区块上添加头部信息
type Block struct {
	Timestamp int64
	Hash      []byte //区块hash值就是其ID
	PrevHash  []byte
	Data      []byte
	Nonce     int64
	Target    []byte
}
- 1
- 2
- 3
- 4
- 5
- 6
- 7
- 8
接下来会有一些函数报错,我们后面再改
POW实现
在proofofwork.go中,首先实现一个获取target函数,这个函数可以方便我们以后在分布式系统中反复获取target
func (b *Block) GetTarget() []byte {
	target := big.NewInt(1)
	target.Lsh(target, uint(256-constcoe.Difficulty))
	return target.Bytes()
}
- 1
- 2
- 3
- 4
- 5
- 6
Lsh函数就是向左移位,difficulty越小,移的越多,目标难度值越大,哈希取值落在的空间就更多就越容易找到符合条件的nonce。
下面我们进行寻找nonce的计算
func (b *Block) GetDataBaseNonce(nonce int64) []byte {
	data := bytes.Join([][]byte{
		utils.Int64ToByte(b.Timestamp),
		b.PrevHash,
		utils.Int64ToByte(nonce),
		b.Target,
		b.Data,
	},
		[]byte{},
	)
	return data
}

func (b *Block) FindNonce() int64 {
	var intHash big.Int
	var intTarget big.Int

	intTarget.SetBytes(b.Target)

	var hash [32]byte
	var nonce int64
	nonce = 0

	for nonce < math.MaxInt64 {
		data := b.GetDataBaseNonce(nonce)
		hash = sha256.Sum256(data)
		intHash.SetBytes(hash[:])
		if intHash.Cmp(&intTarget) == -1 {
			break
		} else {
			nonce++
		}
	}
	return nonce
}
- 1
- 2
- 3
- 4
- 5
- 6
- 7
- 8
- 9
- 10
- 11
- 12
- 13
- 14
- 15
- 16
- 17
- 18
- 19
- 20
- 21
- 22
- 23
- 24
- 25
- 26
- 27
- 28
- 29
- 30
- 31
- 32
- 33
- 34
- 35
可以看到,神秘的nonce不过是从0开始取的整数而已,随着不断尝试,每次失败nonce就加1直到由当前nonce得到的区块哈希转化为数值小于目标难度值为止。
那么区块链如何知道这个分布式系统中你这个系统算出来的就是对的呢?下面我们需要写一个验证函数
func (b *Block) ValidatePoW() bool {
	var intHash big.Int
	var intTarget big.Int
	var hash [32]byte
	intTarget.SetBytes(b.Target)
	data := b.GetDataBaseNonce(b.Nonce)
	hash = sha256.Sum256(data)
	intHash.SetBytes(hash[:])
	if intHash.Cmp(&intTarget) == -1 {
		return true
	}
	return false
}
- 1
- 2
- 3
- 4
- 5
- 6
- 7
- 8
- 9
- 10
- 11
- 12
- 13
- 14
pow我们实现完了,接下来回到block.go中做点小修改
func (b *Block) SetHash() {
	information := bytes.Join([][]byte{utils.Int64ToByte(b.Timestamp),
		b.PrevHash, b.Target, utils.Int64ToByte(b.Nonce), b.Data}, []byte{})
	hash := sha256.Sum256(information) //软件包sha256 实现 FIPS 180-4 中定义的 SHA224 和 SHA256 哈希算法。
	b.Hash = hash[:]
}

func CreateBlock(prevhash []byte, data []byte) *Block {
	block := Block{time.Now().Unix(), []byte{},
		prevhash, data, 0, []byte{}}
	block.Target = block.GetTarget()
	block.Nonce = block.FindNonce()
	block.SetHash() //所有数据添加好后再计算hash
	return &block
}
- 1
- 2
- 3
- 4
- 5
- 6
- 7
- 8
- 9
- 10
- 11
- 12
- 13
- 14
- 15
一切完成!
调试
打开main.go,我们加一行输出来验证pow是否成功
package main

import (
	"fmt"
	"lighteningchain/blockchain"
	"time"
)

func main() {
	blockchain := blockchain.CreateBlockChain()
	time.Sleep(time.Second)
	blockchain.AddBlock("This is first Block after Genesis")
	time.Sleep(time.Second)
	blockchain.AddBlock("This is second!")
	time.Sleep(time.Second)
	blockchain.AddBlock("Awesome!")
	time.Sleep(time.Second)

	for num, block := range blockchain.Blocks {
		fmt.Printf("number:%d Timestamp: %d\n", num, block.Timestamp)
		fmt.Printf("number:%d hash: %x\n", num, block.Hash)
		fmt.Printf("number:%d Previous hash: %x\n", num, block.PrevHash)
		fmt.Printf("number:%d data: %s\n", num, block.Data)
		fmt.Printf("number:%d nonce:%d\n", num, block.Nonce)
		fmt.Println("POW validation:", block.ValidatePoW())

	}
}
- 1
- 2
- 3
- 4
- 5
- 6
- 7
- 8
- 9
- 10
- 11
- 12
- 13
- 14
- 15
- 16
- 17
- 18
- 19
- 20
- 21
- 22
- 23
- 24
- 25
- 26
- 27
- 28
- 29
点击运行,输出
number:0 Timestamp: 1677654426
number:0 hash: 51c810ee37b56f26baaf27ad8c8c271c1e383dcf75c6b8baaca059a9e621ac67
number:0 Previous hash:
number:0 data: HelloWorld!
number:0 nonce:14014
POW validation: true
number:1 Timestamp: 1677654427
number:1 hash: 059131a889810a8484bc072d0bcd7ecba3011a509ab6bc460c7a892357621f82
number:1 Previous hash: 51c810ee37b56f26baaf27ad8c8c271c1e383dcf75c6b8baaca059a9e621ac67
number:1 data: This is first Block after Genesis
number:1 nonce:1143
POW validation: true
number:2 Timestamp: 1677654428
number:2 hash: 055263bd8eea37b526e45b097b1f837c108ab2fc88f26bbf567a4fa9598cadb9
number:2 Previous hash: 059131a889810a8484bc072d0bcd7ecba3011a509ab6bc460c7a892357621f82
number:2 data: This is second!
number:2 nonce:10091
POW validation: true
number:3 Timestamp: 1677654429
number:3 hash: d0b5a049c2780c01e2e66cc23934267c528df80a3bcc69180a3f2231cf08d87f
number:3 Previous hash: 055263bd8eea37b526e45b097b1f837c108ab2fc88f26bbf567a4fa9598cadb9
number:3 data: Awesome!
number:3 nonce:592
POW validation: true
- 1
- 2
- 3
- 4
- 5
- 6
- 7
- 8
- 9
- 10
- 11
- 12
- 13
- 14
- 15
- 16
- 17
- 18
- 19
- 20
- 21
- 22
- 23
- 24
成功!
总结
本章讲解了PoW共识机制,需要重点理解nonce与目标难度值,以及pow的实现。下一章中我们将会实现区块中的数据信息存储方式,以及UTXO模型。
另外,现在区块链主流的共识已经从PoW改为PoS了,以后有时间我再改进一下

